Articles
All photos from the article
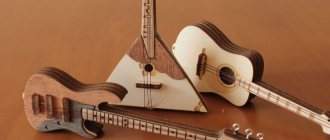
Sawing out plywood crafts is an interesting and useful pastime. Any plywood product can be loaded with functionality, and then you get what is called two in one - a beautiful and useful craft. This instruction will tell you how to turn a boring sheet of plywood into something useful or simply unusual.
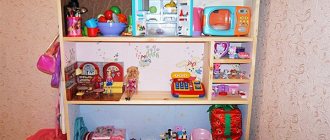
A whole farm in the garden.
Plywood fauna
Many animals can be guessed by their outline.
Sawing out animal figures is a fairly simple and rewarding task:
- First, most animals are recognizable by their outlines.
- Secondly, usually two or three colors are enough to turn the workpiece into a full-fledged “beast”.
- Thirdly, any pattern of animals made of plywood, which involves installation on a rocking stand, or loaded with some kind of seat, will turn the wooden blank into an interesting toy for children. Using your imagination, an animal figurine can be made the basis for a garden tool holder, a stand for potted plants and much more.
Photos of “familiar” animals.
Our help! Drawings of plywood animals may involve flat figures, the main purpose of which is to decorate a garden or plot, decorate children's corners and recreation areas. Three-dimensional figures are possible. In this case, there are two main solutions to this problem: gluing plywood - with this technique, parts are glued to each other, resulting in a three-dimensional figure; The second technique is modular design. With this technique, flat fragments are inserted perpendicular to the supporting structure, resulting in a three-dimensional figure. Both methods allow you to create both a decorative animal and a functional one.
Minimum master set
Master's set.
What’s good about working with plywood is a minimal set of tools and a minimal amount of paint and varnish materials.
To work you will need:
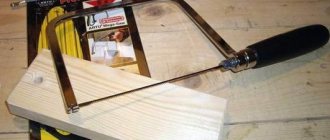
- jigsaws - manual or electric with sufficient consumables;
For your information! Even if you decide to cut something grandiose, for example, you are interested in a moose made of plywood, then one saw for plywood and laminate will be enough for your jigsaw. For hand tools, you need several files. No one will give you clear calculations of saw blade consumption. The thing is that saw blades for hand tools can simply burst if the load is incorrect. If you do not have the skills to work with this tool, buy the package right away. Its price is quite reasonable, and the files are unlikely to be superfluous; they will be useful for other homemade products.
- abrasive materials - usually two types of sandpaper are sufficient: coarse-grained and fine-grained (zero). If you have needle files or an abrasive attachment for an angle grinder, you can use them - the first for processing the ends and internal contours, the second for processing surfaces. But you don’t have to buy them separately for one or more crafts;
- clamps or a vice, as a rule, two clamps are enough to fix even a large sheet;
Note! When working with plywood, the sheet must be tightly fixed to the working surface. If necessary, the sheet is fixed in a new place so as not to interfere with the passage of the cutting tool.
The jigsaw easily copes with tasks in a closed loop.
- default meters, markers, or pencils;
- Of the consumable paints and varnishes, we are interested in a primer for plywood, which has antiseptic properties and also creates a water-repellent layer. Paints can be selected depending on where your homemade product will be used: acrylic - indoors, enamel - in the yard or on the site.
Is the drawing needed or not?
Let's start with the most important thing - you need a drawing, especially if you decide to design a three-dimensional beast. Thus, you can draw dragon drawings from plywood or dinosaur drawings from plywood.
Drawing of dinosaur parts made of plywood.
Advice! If you have small children and you want to please them with a plywood zoo, buy a simple model of a ready-made toy. After looking at the factory diagram, you will understand the principle of constructing the toy; all other representatives of the fauna will turn out much faster and easier for you.
In this section, we will look at two techniques that will be useful to you when designing large objects, as well as when transferring a drawing to a material.
So:
- The first technique concerns large objects - think about the moose. The plywood drawings of a moose are large enough that you can immediately make a drawing on plywood. Your task will be even more simplified, given that a simple pencil leaves a noticeable mark on this material. There is no need to be afraid of mistakes, since the eraser will remove unnecessary lines. Drawings of a plywood horse are developed using the same principle;
Drawings and details may vary.
To the piggy bank! If you want to make a rocking horse from leftover plywood sheets, for example, 10 mm, then you will have to build the frame from several plywood parts. Having drawn one horse and cut it out, you can use the finished fragment as a template. Minor deviations from the dimensions are not a problem. Having connected the workpieces, they can always be leveled with abrasive assistants, including electric ones.
Transferring details from paper to plywood is easy!
- The second technique concerns transferring a design from paper to plywood. In this case, paper fragments are cut out along the contours, and they will also serve as patterns for plywood. It is enough to attach the cut out part and repeat its contour on the working material. Let us remind you that small figures are transferred using this principle; for example, a swan template can be cut out of plywood using this pattern transfer technique.
General cutting rules
Regardless of whether you are more interested in a plywood rooster or a plywood bear, the cutting, processing and coating techniques are identical.
Here they are:
- the finished drawing is transferred to the material;
Three-dimensional figures are increasingly popular.
Advice! Not all people have the necessary drawing skills, but this is not a problem. You can print the design you like on a printer and transfer it to plywood. If you have a large model in mind, there is another technique called scaling. A grid is superimposed on the printed image, and a certain fragment falls into its square. All you have to do is draw a grid of the required dimensions on a blank sheet of paper or whatman paper and transfer the drawing you like to another grid, applying scaling.
- Using a jigsaw or a regular jigsaw, cut out the outline of the animal. If you decide to make internal contours, for example, an animal's paw rests on the side, then you will need a drill or screwdriver and a wood drill of such a size that, having drilled through the material, you can insert a file and point it in the required direction without a clamp or other obstacles;
Even women can easily cope with the task.
For information! If you decide to make several animals of the same type, for example, you are interested in birds made of plywood for the garden - cut out with your own hands, then the first blank is a stencil for the rest. If you are making several birds from different scraps, then with a jigsaw you can easily cut out several animals at once. The same can be done with hand tools, but remember here - the thicker the material, the more difficult it is to work with.
Homemade products can be not only beautiful, but also useful.
- the edges of the product, as well as the body of the workpiece itself, are processed with abrasives;
- the workpiece is primed with the necessary primer;
- After the primer has dried, wood paint is applied to the product itself.
Advice! If you are making products for home use, then after painting the figurine is opened with varnish. The varnish can be applied without paint, and if you want to preserve the texture of the veneer, you can use varnish with stain. If you use stains, you will get an imitation of any wood that you like best.
Plywood is a universal material for creating any characters.
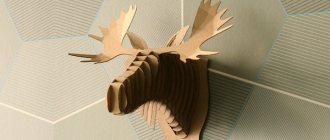
Craft drawing “Deer Head”
Try cutting out a deer head like this.
The work is difficult
Your loved ones will surely like this craft by placing it in a visible place, for example, on a shelf. To make this craft you will need the following:
Sawing tools.
Preparing your desktop
First of all, you need to prepare your table on which you will work. There should be no unnecessary things on it and every tool should be at hand. Not everyone has their own desktop and has probably already thought about creating one. Making a table is not difficult, but choosing a place for it in the house is difficult.
The ideal option is an insulated balcony, on which you can do crafts at any time. I have already written about preparing the table in a separate article and tried to describe in as much detail as possible the entire process of creating it. If you don’t know how to prepare your workplace, then read the following Article.
After you have completed the process of creating a table, try to start choosing your future craft.
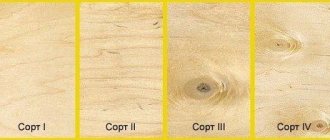
We choose quality material
The main material is plywood. The choice is always difficult. Each of us has probably encountered such a problem as delamination of plywood from the end part and asked the question, what causes this delamination? Well, of course, this is mainly due to low-quality plywood.
If this is not the first time you have picked up a jigsaw, then you can select plywood from the remnants of a previous craft. If you are new to sawing and you don’t have plywood, then buy it at a hardware store. Choosing material for sawing is always difficult.
You should always choose plywood carefully, often look at the defects of the wood (knots, cracks) and draw conclusions. The difficulty in choosing plywood lies in the fact that no matter how you guess at its defects and shelf life. For example, you bought plywood, cleaned it, translated the drawing and suddenly it began to delaminate.
Of course, this has happened to almost everyone and it’s oh, how unpleasant. So it is better to pay attention when choosing and choose good plywood. I wrote a special Article in which all the principles of choosing plywood are described step by step.
Stripping plywood
We clean our plywood with sandpaper. As you already know, “Medium-grained” and “Fine-grained” sandpaper is used for cleaning plywood when sawing. You've probably seen sandpaper in hardware stores, and that's what we'll need.
In your work you will need “Coarse-grained”, “Medium-grained” and “Fine-grained” sandpaper. Each of them has its own property, but a completely different coating, by which it is classified. “Coarse-grained” sandpaper is used for processing rough plywood, i.e. which has many defects, chips, and cracks.
“Medium-grained” sandpaper is used for processing plywood after “Coarse” sandpaper and has a slight coating. “Fine-grained” or otherwise “Nulevka”. This sandpaper serves as the final process for stripping plywood. It gives the plywood smoothness, and therefore the plywood will be pleasant to the touch.
Sand the prepared plywood in stages, starting with medium-grain sandpaper and ending with fine sandpaper. Sanding should be done along the layers, not across. A well-polished surface should be flat, completely smooth, glossy in the light and silky to the touch.
How best to prepare plywood for sawing and which sandpaper is best to choose Read here. After stripping, check the plywood for burrs and small irregularities. If there are no visible defects, then you can proceed to the process of translating the drawing.
Translation of the drawing
For me, drawing translation has always been the main process in my work. I will tell you a couple of rules, as well as tips for high-quality translation of a drawing.
Many people transfer the drawing onto plywood not only using a pencil and copying, but also using “Black Tape”, glue the drawing to the plywood, then wash off the drawing with water and the markings of the drawing remain on the plywood. In general, there are many ways, but I will tell you about the most common method.
To transfer the drawing onto prepared plywood, you must use a copy, a ruler, a sharp pencil and a non-writing pen. Fasten the drawing in plywood using buttons or simply hold it with your left hand. Check if the drawing fits the dimensions.
Arrange the clock drawing so that you can use a sheet of plywood as economically as possible. Translate the drawing using a non-writing pen and ruler. There is no need to rush, because your future craft depends on the drawing.
Drilling holes in the parts
As you have already noticed, the parts contain parts of the grooves that need to be cut out from the inside. To cut out such parts, you need to drill holes in them using a hand drill or, as in the old fashioned way, make holes with an awl.
By the way, the diameter of the hole must be at least 1 mm, otherwise you can damage the elements of the drawing, which, alas, are sometimes difficult to restore. To avoid damaging your work table when drilling holes, you must place a board under the workpiece so as not to damage the work table.
It is always difficult to drill holes alone, so ask a friend to help you in your task.
Sawing parts
There are many rules for cutting, but you need to stick to the most common ones. First of all, you need to cut out the internal parts, only then according to the external pattern. There is no need to rush when cutting. The main thing is to always keep the jigsaw straight at a 90-degree angle when cutting.
Cut out the parts along the lines you accurately marked. The movements of the jigsaw should always be smooth up and down. Also, do not forget to monitor your posture. Try to avoid bevels and unevenness. If you go off the line while cutting, don't worry.
Such bevels and irregularities can be removed using flat files or “coarse-grained” sandpaper.
Rest
When sawing, we often get tired. Fingers and eyes, which are always tense, often get tired. When working, of course, everyone gets tired. In order to reduce the load, you need to do a couple of exercises. You can view the exercises here. Do the exercises several times during work.
Cleaning Parts
You should always clean the parts of a future craft carefully. At the very beginning of the work, you already sanded the plywood with sandpaper. Now you have to do a small part of stripping the plywood. Using medium-grain sandpaper, sand the edges of the parts and the back of the plywood.
“Fine-grained” sandpaper is considered the final stage of cleaning parts. It is better to clean the front part of the parts with fine sandpaper. When processing plywood, take your time. You can also use a rounded file, which is convenient for cleaning the inside of the holes.
Try to ensure that the parts come out without burrs or irregularities.
Assembly of parts
Assembling the parts of our craft is not so difficult here. In order to correctly assemble the parts, you need to read the following Article, which describes in detail all the details of the assembly. After the parts are assembled into one common craft without any problems, then start gluing them.
Gluing the parts
The shelf parts must be glued using PVA or titan glue. You don't need to pour a lot of glue. It is better to tie the assembled craft with glue with a strong thread, tighten it and lay it out to dry. The craft glues together in about 10-15 minutes.
Burning out crafts
To decorate our craft with a pattern (for example, along the edges of the craft), you will need an electric burner. It can be very difficult to burn a pattern beautifully. To burn patterns, you must first draw the pattern with a pencil. You can read how to work with an electric burner and add patterns to a shelf here.
Varnishing crafts
If desired, you can transform our craft by covering it with Wood Varnish, preferably colorless. Read how best to varnish a craft. Try to choose a quality varnish. Varnishing is carried out using a special brush “For glue”. Take your time. Try not to leave visible marks or scratches on the craft.
Buy a drawing of a deer head made of plywood.
Price 50 rub.
Formats:
Volume: 40 sheets A4 format.
Downloading will be available after payment. The file will be duplicated to your e-mail.
Source: https://chudo-lobzik.ru/chertezh-podelki-golova-olenya/
DIY video, photo drawings of a rhinoceros, deer
Nowadays, you can decorate your home with original accessories and handmade crafts. Products in the form of animal heads made from plywood look original and very attractive. Let's talk in this article in more detail about how to make animal heads from plywood: rhinoceros, deer, elk, bull
Artificial taxidermy
Today, having a stuffed dead animal in your home is no longer fashionable. Such products were replaced by bright and impressive animal heads made of plywood, plaster and other materials, made using the method of artificial taxidermy. Look at the following photo to see the originality of such crafts.
Today a person of any income can have such an animal in his apartment or country cottage, because you can make it with your own hands from sheets of plywood.
Recently, humanity has been striving to move away from cruelty to animals for the sake of their stuffed animals, skins and fur, preferring an eco-strategy for the development of the fashion industry and interior design. In addition, green supporters and animal activists do not protest against bulky plywood accessories.
And really, look around. In many cafes and restaurants, seeing the head of a rhinoceros or deer, created by the hands of a craftsman from sheets of plywood, is not such a rarity.
A deer head made of plywood or figurines of other animals can create a warm atmosphere in the interior of any living room or bedroom. And there is absolutely no need to sacrifice a living animal for this. You can make an original accessory with your own hands without harming the environment.
Peculiarities
Gorgeous green lion made of plywood
Elephant, deer and elk
The death of a wild animal is too high a price to pay for creating a cozy atmosphere in the house. It is better to make the head of an animal such as a deer or rhinoceros out of plywood.
Of course, you can purchase a ready-made three-dimensional craft, because such plywood sculptures, in the best traditions of labor lessons, are sold in many souvenir shops. You can also order a bull or elk head of different shades and textures in online stores.
But if you don’t want to overpay and want to show your individuality and sense of style, you can use the instructions for creating animal heads from plywood sheets. To do this, you will need drawings of a plywood head, a regular jigsaw, paints, varnish and, if desired, rhinestones or stones for decoration.
Where to find the drawing
You can try to find such a scheme in magazines on design and interior decoration. But this is not an easy path that takes a lot of time. It is much easier to turn to the Internet, which is replete with many drawings for creating such crafts. So on many forums of craftsmen and designers you can find drawings of a rhinoceros head made of plywood.
We do the work with our own hands
The original rhinoceros head made of plywood, as in the following photo, can be made by you yourself. You just need to find the appropriate diagram.
So, if a diagram is found, then it needs to be printed on paper. Next, the resulting parts are cut out using ordinary scissors and applied to a sheet of plywood. They will need to be outlined with a simple pencil.
Now comes the most painstaking work. You need to cut out the details of the future craft using a reciprocating saw or a regular jigsaw according to the drawing. The blade should be secured to the jigsaw as tightly as possible, and then, moving strictly along the contour, cut out the blanks.
If you have the opportunity and desire, you can apply a through pattern to solid parts using a milling machine. The following photo shows a development of a plywood head.
Do not forget that when cutting out the workpiece, you need to leave about 1 cm of allowance, because the edge of the parts should subsequently be processed and polished using sandpaper. Why is this necessary? To make the voluminous head of a bull made of plywood look more neat and attractive, because paint or varnish will adhere better to a smoother surface.
Also, special cuts must be made on the parts, as can be seen in the diagram, in order to then insert smaller parts into larger ones.
If you are carrying out work for the first time, without having had similar experience before, experienced craftsmen advise having several spare parts in case you damage one of them during connection.
At the next stage of work, the parts are combined into a single whole according to the drawings, moving from large parts to smaller ones, to create a real animal head made of plywood.
When the plywood or buffalo elk head is assembled, all that remains is to paint it with acrylic paint, gouache or spray can. The choice is yours. If you wish, you can decorate the craft with stones, colored glass or rhinestones.
choice of material and installation details
When decorating premises, you need to pay attention to even the smallest details. The fact is that a small decorative item will make you look at the room completely differently, giving it a certain style intended by the designer. Taking this into account, recently items such as a deer head made of plywood and other similar products made from this material have become especially popular.
Amateur photo of a decorative element in the form of a deer’s head made of plywood
Practical application and appearance
To begin with, it must be said that these designs look quite original on the wall and give it a special appearance. The fact is that a plywood head is not a hunting trophy and does not evoke feelings associated with killing animals.
At the same time, it visually differs from the usual form, creating an interior of a new style without making major changes to the layout.
Scheme for creating such structures, presented in the form of separate elements
Blueprints
- First of all, you need to choose the right drawing. At first it may seem simple, but there are certain rules for proper interior design.
Such elements have an original appearance and differ significantly from the original trophies
- Particular attention is paid to sizes. The point is that they must match the appearance of the room. A structure that is too large will stand out and get in the way, and a small product will simply turn into a decoration or a toy.
- Typically, drawings come with standard dimensions that correspond to the actual items. For example, a plywood elk head after assembly will completely correspond to the original trophy. That is why professional craftsmen advise recalculating all sizes according to needs.
When using a good dye, you can give the structure a stunning appearance.
- You should also immediately pay attention to the number of elements that make up the product. The fact is that two seemingly similar drawings may have a different number of components. Moreover, this factor will significantly affect the amount of material, which will also affect the cost.
- Each drawing is usually accompanied by instructions or an explanatory note. It points out elements that are difficult to manufacture or connecting units of increased complexity, describing the methodology for their creation. Such documentation is very important in your work, as it allows you to avoid many mistakes. (See also the article Plywood horse: features.)
Advice! Professional craftsmen recommend first creating all the elements from paper and trying to assemble the structure. Subsequently, these parts can serve as patterns when working with plywood.
Applying structural details to plywood for subsequent sawing
Selection of material and installation details
- First of all, it should be noted that there are many different types of such structures. They are made from corrugated cardboard, textolite or plywood. In this case, the choice depends on the price and the personal preferences of the performer.
Such items in the interior immediately catch the eye and create a certain appearance.
- Ordinary plywood, which is subsequently treated with impregnation and painted, is best suited for such work. Then the product can be given almost any appearance using various paints. At the same time, designs that use several colors look especially good. (See also the article Crafts made from plywood: features.)
- Some craftsmen prefer to use bakelite-based plywood because it is resistant to moisture, which means the product can be washed. However, the cost of such material is very high, and such a solution can be considered wasteful if the conditions of subsequent operation do not require it.
Some structures of this type can be used to decorate facades or garden plots, although this requires the use of moisture-resistant materials that can withstand temperature changes
- It is worth noting that after manufacturing the structure must be protected from moisture. The fact is that such interior items collect dust very well and sometimes require wet cleaning. Therefore, they should be treated with impregnation and painted.
- Some types of such structures are used to decorate facades. However, then it is worth using bakelite-based plywood, which is subsequently painted. This way the product will last much longer, even in rain and open sun.
Advice! Before applying primer to the structure, it should be pre-treated with fine sandpaper. This will straighten the edges and eliminate lint on the surface.
The assembly of structures of this type may require certain skills and abilities from the master.
Conclusion
By watching the video in this article, you can get more detailed information on how to make a similar decorative element from plywood according to the drawings. Also, based on the text proposed above, it should be concluded that there is nothing complicated in this work, and even a beginner can cope with it if he has the necessary documentation. However, it is necessary to have the skills to read drawings and understand the design features.
fanera-info.ru
product benefits and how to do it
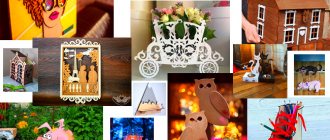
Animals from plywood can be made by anyone. It is not necessary to have special professional artistic skills and abilities. Although in this case there is a chance to create a complex composition. Simple figures are quite suitable for the interior of a garden plot. An excellent solution would be to invite children to the process of coloring finished products. Extraordinary bright colors are guaranteed.
The structures can be installed in any place that is liked and considered favorable. However, you should still approach this wisely and choose an area that is suitable for a particular figure. There is no need to place the figure of a fox against the backdrop of a pond, or attach a frog to a grape bush. There is simple logic at work here.
Advantages
The following advantages of plywood products are noted:
- Durability, which contributes to service for many years;
- Good level of flexibility;
- The material does not allow water to pass through;
- Environmentally friendly qualities;
- Ease of processing.
The color scheme of the product and structure may depend on the texture of the plywood sheets.
Attention!
When using a base made of coniferous wood, it is more convenient to paint; birch wood looks beautiful even without treatment with paints.
Unpainted three-dimensional product
Material selection
There is a wide range of plywood types, the quality of which is at the highest level. Good moisture resistance characteristics are noted. For a garden plot, material of the FB, BS and FSF brands is better suited. There is a cheaper option - the FC brand, which has relative moisture resistance. Because of this, it needs to be treated with a moisture-repellent composition before painting.
It is not recommended to use the FBA brand in this case due to poor perception of the effects of atmospheric factors. Can survive just one season in open space.
Note!
Drying oil is quite suitable as a processing agent. The figures are updated at least once a year.
As for the thickness of the material, a sheet with any number of layers may be suitable. By choosing fragments with different thicknesses, you can easily give volume to an artificial animal. Often the convexity of parts is played up using coloring. The weather vane is made from thinner sheets, and the ground figure is cut out from thick material. It would be appropriate to use sheets with a thickness of 2 and 3 cm.
Tool preparation
The main tools for creating a figure are a hand or electric jigsaw, a stencil purchased or made by yourself, fine-grained sandpaper, a pencil, self-tapping screws, and a screwdriver. For finishing work you need to stock up on furniture varnish, paints and brushes.
When planning to make a figurine without Oprah during installation, you should take care of purchasing pegs. The size is chosen taking into account their deepening into the ground. The parts must be at least 50 cm long.
Drawing
Animal figures made from plywood are made according to previously prepared images. On the Internet you can easily find a picture for every taste and make a printout on a regular sheet of paper.
To create animals from plywood with specific data, drawings are simply necessary. To do this, you need to create a template, according to which all the contours of the selected image will be transferred.
Owl drawing
You should draw or print a grid of small square cells. The same type of mesh is applied to a plywood sheet, taking into account the parameters of the future animal on the required scale. After this, there is no difficulty in transferring all the contours from the drawing to the workpiece.
Attention!
It is advised to initially outline the outline of the figure in cells, then draw the outline of the remaining elements of the image.
Transferring a design to a plywood sheet
If the performer knows how to draw, you can sketch the desired design directly on a sheet of plywood.
How to make a figurine and attach it to the site
At this stage, all that remains is to cut out the animals from plywood using an electric or manual jigsaw, after which you can paint the products with acrylic paint, in different colors.
Cutting animals out of plywood occurs in the form of manufacturing structural elements one by one. Don't forget about the animal's hind and front legs. They are glued to the finished body on the sides to gain stability. For some cases, the construction of stands is provided:
- Separately;
free-standing animal
Composition of animals
- According to the plot scene.
The sculpture is mounted on a tree or pole. After making a figurine, it can be moved from one place to another. An option is to support it on a flat stand, which is screwed to the product with self-tapping screws. This can be fasteners in the form of pins made of wood, plastic or steel. They are stuck into the ground.
Stationary products need a more reliable base that will help them hold on and not fall over in the slightest wind. The support should last for many years. This is why it is worth using a pipe with plugs on both sides or thick reinforcement that is treated with bitumen mastic. A plate with prepared holes for fastening is welded to the upper part. If the plywood is thick, a pin can be inserted into a drilled hole along the bottom edge.
Attention!
Dig a support at least 0.5 m deep.
Animal heads
Animal heads made of plywood are an alternative option for people who like to hang stuffed animals and heads of killed animals on the wall. Moreover, such products are now at the peak of popularity. They are made from different types of material. But plywood is ideal for this role both in terms of quality and material structure. The cost of the products is relatively low.
Work is carried out in stages:
- First, choose the appropriate type of plywood. Depending on the location of the future product, the required level of moisture resistance of plywood sheets is determined. Having decided on the desired parameters, you can think about the thickness of the material.
- Ensure the following tools are available:
- Jigsaw or self-tapping screws,
- Pen or simple pencil,
- Screwdrivers or screwdrivers,
- Sandpaper with fine grains,
- Furniture varnish,
- Brushes and special acrylic paints.
- To create animal heads from plywood, drawings are simply indispensable.
- You should make stencils from ordinary sheets of paper, applying them to cut out all the details separately;
Attention!
For greater efficiency, it is better to paint the product; this is easier to do in a disassembled state using a spray can. It is recommended to paint different elements in different colors (meaning the head and horns).
- The resulting elements are collected from largest to smallest and inserted into already prepared cuts;
- The finished structure is fixed with glue.
Elephant head
It's time to decide on the location and attach an unusual exhibit there.
Thanks to the bright decorations made by yourself, the garden plot will look original and fabulous.
profanera.ru
Deer head made of plywood: choosing a drawing, cutting and assembly, where to buy a ready-made one
A deer head made of plywood is created in beige or with a paint coating. It differs from the usual form, ensuring satisfaction of the requirements for creating an interior in a hunting style. To make a decorative element yourself, you will need to prepare individual parts cut out according to a template.
Plywood deer head
Drawing selection
The deer head made of plywood in the drawings attracts with its original design and variety of parameters. They match the appearance of the building. Selecting large parameters stands out strongly on the walls and gets in the way. The design of small sizes will be similar to a toy.
The plywood deer head template corresponds to standard parameters that reflect real objects. That is, after assembly the product coincides with the original.
The number of details included in the decoration is taken into account. There are situations when two externally identical products have a different number of elements.
Plywood animal head
If you create a deer head from plywood with your own hands, instructions or an explanatory note are attached to each diagram. It displays the most complex parts or connections, allowing you to describe the method of their development.
Attention!
Experts recommend initially making all the parts from paper and assembling. In the future, these elements serve as patterns for working with plywood.
Material for production
If you need a deer head made of plywood, buying the product will not be difficult. However, it is cheaper to reproduce the product yourself. The work uses a plywood panel treated with impregnation and paint. To give maximum effect, several shades are used.
Deer head made of plywood boards
In some cases, you can use bakelite-based plywood, as it has moisture-resistant properties. But this preparation is very wasteful. They are used to decorate façade surfaces or garden plots.
The glue is selected from ready-made offers or created on the basis of PVA. After development, the product is protected from moisture. For this you need impregnation and paint.
If plywood is used for facades, a bakelite-based material that can be painted is selected for this purpose.
Before applying the primer, the structure is treated with a fine abrasive. This helps to correct edges and eliminate lint on the coating.
Plywood trophy in the form of a deer's head
What else will be needed during the manufacturing process?
In addition to a plywood sheet and a photocopy of the drawing, you need to prepare copy paper, a non-writing pen, a sawing table, a jigsaw, abrasive sandpaper, a file, a sharp knife, PVA glue, an awl, a 4 mm drill, a drilling machine or an electric drill.
Preparing a sketch
The pattern is printed in real scale (44 - 48 cm). The layout will fit on an A2 sheet. If it is not possible to print in this format, the drawing is divided into separate sketches placed on A4. The sheets are glued together into a single drawing and then cut out.
If you have a good stationery knife, cut out elements from cardboard panels according to the pattern. The width of the slots for joining products corresponds to the width of the plywood. This should be taken into account when cutting. You will need 2 parts for the second pattern.
Plywood decoration in the form of an animal head: diagram
Elements of the finished structure are assembled. They should be numbered first. Using template elements, you can assemble a plywood product.
Based on the external appearance of the deer, you can paint, paste, apply a design, or leave it in its original form.
Features of applying a pattern to the material
The main requirement for pressed solid wood slabs is a smooth coating that excludes visible defects. Typically, pressed plywood is used to create decorative products. Sanded plywood elements with a layer of 4 mm and 6 mm can be replaced with an 8 mm solid. The assembly of volumetric products is carried out “groove to groove”.
Deer head made of plywood boards
After selecting the base for cutting, the drawing of the first element is applied. Its blank had already been previously found on the Internet and then printed out on a printer.
The outline of the workpiece is cut out using a stationery knife. The drawing is fixed on a plywood sheet using double-sided tape or PVA glue (it is not recommended to carry out permanent gluing, since the sketch will be removed in the future). Use a marker or pencil to trace the outline.
Upon completion of the work, regarding drawing the outline, the paper figure is removed from the sheet and the design is cut out.
What's the best way to cut
To work with plywood, use a jigsaw:
- Manual. A simple and understandable tool designed for household purposes. Any beginner can easily handle it.
- Jigsaw. Using an efficient and fast device allows you to create figures in the shortest possible time.
- Stationary product. Used to create high-quality drawings in a short period of time. The main criterion is the presence of a bed and rigid fixation of the saw.
To carry out the process, a nail file is inserted into the jigsaw - made of metal, coated with diamond. A small gap is made in the drawing on the raw material for inserting a nail file and cutting is carried out along a given contour for cutting out of a plywood sheet with a jigsaw.
Subsequently, the figure is carefully cut out along the previously created contour, ensuring smooth bends.
Plywood decoration in the form of hunting treofey: cutting
Tenon joints
At the end of the marked eye, at a distance of 2 mm, a through gap with a cross-section of 4 mm is drilled.
The groove is cut using a jigsaw. The jigsaw file moves from the inside of the marking.
After the cut has been formed, it is necessary to ensure control using a sanded piece of plywood from the workpiece. This template fits tightly into the groove.
Where can I buy
Among the companies offering to purchase a deer head made of plywood, we can highlight the following distributors.
For sale is a decorative deer head made of plywood. You can buy a handmade product in 9 color options, made like a 3D puzzle from sheet material, 4 mm thick.
- Location:
st. Novocheremushkinskaya 17, Moscow - Call here:
(495) 10 599 11 - Find out more:
https://dg-home.ru/
- Location:
st. Atamanskaya 3/6, St. Petersburg - Call here:
(812) 30 997 94 - Find out more:
https://zpos.ru/
Source: https://profanera.ru/montazh/golova-olenya-iz-faneryi-vyibor-chertezha-vyipil-i-sborka-gde-kupit-gotovuyu.html