Fans of all kinds of handicrafts should definitely pay attention to this type of decorative and applied art, such as plywood cutting. This method can be used to make all kinds of figures, patterns and other decorative elements.
Moreover, mastering such a technique is quite simple; the only thing is that you first need to familiarize yourself with its main nuances, which we will do below.
Plywood carved sconce
What you need for cutting
First of all, let's consider what tool you will need for this. It should be said right away that expensive equipment for cutting out plywood is not required. Therefore, anyone can do this kind of work.
The only thing you need to prepare is the following tool:
In the photo - a manual jigsaw
In addition, you will need various consumables, such as:
- sandpaper for sanding cut areas;
- tracing paper;
- pencils;
- glue;
- varnish;
- acrylic paints, etc.
In addition, it is necessary to prepare a workplace. Since working with any wood materials involves the presence of sawdust and unnecessary trimmings, it is advisable to set up a workplace not in a living room, but, for example, in a garage.
The workplace itself is a table. It is advisable to attach a jigsaw stand to it, which can be made from a plank. It is also necessary to ensure good local lighting of the workplace.
How to cut plywood at home
- For the process, only special discs with many teeth (at least 160 by 5 cm) are used.
- To quickly and accurately cut the desired part, you need a stop, which is a movable rail of an even shape. This is true for all cutting devices.
- The need to level the gap between the disk and the installation hole. The fact is that the gap does not allow sawing without chipping, so a special overlay is used or a platform is arranged from a furniture panel or a sheet of plywood.
- It is desirable to have the ability to adjust the position of the disk. It is taken into account that the teeth should not protrude more than 25 mm.
How to treat the surface → Room decoration → How to choose the right paint → Surface treatment technologies → Leveling and finishing the walls → Selecting and applying a primer → Removal from the surface → Stretch ceilings and technologies → Reviews and testimonials
Cutting Features
Material selection
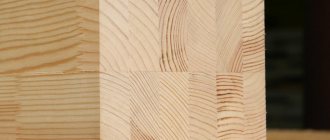
As you know, plywood is a multilayer material that consists of several layers of veneer. This makes it great for creativity.
Example of the surface of different types of plywood
The only thing is that you need to choose the right type of plywood. To do this, you need to pay attention to the following parameters:
| Options | Optimal material type |
| Thickness | To cut out plywood yourself, you should not use sheets that are too thick, as this will complicate the work. At the same time, the material must be strong enough. Therefore, the optimal thickness is 8 mm. |
| Brand | The brand indicates the type of adhesive used to glue the veneer together. |
It depends on things like:
- material price;
- its moisture resistance;
- environmental friendliness.
To make decor that will be used in a residential area, you should use environmentally friendly brands of plywood, for example, FC. If the product is made for outdoor use, it is necessary to use moisture-resistant sheets, such as FSF.
What to cut
As a rule, people who encounter this kind of work for the first time are interested in what can be cut out of plywood?
There are a lot of options - these could be:
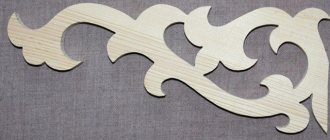
- patterns for decorating furniture or other interior elements;
- panel on the wall;
- decorative inscriptions;
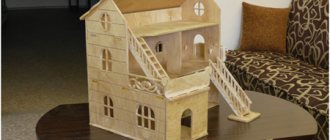
- all kinds of figures, toys for children, etc.
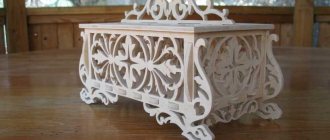
Advice! You can also make functional carved objects from plywood, for example, boxes, candlesticks, napkin stands, lamps and much more.
Decorative carved sleigh
Of course, you should start by cutting out the simplest products in order to “get your hand.” After gaining experience, you can take on work of any complexity.
Cutting process
After preparing the workplace and materials, we proceed directly to the cutting itself.
Instructions for doing this work look like this:
- First of all, you need to make an image of the future product. You can make them yourself, or find them on the Internet and print them. It must be said that templates must be prepared even before cutting out words from plywood with simple contours, as this will greatly simplify the work and improve its quality.
You can also prepare templates of simple geometric shapes of different sizes in advance so that, for example, you can quickly cut a circle or square from plywood;
- then the images should be transferred to cardboard, for example, using carbon paper;
- now you need to cut out templates from cardboard;
- Next, the prepared templates need to be placed on a plywood sheet and outlined with a pencil. If the design is large enough, it can be fixed with tape or even glue;
- Now let's start cutting. If you need to beautifully cut the edge of plywood, giving it smooth shapes, you can use a jigsaw. More delicate and complex work, for example, small openwork patterns, should be cut out with a hand jigsaw.
Material characteristics
Plywood is a wood-laminated board assembled from veneer or tree bark. Birch or coniferous trees are used. The sheets are distinguished by the thickness of the canvas, the types of coating of the outer layer and the type of glue that is used to glue the layers together.
If you want to place crafts cut from plywood in the fresh air, then it is best to take sheets assembled using phenol-formaldehyde glue. It's called FSF plywood. It has the highest level of protection from moisture and resistance to environmental influences. But such products cannot be used indoors, as they are harmful to health.
For children's crafts and decorative elements for the interior of rooms, use FK type plywood based on urea glue. Such sheets are used for furniture even in kindergartens. It is not harmful, but is not able to withstand moisture. Therefore, such crafts cannot be soaked in water.
Conclusion
Sawing out plywood with a jigsaw is a much simpler task than, for example, wood carving. Therefore, to achieve good results it will not take years to master the skill. You just need to do the work carefully, adhering to the recommendations outlined above.
The video in this article contains additional information on the topic discussed. If some points are not clear to you, you can leave your questions in the comments, and we will be happy to answer them.
When it is necessary to cut something out of plywood, many people are interested in the question of how to cut plywood? It is impossible to answer this question unambiguously, because there are different methods and tools for different purposes. In this article we will talk about the most popular methods of cutting plywood.
Drawing a design on a sheet of plywood
If you know how to draw well, then before cutting a figure out of plywood, draw its outlines onto the wooden surface with a pencil or marker. If you do not have the talents of an artist, then you can either redraw the picture from the finished one, or transfer it using the method shown in the photo below in the article.
The selected design is printed on a sheet of paper using a printer, then draw its outlines with a thick marker and, turning the sheet over with the design facing the plywood, iron the back side with a hot iron. The design will be imprinted on the wood. If the print comes out with gaps, re-draw it with a marker. Then cut out the figure using a jigsaw along the bright lines.
Some craftsmen attach a sheet of paper directly to the plywood with thumbtacks on the edge and then cut out the design with the paper at the same time. But here an opportunity may occur and a sheet of paper will move to the side due to vibration, ruining the evenness of the line.
Cut the plywood
This procedure is performed using several methods. The easiest and most accessible is to use a hand saw. However, since the plywood sheet is quite dense, even when compared to a regular spruce board, cutting the plywood will require a lot of effort. For this reason, this method is only suitable for thin sheets of plywood. An electric circular saw can act as a substitute for a hand hacksaw. In domestic conditions, this option is quite effective and makes it possible to cut both thin and thick sheets of plywood without much difficulty. The disadvantage of this method is that it cuts only in a straight line. When cutting with such a tool, you get a lot of chips.
When it is necessary to carry out figured cutting from plywood in a large volume, then you should pay attention to specialized equipment. Lasers and milling machines make it possible to obtain a high-quality product.
Some tips:
- Sawing should only be done on dry material. High humidity levels cause increased resistance of plywood. As a result, excessive force may cause the veneer to delaminate or the file to break.
- It is necessary to replace the saw or cutting blade immediately after detecting signs of dull teeth
- When cutting with a jigsaw to create clean and even ends, the main cutting lines should be placed along the line of the veneer grains
- A rune jigsaw is more convenient when working across the grain. Although there are slightly more chips this way, the risk of the file being pinched and moving away from the drawn line is reduced.
- When transferring a pattern for cutting onto a workpiece, you need to place the stencil in such a way that the parts to be removed are located in areas with imperfections, for example, knots, chips.
Shaped cutting methods
Procedure for using a jigsaw:
- first of all, you need to print out drawings or stencils, which are transferred to the workpiece using carbon paper
- to create through sections it is necessary to make starting holes with a thin drill
- a file or jigsaw blade is inserted into the resulting holes, the free edge of which must be secured using a mounting screw or clamp
- After this, the cut is made along the intended lines. At this time, you need to press the workpiece tightly against the workbench.
- Upon completion of cutting, you need to remove excess parts and process the finished object with a file or sandpaper.
Carved plywood
Decorative wooden panels are a true classic, they give nobility and are considered a sign of excellent taste. Wall carved plywood panels are an affordable and durable material for creating a unique interior. The plywood sheet is the basis for applying natural wood veneer of valuable types of wood, for example, oak, ash and others. Such products are distinguished by their attractive appearance, low cost, strength, flexibility and ease of processing. In addition, this material is resistant to chipping and damage during cutting out designs.
Various kinds of crafts made of plywood and wood, made by skilled craftsmen, are highly valued all over the world, causing universal admiration. Undoubtedly, carving is creativity and art, but you can certainly master it with effort and constantly honing your skills. This optimal hobby related to wood and plywood will not require too much free time from you and equipment that is not very expensive. Of course, this means carving plywood using jigsaws!
It is rapidly gaining popularity: who doesn’t want to make an excellent piece of decoration for themselves, decorating their home, furniture, and creating an artistic ambience! Cut-out products of different thicknesses are optimally integrated into many existing decorative styles, and we get, for example, frames for photo cards with ornaments, words, individual letters, figured shelves made with jigsaw carving on plywood. In addition, such creativity is an action that is accessible to anyone interested in the process, even a beginner. You just need to get an idea of “how it works.” And you can start creating!
Video to get started:
Serial models of engravers
Serial models of engravers, which are equally successfully used both at home and in the professional sphere, can be divided into the following categories.
These are powerful sleeveless devices with which you can successfully perform various technological operations, namely: drilling, grinding, milling, etc. Such units, operating at low speeds, are equipped with a convenient foot pedal and can be used in conjunction with both collet and quick-release chucks.
The power of technical drills allows them to be used for various operations with the help of additional attachments and accessories
The compact drive motor, which is equipped with engravers of this type, is mounted at the rear of the working attachment. Such small and high-speed engravers, not intended for heavy loads, are used primarily for the most delicate work. At the same time, the micromotor with which these engravers are equipped cannot be repaired; it can only be replaced with a new one. That is why it is advisable to use these devices for not too complex work, without subjecting it to significant loads.
Engravers or drills with flexible shaft
These drills are very convenient to use for engraving and fine carving. However, it should be borne in mind that the flexible shaft with which they are equipped reduces their power by almost half.
Why use plywood to create carvings?
This wood material is chosen for the following reasons:
- moisture resistant;
- temperature changes do not have a negative impact;
- quite low cost;
- ease of learning to cut with a jigsaw;
- low weight of products.
It is also necessary to choose plywood of the 1st and 2nd grades for crafts. The rest are not suitable for creativity: the surfaces have cracks with knots and chips (unless they can be used for internal substrates). Birch plywood (3-10 mm thick) is most suitable for cutting.
At the present time, this material is divided into a fairly large number of subspecies - each for specific purposes.
- Experts and folk craftsmen advise using sheets produced using a urea-formaldehyde composition. Such material is marked “FC”. This type of plywood can be bought “clean” or coated, for example, with varnish. It is most convenient to transfer the drawing to untreated plywood sheets for cutting with a jigsaw.
- Plywood marked “FOF” is intended for furniture production, and is often produced over 12 millimeters in thickness.
- The FB brand was originally developed as a boat material, which is why its cost is high (but if it is possible to use it, then it is suitable for cutting with a jigsaw).
- But masters do not recommend purchasing FSF. Although attractive in appearance, it is toxic because it is made using a composition of phenolic resins.
What additional materials and tools will be needed?
- Stencils and drawings with drawings for work. You can come up with them yourself or copy them on the Internet.
- Carbon paper to transfer patterns and lines according to the drawing;
- Glass paper and sandpaper, a set of files - for grinding parts;
- Joiner's (optionally casein) composition for gluing parts;
- Transparent varnish – for coating;
- To make holes inside the material to thread the blade through, use a drill and an awl.
- Before starting cutting with a jigsaw, carefully sand the material with glass paper, and only then transfer the patterns according to the drawing.
- Transfer elongated shapes of designs with narrow elements onto plywood so that they are located along the fibers of the “face” of the material.
How to work as an engraver
To make the work performed by the engraver more comfortable and efficient, certain rules should be followed.
Preparation of the workplace
The working surface on which engraving is carried out with a drill must be well lit, so it must be equipped with a powerful lamp that allows you to easily examine in great detail all the elements being processed. If you use a paper template for engraving, you will need masking tape, with which the template is fixed to the surface to be processed. Sometimes a sketch of a design or inscription that needs to be engraved is applied to the product being processed with a regular felt-tip pen or pencil. The surface must be degreased with alcohol.
It is convenient to store all engraving tools in one case if there is no space for setting up a full-fledged workshop
To perform engraving, various tools are used that are installed in the engraver. Each of them performs certain functions. Thus, a tool with a cone-shaped working part is needed to apply the outline of a design, and a cylindrical bur is needed to create small strokes. Before starting work, all tools should be laid out on the workbench in the exact order in which they will be used.
The hand holding the engraver's working attachment should slide freely over the surface being processed; for this, it is recommended to wear a fabric glove. Such a glove will also allow you not to leave hand marks on the grease-free surface of the workpiece. If you do not yet have experience in engraving, it is better to carry out the work at minimum speed. This will allow you to cut an even pattern consisting of strokes of the same depth, without damaging the workpiece.
Engraving inscriptions using a stencil
All engraving methods assume that the outline of the design is first made, and only then its details are “drawn” with the appropriate tool. The made drawing should be processed with a felt roller, which will give it a more neat appearance and remove all burrs left by the tool from the treated surface.
If the design of the engraver or drill you are using does not provide a forced ventilation system, then after 10–15 minutes of operation you should turn off the equipment and allow it to cool naturally.
Artistic cutting with a jigsaw: drawing, stencil and work
Let's get to know the devices
A jigsaw is a toolkit that is designed for working on different contours. The device includes a blade equipped with teeth small enough to cut the working material, practically without forming burrs or chips.
Manual
The “founder” of the genus is, of course, the manual jigsaw. Everything ingenious is simple: a metal U-shaped arc, and a working blade is stretched between the ends, which is secured with clamps. They hold the files during operation, and with their help, its tension is also adjusted. The handle for convenient operation is located on one side of the frame. The tool clamps can be rotated, thereby creating a different plane for carrying out work, providing opportunities for carving plywood with a jigsaw of increased complexity.
- When creating with a hand-held device, you must be extremely careful: the design is quite fragile, and with intense pressure, the blade sometimes breaks and needs to be replaced. Every novice craftsman should stock up on additional working files.
- When working with a jigsaw, it is convenient to use an auxiliary board: it protects the table and solves problems with the convenient location of the plywood workpiece.
Jigsaws
This device operates using electricity. It is a housing where the mechanism is located, and the control handle is also located there. The sawing element is located at the bottom of the device at the front. The blade is protected, and this allows you to cut along the contour very smoothly, without deviations. Professional models of equipment have many attachments that greatly facilitate the work process, for example, leveling the edge of the material. Jigsaw blades can also have teeth that vary in shape and size. They should be selected in accordance with the material for the saw to avoid damage to the plywood sheets during operation.
- Household electric jigsaws for non-production purposes are usually of low power (from 350 to 500 W). For beginners, this is the most common option when you are just learning to cut out crafts and figures from plywood (usually of small thickness). It is quite safe to operate such a device, especially when it is equipped with protection.
- A professional jigsaw is intended for industrial purposes, has a power of more than 700 W, high speed and cutting accuracy. It can cut sheets over 10 cm thick, aluminum, and thin steel.
Video: simple jigsaw:
Equipment selection
When choosing an engraver or drill, you must decide for what work such a device will be used, as well as what materials will be processed with its help. Knowing this, you can choose an engraving machine for working on metal and other materials or a drill for wood carving (even taking into account the huge variety of similar devices presented on the modern market) without any problems.
The most significant characteristics of engravers that you should pay attention to are:
- the power of the drive motor, which determines the ability of the equipment to operate for a long time under significant mechanical loads and process various materials;
- the number of revolutions developed by the working body in which the engraving tool is fixed.
Nowadays, there is plenty to choose from; each manufacturer produces several models of engravers that differ in both price and functionality.
Very often, those who are going to purchase an engraver for their professional activities or for work at home have to make a choice between the two characteristics mentioned above. No matter how much one would like it, not a single modern engraving device from among serial models is capable of effectively combining high power and speed. That is why specialists who often have to use an engraver immediately purchase both powerful and resourceful models. The best choice in such cases would be:
- powerful engraver, the working tip of which has a reinforced design;
- compact and lightweight micromotor capable of operating at high speeds.
For heavy work, a tool with an additional handle will be convenient, and fine engraving is best done with a compact device
For not too complicated engraving work at home, you can make such a device yourself, giving it exactly the functionality and characteristics that are necessary. There is a wide variety of designs of homemade engravers and videos about their manufacture, so choosing an acceptable option is not difficult. For example, you can make an engraver that will be driven by an electric motor from old household appliances. However, to make it convenient to work with, a homemade engraving machine must be equipped with a flexible drive and a special attachment in which the tool used will be fixed.
Using a homemade engraver at home, you can not only apply inscriptions and patterns to the product, but also perform various types of processing of parts made of metal, plastic and bone. Wood carving with a handmade engraver is also possible. Depending on the working tool installed in the attachment of such a device, it can be used as a mini-drill, a small router, a compact grinder and polisher.
Read also: Checking the accuracy of boring machines
Homemade engraver with flexible shaft
To choose a serial model of an engraver that will effectively cope with all assigned tasks, you should focus not only on the rating of such equipment among specialists, but also on its characteristics and functionality.