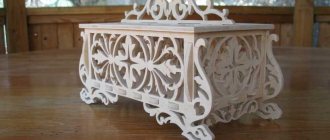
A couple of days ago I moved to a newly built dacha. I’ve already unpacked, set up the furniture, and as I walk around I feel like there’s not enough atmosphere. I decided to make several fakes using a hand jigsaw from plywood that was left over after construction. Therefore, next I’ll tell you a little about the cutting process itself and show you the drawings and stencils for cutting with a hand jigsaw that I used.
Source nestling.com.ua
Cutting plywood products with a hand jigsaw requires time, attention and patience. However, it is worth it - the result can be beautiful and, most importantly, practical products.
What is artistic carving?
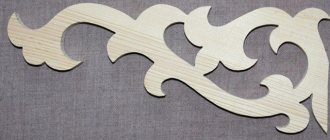
This is one of the types of wood carving. Its main difference is not superficial, but through curved cuts that make up ornaments, figures, product details, etc. The photo shows a simple example of such work:
Obviously, this kind of work can only be done effectively with a jigsaw. Of course, you will need auxiliary tools.
If desired, the slots can be made without a jigsaw. For example, punch with chisels, straight and rounded, use cutters for semicircles and circles. But such work options are slower and of poorer quality than using a jigsaw. Therefore, this method of wood processing is called “sawing with a jigsaw”, because this tool is the main one.
Where to start studying
It’s best to start learning this craft by becoming familiar with the full range of different products that are made in this way. These include small items that are closer to jewelry, and large-sized details of small architectural form - verandas, gazebos, etc.
The average between them is furniture and interior items. What is chosen is what is closer, in demand, more accessible to the possibilities of the workshop space, what there is a market for, what there is a desire to do with your own hands for the soul or as a business start-up.
After selecting the item to be made, it is studied how it is made and what is required for it.
Work examples. The products in the photo below are simple artistic ones.
To begin with, you need simple motives. Then you can move on to more complex ones.
An example of another direction: carved moldings for exterior or interior interiors, flat balusters for stairs, fences:
What tool is needed
All tasks are performed by different tools. There are 3 main groups of tools that work on the principle of a jigsaw.
Manual
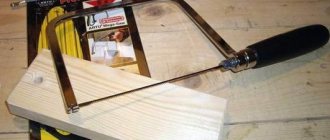
This is the simplest option, files of different sizes that are held within a frame. In principle, a jigsaw can be called both a metal file in a frame and a small bow saw for wood. But classically this is the name of a jewelry jigsaw, a short thin file in a high frame.
Manual electric
A jigsaw has a number of advantages and disadvantages compared to a simple hand tool. It cuts quickly and easily. The craftsman's only effort is to accurately guide his saw.
The downside is that this tool is quite clunky. The file is fixed at only one end in the rod. Therefore, it tends to move away from the markings. Visual control of the progress of the saw is somewhat difficult.
Therefore, the finest and most precise work is performed with hand tools, while coarser work is performed with electric tools.
If you need an electric jigsaw, then before purchasing we strongly recommend that you familiarize yourself with 9 tips that will help you choose a jigsaw.
Tabletop electric
This is a version of a mobile (manual) jigsaw. The only difference is that it is stationary. If a hand tool moves along the workpiece, then in a stationary tool the workpiece is dragged under a file. For this reason, it is more difficult to work with large parts.
At the same time, among the desktop options there are highly efficient and productive tools. Especially those that work on the principle of a band saw. Instead of a saw, they have a closed saw blade running in a circle on two guide wheels. In its pure form, such a tool is not called a jigsaw, but rather a tabletop band saw. But it is quite possible to perform jigsaw tasks on it.
There are also stationary jigsaws of varying power and classic design, where the file makes reciprocating movements. Moreover, on some models it is fixed not at one end in the driving rod, but also at the other end in the passive (driven) rod, which makes cuts more accurate.
Cutting laminate and chipboard with a jigsaw
To cut these materials, you should choose a reverse cut saw. True, this increases vibration, but the quality of material processing does not suffer in any way. Some craftsmen use standard wood blades, but in this case they should work on the back side of the workpiece.
Just like when processing wood, when sawing laminate and chipboard, you should set the maximum speed of the saw. But the pendulum function should be turned off, otherwise the file will “tear” the edges of the part. When working, we recommend that you press the sole of the jigsaw firmly against the surface being processed, avoiding lateral forces.
In their reviews, many craftsmen recommend using an anti-splinter liner when cutting laminate and chipboard. This is a specific device that is inserted into the grooves on the sole of the jigsaw. It is designed in such a way as to prevent chipping. In each specific case, it is necessary to make a test cut and select an anti-splinter liner with the necessary parameters. The ideal insert is one in which the cut exactly matches the thickness of the saw blade mounted on the jigsaw.
What plywood to use
Plywood is a popular material for such carvings. Externally, it imitates wood. At the same time, it is less prone to drying out, cracking and warping. This is achieved by the fact that the individual layers, when gluing, are laid alternately along and across the fibers. In this case, the fibers of one layer work in transverse tension, the others in longitudinal tension, which keeps the material from cracking.
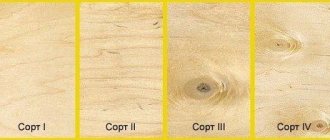
Plywood is selected according to grade and thickness . On sale you can find sheets of five grades, from first to highest (elite) grade. Photos of samples:
The choice of quality depends on the type of product to be made. When selling, plywood sheets are not cut. From a sheet of plywood of 2-4 grades measuring, for example, 1.5x1.5 m, you can cut the highest quality pieces. At the same time, you need to ensure that low-grade plywood does not peel.
It doesn’t always make sense to buy sanded sheets, since after manufacturing the products are most often sanded with “zero” emery.
The second selection parameter is sheet thickness . On sale you can find sheets with thicknesses from 3 mm to 30 mm. Special plywood up to 50 mm thick is also sold.
Plywood with a thickness of 5 mm or more is more difficult to saw, but gives greater strength to the product. The thickness is selected based on the optimal ratio of “sufficient strength X possibility, ease of cutting X price.
The cost of a sheet increases almost in direct proportion to its thickness.
Characteristics of plywood
Plywood is an accessible and inexpensive material for making crafts. You probably have pieces of plywood in your closet or garage.
You can always buy it in specialized stores.
- For crafts that will be used indoors, it is better to use plywood of the FK category.
- For work that will be outdoors, it is recommended to buy plywood of the FSK category, which is moisture resistant.
- Sheets of plywood have different thicknesses, so before starting work, decide what thickness of material is best for you to use.
- For small products, a material with a thickness of 3-5 mm is suitable; for large-scale work, plywood of 10-13 mm is used.
For beginners, it is better to use plywood made from softer types of wood: pine, fir, spruce.
Sheets of plywood from harder wood species: birch, oak and cedar are used for the manufacture of works intended for varnishing.
Which file to choose
For manual jewelry jigsaws, standard universal files for metal and other materials are used. Selection principle: the more complex the profile, the narrower the canvas. A wide blade “maneuvers” in the slot less easily.
The blade cuts metal accurately and does not tear the material, but it can cut too slowly. When speed is needed, files with larger teeth are selected.
In addition, craftsmen recommend purchasing Russian-made canvases. In extreme cases, not the cheapest “good quality China” under the brand of a respected corporation from the EU or the USA.
For manual electric jigsaws, Bosch T101AO files are recommended; they are made with straight teeth made of HCS steel. It is noteworthy that the manufacturer recommends other blades with oblique teeth for figured carving, but they tear the edges of the cut more strongly.
Read more about the types of jigsaw files and their choice in our detailed guide here.
Tapes and files for stationary machines are selected depending on the design, manufacturer’s recommendations and tasks. Sometimes you need to cut not just one, but a whole stack of blanks according to one template. The most suitable option for such tasks is selected during real work through trials.
What else do you need for creativity?
First, you need a sketch of the future product. When choosing profiles, designs and ornaments, you can use both traditional sources, books and magazines, and Internet tools. There are a huge number of photographs of finished products, as well as drawings and patterns on the Internet. You can use three types of prototypes and sketches:
- completely finished sketches, patterns or drawings;
- ready-made sources, modified at your discretion;
- completely unique own sketches.
In addition to the jigsaw, you will need many auxiliary tools and tools. It is impossible to give an exact list; it all depends on the technology and size of the future product. But you can make a mandatory list of what you need, here it is:
- drill or screwdriver with drills or cutters. If the slot is closed and does not start from the edge of the workpiece, holes are drilled to insert the file;
- marking tool: compass, ruler, square, tape measure, pencil, awl for pricking the center of holes, etc.;
- a set of round and flat needle files and files or emery devices for finishing the internal planes of the workpiece.
For the combined technology, jigsaw plus surface carving or lathe processing, separate tools are required.
Tools for work
To work on crafts, you need to prepare the necessary tools and materials:
- Jigsaw or jigsaw, hacksaw,
- Carpenter's glue, transparent,
- Self-tapping screws or self-tapping screws
- Screwdriver,
- Sandpaper of various grits,
- grinding machine,
- Set of files,
- Construction vise,
- Paint or varnish
- Ruler or tape measure
- A simple pencil.
If you plan to install or hang your product, a building level will come in handy.
Preparing the tool for work
When preparing a manual jigsaw, the most important thing is to insert the file correctly and ensure the tension of the blade using the threaded fastener. A weakened file will dangle, bend, will not be able to provide an even cut and may break. If it is overtightened, it may burst immediately.
The tension is determined by trial sawing. At first it’s better not to hold out. If the blade bends during sawing, it is tightened a quarter turn of the screw fastening. You may need to do this several times until the file starts cutting consistently. With some experience, the master immediately accurately adjusts the tension.
Files with an oblique tooth are inserted so that the tip is directed forward, as the sawing progresses. Straight-toothed files are inserted on either side, except when the sawing direction is indicated by an arrow on the blade.
There may be jigsaw frames without screw tension adjustment. In such designs, the frame itself is spring-loaded. Before installing the file, the frame is compressed with a special eccentric clamp, which should be included in the kit, or using a handy vice, clamps, or clamps. Then the file is inserted and the clamp is removed. The spring-loaded frame opens and provides optimal tension force.
Complex power tools are prepared in accordance with the Operating Instructions, or by generally known methods.
Carving techniques for beginners
Organization of the workplace is important. The master must work while sitting in a comfortable position, without bending or reaching with his hands to the place of work. For small parts, a sawing table is used.
They are on sale. But to gain first experience, it is better to cut it out with your own hands from a piece of thick plywood or board according to the following drawings:
The table is attached to a large work table with a clamp or self-tapping screws.
In some cases, it is more convenient to clamp the workpiece vertically with a clamp, then you will have to cut not from top to bottom, but horizontally, which is more convenient.
Plywood drawings for artistic cutting with a jigsaw
Plywood is a very accessible, relatively inexpensive material for various crafts. Things made from it can have not only decorative value, but also be useful in our everyday life.
Plywood is an easily processed building material, which is produced by gluing together several layers of veneer and specially treated wood chips.
Photo: Having drawings of animals made of plywood, you can use a jigsaw to create a special atmosphere in your home, including a cheerful one, for example, this cat made of thin plywood makes you smile. Is not it!
Introduction
These sheets, which can be used for making crafts and structures, may differ:
- number of layers of veneer - three-layer, five-layer and multi-layer;
- the type of wood from which the multilayer sheet is made (deciduous or coniferous);
- according to the degree of processing of the surfaces of the plywood sheet (sanded on one or both sides, not sanded).
Building codes and standards
To learn more about the building material in question (about the classification of the entire plywood nomenclature, grades, standard sizes produced), which can be purchased for the manufacture of many products and crafts, it is recommended that you familiarize yourself with the following documents:
- GOST 3916.1-96 “General purpose plywood with outer layers of hardwood veneer.”
- GOST 3916.2-96 “General purpose plywood with outer layers of softwood veneer.”
Schemes, drawings and patterns for products made from plywood sheets
A pattern of a cat, according to which, using drawing programs, you can easily make a plywood blank of any size with your own hands for further processing (for example, cover it with polyurethane foam and paint it black).
Computer drawing programs
Today you can easily find a diagram, a pattern for a plywood structure, so that you can then prepare any drawing using computer-aided design systems (including the above cat pattern). Next, use a plotter to print it onto a paper sheet of the required format.
Popular drawing programs are the easiest to learn and can be used in 2D and 3D modeling, including for plywood structures:
- "KOMPAS" is a complex of automated systems with the ability to prepare drawings in accordance with the standards of the ESKDI and SPDS series;
- AutoCAD is a two- and three-dimensional computer-aided design and drawing system.
So, if you cannot find a detailed drawing of the plywood product you need, then the application capabilities of the given software will help you make a full-fledged drawing using any diagrams and patterns posted on the Internet.
Kayak
The price of the construction plywood from which the kayak is made is simply incommensurate with the pleasure that the person who made it with his own hands and who loves rowing boats will receive.
Appearance of a single-seater boat, drawings of which are given below in the article
The Eskimo kayak is the same kayak among the Aleuts - a traditional rowing boat of the Arctic peoples. This boat can be single, double or triple. Let's post drawings of a plywood kayak for one person.
For this kayak, plywood sheets were purchased - 1525 x 1525 (mm), thickness 4 (mm).
The algorithm for building a rowing boat from plywood sheets is, in principle, general, with the exception of some nuances. A step-by-step procedure for cutting, processing and assembling a kayak can be seen in the video in this article.
Plywood table - simple and functional
Plywood table: 1 – cover; 2 – inner wall; 3 – side (end) walls.
Clear drawings of a plywood table with your own hands, which will be easy to implement even for a person without special carpentry skills and experience.
Table cover (1 sheet) - 1300 x 600 x 16 (mm)
Inner wall (1 sheet) - 1170 x 400 x 16 (mm)
End wall (2 sheets) – 450 x 740 x 16 (mm)
Plywood constructor
Various plywood construction kit drawings are now gaining more and more popularity. Assembling such models from safe material is a very useful activity for children and teenagers. Such crafts will become good examples of collections and will decorate the modellers' corner.
Tank
The photo shows drawings of a plywood tank: top of the hull
Tank bottom
Tower details
Other tank elements
The stages of work on installing a tank model are as follows:
- The plywood is sanded (first with medium-grain sandpaper and then with fine-grain sandpaper);
- The drawings are carefully transferred through carbon paper onto sheet plywood material sanded with fine-grained abrasive.
- In the corners of the contour transfer, through holes are drilled with a drill (drill 3 mm or more);
- Attach the file to the jigsaw and start cutting out the elements of the tank;
Sawing can be done even by a child
Note! Cutting out parts must begin inside the contours of the tank blanks, and only then around the office itself.
- After cutting out all the parts, sand them again with sandpaper, removing the burrs left from the file;
We polish every detail - Start assembling the parts.
Advice! When assembling the model's plywood assemblies, have different types of needle files on hand so that you can fit the elements together at any time.
- After adjusting all the parts, you can start gluing them (for example, with PVA glue, “Titan”);
Advice! In order for the components and elements of the tank to grip each other more firmly and reliably, you can tie them with thread or rope for a while after gluing them.
- The cannon can be made by cutting the wooden handle of a watercolor brush or from other auxiliary material;
- If desired, you can apply a side number or other inscriptions and patterns to a tank, or any other model, using an electric burner;
- For greater preservation and decoration of the model, they can be coated with varnishes and paints.
The model of the tank is made of plywood with a thickness of (3 – 5 mm), the plywood elements were sanded, joined with “Titan” glue, primed and coated with acrylic varnish and paint. The photo shows the result of the actions described above.
Car – retro (old Mercedes)
Model of a retro Mercedes car
Note! When you transfer these drawings of a plywood machine with your own hands onto the plywood sheets themselves, do not forget to transfer the numbers.
Mercedes parts (1)
Mercedes parts (2)
When assembling the model itself, look carefully at the numbers.
In this case, the process is carried out according to the following algorithm, in accordance with digital notations:
- the part or assembly numbered 1 must be connected to another number 1;
- and part number 2 is attached accordingly to the next number 2 and so on until the machine is assembled.
Gun
Model of a pistol such as "Bulldog" M19
Drawings of a pistol made of plywood model "Bulldog". When assembling, we follow the same rules as when assembling a machine: the same numbers must be mounted with each other.
Pistol parts(1)
Pistol parts(2)
Advice! This model of pistol is best coated from a bottle of spray paint; for a better resemblance to the original, layers of black paint can be applied.
Dinosaur
It’s not difficult to make a model of such a dinosaur; it’s just a matter of patience when cutting out the parts with a jigsaw.
When designing, drawings of plywood dinosaurs, for example, those presented below, can be made in any scale you need according to the presented pattern in a drawing program for a computer.
Preparing the material, model elements and the assembly itself is not difficult, but you will have to have some patience when working with a jigsaw and adjusting the model components to each other.
Parts for assembling a dinosaur
Napkin holder – “Grape leaves”
Very light + simple + necessary part in everyday life
This item in the shape of grape leaves is always useful in the household for its intended purpose - for napkins, and for storing, for example, sheets of paper of the selected format:
Drawings of a plywood napkin holder: before varnishing, staining or painting a plywood blank, you need to burn out the pattern
Napkin holder base with technological slots for attaching vertical parts, in the shape of grape leaves
Vase, stand for pencils, pens, brushes
A vase that can be used for sweets, for writing objects, for storing other small household items
Drawings of a plywood vase, from which you can easily cut out a craft of the size you need:
Stand, with holes for fastening the side walls of the vase
Side, prefabricated walls of the vase with holes for attaching to each other
Plywood panel
It is the ease and simplicity of cutting out plywood sheets of various configurations with different sizes with a jigsaw, and installing various structures from them, that allows us to create a variety of decorative panels for the walls of our homes. Any panel made carefully is an excellent gift for family and friends.
Panel – “butterfly shelf”
Drawings of a plywood panel, which also serves as a shelf in the household:
A panel in the shape of a butterfly with a hole for a shelf (the shelf can be made shaped, rectangular, or semicircular).
Tips for preparing and assembling plywood crafts
To avoid such defects in the workpieces when sawing with a jigsaw, prepare a plywood sheet by coating its surface with a solution of glue and water
Some useful tips and warnings:
- When transferring patterns and drawings onto plywood, use the thinnest and sharpest pencil lead. It's even better to use a used ballpoint pen, then the lines will always be the same and the copy paper won't be torn by the ballpoint. It is convenient to transfer drawings to plywood using a laser printer.
- For better fastening of parts, where possible, it is recommended that the width of the grooves correspond to the thickness of the plywood sheet.
- There are two types of files with large and small teeth. It is more convenient for beginners to learn how to use a thick file, and cut out small parts with a thin file, already having some experience and skills in using a jigsaw.
- The files must cut from top to bottom, so pay special attention to the correct fastening of the file in the jigsaw.
- Files can easily break, so cut carefully and do not allow parts to hang on the saw blade.
- When purchasing a file, make sure that the teeth are sharp, and that the file itself should not bend easily, but rather be firm. It’s not the flat ones that are easy to use, but the so-called “twisted” files – they can be used to make cuts in any direction.
- For those who enjoy cutting out structures from plywood sheets as a hobby, there is no need to purchase a band saw; it is enough to purchase a jigsaw. Although everyone is an amateur, some craftsmen still often resort to a hand jigsaw when they “need to get a feel for the material.”
conclusions
- Before choosing, purchasing and directly working with the material from which you will cut models, panels, construction kits and structures, familiarize yourself with its types and classification according to construction documents (GOST).
- For sawing, purchase high-quality tools, equipment and accessories for it.
- Take a responsible approach to choosing high-quality plywood. Do not limit yourself to a visual inspection, tap it for internal voids and delaminations due to poor gluing of the veneer layers.
- Before working with a jigsaw, optimally equip your workplace. Pay special attention to good lighting so that the cut and markings are clearly visible and your eyes don’t get tired. It’s not a bad idea to use a strobe light to illuminate the area where you’re working with a jigsaw. Convenient and comfortable sawing!
fanera-info.ru
Common problems
When working with different materials and tools, various problems arise, but there are also some common to all types of work.
Why does the file stick and how to fix it
If the saw gets stuck immediately at the beginning of work, this means:
- the fabric is loosely stretched;
- the file is not suitable for this material;
- The material is too thick for this tool.
When it starts to get stuck after a smooth and even cut, this means:
- the canvas has weakened and needs to be tightened;
- the teeth have crumbled or become dull, all or part of them;
- gets stuck on a turn - the blade is too wide for a sharp turn in a semicircle of small diameter;
- The structure of the workpiece has changed, a branch has been caught.
Why do chips appear, how to cut without them
For artistic cutting with a jigsaw without chipping, suitable files are used. Most often, the material is torn by blades with large teeth or with an incorrect angle. Also, the appearance of chips can be affected by jerky sawing or a defect in the workpiece, peeling of wood or a layer of plywood.
What additional materials and tools will be needed?
- Stencils and drawings with drawings for work. You can come up with them yourself or copy them on the Internet.
- Carbon paper to transfer patterns and lines according to the drawing;
- Glass paper and sandpaper, a set of files - for grinding parts;
- Joiner's (optionally casein) composition for gluing parts;
- Transparent varnish – for coating;
- To make holes inside the material to thread the blade through, use a drill and an awl.
Adviсe:
- Before starting cutting with a jigsaw, carefully sand the material with glass paper, and only then transfer the patterns according to the drawing.
- Transfer elongated shapes of designs with narrow elements onto plywood so that they are located along the fibers of the “face” of the material.
Wood instead of plywood
With all the advantages of plywood, this material has its drawbacks. This is an industrial material, and not completely natural, like pure wood. Additionally, plywood is made primarily from birch, which does not have the beautiful texture, grain patterns, and colors that some other woods have. Therefore, even highly artistic products made from plywood do not have the same attractiveness and charm as purely wooden ones.
Before mass production of plywood began, all carving was done on wood. Many antique products are still intact, so wood is also well suited for artistic cutting with a jigsaw.
In this case, you must be prepared for the fact that the workpiece will crack or warp during work or immediately after it. To avoid this, you should use only well-prepared wood:
- completely and evenly dried throughout the entire massif;
- maintained in a period sufficient for all internal stresses to manifest themselves in the form of cracks and warping.
Doll furniture made of plywood is a fun activity for parents and joy for the baby
Any child should always have a lot of toys. Toys give him the opportunity to create his own world, in which he himself determines the rules. For a boy, these are soldiers, cars and children's weapons, but for any girl, regardless of age, dolls are always the main toy. But to create an exact copy of the world that the child involuntarily reproduces, all the required elements must be present. Playing with dolls is impossible without furniture. The most popular is still plywood doll furniture, which you can buy or make yourself.
Assorted plywood doll furniture
Types of doll furniture
Toy furniture belongs to a special category of children's toys. Reduced in proportions, it accurately reproduces interior items used by both adults and children. Doll furniture has its own distinctive features:
- Similarity to the original. The children's version of furniture should almost completely copy real objects. It is very difficult to deceive a child. Children want toy replicas to be exactly like the regular furniture they themselves use with their parents at home or in kindergarten.
Photo of finished furniture from the book
- Careful manufacturing. Production often involves only manual assembly. Small parts from which furniture is assembled for children must be carefully processed, do not contain sharp edges and are always subject to strict control during acceptance of the finished product.
- Safety. Doll furniture always remains, first and foremost, a toy that a child can put in his mouth or leave with him in bed all night. Therefore, only materials and processing agents that are harmless to health should be used for production.
Photo of a template for making furniture from plywood
Plywood has been used for the production of furniture for dolls for quite a long time. This was due to several reasons:
- Strength of the material. Products can serve more than one generation without losing their original properties.
- Ease of processing. A hand jigsaw is enough to give the desired shape.
- Harmlessness. Certain brands are absolutely harmless to humans.
Another indisputable advantage of using plywood is the ability to independently make any items at home.
Photo of finished doll chairs
Making furniture yourself
Everything you can do for a child or with him can confidently be called the best moments of any person’s life. In most cases, furniture for a doll can be purchased. The range of stores for children offers a wide range of different materials. But do-it-yourself doll furniture made from plywood for a child will be the best childhood memory for parents and baby.
Photo of finished toy stools
When starting work, you should decide on the list of elements that need to be manufactured. The easiest way to do this is with a child. Usually girls always know exactly what they need to make their favorite dolls happy. Agree on the list, sizes and quantities of required items. After this, you need to prepare a drawing.
Preparation of the drawing
Making doll furniture from plywood, the drawings of which are to be made, is different from making the usual production process, but the principle remains the same. Furniture is assembled from pre-prepared elements using different fasteners.
Photo of a drawing of a chair back
To prepare the drawing you can use:
- Ready template. Plywood furniture for dolls has been made for several decades since the times of the Soviet Union. In books or on the Internet you can find ready-made templates for doll furniture made of plywood. As an example, below is a photograph of finished furniture and templates for its manufacture.
Important! A distinctive feature of all ready-made templates are the provided fasteners, which allow you to connect the parts together.
- Hand made drawing. Do-it-yourself plywood doll furniture, drawings of which must be made, will take into account the personal wishes of the child and parent.
Even without minimal practical experience, it will not take much time. To visualize what this looks like, below are several examples of preparing a drawing for toy chairs and stools.
Photo of chair seat drawing
A template for making stool legs is also provided.
Manufacturing and assembly
The technological stages of assembly are simple and will not cause difficulties:
- Preparing parts. After preparing the drawing and template, the process of preparing the details of future furniture begins. To do this, you need to take plywood with a thickness of no more than 6 mm. Typically, a four-millimeter plate is used for the frame, and a six-millimeter plate for auxiliary parts.
For cutting, it is better to use a manual jigsaw, which even a woman can operate. The finished parts are first tried on, after which they must be cleaned with sandpaper.
Photo of a template for stool legs
Important! It is better to carry out cleaning by machine, for example, using special attachments on a screwdriver. This improves quality and speeds up the process.
Preparation of individual furniture elements
- Assembly. Finished parts are assembled using self-tapping screws, glue or connections provided in the parts, usually tongue-and-groove. The assembled furniture must dry.
The cracks or technological holes in the finished product are sealed. To do this, you can use acrylic putty, which after drying is almost invisible and completely harmless.
Finished plywood stool.
- Finishing doll furniture made of plywood. Depending on the mood or wishes of the child, the furniture can be coated with any acrylic paint. Often furniture is completely covered with white paint as a base, which is then painted in different colors or a design is applied.
An example of finishing plywood furniture
The result obtained, no matter how it turns out, will bring joy to all participants in the process. If over time, toy tables, chairs or cabinets seem not so beautiful, you can add variety by making soft pillows, or upholstering the furniture with fabric. You can simply make covers of different colors and change them periodically. In any case, everyone will be happy.
profanera.ru
Examples of crafts or what you can do with your own hands
Here, endless opportunities open up for amateurs who can then become professionals. The technology allows both to give the external shape to the product and to create ornaments on different surfaces, from boxes to openwork stair railings or carved platbands.
Let's look at simple examples of work. The photo below is a purely artistic product that has no practical value.
An arts and crafts product, a hanger for the hallway, kitchen or bath.
Artistic carving for children
A complete description of artistic cutting with a jigsaw for children and beginning adults, including a practical task, can be found in the textbook “Technology” for the 5th grade.
A simple and clear illustration from the course:
However, the compulsory school curriculum inevitably carries a connotation of coercion. If a child does not enjoy the activity, he may lose interest in it for life. Conversely, even at an earlier age it can captivate the child.
The lesson trains hand motor skills, artistic imagination, and the habit of creation. Something made with your own hands gives you self-confidence and raises the bar for assessing your capabilities. Therefore, you can try to show your child a simple product and offer to make something similar yourself.
We must not forget about safety precautions. A child is less aware of the likelihood and possible source of injury than an adult. Safety comments for the illustrations above.
Left: the pose is chosen correctly, the eyes are far from the file. If the canvas bursts, it will not cause harm.
Right: The thumb is too close to the file. It is safer to clamp the workpiece with a clamp and keep your hand away.
In addition to the school course, starting knowledge can be supplemented by video, lesson 1 and further:
In our age of continuous conveyor production, any unique piece of product arouses interest. Of course, you won’t be able to earn much from one copy; from a business point of view, you should again set up continuous production. However, artistic sawing with a jigsaw can be promising for those who are interested in it, simply as a useful hobby, making gifts for loved ones, or making a first prototype.