Wood carving is fashionable and stylish. Not only decorative items are cut from plywood, but also beautiful trims, balusters and other decorative elements for the home are created. Cutting with a jigsaw itself requires some experience and knowledge of technology. In addition to a regular manual jigsaw, you can use an electric one, or special tables for volumetric carving, which allows you to create real masterpieces.
For artistic wood carving, a jigsaw (manual or electric) is used.
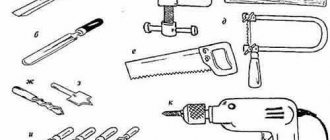
The following tools and materials are used for carving:
- jigsaw, which can be manual or electric;
- special machine for volumetric carving;
- set of files;
- awl and chisel;
- drill;
- pliers;
- glue for gluing individual parts;
- brush;
- stain and varnish.
Before you start carving with a jigsaw, you need to apply a design to the wooden workpiece using a pencil.
In some cases, professional equipment is used, which requires certain skills and experience to use. The work requires patience, and your hands often get tired, so it is recommended to take breaks.
The technology of cutting wood with a jigsaw includes the following steps:
- First you need to prepare blanks from sheets of plywood; thin wooden boards will also do.
- A pencil drawing is applied to the workpiece. After making holes with a drill, you can then start cutting out the design.
- For thin elements, not only a jigsaw is used, but also an awl, which is used to mark.
- The tool must be kept level while working; chips and other deformations are not allowed.
Operating procedure
To obtain a high-quality product and minimize the formation of defects, you need to do the work slowly and focus on the process. Before starting work, it is recommended to make sure that the thickness of the plywood is equal to the height of the groove on the printed sketch.
Preparing the stencil
Schemes for sawing with a tool can be of different sizes. To create a drawing of an interior item, for example a shelf, you will need to use whatman paper in A1 or A0 format, and for toys you can use a standard sheet of cardboard.
The contour of the product is applied to the surface in compliance with the exact dimensions. Templates for cutting with a hand jigsaw can be found on special resources. But it’s easier to come up with your own compositions based on the type of workpiece. An individual approach to developing a product design will highlight the texture of the wood.
Transferring an image to the surface of plywood or boards
To accurately apply a contour to the surface of plywood or wood, print the template on thick paper. Transferring a drawing from an A4 drawing can cause a lot of trouble if you draw the ornament with a pencil.
The drawing can be glued to the plywood with 2-sided tape. When using glue, you need to clean the surface with sandpaper. An accessible method involves using a stencil made using nail scissors. After preparation, the template is applied to the surface and each fragment is outlined with a pencil.
For convenience, the sheet is secured with tape or insulating tape. The design can be applied thermally. For this, an inkjet printer is used, with which the diagram is printed. After this, the design is applied to the surface with the front side and processed with a heated iron.
Sawing process technology
Sawing from plywood is carried out after applying the drawing to the workpiece. Processing begins with the internal elements of the product, and then the outer contour is cut out. This order of work allows you to get a straight line and provides convenient fastening of the workpiece.
Holes for the blade must be drilled in sharp places on the internal contour. This requires attention as chips may form on the back side. To avoid this, it is recommended not to make the holes completely.
You can limit the depth using insulating tape that is wrapped around the drill. After this, turn the workpiece over and process the hole with an awl. After finishing the work, the product is polished using a file or needle file.
Sawing with hand tools requires the equipment of a special machine with a clamp. This device is used as a base. During processing, the workpiece is fixed at chest level, which provides convenience and allows you to closely monitor the process.
For beginners, it is important to be careful when using a jigsaw in order to practice smooth movements. The cutting blade for a jigsaw is fragile, so it is recommended to avoid distortions, sudden movements, and overheating
When processing a workpiece, the movements must be reciprocating, and the tool must be positioned vertically. Using an electric jigsaw requires securing the workpiece to a workbench. When using this equipment, workpieces up to 5 cm thick can be processed.
Defects in work
If the workpiece processing technology is violated, the tool may shift. A jigsaw may cut crookedly if the tool is tilted or improperly fastened. If the blade gets stuck at the stage of forming the figured elements, then you will need to carefully draw a new line located parallel to the fragment with the defect.
Instrument care
Periodically, you need to take care of the tool: check the knives for corrosion and sharpen them. You can use several methods for sharpening: whetstones, sandpaper or leather belts, choose the most suitable for yourself.
First, the blade is sharpened using a fine abrasive (diamond chips or sandpaper). Both sides are processed until burrs appear, then these irregularities are eliminated with a fine-grained abrasive, and the final stage is polishing the blade. The quality of sharpening is checked on a block of wood - if you run the knife across, the fibers should not fluff. A straight line indicates the required degree of sharpening.
Experts recommend using special belts. The tool consists of a metal ring and a handle. Used by professional sharpeners, the leather belt is great for finishing the blade.
The ideal condition of the cutting blade is achieved by sharpening the knife along a tensioned belt in the direction of movement. You need to press the canvas without unnecessary pressure at a slight angle. At first, the emphasis is made stronger, and towards the end of the belt it is weakened so that the cutting blade goes to the top.
Used in conjunction with a polishing belt, the pastes serve to finish the knife, giving the blade a smooth, high-gloss shine. The composition is applied directly to the belt.
On sale you can find many pastes containing various abrasives. Most of them are perfectly replaced by the well-known GOI paste. It is also available in varying degrees of grain size, and is suitable for both ductile metals and high-carbon steel, glass, ceramics and other materials.
Store tools in separate (preferably wooden) cabinets, pre-wrapped in cotton or canvas fabric.
Cleaning from traces of oxide
If the knife shows signs of corrosion, it is not time to throw it away. You can try to revive it.
- Pitting corrosion is removed using an eraser or auto polish with a fine abrasive fraction.
- Cavities are removed with scratch polish, and then also polished with a fine abrasive compound.
- Large areas of rust can be cleaned with sandpaper, then polished.
The use of polish at the final stage of processing is mandatory!
Artistic cutting with a jigsaw: drawing, stencil and work
Let's get to know the devices
A jigsaw is a toolkit that is designed for working on different contours. The device includes a blade equipped with teeth small enough to cut the working material, practically without forming burrs or chips.
Manual
The “founder” of the genus is, of course, the manual jigsaw. Everything ingenious is simple: a metal U-shaped arc, and a working blade is stretched between the ends, which is secured with clamps. They hold the files during operation, and with their help, its tension is also adjusted. The handle for convenient operation is located on one side of the frame. The tool clamps can be rotated, thereby creating a different plane for carrying out work, providing opportunities for carving plywood with a jigsaw of increased complexity.
Adviсe:
- When creating with a hand-held device, you must be extremely careful: the design is quite fragile, and with intense pressure, the blade sometimes breaks and needs to be replaced. Every novice craftsman should stock up on additional working files.
- When working with a jigsaw, it is convenient to use an auxiliary board: it protects the table and solves problems with the convenient location of the plywood workpiece.
Jigsaws
This device operates using electricity. It is a housing where the mechanism is located, and the control handle is also located there. The sawing element is located at the bottom of the device at the front. The blade is protected, and this allows you to cut along the contour very smoothly, without deviations. Professional models of equipment have many attachments that greatly facilitate the work process, for example, leveling the edge of the material. Jigsaw blades can also have teeth that vary in shape and size. They should be selected in accordance with the material for the saw to avoid damage to the plywood sheets during operation.
- Household electric jigsaws for non-production purposes are usually of low power (from 350 to 500 W). For beginners, this is the most common option when you are just learning to cut out crafts and figures from plywood (usually of small thickness). It is quite safe to operate such a device, especially when it is equipped with protection.
- A professional jigsaw is intended for industrial purposes, has a power of more than 700 W, high speed and cutting accuracy. It can cut sheets over 10 cm thick, aluminum, and thin steel.
Video: simple jigsaw:
Fraser
Sometimes this device is used for carving. It is a type of special hand tool, with the assistance of which you can perform various types of work on wood and plywood in everyday conditions. However, working with it requires some skill; but craftsmen who deftly handle this equipment can create real, highly artistic masterpieces of folk art.
Preparing the stencil
Drawings for creative work come in different sizes, depending on the scale of the products being manufactured. For example, for diagrams of a shelf or a piece of furniture, for a three-dimensional toy, you should take a sheet of whatman paper in A1 format, a roll of wallpaper left after repair may also be suitable, and for small figures (such as souvenirs) we take office paper (A4 or A3 format).
Using a marker or pencil, we draw the contours of the future object on the surface of the paper, adhering to the specified dimensions. Templates are presented in the public domain in a wide range, we choose the appropriate one (for beginners, as a rule, it is not too complicated). Or you can come up with your own options for cutting with a jigsaw and then transfer it to a paper base.
Then we transfer the images to the surface of the working material (plywood, boards). To do this, cut out a figure from paper, apply it to plywood and carefully trace along the contour with a pencil. The lines must be precise and even. If necessary, correct it by erasing it with an eraser.
The contours are applied “from the rear” of the material so that no remnants of the drawing are noticeable on the finished form. The internal areas can also be shaded so as not to cut off an extra piece, thereby indicating an inviolable fragment.
Vase
Snowflake
Deer
Typewriter
Geometric carving technology
Geometric wood carving is considered the simplest and is perfect for beginners. To create the intended design, you need to have a small set of wood carving tools and clearly follow the design. In geometric wood carving, symmetry and repetition are of utmost importance. This achieves a wonderful play of light and shadow.
Cutting boards using this technique and wooden panels look wonderful in the kitchen.
Geometric carving consists of sequential cutting out of simple geometric shapes: rectangles, triangles, squares, rhombuses. But the result is a wonderful ornament that looks different in different lighting.
The sequence of performing any wood carving is as follows:
- First, a wooden blank is made (board, deck, blank).
- Next is rough leveling of the surface of the workpiece, during which all defects and roughness are removed.
- Then a decorative relief is formed using special cutters.
- After the main carving is completed, the finishing process is grinding, impregnation, painting, varnishing.
You cannot work with a workpiece on your knees! The master must have a table to work on.
Master class “Geometric wood carving on a cutting board”
Tools . You will need 2 knives for wood carving: a triangular jamb knife and a feather knife, a ruler, a compass, a pencil.
A triangle jamb knife is necessary for cutting triangular shapes of various configurations, as well as for cutting long straight lines. A pen knife is used to cut long lines such as a petal or groove. Carving knives should be sharp and comfortable.
First stage. We make a sketch of the pattern on the board. It can be applied using a compass and ruler. Or you can print out carving patterns taken from the Internet and use carbon paper to transfer them to a prepared cutting board.
Second phase . Cut out the petals. We use a pen knife.
While working, the thumb is pressed firmly against the board, and the index finger lightly touches the wood. This will help regulate the depth of the knife into the surface and the angle of inclination. And your thumb will help you move the blade smoothly. First, we cut in one direction at an angle, then we turn the board over and cut on the other side.
If the shavings curl like a rope, the knife is good and sharp. It must be periodically sharpened with a piece of leather with GOI paste.
Third stage . We cut out the triangles with a blunt knife. Using the heel, at an angle of 45 degrees, we cut the knife into the wood, not reaching the edges of the pattern on three sides. The slots should meet on all sides in the shape of a pyramid. The sliver falls out and forms a beautiful triangle.
Fourth stage. What we couldn’t cut, carefully clean it so that the edges are frequent and even. Using the same principle, we cut out grooves and triangles around the perimeter of the board.
Fifth stage . We sand everything with sandpaper and treat it with natural impregnation. All! The work is done. We decorate the kitchen with a useful and beautiful cutting board with wood carvings.
Original
About the device and principle of operation
During the operation of the product, the cutting part makes reciprocating movements, due to which the particles of the workpiece fall off, forming a fairly narrow cut. During operation, 500-3000 work cycles are completed in one minute. The final figure depends on the model used.
Visual acquaintance with the components of the tool.
Basic components
- The base plate acts as a guide element. It sets a certain cutting angle for the tool and holds the blade in this position while cutting.
- A blade with a fine tooth is the main device that comes into direct contact with the material being cut. It is selected depending on the situation.
- An electric motor is the force that powers any device. The most commonly used models are those with power ranging from 200 to 900 W. The choice of a specific option is carried out taking into account the characteristics of the intended work.
- Each instrument has a special holder that looks like a mushroom stem. By grasping it, you can perform construction operations related to cutting materials.
- The role of a guide for the file is played by a special sponge or roller. These elements are installed on the flat side of the blade. That is, it turns out that the canvas slides directly over one of these parts.
- To start the engine, a special button is usually used, which is not necessarily held down during work.
Purpose of some files.
Attention! The blade for a jigsaw for wood can differ in the quality of workmanship, the shape of the shank, the size, shape and size of the teeth, as well as the width of their setting
Additional details
This device can be equipped with other elements that can make work comfortable and safe. For example, very often they add: a quantitative shear control, a lighting device, a chip blowing mechanism, protective equipment and all kinds of vibration and sound mufflers.
Types of slotted threads
Cut-out images are characterized by the presence of through patterns. They can be flat or voluminous; in the latter case, after creation, they are processed using special knives used for wood processing. Relief carving is also called lace carving.
If the image remains in the form where the holes made by the master are visible, then such images can be called through. Sometimes it is glued onto a wooden base and a kind of bas-relief is obtained. In this case, the pattern is called overhead.
This technique is also used for house cutouts. In this case, we are talking about the manufacture of parts for decorating wooden houses. It has its own characteristic features. One of them is the desire to avoid small details.
Tool for making decorative and openwork crafts
Sawing with a jigsaw is a type of creative activity that most people are familiar with from childhood, from school. At least it wasn't that long ago. When labor lessons began at school and girls learned sewing and needlework, boys were introduced to such a tool as a jigsaw.
It is not difficult to use, and crafts made with a jigsaw from plywood carry not only artistic value, but also practical application. Manufactured products can act as souvenirs: various boxes and toys, and also have practical applications in everyday life. Decorated elements of the porch of a house, windows, stylish benches with carved legs, beautiful kitchen furniture and many other useful wood products can be made using this wonderful tool.
Ideal hobby tool
A hand jigsaw is a tool for cutting shapes out of plywood or some other material, for example, plastic. Its manual version is budget-friendly - its cost does not exceed several hundred rubles, and its scope is very wide. Figure cutting with a hand jigsaw is a very interesting activity. This is not only a pleasant pastime, but also practical benefits, not only financial, but also moral.
The design of this tool is very simple:
- U-shaped frame. It can be either tubular or lamellar.
- Saw handle.
- Two fastenings for a file. These mounts can rotate, thereby creating different planes, allowing you to perform cutting of varying complexity.
- Jigsaw blade. Sets of such files of 50 pieces are available for sale. The blades are distinguished by the thickness and size of the teeth. Thick blades are used for cutting out contours, and thin blades are used for openwork work with small elements of the workpiece.
Electromechanical jigsaws
The electric hand jigsaw has become an indispensable tool in the household. It can be used to cut various materials: plywood, wood, plastic, metal, ceramics, etc.
This tool operates from a 220 W electrical network and is a plastic case with working elements, equipped with a control handle. Its main component is the saw blade, which is mounted on a rod located in the front of the device.
The rod is driven by an electric motor. The movement of the cutting blade is reciprocating. To speed up the sawing process, some samples of this tool use the pendulum principle, that is, the file moves not only up and down, but also back and forth.
Cutting blades are consumables and need to be replaced from time to time. They are functionally different from each other - there are attachments for wood, metal, and ceramics. There are thicker blades, with more or less rigidity, with larger or finer teeth
An important characteristic of files is their shank. The most common ones nowadays are files with U-shaped and T-shaped shanks.
It is with such files that you need to purchase a jigsaw - then there will be no shortage of consumables.
Electric tools differ in many respects, but in this article we will pay attention to only one important factor - the backlash of the saw. This characteristic affects the pull towards the cutting blade during figure cutting
Many brands of jigsaws cannot cope with the task of perpendicular cutting, this is especially sensitive when cutting thick wood - the error can be up to 5 mm.
Experiments on cutting wood to shape showed that the best jigsaw was a tool from Festool. The popular company Makita did not show its best side in this competition - the error of the perpendicular-shaped cut turned out to be quite large (up to 5 mm), and the jigsaw of this brand entered the tree with large chips.
An electric stationary jigsaw is already professional equipment for cutting. Its design is more complex than the equipment discussed above. The principle of its operation can be compared to a sewing machine, which has a jigsaw blade instead of a needle. The quality of the products obtained using this unit is incomparably better. The error of a perpendicular cut with a large workpiece thickness is zero.
The only disadvantage of this electromechanical device is its high price. But this is compensated by the comfort of working on it and high productivity with the highest quality of the resulting products.
Advantages and disadvantages of the tool
Any technique is imperfect. Of course, using an electric jigsaw is much easier than using a hand saw. Before you decide to purchase such a tool, you need to understand for what purposes you will use it, as well as understand the pros and cons of the device.
- Nowadays it is possible to purchase high-quality devices at a relatively low cost.
- The simplicity of the equipment allows even a beginner to cut the material.
- As a rule, manufacturers focus on universal models with large cutting depths.
- You can purchase various accessories that will make your work easier.
- The thin blade allows you to cut real masterpieces.
- When working with thick canvas, it is difficult to remove sawdust.
- When working, you must follow safety rules, since the saw is not equipped with a safety mechanism.
- Because the saw is fixed at only one end, it cannot be made thin enough.
An electric jigsaw works best with thin materials. If you need to cut a plinth, lath, or parquet board, then this tool is ideal.
What is a jigsaw: general description
A jigsaw is a tool designed for cutting various contours from plywood, including curved ones. It is equipped with a blade with fine teeth that can make an even cut of plywood without the formation of significant burrs.
Hand tool
The ancestor of this type of tool is a manual jigsaw. It consists of a metal arc in the shape of the letter “U”, between the ends of which a sawing blade is stretched and attached to clamps. They securely hold the file during operation and allow you to adjust its tension. On one side of the frame there is a handle.
The clamps on the tool can rotate, creating different planes for sawing, thereby providing the opportunity for wood carving of varying complexity.
When cutting from plywood with a hand jigsaw, you need to be careful: its design is quite fragile, and during intensive work, the blade often breaks from force and heat, so it has to be replaced. To do this, each master must have several dozen spare files.
When working with a jigsaw to carve internal contours, it is convenient to use such an auxiliary board as in the photo: it will help both protect the table and solve the problem of convenient placement of the workpiece.
Jigsaw
The tool operates from an electrical network. It is a housing in which the working mechanisms are located, and there is also a handle for control on it. The sawing organ is located in the lower front part. The blade is often protected by a foot, which allows you to cut the contour exactly along the line without deviation. Advanced and professional jigsaw models have various attachments that facilitate the cutting process and straighten the edges of plywood.
Blades can have different teeth in shape and size. It is necessary to select saw blades that are appropriate for the material being processed so that damage and damage to the plywood sheet does not occur during operation of the mechanism.
Classification of jigsaws by power and application:
- Jigsaws for household use are usually equipped with a low power of 350-500 W. A household jigsaw for beginners is the best option if you want to learn how to cut out patterns, create crafts from wood and shapes from plywood, the thickness of which does not exceed 7 cm. It is safe to work with such a tool if it is equipped with a safety foot.
- The professional jigsaw is equipped with various attachments and functions; it has increased power from 700 W, cutting speed and accuracy. A jigsaw can handle a wooden sheet with a thickness of 130-140 mm, a sheet of steel 10 mm and aluminum 20 mm.
The instructions on how to use a jigsaw, or the technical data sheet, should describe the main parameters of the tool that must be taken into account when using the mechanism.
Choosing tools for wood carving
As in every business, wood carving has its own secrets and nuances, which allow one to reveal the beauty of wood in a wonderful ornament. It is necessary to select special tools for wood carving and stock up on the necessary blanks and sketches for wood carving, which will be embodied in the form of drawings, borders, lace or genre scenes.
Basic tools
Very high demands are placed on the quality of carving tools. Of course, skill plays an important role, but well-selected and sharpened tools will help bring your idea to life. Experienced carvers will tell about its quality at first glance at a tool, but beginners get lost in the store because of the huge selection.
The basic set for wood carving includes:
- several knives and chisels;
- needle files;
- hacksaws for metal;
- vice;
- sandpaper;
- drill with several types of drills;
- bars.
Knives should be made only from high quality steel. It is better to purchase them in specialized stores for creativity. Although at the initial stage, just sharply sharpened knives will do. An excellent start would be knives, Narex, Kogatana, etc.
It is not necessary to choose an expensive foreign-made instrument, because domestic instruments can be of the same good quality, but much cheaper
As your skill grows, you may need a set of tools, a milling machine, a drill, etc.
Chisels for carving
Sometimes, instead of a chisel, a sharpened screwdriver or file is used for wood carving.
A flat chisel is a long rod with a flat cutting edge at the end. Very often it is used for primary wood processing.
A semicircular chisel is one of the most important tools for work. They differ somewhat in the degree of roundness, that is, they are medium, round and sloping.
There is also a V -shaped version of chisels . It can be useful for geometric wood carving, which we will introduce you to below.
Beginners need only a small wood carving set of good quality to immediately get used to the correct movements and pressure.
In this video, the wonderful master A. Yuryev shared with us which tools to choose for carving.
How to protect yourself from injury when carving wood
Any tool of a master carver can be compared to a straight razor, therefore, when working with it, you must strictly follow safety precautions. The material must be positioned so that you can work freely with a knife or chisel, eliminating the possibility of the sharp edge hitting your hands.
The work place should be comfortable and clean. All unnecessary tools at the moment should be carefully folded, because they are very sharp and can cause injury.
Sawing with a jigsaw: tools
The first thing you need to cut out plywood figures with your own hands is a jigsaw.
Such a tool is represented quite extensively on the domestic market and in several main types:
- Manual. A tool familiar to many from labor lessons at school. As the name suggests, all cutting work will need to be done manually. The best choice for creating small things or teaching children the skills of this exciting process;
- Electric. It works much faster than a manual one, but at the same time, it has a significant mass (1-3 kg), and therefore it is quite inconvenient to hold it “in weight”. Yes, and it will not be possible to create a thin pattern, since the blade of the file is too large for such jewelry work;
Drawing for woodworking
Stationary. The only drawback of such a tool is its price - it is much higher than that of an electric or manual device. Nevertheless, the device is very convenient for the carver; it does not need to be held suspended, and although the cutting line will be rougher than that of a manual “colleague,” the speed of work is still many times higher.
The choice of one or another tool for creating various structures from wood raw materials depends only on the amount of work and the personal preferences of the master himself. If, for example, working with a jigsaw on plywood is just a hobby, then a hand tool will be quite enough.
Preparation of raw materials and stencil
For those people who have skillful hands and extensive experience working with tools, cutting out plywood with a jigsaw will not be difficult. First, you will need to take a piece of material on which the design will be applied and sand it to a smooth surface with fine sandpaper.
After such preparation, it will be enough to apply the desired drawing and begin the process itself. Traditional template for wood raw material sheet products
Well, novice craftsmen, in order not to spoil the material and get really interesting and beautiful elements, will first need to download special drawings on the Internet for cutting out of plywood with a jigsaw. Currently, the choice of such decorative pictures is really large; you can download certain options for every taste for free without any problems. (see also the article Cutting out plywood with a jigsaw - drawings for success)
All you need to do after downloading the drawing is to print it, transfer it to a sheet (you first need to prepare it with sandpaper) and start working with the tool along the contour.
Thus, even the person who has started working with a jigsaw for the first time will be able to get a beautiful product with an even contour that will become a real decoration for the home. (see also the article Laser cutting of plywood: technology features)
The process of sawing wood: features
The process of creating decorative parts from wood is even simpler than applying a design to a sheet of material. It is enough to simply insert the file into the pre-made hole (for this you can use a hand brace or an electric drill) and start working along the drawn contour. Photo of a beautiful box made from a sheet of pressed wood
Moreover, if the work is performed with hand tools, then all movements must be smooth, without jerking, otherwise you can simply break the fragile jigsaw file.
If everything is done correctly, then in the end you can get a uniquely beautiful design, transferred exactly to the material, a detail that can advantageously decorate any room or facade of a building.
Additional finishing
To make a product created from a sheet of material using a jigsaw look even more beautiful and original, it can be further trimmed. First, you should sand all surfaces with sandpaper, eliminating all small irregularities and roughness.
Afterwards, you can varnish or stain the entire surface of the plywood product, cover it with paint or other finishing materials.
Prefabricated decorative product made from a single sheet
It should be noted that cutting out plywood with a jigsaw allows you to obtain not only solid, but also prefabricated structures. In the latter case, the final finishing will also be accompanied by joining several elements together using special glue or shingled nails.
The main thing in the process of creating a prefabricated product from several parts, even during the work process, is to pay special attention to the cutting line; it should be positioned so that the notch is somewhat smaller than always. Stationary jigsaw for making products
Stationary jigsaw for making products
Do-it-yourself carved window frames. Stencils and templates. Step by step photos
The content of the article:
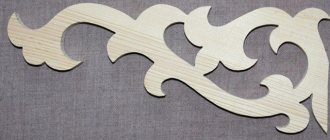
Carved trim on doors and windows decorate the house and make it different from its surroundings. Even if a building is built according to a standard design, it can become unique.
How to make a template from a drawing?
To make beautiful window frames with your own hands, you will need templates. With their help, the design is transferred to the surface of the wood.
The creation of a template begins with the selection of a picture . You can find many options; if you wish, you can copy the pattern from a photograph. There are several ways to enlarge a drawing to the size of a template. If the drawing is in electronic format, then it can be processed in a graphics editor.
If the drawing has already been printed, then you should use one of two methods. The first is photocopying. All copiers can print with changes in scale and proportions. The second method is manually. It can be called traditional. The pattern is simply redrawn with increasing cell size.
The resulting enlarged drawing is transferred to cardboard, and then ready-made window frame templates are cut out of it. A separate template is made for each pattern or element. Then it is placed on a board from which the platband will be cut and traced with a pencil.
We make window frames with our own hands
Project
Design is the basis of any process. If you want to make carved window frames with your own hands, then you should also start with design. A drawing of the facade of the building is made and a drawing of carved elements . This allows you to imagine the appearance of the building. If you have a visualization program, you can make a three-dimensional house project.
Do-it-yourself platbands: drawings.
DIY window trims. Photo
At this stage, materials and tools are prepared. The best material is pine boards with a minimum number of knots.
You can make window frames with your own hands using:
- jigsaw with soft start;
- feather drill with a diameter of 12mm;
- screwdriver;
- grinding machine.
Sawing
Do-it-yourself carved window frames. Step by Step Photos
After the stencils of the window casings have been traced, you should begin the cutting process. First, the internal openwork elements are cut out. To do this, holes are drilled along the contour of the image. The drill should be perpendicular to the board.
Next, the pattern is cut out with a jigsaw . They start cutting from the hole and follow the drawn contour.
After cutting out the internal contour, move on to the external one.
The jigsaw is led from one end of the future casing to the other. The cuts are made in advance to make the process easier.
The result is a finished part. For the other side of the window, you need to make a mirror image of it.
Grinding
In order for the surface to acquire an aesthetic appearance, it is treated with a grinder. An 80-grit sanding wheel is used. After this, the part can be painted.
Primer and painting
Wood is sensitive to rot and damage by insects, so before painting it is carefully treated with an antiseptic . The fewer gaps, the longer the platbands will last.
After applying the composition, the parts are dried. Dry surfaces are painted. The best option is water-based paint for wood. The color is selected during design. In this case, white and cherry are used.
Paint with two brushes. The wide one is used to paint the outer surface, and the narrow one is intended for the side parts and hard-to-reach places.
The elements are painted carefully, in two layers. The second layer is applied when the previous one has dried.
The final layer is varnish. For this purpose, it is better to take an acrylic composition that is water-based.
The varnish is applied in one layer, trying to avoid drips. Dry the parts outdoors.
Assembly
All parts are assembled into a common composition before installation on the window. This sequence is more convenient.
Do-it-yourself carved window frames. Step by Step Photos
Fastening is carried out according to the sketch using self-tapping screws. They are screwed in from the wrong side so as not to spoil the appearance of the platbands.
Installation
Direct installation of platbands on the window is carried out using scaffolding. It is safer and more convenient than stairs. Fasten the module in place using self-tapping screws.
Variants of stencils for platbands
When choosing patterns for platbands, you should pay attention to a number of points. Among them is compatibility with the overall appearance of the house. If you are making wooden window frames with your own hands for the first time, then it is better to choose a simpler option.
DIY trim templates
Previously, each region had its own traditions in window design. They can be used now if you want to remind about cultural heritage.
The role of platbands
Window trim elements are often called platbands, but their correct name is casing. Cashing has many functions. Let's consider the main ones:
- decorative - the appearance of the windows and the entire facade looks complete; with the help of the platband you can visually change the proportions of the house;
- the right ornament helps express personal preferences or traditions;
- with the help of platbands, all buildings on the site are combined into a single architectural ensemble;
- thanks to the platbands, moisture and debris do not get into the cracks between the wall and the frames;
- Heat loss is reduced since the gaps around the windows are additionally closed.
When making platbands, it should be taken into account that wood deteriorates over time. Antiseptic compounds will help prolong his life.
What can be made from plywood: interesting ideas and drawings
Sawing wood with a jigsaw or hand tools is a creative process. You can create many decorative products of different directions:
- Funny figures from cartoons and fairy-tale characters for children as toys or room decorations;
- Sawn parts for making furniture: shelves, panels for wall decoration, tables, trim for wooden windows, cabinet doors;
- Three-dimensional and flat toys;
- Figurines for interior decoration and clothing.
Drawings of plywood crafts do not have to be made in exact dimensions. Even taking an example from the Internet and changing its proportions, you will get a unique product that no one else has in this form.
DIY plywood crafts can be painted or left in a natural color; you can glue buttons, beads, ribbons and other decor onto them to liven up the product. To do this, it is worth involving children in the work; their imagination is a bottomless well of interesting ideas.
We offer you diagrams with photos for cutting out of plywood with a jigsaw.
You can come up with your own idea of what you can cut using a hand or electric tool, make your own sketch and transfer it to paper, then to a piece of wood or plywood.
Carving plywood with a jigsaw requires certain knowledge and skills
If you don't have them, consider the following rules:
It is necessary to cut strictly along the line, without pressing the tool with force; Use templates and saw according to the sketch; Plywood should be sawed across the grain whenever possible.
This way you will get a straight line and a clear contour; Corners must be done carefully: on blunt corners of coal, a straight cut is made, after which the plywood is turned (not a tool!) and the corner comes out smooth. For sharp ones, otherwise - using the method of forming a loop, we first make a cut for one edge, then from the outside we make a slotted path for the file in the form of a loop so that the blade can be brought onto the second edge.
Types, features, examples
Wood carving is a decorative method of processing wood for the purpose of its artistic design: in the form of shapes, patterns, reliefs. Quite painstaking work, which was previously performed exclusively manually, is now being automated with the help of electrically driven copy-milling devices.
The use of automated cutting greatly simplifies work, and is justified in carpentry and furniture workshops - where items are produced in large quantities for the purpose of sale. But still, the value of wood carving lies precisely in its uniqueness, exclusivity, of each copy - that is, directly in manual production.
Artistic processing will favorably emphasize the style and sophistication of the interior, creating a special atmosphere of comfort and respectability. People who have the means to purchase designer products tend to move away from conveyor belt purchases: pieces of furniture, dishes, decor - in such houses they always attract the eye and capture the imagination.
Carved patterns with whimsical shapes add a touch of elegance to any interior.
Features of the sawing process
Doing the job requires good lighting. It is advisable to prepare the tools in one convenient place under the right hand, without cluttering the space with unnecessary details.
Sawing should begin with the internal elements of the design applied from the stencil. To perform slotting work on plywood, holes are first made in some places on the contour.
When cutting with a regular hand jigsaw, hold a piece of plywood with your hands. When working with an electrical apparatus, the workpiece is fixed on a workbench or table using a vice. If you have experience working with an electric jigsaw, cutting is easy and quick; As a result, the lines are smooth, neat, requiring minimal subsequent sanding.
Successful carving is only possible if the nail file is properly and firmly secured, which is subject to mandatory inspection. Carelessness leads to distortion of the drawing, which will turn out to be completely different from the stencil. Inattention can provoke traumatic situations.
The presence of stencils, a good jigsaw and the desire to start cutting - all this together can bring pleasure to the work process and the result both to the master himself and to loved ones or customers.
Templates and drawings
It can be more difficult to find a jigsaw and high-quality files than to figure out what exactly you want to do - the variety of options makes your eyes wide open. You can cut out anything: from butterflies to complex floral patterns. When making wooden furniture, scalable diagrams are useful.
Once you have found a sketch you like, all that remains is to print out the template for cutting it out of plywood with a jigsaw. The next task will be to transfer the drawing to the work surface . This can be done in several ways:
- Cut out a stencil from paper and trace it. This option is good when you need to make many identical parts. In this case, it is better to make the pattern from cardboard.
- Transfer the drawing using carbon paper.
- Use glue. The diagram is printed in a mirror image. Apply PVA glue to the drawing and let it dry. Plywood is also coated with glue, but before that it must be sanded well. Place the design face down on the selected location and smooth it out thoroughly. After complete drying, the drawing is moistened with water and the paper is removed. The method is suitable for images printed on both inkjet and laser printers.
- Iron the image. The principle is the same as with glue: the mirror pattern is applied face down to the plywood, secured and thoroughly heated with an iron.
Openwork cutting with a hand jigsaw looks great, drawings and patterns for which can also be found on the Internet or come up with yourself.
How to carve plywood
Working with the device will not be difficult if you properly prepare for the creative process.
- The work area must have good lighting;
- The working plane must be protected from damage. You can, for example, lay a sheet of plywood or cover it with film;
- All necessary tools and spare blades should be prepared in advance. And we can begin.
The first step should begin with drawing the inner outline of the drawing or drawing. To do this, you need to make slots into which the blades of the device will be inserted. Usually, when cutting large contours, there is no problem, but in small remnants, working with a jigsaw from the inside can cause chips, burrs or cuts. You must act very carefully.
Working with a jigsaw
- Secure the working material on the table so that the blade does not catch on the surface of the plywood.
- Turn on the device and start cutting.
The jigsaw is not very difficult to control: move the tool forward along the lines. If the equipment is equipped with additional options for tracking the result of work, use them. Working with a jigsaw - After finishing cutting, sand the ends with sandpaper or files.
- Carry out further finishing work on the cut product: varnishing, painting, etc.
How to saw with a hand jigsaw
- Secure the piece of plywood with one hand and hold the cutting jig by the handle with the other.
- Start moving along the drawn contours, moving the jigsaw up/down. This should be done around the perimeter of the drawing.
Working with a manual jigsaw
As you can see, there is nothing super complicated in this work. And you will acquire a real creative hobby by learning how to operate these devices.
How to cut plywood with a jigsaw
Sawing plywood with an electric or manual jigsaw is undoubtedly a creative process. And you will be able to create decorative items of various styles with your own hands: from fairy-tale cartoon characters for children to decorations for furniture and home.
Preparing the workplace and creating a workpiece before cutting
For comfortable and easy work, it is necessary to prepare the workplace in advance. Take care of lighting and ventilation. If carving is done at home, you can put newspaper on the floor to make it easier to collect the shavings after work. Transfer the stencil onto wood using any suitable method. Carefully sand the block with sandpaper and select the required tension on the jigsaw. This is very important, since the speed of work depends on it, in addition, if the tension is incorrect, it can lead to breakage of the file.
The cutting technique with a jigsaw is a slotted thread, or openwork. It is characterized by the fact that the pattern has no background, it is cut right through. To achieve this effect, the first step in sawing threads is to drill holes in the places where the excess needs to be cut. After this, a jigsaw file is inserted into the holes and parts of the desired shape are cut out along the drawn contour. For beginners, templates with a small number of parts and the absence of notches and sharp corners are better suited.
Simple wood cutting templates for beginners.
Simple flat crafts
Simple flat plywood figures can be easily made using a jigsaw. They are manufactured in the following order:
- A rectangular blank of the required size is formed from a plywood sheet using a hacksaw.
- A stencil (template) of the figure is prepared according to the size of the workpiece. It is made of cardboard or thick paper (Whatman paper). You can draw the figure yourself if you have artistic abilities, transfer it from a picture using carbon paper, or print it on a printer from the Internet. Then it is cut along the contour.
- The stencil is placed on a piece of plywood and outlined with a pencil or marker (felt-tip pen). All internal parts are transferred onto plywood using carbon paper.
- A figure is cut out using a jigsaw according to the markings.
- The edge is processed with files and all sawing errors are corrected. The surface is sanded with sandpaper.
- The figurine is given the desired appearance. You can apply all the necessary elements using a burning device. Another option is to paint with acrylic paint using a brush along the markings made from a stencil.
- Final finishing - Most often, varnishing.
Using this method you can make the following crafts:
- Figures of animals, birds, fish. Figure 1 shows a stencil for making a swan figurine. It can be enlarged to the desired size and printed on a printer.
- Figures of funny people, cartoon and fairy tale characters.
- Composition crafts. Figure 2 shows a dolphin on a sea wave.
A cute “Dog” craft can be made using a burning device. For it, you can cut a blank along the contour of the head or burn a design directly onto a plywood blank. You can offer a huge number of different ideas. Fantasy is not limited by anything.
Sawing out of plywood with a jigsaw: drawings and rules for working with the tool
A jigsaw is one of the most common hand-held power tools. They can process a wide variety of materials: wood, plastic, ceramics, metal, etc. However, the main material with which most jigsaw masters work is plywood.
Using a narrow file, this tool allows you to not only make straight cuts, but also create intricate patterns. And in this article we will look at some tips from experts working with jigsaws.
An example of drawings for cutting with a jigsaw.
Safety precautions
Basic safety precautions are required for all types of physical work.
- The workplace must be properly prepared. It should not be cluttered with unnecessary objects or tools.
- The work table or workbench must be well secured and set to the individually required height.
- The workplace should be well lit.
- When working, you should use personal protective equipment, such as gloves, safety glasses, etc.
- When using a power tool, make sure it is in good working order. For beginners, study the technical documentation of the tool they use.
Safety regulations
For any equipment, there are operating rules, as well as safety standards, which must be observed. When working with a jigsaw, it is important to ensure that:
- The handle of the device was comfortable and you were wearing safety glasses.
- The stop was as durable as possible, as was the working surface.
- The saw mount was of high quality.
- The work was carried out in the correct lighting.
- The cutting process began with familiarization with the instructions.
Remember not to lean too close to the device!