What is artistic carving?
This is one of the types of wood carving. Its main difference is not superficial, but through curved cuts that make up ornaments, figures, product details, etc. The photo shows a simple example of such work:
Obviously, this kind of work can only be done effectively with a jigsaw. Of course, you will need auxiliary tools.
If desired, the slots can be made without a jigsaw. For example, punch with chisels, straight and rounded, use cutters for semicircles and circles. But such work options are slower and of poorer quality than using a jigsaw. Therefore, this method of wood processing is called “sawing with a jigsaw”, because this tool is the main one.
The cutting process itself
Before you start carving wood with a jigsaw, you should check whether there is enough light falling on the work area. The light source should be located in front. The lamp should be placed at a slight angle to the plane on which the work will be done. For a sawing master, there are two options for working posture: sitting or standing. Having positioned yourself so that it is convenient to work, you should monitor the position of the plywood. It should be located at a distance of approximately 30-40 centimeters from the eyes.
If you are using a manual jigsaw, you must first fix the file correctly: it should be positioned vertically so that the teeth “look” down, and be taut. To apply tension, you need to rest the jigsaw on the table and press it with your hand. After this, you should twist the “ears” so that the tension is sufficient. If you need to tighten them more, use pliers. After calibration is complete, carefully release the jigsaw: once it straightens, it will ensure the correct tension.
Jigsaw and cutting out a “cloud” for a children’s room Source toolsreview.uk
Rules for cutting out plywood with a jigsaw:
- before starting work, it is better to go over the workpiece with glass paper, after which you can transfer the drawings onto plywood;
- During the entire cutting process, the master’s hand should be positioned vertically, making forward and downward movements;
- it is best to choose plywood of the first or second grade, since it does not have knots, cracks and other irregularities (birch plywood with a thickness of three to ten millimeters is considered ideal for cutting);
- to make a hole for the purpose of subsequent cutting, use a drill or awl;
- Do not exert lateral pressure on the workpiece;
- movement when cutting should be without jerking, with the maximum possible amplitude;
- if you need to make curly cuts inside the pattern being cut, you should drill a hole, remove one of the sides of the jigsaw file, insert it into this hole, fasten it again on the jigsaw and continue sawing;
- the second (free) hand of the master is needed in order to carefully advance the part and scroll it;
- to prevent the file from overheating, you need to take short breaks in work;
Where to start studying
It’s best to start learning this craft by becoming familiar with the full range of different products that are made in this way. These include small items that are closer to jewelry, and large-sized details of small architectural form - verandas, gazebos, etc.
The average between them is furniture and interior items. What is chosen is what is closer, in demand, more accessible to the possibilities of the workshop space, what there is a market for, what there is a desire to do with your own hands for the soul or as a business start-up.
After selecting the item to be made, it is studied how it is made and what is required for it.
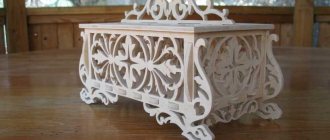
Work examples. The products in the photo below are simple artistic ones.
To begin with, you need simple motives. Then you can move on to more complex ones.
An example of another direction: carved moldings for exterior or interior interiors, flat balusters for stairs, fences:
What tool is needed
All tasks are performed by different tools. There are 3 main groups of tools that work on the principle of a jigsaw.
Manual
This is the simplest option, files of different sizes that are held within a frame. In principle, a jigsaw can be called both a metal file in a frame and a small bow saw for wood. But classically this is the name of a jewelry jigsaw, a short thin file in a high frame.
Manual electric
A jigsaw has a number of advantages and disadvantages compared to a simple hand tool. It cuts quickly and easily. The craftsman's only effort is to accurately guide his saw.
The downside is that this tool is quite clunky. The file is fixed at only one end in the rod. Therefore, it tends to move away from the markings. Visual control of the progress of the saw is somewhat difficult.
Therefore, the finest and most precise work is performed with hand tools, while coarser work is performed with electric tools.
If you need an electric jigsaw, then before purchasing we strongly recommend that you familiarize yourself with 9 tips that will help you choose a jigsaw.
Tabletop electric
This is a version of a mobile (manual) jigsaw. The only difference is that it is stationary. If a hand tool moves along the workpiece, then in a stationary tool the workpiece is dragged under a file. For this reason, it is more difficult to work with large parts.
At the same time, among the desktop options there are highly efficient and productive tools. Especially those that work on the principle of a band saw. Instead of a saw, they have a closed saw blade running in a circle on two guide wheels. In its pure form, such a tool is not called a jigsaw, but rather a tabletop band saw. But it is quite possible to perform jigsaw tasks on it.
There are also stationary jigsaws of varying power and classic design, where the file makes reciprocating movements. Moreover, on some models it is fixed not at one end in the driving rod, but also at the other end in the passive (driven) rod, which makes cuts more accurate.
The best 5 jigsaws for cutting out plywood - our rating of lightweight models
For precision work, you first need a jigsaw that is light and has a high-quality, even cut. There is no need for a pendulum or power above 450 W. In our rating today, we will look at the 5 most convenient, luxurious, high-quality jigsaws for fine work, such as cutting out plywood and other fine work on wood and metal. It’s impossible to count how many jigsaws we have sold, but Makitov’s are ahead of the rest, followed by Boshev’s.
The most interesting thing is this: low-power professional jigsaws cost the same as sophisticated household Chinese models. That is, for 5,000 rubles we can buy a low-power Makita jigsaw or a super-sophisticated, powerful and heavy Chinese one for “cutting wood.” There is no talk of any accuracy here. Therefore, in this selection there are only models that are super lightweight and easy to use with one hand. Go…
Makita 4326
A classic of the genre for precision work, I have three friends who cut all sorts of “openwork” out of plywood, and I sold this jigsaw to all three of them. The reviews are rave. Please note - there is no speed control, no pendulum action and the power is only 450 W, which is why it is so cheap. Of the professional low-power models, it is the best in terms of price and quality. Ideal for sawing plywood, chipboard and boards no thicker than 20 mm. Weighs only 1.9 kg.
If you need a more universal one, then look at model 4329 - the power is the same, but there is speed control and a pendulum. But the price tag is one and a half times more expensive. Therefore, 4326 is the sole leader among jigsaws for precision work. The engine has a smooth running, low noise, high cutting precision and you can work without a break for up to 2 hours (personally tested) - it works like a clock. It's a Makita after all! Thing!
Bosch GST 65 B
The second leader in sales and in the popularity rating of “sawing machines” is this model from Bosch, the blue one is professional. This one is even more “delicate” - the power is 400 W, there is no pendulum and speed control; for its purpose it does not need these options. Super-light - weighs only 1.7 kg! What does he need for precision work? That's right - blowing sawdust and the ability to connect a vacuum cleaner, since they often use it indoors. In addition to plywood, fiberboard and chipboard, they can also work on thin wood; the stated cutting depth for wood is 65 mm. But from personal experience, sawing such boards and bars without a pendulum means “setting down” and “working out” the tool. This jigsaw is for precision work, and sometimes you can use it to cut through a couple of boards if you use a hacksaw to break it in)) A most gorgeous thing, I highly recommend it!
In theory, it was already possible to stop, since these 2 models are the most luxurious. But since the price tag here is about 4-5k rubles, then we will next consider cheaper options from household brands. True, I’ll say right away that they will lose in the softness of the engine and the accuracy of the cut. The differences are, of course, minimal, but they are there.
Bosch PST 700 E
If you need a high-quality household tool, then there is nothing better than a green Bosch - fact! There is only one model with a power of 500 W, without a pendulum, but there is already a stroke adjustment by pressing a button. This model is already more universal; people use it not only to saw plywood, but also to cut thicker boards and even metal. A sort of home station wagon with little power. Such models are called “compact”.
It can blow away sawdust (the switch is on the side), you can connect a vacuum cleaner, it has an anti-vibration system - it’s just super, it’s quite suitable for our needs. And the price tag is about 3,200 rubles, which is almost 2k rubles cheaper than the blue Bosch and Makita. So - as a very good option, the quality here is at its best. By the way, the jigsaw is sold in a convenient suitcase, which is also an awesome plus!
Skil 4181 LA
The lightest in its class - weighing only 1.4 kg! Power 380 W - sufficient for sawing plywood and sheet materials made of wood. Sometimes it is possible to saw thin boards, because the stated cutting depth for wood is 55 mm. If you are just starting your hobby and don’t want to spend a lot of money on a professional tool, then I highly recommend paying attention to the Skill brand.
Their jigsaws were sold a lot; they work for a long time and reliably, of course, if they are used correctly. For example, if you cut 40-50 mm boards with this model, then it will not last long, since the power here is only 380 W and there is no pendulum. This jigsaw is purely for cutting, fortunately it has everything you need - blowing away sawdust, connecting a vacuum cleaner. And the price is only 1800 rubles!
Black & Decker KS500
Well, let’s complete our rating with another high-quality model from a popular household brand. We also sold a lot of Black Dekkers, all of them jigsaws with low power, but precise cutting and pleasant engine operation. This model has a power of 400 W, there is no pendulum and there is no speed control either. So it’s only for sawing thin wood, or, alternatively, for sawing all sorts of carved things out of plywood. Sold in a convenient case (plus) and the price is quite affordable - about 2400 rubles. For indoor work, you can connect a vacuum cleaner, there is a sawdust blowing function. So having glasses is a must!
An excellent jigsaw for home and garden use; the cutting depth is stated to be 60 mm. But since there is no pendulum, cutting such a thick tree is often not recommended. His element is carving and thin boards. Lightweight and comfortable to use jigsaw. Well, Dekker gives a 2-year guarantee, which is also nice. We have sold enough Black Dekkers to be convinced of the good quality of their instruments. So yes, we recommend it.
Another note: Cheap hammer drill Foreman - is it worth buying?
What plywood to use
Plywood is a popular material for such carvings. Externally, it imitates wood. At the same time, it is less prone to drying out, cracking and warping. This is achieved by the fact that the individual layers, when gluing, are laid alternately along and across the fibers. In this case, the fibers of one layer work in transverse tension, the others in longitudinal tension, which keeps the material from cracking.
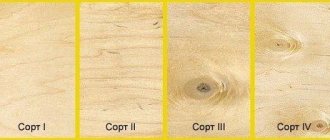
Plywood is selected according to grade and thickness . On sale you can find sheets of five grades, from first to highest (elite) grade. Photos of samples:
The choice of quality depends on the type of product to be made. When selling, plywood sheets are not cut. From a sheet of plywood of 2-4 grades measuring, for example, 1.5x1.5 m, you can cut the highest quality pieces. At the same time, you need to ensure that low-grade plywood does not peel.
It doesn’t always make sense to buy sanded sheets, since after manufacturing the products are most often sanded with “zero” emery.
The second selection parameter is sheet thickness . On sale you can find sheets with thicknesses from 3 mm to 30 mm. Special plywood up to 50 mm thick is also sold.
Plywood with a thickness of 5 mm or more is more difficult to saw, but gives greater strength to the product. The thickness is selected based on the optimal ratio of “sufficient strength X possibility, ease of cutting X price.
The cost of a sheet increases almost in direct proportion to its thickness.
Selection of material and tools
Since we cut plywood with our own hands, it would be logical to use it as the main material. There are many varieties of these lumber available for sale. For making small crafts, small pieces of plywood with a thickness of 3 to 5 mm are quite suitable.
Lumber should be chosen that is not laminated, that is, there should be a clean wooden surface on one side and the other.
From the tool you can use:
- a manual jigsaw, the advantage of which is high cutting accuracy;
- a jigsaw, the advantage of which is high cutting speed without the need for special effort.
Let's take a closer look at the listed tool categories.
Varieties of hand jigsaw
A hand jigsaw is a tool for cutting wood.
The design of the tool consists of 3 main elements:
- frame made in the shape of the letter “U”, with two clamps;
- a handle installed near one of the clamps located on the frame;
- cutting blade - is a narrow metal strip with teeth.
The principle of use is quite simple - first the canvas is clamped in a frame. Then, holding the jigsaw by the handle, we make a series of progressive movements up and down. As a result, the plywood is sawn.
Important: Due to the small size of the teeth, the cut in wood is neat and even. But, due to the small thickness of the canvas, you have to work carefully, as it often breaks.
A jigsaw is a device that is driven by an electric drive.
The device comes in two types:
- manual modifications of power tools;
- stationary modifications.
Artistic cutting with a hand jigsaw
The manual modification of the tool is a massive handle in which the engine and mechanism are located that transmits the force to the cutting part. In the manual version of the jigsaw, the blade is attached not to a frame on both sides, but to a clamp on one side.
The photo shows the use of a stationary jigsaw
The stationary modification is a tabletop on which a jigsaw is rigidly fixed. Unlike the manual modification, where the blade is attached on one side, here the fastening is carried out on both sides.
In addition to the listed categories of tools, working with plywood may require sandpaper with varying degrees of abrasiveness. Sandpaper will certainly come in handy for smoothing out the cut line and eliminating minor imperfections made during cutting.
Important: In order to assemble parts cut from plywood together, when making certain crafts, you may need wood glue.
Requirements for the workplace
The workpiece to be processed must be well lit
Before you start cutting out certain patterns on plywood, you need to properly arrange the place where you will work.
What are the requirements for the workplace?
- The table that will be used as a workbench must be spacious, at least 1 by 1 meter;
- The table must be stable, that is, under the influence of mechanical loads it should not sway;
- There should be protrusions along the edge of the table on which you can mount a vice or install a clamp;
- The workplace should be well lit, for example, with a rotating LED lamp;
- The workplace should be easy to clean, that is, there should be no carpets nearby in which sawdust could get stuck;
- The room in which you plan to work with plywood must be well ventilated.
Important: For storing finished counterfeits and for storing tools, it is advisable to equip a rack. The instructions for making a rack are described in detail in the relevant articles on our portal.
Choosing a cutting pattern
Scheme of cutting parts for the “Dinosaur” figurine
What should be the drawings for artistic cutting from plywood? If you have no experience working with lumber, then it is better to start cutting with a jigsaw from simple diagrams.
Drawing of a vase for candies
For example, you can draw simple geometric shapes by hand and try to cut them out.
Drawing of parts for making a fruit vase
After successfully completing this task, you can begin more serious exercises. For example, sawing a monkey out of plywood or cutting out other complex ornaments will certainly give you pleasure and help you gain the missing experience.
Diagram of parts for assembling a fan
In this article we bring to your attention a number of drawings, on the basis of which you can make such useful things as vases, plywood boxes, etc. But you need to start working on such schemes only when you have already acquired considerable cutting experience.
Manual jigsaw cutting technology
Working with a workpiece clamped with a clamp
The instructions for using a manual jigsaw are as follows:
- select one of the drawings proposed in the article and print it on paper;
- We place a sheet of copy paper on the plywood, and put a sheet with a drawing on top;
- carefully outline the drawing so that the drawing transfers to the plywood;
- remove the drawing and carbon copy;
Drilling holes for the file
- We fix a drill with a diameter of 2 mm in a drill and drill holes at those points of the ornament where it is impossible to start sawing from the edge of the plywood;
- We fasten the workpiece to the table with clamps so that most of the plywood sheet extends beyond the table;
- We thread the blade into the pre-drilled hole with the teeth in the direction in which we will cut and fix it in the jigsaw frame;
- we take hold of the handle and saw without making much effort and without tilting the frame so as not to break the blade;
- when we reach the corner of the ornament, we try to unfold the frame without damaging the canvas;
- if the gap at the turn is small, take out the blade and drill a hole, then turn the blade in the desired direction, fix it in the frame and continue cutting;
- upon completion of cutting, take a small piece of sandpaper No. 100 and align the ends along the cut line;
- the finished product is cleaned of dust and can be coated with wood varnish.
Important: The sheet heats up during the cutting process and the thicker the sheet being cut, the stronger the heating. Therefore, from time to time it is necessary to arrange short breaks, during which the canvas cools down. If you work continuously from the beginning of the pattern to the end, the metal file may break.
Features of cutting with a jigsaw
As already mentioned, various patterns can be cut into a sheet of plywood using an easy-to-use hand jigsaw. But, if your hobby develops into something more than brightening up your leisure time, you can use a power-driven device instead of a hand tool.
In this case, sawing productivity will increase sharply. In addition, you will have to cut much less with your hands and in the end the work will be more enjoyable.
In general, the instructions for working with a power tool are not much different from cutting out ornaments with a hand jigsaw. The key to success is the correct choice of file size.
For working with plywood, undrawn, narrow blades are suitable. If you use a cut blade, the teeth will break the edges of the plywood and it will not be possible to achieve precision and accuracy of the cut.
Which file to choose
For manual jewelry jigsaws, standard universal files for metal and other materials are used. Selection principle: the more complex the profile, the narrower the canvas. A wide blade “maneuvers” in the slot less easily.
The blade cuts metal accurately and does not tear the material, but it can cut too slowly. When speed is needed, files with larger teeth are selected.
In addition, craftsmen recommend purchasing Russian-made canvases. In extreme cases, not the cheapest “good quality China” under the brand of a respected corporation from the EU or the USA.
For manual electric jigsaws, Bosch T101AO files are recommended; they are made with straight teeth made of HCS steel. It is noteworthy that the manufacturer recommends other blades with oblique teeth for figured carving, but they tear the edges of the cut more strongly.
Read more about the types of jigsaw files and their choice in our detailed guide here.
Tapes and files for stationary machines are selected depending on the design, manufacturer’s recommendations and tasks. Sometimes you need to cut not just one, but a whole stack of blanks according to one template. The most suitable option for such tasks is selected during real work through trials.
What else do you need for creativity?
First, you need a sketch of the future product. When choosing profiles, designs and ornaments, you can use both traditional sources, books and magazines, and Internet tools. There are a huge number of photographs of finished products, as well as drawings and patterns on the Internet. You can use three types of prototypes and sketches:
- completely finished sketches, patterns or drawings;
- ready-made sources, modified at your discretion;
- completely unique own sketches.
In addition to the jigsaw, you will need many auxiliary tools and tools. It is impossible to give an exact list; it all depends on the technology and size of the future product. But you can make a mandatory list of what you need, here it is:
- drill or screwdriver with drills or cutters. If the slot is closed and does not start from the edge of the workpiece, holes are drilled to insert the file;
- marking tool: compass, ruler, square, tape measure, pencil, awl for pricking the center of holes, etc.;
- a set of round and flat needle files and files or emery devices for finishing the internal planes of the workpiece.
For the combined technology, jigsaw plus surface carving or lathe processing, separate tools are required.
Tool for making decorative and openwork crafts
Sawing with a jigsaw is a type of creative activity that most people are familiar with from childhood, from school. At least it wasn't that long ago. When labor lessons began at school and girls learned sewing and needlework, boys were introduced to a tool such as a jigsaw .
It is not difficult to use, and crafts made with a jigsaw from plywood carry not only artistic value, but also practical application. Manufactured products can act as souvenirs: various boxes and toys, and also have practical applications in everyday life. Decorated elements of the porch of a house, windows, stylish benches with carved legs, beautiful kitchen furniture and many other useful wood products can be made using this wonderful tool.
Ideal hobby tool
A hand jigsaw is a tool for cutting shapes out of plywood or some other material, for example, plastic. Its manual version is budget-friendly - its cost does not exceed several hundred rubles, and its scope is very wide. Figure cutting with a hand jigsaw is a very interesting activity. This is not only a pleasant pastime, but also practical benefits, not only financial, but also moral.
The design of this tool is very simple:
- U-shaped frame. It can be either tubular or lamellar.
- Saw handle.
- Two fastenings for a file. These mounts can rotate, thereby creating different planes, allowing you to perform cutting of varying complexity.
- Jigsaw blade. Sets of such files of 50 pieces are available for sale. The blades are distinguished by the thickness and size of the teeth. Thick blades are used for cutting out contours, and thin blades are used for openwork work with small elements of the workpiece.
Electromechanical jigsaws
The electric hand jigsaw has become an indispensable tool in the household. It can be used to cut various materials: plywood, wood, plastic, metal, ceramics, etc.
This tool operates from a 220 W electrical network and is a plastic case with working elements, equipped with a control handle. Its main component is the saw blade , which is mounted on a rod located in the front of the device.
The rod is driven by an electric motor. The movement of the cutting blade is reciprocating. To speed up the sawing process, some samples of this tool use the pendulum principle, that is, the file moves not only up and down, but also back and forth.
Cutting blades are consumables and need to be replaced from time to time. They are functionally different from each other - there are attachments for wood, metal, and ceramics. There are thicker blades, with more or less rigidity, with larger or finer teeth. An important characteristic of files is their shank. The most common saws today are those with U-shaped and T-shaped shanks. It is with such files that you need to purchase a jigsaw - then there will be no shortage of consumables.
Electric tools differ in many respects, but in this article we will pay attention to only one important factor - the backlash of the saw . This characteristic affects the movement of the cutting blade towards the side during figure cutting. Many brands of jigsaws cannot cope with the task of perpendicular cutting, this is especially sensitive when cutting thick wood - the error can be up to 5 mm.
Experiments on cutting wood to shape showed that the best jigsaw was a tool from Festool . The popular company Makita did not show its best side in this competition - the error of the perpendicular-shaped cut turned out to be quite large (up to 5 mm), and the jigsaw of this brand entered the tree with large chips.
An electric stationary jigsaw is already professional equipment for cutting. Its design is more complex than the equipment discussed above. The principle of its operation can be compared to a sewing machine, which has a jigsaw blade instead of a needle. The quality of the products obtained using this unit is incomparably better. The error of a perpendicular cut with a large workpiece thickness is zero.
The only disadvantage of this electromechanical device is its high price. But this is compensated by the comfort of working on it and high productivity with the highest quality of the resulting products.
Preparing the tool for work
When preparing a manual jigsaw, the most important thing is to insert the file correctly and ensure the tension of the blade using the threaded fastener. A weakened file will dangle, bend, will not be able to provide an even cut and may break. If it is overtightened, it may burst immediately.
The tension is determined by trial sawing. At first it’s better not to hold out. If the blade bends during sawing, it is tightened a quarter turn of the screw fastening. You may need to do this several times until the file starts cutting consistently. With some experience, the master immediately accurately adjusts the tension.
Files with an oblique tooth are inserted so that the tip is directed forward, as the sawing progresses. Straight-toothed files are inserted on either side, except when the sawing direction is indicated by an arrow on the blade.
There may be jigsaw frames without screw tension adjustment. In such designs, the frame itself is spring-loaded. Before installing the file, the frame is compressed with a special eccentric clamp, which should be included in the kit, or using a handy vice, clamps, or clamps. Then the file is inserted and the clamp is removed. The spring-loaded frame opens and provides optimal tension force.
Complex power tools are prepared in accordance with the Operating Instructions, or by generally known methods.
Carving techniques for beginners
Organization of the workplace is important. The master must work while sitting in a comfortable position, without bending or reaching with his hands to the place of work. For small parts, a sawing table is used.
They are on sale. But to gain first experience, it is better to cut it out with your own hands from a piece of thick plywood or board according to the following drawings:
The table is attached to a large work table with a clamp or self-tapping screws.
In some cases, it is more convenient to clamp the workpiece vertically with a clamp, then you will have to cut not from top to bottom, but horizontally, which is more convenient.
Making a jigsaw
Note. It is not at all necessary to repeat and exactly copy the design that we will tell you about, since here we simply want to convey the principle.
What is needed for this
Thin files
First we need to prepare the materials from which we will assemble the structure, and for this we will need:
- To make a homemade jigsaw for cutting out plywood, first of all, of course, you need nail files, and they should be immediately purchased in large quantities, since they often break. Previously, such thin wire-type blades could be bought in packages of 50 pieces - if you can find such packaging now, then this is very good, but you can definitely buy them individually in stores that sell power tools;
- In addition, you will need thick plywood, at least 20 mm thick, for the desktop, and here you should pay attention to its strength. The most durable brands are FSF, FSF-TV, FC, FB, BS (aviation) and BV. You can secure such a table to a workbench or other table with self-tapping screws or clamps;
- You will also need a motor with a pulley to drive the saw. If you have an old electric jigsaw, you can use the motor from it.
Note. Below we want to show you two options for making such electric saw tools.
Option one
Factory jigsaw in detail
In the top image you see a factory tool with a description of its main components. Look at it carefully and read about the purpose of this or that unit - these will be instructions that you can follow when making a homemade device.
Of course, you can buy a factory tool in a store - its price will differ depending on the manufacturer and the power of the machine, but such a purchase is only necessary if you intend to do sawing all the time, and not from time to time.
Schematic diagram of operation
And here is a schematic diagram according to which you can assemble a structure of any power. The most important thing is that you have the details for this.
Ready assembled structure
In the top photo you see a jigsaw assembled with your own hands from plywood; more precisely, a work table is made from plywood. A special feature of this assembly is the drive for moving up and down a usually manual jigsaw. This is an electric motor, to the shaft of which you attach a roller for a pulley (it is easiest to find) and attach a movable drawbar to the edge of this roller.
To fix the drawbar to the roller, you can use the most ordinary bolt with a bearing mounted on it. Here you just need to find a rod for the drawbar with an eye along the outer diameter of the bearing. Please note that this design is not intended for long-term use - only minor work can be done on it.
Option two
Note. The second version of this design can be assembled from a factory unit from one manufacturer or another and a tabletop made of thick wooden plywood or metal.
Electric jigsaw from MELABO
As we have already said, it is very difficult to make sharp bends with a wide blade when cutting out any patterns - when turning, the blade is clamped, and besides, when you work with such a tool in your hands, the stop panel partially covers the saw.
And so, when the drawings for cutting out plywood with a jigsaw are transferred to the wooden surface being processed, these two factors together do not allow the contour to be clearly processed - the cut is not as smooth as we would like.
Homemade sawing machine
But there is a way out in this situation - if you already have a manual electric jigsaw at home and you need to cut out any openwork wood products, then you can convert this tool into a machine by attaching it to the tabletop. To understand the principle of its operation, look at the photo above. There, the work table is even equipped with a stop bar with screw clamps, and at the same time it is attached to another, more massive table or workbench.
You will need to make a hole in the work table for the blade - to do this you can simply drill it with a drill 8 mm in diameter. But do not forget that the stop panel on the jigsaw can be rotated in one direction or the other with an inclination of up to 45⁰ and even more (depending on the manufacturer). Therefore, the hole for the file must be flared from the top side to allow tilting.
The jigsaw itself can be attached to the work table with self-tapping screws by screwing them through the tool’s stop panel. But it is best to do this with bolts - four holes are drilled in the work table with countersunk holes for the bolt head and the same holes are made on the thrust panel of the tool - it is put on the bolts from below and pressed to the table top with nuts - it can be removed at any time.
In addition, you can cut longitudinal holes in the table, as you saw in the photo above, in order to insert a stop bar with homemade screw clamps into them.
Set of BOCH nail files
Now let's get back to the process of cutting out patterns with sharp curves, which are very difficult to do clearly with a wide blade. Here, for such work, it is best for you to use metal files that come in similar sets - they are narrower, although shorter, but their length will be sufficient for plywood.
In addition, with this method of finishing, the canvas will always be in front of your eyes and it will be much easier for you to stick to the line, guiding not the tool but the part itself along it, so most likely there will be no problems with torn edges here.
Common problems
When working with different materials and tools, various problems arise, but there are also some common to all types of work.
Why does the file stick and how to fix it
If the saw gets stuck immediately at the beginning of work, this means:
- the fabric is loosely stretched;
- the file is not suitable for this material;
- The material is too thick for this tool.
When it starts to get stuck after a smooth and even cut, this means:
- the canvas has weakened and needs to be tightened;
- the teeth have crumbled or become dull, all or part of them;
- gets stuck on a turn - the blade is too wide for a sharp turn in a semicircle of small diameter;
- The structure of the workpiece has changed, a branch has been caught.
Why do chips appear, how to cut without them
For artistic cutting with a jigsaw without chipping, suitable files are used. Most often, the material is torn by blades with large teeth or with an incorrect angle. Also, the appearance of chips can be affected by jerky sawing or a defect in the workpiece, peeling of wood or a layer of plywood.
Why use plywood to create carvings?
This wood material is chosen for the following reasons:
- moisture resistant;
- temperature changes do not have a negative impact;
- quite low cost;
- ease of learning to cut with a jigsaw;
- low weight of products.
It is also necessary to choose plywood of the 1st and 2nd grades for crafts. The rest are not suitable for creativity: the surfaces have cracks with knots and chips (unless they can be used for internal substrates). Birch plywood (3-10 mm thick) is most suitable for cutting.
At the present time, this material is divided into a fairly large number of subspecies - each for specific purposes.
- Experts and folk craftsmen advise using sheets produced using a urea-formaldehyde composition. Such material is marked “FC”. This type of plywood can be bought “clean” or coated, for example, with varnish. It is most convenient to transfer the drawing to untreated plywood sheets for cutting with a jigsaw.
- Plywood marked “FOF” is intended for furniture production, and is often produced over 12 millimeters in thickness.
- The FB brand was originally developed as a boat material, which is why its cost is high (but if it is possible to use it, then it is suitable for cutting with a jigsaw).
- But masters do not recommend purchasing FSF. Although attractive in appearance, it is toxic because it is made using a composition of phenolic resins.
Produced grades of working material
Wood instead of plywood
With all the advantages of plywood, this material has its drawbacks. This is an industrial material, and not completely natural, like pure wood. Additionally, plywood is made primarily from birch, which does not have the beautiful texture, grain patterns, and colors that some other woods have. Therefore, even highly artistic products made from plywood do not have the same attractiveness and charm as purely wooden ones.
Before mass production of plywood began, all carving was done on wood. Many antique products are still intact, so wood is also well suited for artistic cutting with a jigsaw.
In this case, you must be prepared for the fact that the workpiece will crack or warp during work or immediately after it. To avoid this, you should use only well-prepared wood:
- completely and evenly dried throughout the entire massif;
- maintained in a period sufficient for all internal stresses to manifest themselves in the form of cracks and warping.
Manufacturing technology of decorative and openwork products
To work you will need the following:
- Plywood or wooden blank.
- A template, drawing or drawing of a future product.
- Manual or electric jigsaw.
- Files and needle files of various configurations.
- Wooden square and ruler.
- Skin of various grain sizes.
Cutting drawings
To begin work, you need to determine what should happen at the end of the work. To do this, you will need a drawing or template of the future product. You can come up with it and draw it yourself, or use ready-made solutions. There are many collections containing drawings and diagrams of crafts. The Internet is also replete with a variety of interesting ideas. And for almost everyone there will be an interesting diagram or drawing.
Typically, diagrams of small crafts are printed on A4 paper. To create drawings of decorative and stylish furniture or other large household items, whatman paper in sizes A0 and A1 is used, however, other paper and cardboard media, for example, pieces of unnecessary wallpaper glued together, can also be used for this purpose.
After the drawing is selected, it must be transferred to the material from which the craft will be made. There are several ways to do this:
- Transferring a design using a stencil. To do this, the drawing is cut out of paper - a stencil is prepared. Then this stencil is applied to the plywood and carefully traced (it is better to trace with a simple pencil, so that if something happens, the drawing can be corrected).
- Drawing a drawing on a workpiece using carbon paper. This paper is applied to the workpiece with the glossy side, the drawing is placed on the copy and traced with a sharp object (pencil or knitting needle). It is better to use dark paper so that the drawing on the workpiece is better visible.
- Drawing by thermal method. To do this, you need an inkjet printer; the selected pattern is printed with a large amount of printer ink. Next, this drawing is applied with the front side to the plywood and processed with an iron. A few seconds of ironing is enough for the design to be completely imprinted on the surface of the workpiece.
- The easiest way is to directly glue the drawing onto a wooden piece. The glue can be used as stationery glue or PVA glue. However, with prolonged sawing from plywood with a hand jigsaw, the drawings may stick strongly, which will increase labor costs during further processing and sanding of the product.
Technology
After applying the drawing to the workpiece from which the future craft will be made, they begin to cut it out. Sawing begins with the internal elements of the workpiece and only then the outer contour is cut out. This procedure is more convenient - holding the workpiece is much easier.
Holes for the jigsaw blade are drilled in sharp places on the internal contour, which also makes work easier. You need to drill holes carefully, as chips may form on the back side.
To avoid this, you need to follow a simple rule - do not drill holes completely. For example, if the thickness of the plywood is 3 mm, then the depth of the hole to be drilled should also be set to 3 mm. This is easy to do if you limit the depth of penetration of the drill into the plywood using electrical tape - wrap it around the drill, leaving only the 3 mm long tip without electrical tape. After drilling, turn the workpiece over and use an awl to make holes.
After the workpiece is cut, it needs to be processed and sanded . If the outer contour is not difficult to process, then grinding the internal elements is sometimes difficult, especially in sharp corners. It is difficult to sand such places with a file or needle file. Therefore, ingenuity can come to the rescue. You need to cut a thin strip of sandpaper and insert it instead of a jigsaw and then it will be much easier to process hard-to-reach places.
The principles of sawing with a manual or electromechanical jigsaw are similar, but there are also differences.
Working with a hand jigsaw
When working with this tool, you need an additional device - a sawing machine . It must be equipped with a clamp for attaching to a workbench or table. This device serves as the base on which the workpiece is sawed. This addition can either be purchased at the store, or you can make it yourself from a piece of thick plywood.
When working, the workpiece should be secured at chest level - this will make work more comfortable and maintain posture.
When working with a hand jigsaw, you need accuracy and patience . The files of this tool are quite fragile, so you need to avoid sudden movements and distortions of the blade, and also not allow the file to overheat during operation; to do this, you need to pause work every 10 seconds and let the cutting blade cool.
When sawing, the jigsaw file should remain in one place, that is, it should not be moved forward or backward, the movement of a hand jigsaw is vertical, reciprocating. They only move the workpiece, turning it smoothly, without stopping the forward movements of the manual jigsaw.
Sawing with an electromechanical tool
The operating principle is very similar to a hand tool. The difference is that a manual jigsaw does not require additional equipment (a machine with a clamp). And also when sawing, the shaped movement is produced not by the workpiece, but directly by the tool itself. The wooden workpiece is firmly pressed or attached to the workbench, and all curly movements are made directly with a jigsaw.
A jigsaw has an advantage over a hand saw - it is the thickness that it can cut in shapes. A wooden blank 50 mm thick is inaccessible for processing with conventional, non-electric tools. So, if you need to decorate elements of a porch or furniture, then you can’t do without a jigsaw.
You need to be very careful when choosing a power tool, since not all tools allow you to perform high-quality figure sawing of great depth.
Examples of crafts or what you can do with your own hands
Here, endless opportunities open up for amateurs who can then become professionals. The technology allows both to give the external shape to the product and to create ornaments on different surfaces, from boxes to openwork stair railings or carved platbands.
Let's look at simple examples of work. The photo below is a purely artistic product that has no practical value.
An arts and crafts product, a hanger for the hallway, kitchen or bath.
Artistic carving for children
A complete description of artistic cutting with a jigsaw for children and beginning adults, including a practical task, can be found in the textbook “Technology” for the 5th grade.
A simple and clear illustration from the course:
However, the compulsory school curriculum inevitably carries a connotation of coercion. If a child does not enjoy the activity, he may lose interest in it for life. Conversely, even at an earlier age it can captivate the child.
The lesson trains hand motor skills, artistic imagination, and the habit of creation. Something made with your own hands gives you self-confidence and raises the bar for assessing your capabilities. Therefore, you can try to show your child a simple product and offer to make something similar yourself.
We must not forget about safety precautions. A child is less aware of the likelihood and possible source of injury than an adult. Safety comments for the illustrations above.
Left: the pose is chosen correctly, the eyes are far from the file. If the canvas bursts, it will not cause harm.
Right: The thumb is too close to the file. It is safer to clamp the workpiece with a clamp and keep your hand away.
In addition to the school course, starting knowledge can be supplemented by video, lesson 1 and further:
In our age of continuous conveyor production, any unique piece of product arouses interest. Of course, you won’t be able to earn much from one copy; from a business point of view, you should again set up continuous production. However, artistic sawing with a jigsaw can be promising for those who are interested in it, simply as a useful hobby, making gifts for loved ones, or making a first prototype.