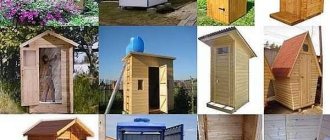
You can read a lot about Canadian and Finnish house-building technologies, but still not understand all the nuances. To consolidate your theoretical knowledge, watch how to build a frame house with your own hands in videos made by builders and frame house owners. Such videos cannot be faked, so all the actions, tips and reviews in them are real. In this collection you will find video tutorials that will help you learn the principle of frame construction from foundation to roof.
Foundation – technology and video instructions
For a frame house, there is no need to spend money and time on a strong foundation, since it is two to three times lighter than a block, brick or monolithic concrete foundation. The choice depends on the type of soil on the site, landscape features, the presence of a basement, and frame construction technology.
How to choose a foundation – video from a professional
Possible foundation options:
- columnar - for light buildings on a flat area;
- pile (pile-screw) – does not require leveling of the area;
- strip - built around the perimeter of the house;
- monolithic slab - a solid base made of reinforced concrete.
The final decision can only be made after the project has been approved . Useful tips in this video will help you choose the foundation for your home.
Video on the construction of a strip foundation
Most often, shallow strip foundations are chosen for frame houses. In this video you will get acquainted with the technology of its installation.
Pile foundation - pros and cons
Companies that build frame houses usually include a pile foundation in the price . Its significant advantage is the speed and ease of installation. But is it worth rushing and abandoning the usual concrete? Carefully study the advantages and disadvantages of this modern method before signing a contract.
Design
And finally, design. He plays an important role
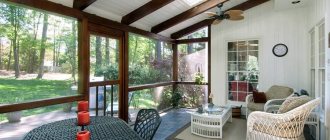
It is very important that your idea coincides with the practical component. But, most likely, you have already thought about the appearance of the house in advance.
For this reason, you already have an idea of the house, and all that remains is to finalize this picture. At the design stage, you can use the services of professional architects. If you do not have the skills to work with drawings, then it is advisable to entrust this matter to a real professional. He will help you draw the future home as accurately as possible and make a project taking into account all your wishes.
At the same time, not only the exterior will be worked out, but also the filling of the house from the inside. This includes the number of rooms, the number of floors, and the location. Think in advance about where you want to place the kitchen stove, TV, and lamps, since the installation of the electrical network and the distribution of sockets will depend on this. If you decide at the very beginning to stick to a certain style, you should keep the whole house in it. The color scheme plays an equally important role. With the help of light pastel shades, it is possible to visually increase the area of the house, as well as give it an elegant look. Taking into account all the recommendations, you will be able to build a house from scratch with your own hands, and it will meet your expectations!
Bottom harness
Construction of a house begins with the bottom frame - a structure made of boards or timber, fixed to the foundation. The purpose of the strapping is to fix the frame to the foundation and become the support of the house. How to properly make a frame from boards on a columnar foundation is described step by step in the video. This option is suitable for a small country house.
For more serious buildings, it is better to make the frame from timber. The following video discusses the installation technology for piles.
Useful: How to quickly and inexpensively build a frame house with your own hands
Material selection
Raw materials for construction are selected depending on the style of the future building.
Unsuitable materials may catch fire or explode. You also need to calculate your efforts so as not to waste a lot of time searching for rare minerals. The Minecraft universe provides many blocks, including:
- boards;
- logs are simple and hewn;
- terracotta;
- ceramics;
- different types of stone.
You can use any materials, taking into account 3 important factors - availability, strength, aesthetics.
To create beautiful houses, it is better to use stone, brick, terracotta. These materials are very durable, but they must be created by smelting or bartered from residents. You can get some cool materials in Nether or Endermere - blackstone, purple block, quartz, but working with them requires a lot of experience.
Where to get material for construction
There are 5 methods for extracting building materials:
- Dig. At the initial stage you have to dig directly with your hand. In this way the player receives wood and clay.
- Chop. This method is used to extract birch, oak, and spruce wood.
- Craft. Through crafting, house details are created - stairs, floors, wooden slabs.
- Melt. Having created a furnace, you can make bricks, terracotta, and ceramics.
- Obtain from living beings. Some building styles use wool obtained from shorn or killed sheep.
- Buy from residents. Masons sell ceramics, terracotta, and various types of quartz. Shepherds offer wool, librarians offer glass. You can buy sand, coral, regular and dense ice from traveling merchants.
Any minerals that are mined in mines are suitable for building houses.
We create tools
A new player finds himself in the Minecraft Universe with absolutely no tools. But he can make equipment simply by using his hands. The first thing you need to do is chop a tree with your hand and craft 4 boards. It's easy to make a workbench out of them. All tools of labor are created on it.
The entry level allows you to make only wooden and stone tools. Having created a stone pickaxe, the player begins to mine iron. Using an iron pickaxe you can dig up various ores and diamonds.
They will be useful for creating the most important construction tools, including:
- pick;
- axe;
- shovel.
It is best to use iron, diamond, netherite tools. It is advisable to enchant them - then the weapons will acquire durability 3, efficiency 5, as well as useful functions “repair” and “silk touch”.
Frame house construction technologies in video tutorials and reviews
A frame house is a general concept that includes several similar, but significantly different technologies. Explore everything to compare and choose the best one for you.
Features of frame-panel construction
The fastest technology for constructing a residential building is based on the production of individual elements in a factory and subsequent assembly of the building on the site. A team of professionals can complete this type of work within a few days. You can also assemble a designer house with your own hands, strictly following the manufacturer’s instructions.
In this video about the construction of frame houses from SIP panels, you will see all the assembly steps in just a few minutes.
Land owners are wary of SIP panels, considering such houses to be short-lived. The reason for doubt is the construction was too fast and the price was low. However, practice shows that with the right approach, such buildings serve no less than any wooden ones, and living in them is comfortable and safe. Watch a video review of a man who lived in a SIP house for almost two years.
Assembling a frame house in a video tutorial
Frame houses are assembled directly on the construction site. First, the frame is erected, then the sheathing, insulation and finishing of the walls and facade are done. The step-by-step instructions in the video reveal all the secrets of assembling such a frame in a few minutes.
Below is shown in detail the assembly of walls with crossbars using Finnish technology .
And then there is the Scandinavian method of building a house frame.
The structure of frame walls is described in more detail in the following video lesson; this video also touches on floor insulation .
The next stage of insulating a frame house is the ceiling. Here, as a rule, the same thermal insulation materials are used as for walls. Be sure to do a vapor barrier, wind protection and waterproofing - for this there are easy-to-install membranes. It is more practical to choose materials that solve several problems simultaneously.
See instructions for ceiling insulation , taken directly at the construction site.
What is half-timbered timber: review in video
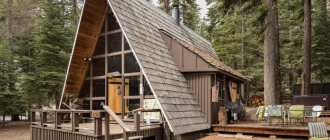
Half-timbered houses look expensive, but building a premium cottage is cheaper than buying an apartment of the same area. A distinctive feature of the technology is the visibility of the frame. A rigid frame can not only be filled with slabs or sandwich panels, but also glazed. Classic designs retain floor projections designed to protect walls from precipitation.
Useful: Frame gazebo - build with your own hands
Find out how half-timbered frame houses are constructed from the video, study the pros and cons of the technology.
Frame rigidity - expert advice in video
The strength of a frame house depends on the rigidity of the frame . An experienced specialist shares his secrets and best practices in a video tutorial.
Roof of the house - installation and installation of the roof
The roof of the house is made immediately after the frame is assembled. You can choose any shape, but for DIY construction it is better to choose a single-pitch or gable roof. In a house with an attic, a sloping roof is practical. When entrusting the work to builders, it makes sense to look for more original projects.
The basis of the roof is the rafter system and attic cover. These elements must be correctly calculated and installed correctly.
It is recommended to choose lightweight materials for roofing. One of the suitable options is corrugated sheeting - it is easy to install, attractive in price and durable. A roofing materials manufacturer explains in this video how to make a roof simply and inexpensively.
A soft roof also has many advantages. There are different requirements and a different technology for installing and preparing the roof.
Types of ventilation systems
It is widely known that wood can “breathe”, and therefore enough air will flow into the living rooms for a comfortable stay in the house. But this is not enough for narrowly focused rooms, kitchens, bathrooms, and basements. Therefore, additional ventilation of the house is required.
Natural air exchange is provided; air ducts are mounted on the roof, which direct the air flow in the right direction. To force the circulation of air draft, you can install special equipment, and install noise-insulating elements using simplified valves for the air supply and exhaust. Thus, the problem of excessive noise levels will be solved.
Mixed ventilation is controlled by a device for powerful air outflow, which is controlled by a fan.
Attention: a ventilation system is needed in both residential and non-residential premises, this applies to basement and attic structures.
The supply pipe is mounted closer to the floor, and the hood is mounted under the ceiling. The entrance openings are equipped with a mesh to prevent dust, dirt, rodents, etc. from entering the house. To keep the house warm in winter, these openings need to be closed. It is important to minimize the risk of air condensation accumulation, which directly affects the life of the wood.
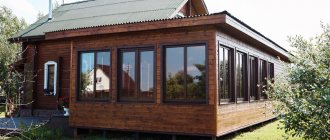
What to choose for facade finishing
To protect and decorate the facade of a frame house, you can choose almost any materials that do not weigh down the structure and do not place significant loads on the walls. You need to decide on the finish before building the foundation in order to take into account the potential load.
Recommended materials:
- vinyl or metal siding - cheap and quick finishing;
- fiber cement boards are an alternative to capricious wood;
- facade concrete tiles with imitation stone, brick, wood;
- block house - imitation logs;
- decorative plaster;
- brick-like clinker panels - imitate brickwork.
Watch how professionals install a block house on a frame house.
Building a wooden house with your own hands
A house is a fortress for every family man, and a wooden one is also an environmentally friendly, “breathing” home in which all family members will be cozy and comfortable. For many centuries, people have chosen wood as a building material for their settlements, and all because such structures are durable, thermally conductive, cozy and attractive. The house will be warm and cozy in winter, cool and refreshing in summer, so that the comfort of the owners of a wooden estate is guaranteed at any time of the year.
Features of building a wooden house
Assessing your capabilities
The wonderful world of Minecraft provides unlimited possibilities for construction. The player can build a house of any complexity - from a simple box to a luxurious castle. But complex architecture can only be done by high-level professionals.
A beginner's house should consist of one large room, without any decoration
It is important to install as many torches as possible - the light drives away monsters that actively spawn at night. The central part of the home is the bed, which serves as a spawn point.
Mandatory elements of a practical home that ensure survival are a workbench, a stove, and chests.
Entry-level players in Minecraft only have access to wood and stone. Advanced users use diamond tools and enchanted netherite armor. Using these capabilities, you can build the most complex structures.
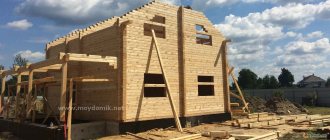
How to build a house from timber: photo report
They built such a house.
Almost ready
We ordered a wall kit for the project, and a strip foundation was poured under it.
Ready foundation with vents
They brought blanks with sawed-off bowls. They were carefully unloaded, while inspecting them for any defects. One beam turned out to be problematic - it was in the middle of the bundle and suffocated - it became covered with fungus. It was postponed for a separate “treatment”. The rest were covered with impregnation (Valti Pohusta) and stacked.
It is more convenient to work with a wide brush
To avoid problems with fungus, a spacer is laid under each - boards lying across.
The timber is placed in ventilated stacks so that it dries as it goes.
Rolls of insulation and dowels were also purchased. The Nagels were sent to bathe in the impregnation. They poured impregnation into the old bathtub and left them for half a day, then took them out and dried them.
Insulation in coils and dowels
The first crown - a half-beam - was laid on top of the waterproofing laid on the foundation. It has no grooves at the bottom.
Laying and leveling the first crown
It was pulled to the foundation with anchors to studs poured into concrete.
Cut shallow holes for the nuts
The first crown was laid. The one that was previously fixed on the foundation is often called “zero”.
At zero, the first crown is laid
Let's measure the diagonals. In order for the cups to stack without problems and to avoid distortion, they must be equal. The permissible distortion is a couple of millimeters.
We measure the diagonals and move them if necessary
Having aligned the diagonals, we drill holes for the dowels. To prevent holes larger/smaller than the required length, a wood stop was placed on the drill.
Drill length limiter))
We put insulation under the beam, but according to the Finns’ recommendations, its edges “do not reach” the edge of the beam. This way it will not draw moisture from the street.
The insulation is narrower than the timber itself
The walls are gradually growing. We fasten them in a checkerboard pattern with dowels.
We fold the walls
In general, the timber is more or less normal, but there are problems with incorrectly sawed cups. When we lay the timber, we get a huge gap. The only way to combat this is to manually adjust the cups so that everything lies evenly.
There should be no gaps. One beam should lie on the second without a gap
It takes a long time to eliminate these inconsistencies, but gradually all the walls are laid out.
Walls made of profiled timber were removed
Let's start assembling the rafter system. First, as is customary, the two outer trusses are installed, then everything else, according to the project.
Assembling the rafter system
The finished sheathing was sheathed with roofing felt. So let's leave the house to dry.
Almost ready
Inside we lay out the subfloor boards, nailing every fifth one. They will dry along with the house.
The subfloor is simply laid
Where should I start?
- Determine what your budget is. Despite the fact that private construction of a house is much cheaper than hiring workers, the expenses will still be considerable. The budget should be calculated based on how much building materials and land will cost, and also allocate a separate budget item for unforeseen expenses.
- Selection of construction site. It should be taken into account that the land must be owned. You should also make a cadastral plan linked to the area. To begin, choose a site so that there is a source of gas, water and electricity nearby.
- Communication connection issue. To do this, you will need to obtain written permission from various authorities.
- Determine the type of foundation. In addition, at the project development stage, you should immediately think about how many floors you will have in the house, where the entrance will be, what shape of the roof, manufacturing materials, etc.
- Studying all issues related to construction. It’s worth starting such a serious business with at least minimal knowledge about construction. If there are none, we recommend that you seek help and competent advice from a good specialist.
Primer of walls.
Depending on whether you are going to decorate the walls with wood, beautiful stone, wallpaper, or paint the walls, it is worth spending time priming the drywall. It's a good idea to do this now. Without any worries, you can be messier with your work without the fear of priming your finished floor.
We prime the walls before laying laminate or parquet
Another advantage of priming now is that you will be able to see defects in the drywall through the dried primer. At the current stage, it is also necessary to paint everything that is planned to be painted: the ceiling, walls, any decor, and so on. If your trim doesn't require painting, you can skip this step.