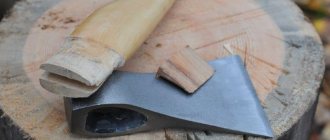
The blade of a carpentry tool is designed for processing wood. It experiences greater loads for a long time than the blade of a regular knife.
Therefore, it is given an original shape that requires sharpening using special methods. A high-quality cutting edge accessible to the beginner is created by a simple sharpening trolley.
The article, based on personal experience, contains practical advice for a home craftsman on how to make a simple device for sharpening a plane knife or other tool with an explanation of the operating technology with diagrams, pictures and a video.
The entire process of creating the cart took literally half an hour and took place in the kitchen. This technology is called: assembly on a knee or stool. It does not require complex equipment and allows you to make a device from the most accessible parts. At the same time, nothing prevents you from assembling such a tool for professional work not from wood, but from metal, using professional equipment.
General sharpening rules
Before you start sharpening a chisel, you need to decide what type of work the tool will be used for.
You need to understand that a chisel that will shave the hair on your arm will not cut oak well. Or he will be good at cutting oak, but at the same time he will not be able to shave the hair on his arm. Ideally, you need to select the sharpening angle experimentally for each individual material.
The smaller the sharpening angle, the sharper the chisel will be, but it will also dull faster.
It is worth considering some general rules for performing this type of work:
- For work, an abrasive with a stone grain size of 300-400 microns is used;
- It is necessary to accurately determine the sharpening angle. This requires correct fixation of the chamfer in the sharpening device. The correct slope is selected in the longitudinal and transverse directions;
- At the end of the work, an abrasive with a stone grain size of 50 or 80 microns is used for manual grinding.
Sharpening semicircular chisels for wood carving is done in the same way as flat ones. The only difference is in the number of steps - with a semicircular blade, all sides and parts of the blade are sharpened separately.
Finishing the characteristics of the cutter
This is a more precise operation performed on machines with diamond wheels. This sharpening method is most often used when it is necessary to remove obvious defects. For example, if a wood lathe cutter has burrs, cracks or nicks. In this case, the working process is carried out under mechanical control. That is, the tool being processed is fixed in a vice and controlled by a hydraulic or electric drive. The operator adjusts the cutter displacement parameters in accordance with the requirements for its correction parameters.
Semicircular chisel
General rules for sharpening a semicircular chisel:
- In addition, further processing is carried out using coarse abrasives;
- The cutting edge must first be dull. This will smooth out the nicks;
- The final stage will be finishing;
- Next, an angle of 20-25° is selected for a semicircular and machined blade profile. Sometimes you have to divide the plane of a metal part into several parts and sharpen each one in turn.
Often the same model is used for chisels and planes. This is the wrong decision, since the instruments themselves (and, accordingly, their components), the principle of their operation and the design are completely different.
In order not to make mistakes when processing the cutting part of the tool, you need to know exactly how sharpening a chisel differs from a flat knife. To more accurately determine the differences, consider the following table:
Comparison of sharpening a chisel and a flat knife
| Chisel processing | Planing knives |
| A fine grit grinding wheel is used first and lapping is done using a coarse abrasive. | Primary processing is carried out with a coarse abrasive, correction of defects is carried out with a fine one, and finishing and finishing polishing is carried out with a leather belt or strip of leather. |
| The procedure can be carried out either manually or using an automated circle. | Sharpening is carried out only on automatic wheels with different abrasive grain sizes. Otherwise, the procedure will take a long time. |
| The sharpening angle usually varies from 25° to 35°. | The angle for a flat knife when sharpening can be 25° – 45°. |
| The inclination of the chamfer is determined based on the thickness of the metal of the chisel. | The inclination of the knife blade when sharpening is selected based on the thickness of the wood with which you will have to work. |
After such comparisons, it immediately becomes clear how sharpening a chisel differs from a flat knife. The difference is quite noticeable and should be taken into account in the process of preparing a particular tool for woodworking.
Types of turning tools
The general segment of turning tools in the main classification involves the division of equipment by purpose - for wood and metal. In this case, the first type is considered. Such models differ from metal cutters in the material of manufacture. Technologists use tool grades of steel, while metal processing is carried out with cutters made of carbon hard alloys.
Also, different types of cutters for a wood lathe differ in design. The working part can be straight, bent, drawn or curved. The choice of one or another type of cutter is determined by the wood processing method, cutting characteristics and equipment. By the way, the parameters for integrating the equipment into the fastening zone also determine differences in the design of the shank. Modern machines focus on versatility, that is, the ability to work with rectangular, round or square holders. Moreover, in this aspect, differences between cutters for metal and wood are most often not made.
Chisel sharpening angle
The sharpening angles of the chisel are selected according to the following principles:
- sharp sharpening angles speed up the processing process, but at the same time increase the risk of chipping and dulling of the blade;
- obtuse angles are used for cutting hardwood;
- The angles of the chamfer and cutting edge are indicated in the corresponding table of GOST 1184-80.
- the larger the angle, the worse the quality and accuracy of the cut;
- sharpening must be done without changing the angles of the blade, since equality of angles or linearity of surfaces will lead to inadequacy of the tool;
Optimal sharpening angles are from 20° to 30°. The angle between the edge and the chamfer should not exceed 50°.
Correct sharpening angle
Assembling a sharpening machine
As previously noted, the sharpener must ensure that the tool is secured at a certain angle. A special device is created for this. In most cases, the required value is 25 degrees. On the Internet there is simply a huge number of drawings for creating a sharpening machine for a wood chisel; when choosing, it is worth considering what type will be processed.
When considering how to make such a device, attention should be paid to the following points:
- The beginning of the assembly involves creating a base of solid wood. In this case, you need to leave a reserve.
- The next step is to create a tongue and groove, which is cut using a suitable cutter.
- Next, a bevel is made at an angle of 25 degrees, after which the part can be fixed with double-sided tape.
- The vertical bevel ensures a product length of 190 mm.
- The next step is to create the cart. The groove disk creates a recess in which the wood chisel or chisel being processed will be attached at the required angle.
- A clamp is also required, for which holes are made for screws in the middle of the created workpiece. The distance from each edge is maintained at 32 mm.
- The handle is glued using a special glue that can withstand the impact.
A device for sharpening a wood chisel ensures reliable fixation, as well as maintaining the required sharpening angle. Due to this, you can count on high efficiency of the tool when used in a wide variety of conditions.
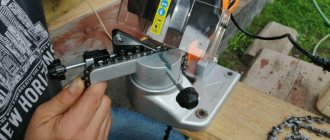
The process of sharpening using a device
Take a dull chisel or chisel. Place the unit on 100-grit sandpaper. Insert the bevel-down chisel into the holder (B) under the fence (C). Align the blade with the edge of the groove in the holder so that the bevel touches the sandpaper. Tighten the wing nuts firmly to secure the bit. The blade is now perpendicular to the work surface, with the tip protruding slightly from the bottom of the base.
The chisel can be attached to both edges of the groove in the fixture. You just need to align it along this edge and make sure that the bevel of the chisel fits tightly with its entire surface to the working surface - a sheet of sandpaper. | Once sharpening begins, you will see a mark on the sandpaper. Periodically move the tool to work on an undamaged area of sandpaper. When you press the device, the sheet of paper cannot move. |
Position the equipment so that the base and the bevel of the blade are touching the sandpaper. Grasp the edge of the paper with one hand and grasp the media (B) with the other. Move the holder and the chisel away from you, pressing the bevel against the paper. Then come back to yourself and release the pressure a little. After performing some of these movements, remove the holder from the base and inspect the blade chamfer. It doesn't matter whether you're sharpening a new or old chisel, the tasks are the same.
It is necessary that the entire bevel is evenly covered with thin lines parallel to the cutting edge. If this requires additional movement, move the base of the device slightly to use an undamaged part of the paper. Remove the chisel from the equipment, press its top (back) plane against the sandpaper and make a few movements from side to side. Again, the same goal - to achieve a consistent latent risk model.
| After a few strokes on 100-grit paper, the traces of factory finishing begin to disappear. Continue working on the same piece of paper until the entire bevel is a uniform matte finish. | Sand the back of the blade (the back) with the same paper before moving to a finer abrasive. This is necessary to maximize the sharpness of the cutting edge and to remove any burrs that have formed. |
Many new chisels have a concave chamfer, and sometimes it takes a little more time and effort to straighten it out. As you gradually reduce the grit of the sandpaper, repeat these steps on both edges of the blade so that they work equally. Examine the surface with a magnifying glass to determine when to change to a finer abrasive.
Of course, you can continue to reduce the grit size to 2000 grit, but in most cases, going up to 400 grit is enough.
The procedure for sharpening a semicircular chisel
Sharpening a chisel with a semicircular cutter is done using a block of wood. In addition, its edge should follow the shape of the cutting edge.
To do this you will need the following:
- a piece of wood;
- a piece of polished leather.
- silicon rod;
- sandpaper (grit size from 400 to 2000 microns);
How is sharpening done?
Sharpening is performed in the following sequence:
- During the work, the chamfer is pressed at the desired angle and movements are made to the sides. The operation is carried out until the onset of acute illness;
- Then take a block, the edge of which is rounded, and on which sandpaper is fixed. During the work process, the abrasive is changed, gradually reducing its grain size;
- Finish the sharpening by polishing and straightening the edge of the leather piece.
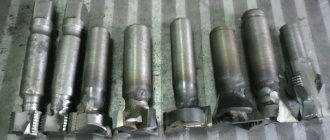
How is the cutter constructed?
The base is a metal rod, which can be divided into two parts: the working head and the shank. The cutting part has the shape of a triangle with rear and front auxiliary surfaces along which chips flow during the cutting process. Processing is performed with the main cutting edge, which craftsmen call the apex. This is the intersection of the secondary and main edges.
As for sharpening, the condition of this particular part matters. The top may be rounded or sharp. The tool also has different formats. Usually the size of the holder is taken into account - on average from 8 to 25 mm. For universal work, it is better to purchase a set of wood cutters for a lathe, which includes more than 10 pieces. The standard set includes cutters with different shapes, which allows you to make grooves, grooves, chamfer and perform shaped processing.
Tools and materials for sharpening
To sharpen a chisel you will need the following tools and materials:
- abrasives in sheet form;
- horizontal and vertical machines;
- polishing cloth or felt.
- sharpener;
- sandpaper on a block;
- special clamps and frames;
In addition, frames with angle adjustment will be useful (it is recommended to use the factory version) and a device with which you can create a distortion on the bevel using special wedges (you can use a homemade device).
In addition, chisels, chisels, knives and planes are sharpened with a sharpener.
The same tools and materials can be used if it is necessary to process the knife in a plane.
Using a wheel and sandpaper
Blades are sharpened using grinding wheels and sandpaper. During the manufacturing process, it is necessary to use different types of wheels of medium and low hardness.
Sandpaper is used in the process of “trying on” the ideal shapes of a metal part. This material is used exclusively by hand.
Sharpening chisels on water stones
The most popular sharpening method is the use of artificial water stones. This method ensures the most gentle and precise guidance of the cutting edge. To bring the stones into working condition, they are pre-soaked for 3-10 minutes. During the sharpening process, the abrasive is actively wetted from a spray bottle or worked directly in a water bath.
The tool is processed sequentially on stones of different grain sizes. The simplest and most effective scheme is the use of three types of abrasives:
- 1200 grit – abrasive for intermediate dressing.
- 800 grit – a coarse stone to start smoothing out the edge after sharpening; If you have not used a grinder and have not seriously sharpened the chisel, you do not need to use this water stone.
- 6000 grit – finishing stone.
If you plan to polish the edges of the chisel to a mirror finish, use an optional 800-grit fourth stone for a fine polish.
With this sharpening method, consistency is very important. After passing through the intermediate abrasive, it will take more time to remove the surface, wear the stone more actively, waste energy and overheat the blade.
Briefly about the types of abrasive
Artificial bars consist of microscopic grains held together by a ceramic bond into bars. Silicon carbide is most often used as an abrasive base. Due to the fragility and sharpness of the microparticles, such a stone provides high sharpening performance. Silicon carbide abrasives do not overheat the blade, harden quickly, do not require long soaking, and produce a pleasant sound when sharpening. Based on their characteristics, they expect stones made from electrocorundum powders or clay, and these are what they recommend buying as your first sharpening kit.
Preparing whetstones for work
Waterstones, like chisels, require maintenance. Before each sharpening, it is good that they restore the geometry of the working surface. To do this, you can use special diamond stones or resort to a simpler method - aiming with sandpaper.
Mark the surface of the stone with a pencil and place in a bath of clean water for 3-10 minutes. When the stone stops releasing small air bubbles, it is ready.
Take a sheet of 240 grit waterproof sandpaper, wet it and place it on the wet glass. The water will prevent the sandpaper from moving as you work.
Move the whetstone back and forth, making circular motions from time to time. When the pencil lines disappear, it means the tabletop is completely flat. After leveling, smooth the edges of the block so that they do not peel off during further use. The stone is ready.
Let's move on to sharpening
Your task is to obtain a perfect bevel of the plane and the back of the blade, then at their intersection a perfectly smooth cutting edge is formed. Don't go for speed at first, but focus on consistency of movement and even pressure. Make sure you use a rubber mat. This detail turns out to be very important. The backing prevents slipping and play on uneven surfaces, so you can fully concentrate on the sharpening process and better feel every hit on the stone.
Aligning the back of the blade
Traditionally, sharpening a chisel begins at the back of the blade. The starting stone is 800 grit abrasive.
With one hand the blade is pressed against the stone, and with the other it is held strictly perpendicular to the long side of the plank. With a light and even pressure, the tool moves along the entire length of the working surface. Once the stone has been treated with 800 grit, all major hazards should disappear from the back of the blade and the surface should have a uniform opacity as shown in the photo. Before moving on to another abrasive material, the chisels are ground on the same stone.
Chamfer sharpening
Here everything is more complicated, since it is necessary to level an order of magnitude less than one area and hold the tool at a strictly specified angle. The chamfer is greatly simplified by a special sharpening carriage made in the form of a carriage. This device allows you to secure the chisel at strictly specified angles and has a number of additional options, which we will discuss below.
You can also align the chamfer manually. In this case, it is important to ensure that your fingertips firmly press the entire bevel plane to the surface of the stone. While maintaining uniform pressure, perform reciprocating movements along the entire length of the stone. It is best to start training with wide chisels. It's easier with them. The large bevel area makes them easier to hold at the desired angle, and you can better feel how tightly the blade fits the surface of the stone.
After every four or five passes through the abrasive, the chamfer is carefully checked for uneven grinding and errors are corrected in a timely manner. The important thing here is to focus on maintaining a constant angle, pressure and coordination of movements constant and smooth. And remember, speed has no effect on the quality of sharpening.
Once the bevel and back of the blade are finished on an 800 grit stone, the next abrasive can be worked on by rinsing the chisel blade and wiping it gently with a clean cloth. This is necessary so that the new stone does not become clogged with the remaining grains of the previous abrasive.
During sharpening, a smaller burr is formed on the cutting edge of the chisel, which can be felt with a light touch of your finger. Once sharpening is complete, it should disappear.
Sharpening semicircular and angular chisels is carried out according to the same principle, but for this purpose stones of a special shape are used, which have a concave and convex profile of the working surface.
Waterstones are very effective, but at the same time they are a very extravagant abrasive. They require discipline in care and use, otherwise they quickly deteriorate.
How to sharpen a plane knife
The first attempt at straightening the cutting edge showed good performance of the created device for sharpening carpentry tools, but immediately pointed out its shortcomings, which were made in a hurry.
What complicates the work of the sharpening trolley
About the body height
To create a high-quality cutting edge, you need to set the sharpening angle correctly. It is formed by extending the blade of a plane, used as the hypotenuse of a right triangle.
This factor must be taken into account when creating the cart height. To form the sharpest corners, I needed to extend the knife out of the sharpening device as much as possible, and this is not very convenient.
Therefore, when setting up, I reduced the height of the device to a minimum by cutting off part of the body. It only took a few minutes, and the capabilities and ease of use of the tool expanded.
About the width of the distance between the wheels
A mistake was made here too. A wide cart requires a large whetstone or large area sandpaper. It's not economical.
I reduced the distance between the ball bearings as much as possible, and they began to fit on a homemade whetstone I made from ceramic tiles. With its help, it is convenient to fine-tune the cutting edge after straightening it on coarse-grained sandpaper.
How to sharpen with different devices?
The work of sharpening a chisel can be done both at home using improvised means, and in specialized workshops. If you don't want to use someone else's services, you can do all the work yourself.
To sharpen a chisel, it is important to have three components.
- Grind the resulting result with materials and bring it to the desired level.
- Abrasive materials used for the first treatment of the blade.
- A stand that allows you to fix the chisel at the desired angle. There is an option that allows you to work with abrasive wheels of an electric grinding machine, as well as a manual one, for which you need to have sanding bars and sheets.
In the process of chamfer sharpening, there is the possibility of variability, the choice between manual and mechanical methods, and exclusively manual processing is suitable for finishing the cutting edge. It is important to select the correct particle size.
For sharpening it should be 300-400 microns, and for final processing of the edge of the cutting surface - 50 or 80 microns.
If you have to work with semicircular tools, the technology for working with them is no different from flat ones, it only increases the number of stages by which each section of the chisel is processed.
To sharpen woodworking tools you will need the following equipment:
- abrasive materials on the sheet;
- horizontal and vertical machine;
- materials for polishing the final result.
- sharpener;
- sandpaper with abrasives of different granulometry applied to the timber;
- fasteners and frames for installing tools;
To properly sharpen chisels, it is important to know how to use all possible tools for this task.
On water stones
One of the most popular options for bevelling a chisel is the wet stone method. To complete the work, it is necessary to soak the stones for 5-10 minutes, and during processing, continuously water the abrasive materials from a spray bottle. An alternative may be to perform the procedure directly in the aquatic environment.
To ensure proper processing and the formation of a uniform bevel and a sharp cutting edge, it is necessary to use stones with different grain sizes.
The algorithm consists of several steps.
- For intermediate processing of the blade surface, a stone with a grain size of 1200 is used.
- Use 800 grit stone. This is a coarse abrasive that allows for initial smoothing of the bevel surface. For instruments that are in good condition and have no major damage, this step can be skipped.
- Introduction to 6000 grit stone is necessary to improve the surface and produce the sharpest, most consistent cutting edge.
For those who want to make the tool absolutely smooth and polished to a mirror shine, you can use an 8000 grit stone, which is necessary for performing fine polishing work.
In this version of sharpening a chisel, it is very important to use wet stones in the correct sequence, otherwise achieving the desired result will be much more difficult and will take much longer.
On the grindstone
Depending on the degree of opacity of the chisel, the appropriate material must be used. For complex cases where maximum impact on the chamfer is required, a machine can be used. Such a sharpener is necessary if it is necessary to change the sharpening angle of a chisel or eliminate chipping and deformation of the tool.
Knife sharpeners are less popular than other sharpening tools because they risk overheating the blade, making it brittle.
In case of mistakes on the grinder, it will be necessary to redo the work by cutting off the scorched edge of the cutting surface, which changes the overall length of the product.
They are trying to solve the problem by using aluminum oxide discs, which have a looser structure and do not press the metal of the bit too much. If you check the speed of the machine and moisten the abrasive in a timely manner, the risk of damaging the tool will be minimal. Given a choice, professionals try to use other methods of sharpening a chisel.
Using a trolley
If there is no opportunity or desire to use ready-made sharpening machines, you can make them yourself. Hand sanders may vary in size and appearance, but the principle of operation will be the same for all.
The structure of such devices will look like this:
- an inclined platform with a clamp allows you to set the desired angle of positioning of the tool for a specific task.
- trolley - thanks to it you can move the chisel along the abrasive material;
The manual sharpening device has two grooved surfaces into which the chisel is inserted. Thanks to the clamps, you can immobilize the tool. The inclined surface allows you to set the desired angle of inclination of the product.
To form the carriage stand, a workpiece is used, on which a bevel is formed at an angle of 25 °, the cut length is 1.9 cm. The workpiece must be secured with double-sided tape. From below, retreating 3.2 cm from each edge, you need to drill holes.
Thanks to the grooved disk, you can form a groove for installing and fixing the chisel. It is also necessary to make a clamp, at the ends of which holes for screws are drilled on both sides at a distance of 3.2 cm. The next step is to glue the handle to the clamp. Once all the elements are ready, you can assemble the entire structure.
Using the carriage, you can not only sharpen the bevel, but also make a micro-bevel, creating an additional slope at the end of the blade. To do this, there must be a switch in the carriage that will allow you to correctly align the tool and sharpen its thinnest edge.
On sandpaper
In the process of sharpening a chisel, it is not necessary to use a power tool or create sharpening equipment; you can use a cheaper, but no less effective material - sandpaper.
Once the chisel is prepared, you can start working with sandpaper. To achieve the best results, it is important to have a perfectly flat work surface. It is best to use thick glass or a ceramic slab as a stand. If these materials are not available, you can take a flat board or a piece of chipboard.
The sandpaper should be smooth and smooth. It must be attached to the holder. The most convenient way to do this is with double-sided tape. There are also options for self-adhesive sandpaper, which is an even better option.
In the process of preparing the base, it is important to make several variations using sandpaper of varying degrees of grit.
The polishing options P400, P800, P1.500 and P2.000 are the best. It is important to use waterproof sandpaper as the tool will need to be regularly wetted while sanding.
The workflow looks like this:
- bevel on one card, at least 30 movements back and forth;
- working with the back of the chisel using P400 sandpaper;
- using sandpaper with a smaller grain size.
It is important that the chisel is parallel to the working surface. An angle is necessary while maintaining the correct position, and by applying multiple abrasives in the correct sequence, good results can be achieved in a minimum amount of time. To check the quality of sharpening, you need to run the tool along the wood and easily remove the chips. If everything is done correctly, a layer of chips will remain on the cutting edge.
At what angle should I sharpen?
A chisel is an important tool, because there are certain standards and GOSTs for working with it.
To properly sharpen the product, it is important to maintain an angle of 25°+5°, depending on the purpose or thickness of the chisel. If the blade is thin, the bevel will be flatter; if it is thick, the bevel will be steep.
The optimal angle that is suitable for sharpening most chisels is exactly 25°, which allows you to have a fairly sharp and reliable tool that can cope with the tasks assigned to it. If we are talking about performing fine carpentry operations with trimming shaped elements, removing thin layers of wood, the angle of placement of the tool should be 20-22°.
When sharpening this carpentry tool, it is important to know that the chamfer processing should differ by 5° from the sharpening angle of the cutting edge for a better result of the tool. The choice of blade angle will also depend on the tool used for sharpening.
For manual processing, the inclination of the product will be different from working with machines.
Using a wheel and sandpaper
When forming the chamfer of chisels, various sharpening stones are used: both round on an electric grinding machine, and flat in the form of bars for sharpening and grinding, as well as sheet abrasive material on a fabric and paper basis. To sharpen the bevel of a chisel on a grinding machine, it is necessary to ensure that its speed and the grinding wheel installed on it do not cause overheating and loosening of the metal of the chisel. The spindle speed of an electric grinding machine should not exceed 1800 ÷ 2000 rpm, and the grinding wheel should be viscous, medium soft and with an abrasive filler (for example, aluminum oxide).
For high-quality sharpening and finishing of a chisel, it is necessary to use abrasive materials that combine honing and polishing qualities. Water-based grinding stones are best suited for this role. Before starting work, they must be immersed in water, which, when sharpened, rises to the surface, mixes with abrasive powder and forms a viscous grinding suspension. Fine-grit sanding sheets are also suitable for this job. During the sharpening process, it must be moistened, so it is advisable to use waterproof sandpaper. This material can be used to sharpen the bevel and edge of a chisel by securing it to a flat surface or wrapping it around a block of wood.
Caring for whetstones
Store sharpening stones so that dust does not collect on their surface. When using a whetstone, the surface eventually becomes clogged, clogged with a mixture of oil and metal dust. As soon as it stops sharpening normally, rub it with paraffin and treat it with coarse burlap.
Impregnation of stones with water wetting
Before using such a stone, it should be soaked in water by immersion. A coarse-grained stone will need 4 to 5 minutes to saturate, and a hard, fine-grained stone will need a little less. Store such stones in special vinyl boxes so that moisture does not evaporate from it and it is always ready for use. Another storage method is to keep the stone in water. Under no circumstances should such a stone be allowed to freeze—it will almost certainly crack.
Restoring whetstones
After a certain period of work, a groove appears on the grindstone - a depression from which its particles have been erased. Level oil-wet stones by grinding with carborundum powder mixed with water or oil on the glass. The surface of water-wet stone can be restored by sanding with 200-grit silicon carbide sandpaper attached to the glass.
Leveling the surface of the whetstone
DIY sharpening technique
As for how to sharpen a chisel at home, a certain algorithm is used, which is determined by the exact sequence of work:
- Preparation.
- Formation of the sharpening angle.
- Milling cutter.
- Final polishing.
- Launch.
If you adhere to exactly the specified plane, you can sharpen an angular, flat, rounded chisel and any other.
Preparatory stage
Sharpening a chisel, chisel, or plow knife begins with smoothing the surface of the bevel. After performing this procedure, there should be no nicks, depressions, dents or scratches on the metal.
When working on a grinding wheel, you must ensure that the metal does not overheat. To do this, it must be periodically immersed in cold water.
In this case, the surface to be sharpened must be precisely adjusted to the desired angle in the longitudinal and transverse position. Typically, a homemade locking tool consisting of several bars is used for this.
Angle editing and chamfering
The blade should be locked at an angle of 25°. Next, the chamfer chamfers are modified. If a major change in geometry occurs, a grinding machine should be selected as the corrective tool. If a minor fix is required, the job can be done as follows:
- Sand the chamfer with an abrasive stone. It is necessary to repeat the tilts of the canvas in the longitudinal and transverse positions.
- Next, a test is carried out to ensure that the geometric accuracy of the chamfer edges is maintained - the lines must be positioned strictly at right angles to the blade.
- Finishing is then performed to improve cutting properties.
At this point, the chamfer modification can be considered complete.
Features of cutter processing
The knife sharpener should operate according to the following recommendations:
- If you notice nicks on the canvas from a coarse abrasive, you should start working with a medium-grained stone.
- First, the flat part of the cutting blade is prepared. You must constantly move along the same path along the entire length of the stone.
- Upon completion of sharpening the chamfer, it is necessary to determine 2 mm in the center of the cutter. This zone is sharpened at an angle of 5-7 °. A few precise movements are enough.
- The next step is to change the position of the blade - the main part is processed, which is used directly in the wood carving process.
If a major correction is carried out not only in terms of sharpening the blade, but also eliminating integrity defects, sharpening takes 1 hour.
Assembling a sharpening machine
As previously noted, the sharpener must ensure that the tool is secured at a certain angle. A special device is created for this. In most cases, the required value is 25 degrees. On the Internet there is simply a huge number of drawings for creating a sharpening machine for a wood chisel; when choosing, it is worth considering what type will be processed.
When considering how to make such a device, attention should be paid to the following points:
- The beginning of the assembly involves creating a base of solid wood. In this case, you need to leave a reserve.
- The next step is to create a tongue and groove, which is cut using a suitable cutter.
- Next, a bevel is made at an angle of 25 degrees, after which the part can be fixed with double-sided tape.
- The vertical bevel ensures a product length of 190 mm.
- The next step is to create the cart. The groove disk creates a recess in which the wood chisel or chisel being processed will be attached at the required angle.
- A clamp is also required, for which holes are made for screws in the middle of the created workpiece. The distance from each edge is maintained at 32 mm.
- The handle is glued using a special glue that can withstand the impact.
A device for sharpening a wood chisel ensures reliable fixation, as well as maintaining the required sharpening angle. Due to this, you can count on high efficiency of the tool when used in a wide variety of conditions.