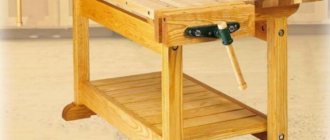
A workbench is a special “work table” with special holes, trays, drawers and a vice. Next, we’ll look at how to make a workbench for plumbing and carpentry so that all the necessary materials and equipment are at hand.
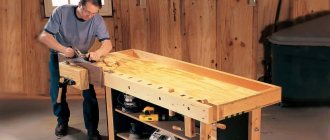
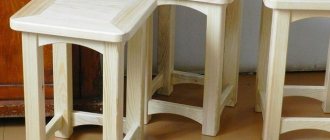
A homemade workbench should be strong and comfortable Source amazon.com
About the workbench
A workbench is a special table that is used for manual, mechanical and other processing of various parts and products. The design of such a device provides for a convenient working surface, a vice, clamps, cavities and drawers for storing tools and small parts. Thus, an ordinary classic carpentry workbench is intended for working with wood and other materials up to 3-3.5 meters in length.
The upper, horizontal part of a carpentry workbench is called a workbench cover or board. Under it there is a bench (bed - for carpentry workbenches), which is a supporting frame. Holes are made in the lid: they are used to install stops and clamps that will fix the workpieces. Also, a convenient workbench is equipped with shelves, trays, nests, and sometimes also an apron for hanging tools.
The workbench can be:
- metalworking (used for turning, grinding and other processing of metal parts);
The workbench can be metal Source ad-cd.net
- carpentry (mainly needed for working with wood, most often the carpentry workbench is longer, unlike the previous option);
- universal (has the combined qualities of a metalworking and carpentry workbench, that is, it has a durable surface and a sufficiently long length);
- carpenter's (the size of a construction or carpenter's workbench can reach six meters, because it is used for the manufacture or processing of various building materials).
The height of a carpentry workbench is usually 85-95 cm. To select this parameter correctly, they are guided by the height of the craftsman: when he stands next to the device, his palms should rest freely on the lid.
Catalog of wooden carpentry workbenches from the manufacturer Region-Snabzhenie LLC in Moscow
A carpenter's workbench is a place of work for carpenters.
A carpenter is a person who works with wood. On a machine he can process and cut wood of the desired parameter. Compared to a mechanic, a carpenter can get by with a small surface to work on. First of all, working as a carpenter is the same as working as an artist. He, like an artist, creates various beautiful products only from wood. These can be different sculptures, and the same cabinets, chairs and shelves in the house are also art. A wooden workbench for carpentry will be very useful for you, especially when you like to do this kind of work. If your husband loves to work with wood, a workbench for him would be a great gift for any holiday. Of course, you can also take a couple of workbenches for your small business. They will turn out to be simply indispensable assistants in working on your planned business.
You can buy a carpentry workbench from us. Our online store Sclad.Ru from Region-Snabzhenie LLC in Moscow is open constantly. On the website you can select a catalog with all the products suitable for you. Since the assortment is very huge, our consultant will always tell you all the details that interest you. Contact us by phone and ask any questions about the product. Decide and order a workbench to work on different materials. And you will always get exactly what you want.
Construction and materials
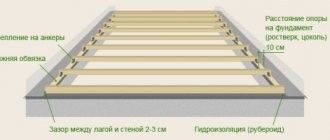
A simple homemade workbench for a summer house or home has a top cover, a shelf that strengthens the entire product, and four corner legs. A “desktop” with a length of 120 cm (this parameter is selected individually), namely its shelf and lid, must have two transverse bridges (intermediate support beams).
Jumpers on the workbench are visible during the assembly stage Source ad-cd.net
When making such a workbench, you can use wooden boards 12 cm wide and 4 cm thick. In this case, the product will be able to withstand a static load of 150 kgf, and a dynamic load (if applied vertically downwards for one second) - 600 kgf.
To assemble the corner legs, you will need 6 * 70 mm screws and two boards folded together. The fasteners must be screwed in “zigzag” with a distance of 3 mm from the edge and a distance between two adjacent ones (in steps) of 10-12 cm. After the boards for the legs are fastened on one side, the same actions must be performed on the other.
If you have wooden beams with a thickness of 5-6 cm and a width of 15-20 cm, this will simplify the task. This way you won't have to fasten two boards together to make the legs of the workbench. The ability to withstand loads of such a workbench will increase to 200-750 kgf (depending on the thickness and width of the beams). If you take wooden beams 6-15 cm thick for work, the workbench will be able to withstand up to 450 kgf from static load and 120 kgf from dynamic load.
A wooden workbench is ideal for carpentry work, but if you need to assemble a product for metal processing, that is, for metalwork, it is better to use welded or prefabricated metal.
A simple workbench can be small but spacious Source pinimg.com
On a note! To make a workbench that can withstand a load of 300 kgf, you will need metal corners with dimensions of 35*35*3 mm and 20*20*2 mm, a metal sheet and galvanized boxes.
Varieties
There are workbenches for students, professional, and also “Lux” class. According to the design, we can distinguish those without pedestals, with one pedestal and with two. The variety of equipment for performing different types of work may depend on the configuration, price, and manufacturer.
In addition, for ease of use and placement in small areas, you can purchase a folding one, the compactness of which will save useful space in the garage, shed or other utility room.
Student models are not only intended for schools or educational institutions with a craft focus. Many owners of suburban areas have already allowed themselves to buy a workbench.
Despite the modest equipment and simplified design, this model is quite suitable for cutting boards or timber, joining wood parts, securing metal pipes, and processing plastic.
Moreover, the price of student machines is 1.5-2 times less than that of professional ones. Therefore, almost everyone can afford to buy such wooden workbenches.
Professional models are designed for more precise work, have greater functionality, equipment and overall dimensions. Professional wooden machines are made of hard wood (beech, birch, oak).
They are intended for carpenters, joiners, and people of similar professions whose specialization is wood processing.
The workbenches belonging to the “Lux” class have been modified to make the work performed as easy as possible. They have a 20-30 cm larger tabletop, a deeper and higher toolbox, more holes for stops and more stops themselves.
Plywood workbench
To make a workbench from plywood, you need to prepare:
- two-meter rule;
- electric circular saw;
- special glue for plywood (you can use plywood glue from the “Moment” line);
- clamps;
- spatula with teeth;
- wooden beam (section size 4 cm by 6 cm);
- glue brush;
- screwdriver;
- plywood (sheets 1.8 cm thick);
- a tool for cutting plywood and wooden beams (for example, a grinder or saw);
- fastening elements (screws 8 * 12 mm);
- drill;
- a strip of plywood 15 cm thick.
Let's consider an example of manufacturing a rectangular workbench with dimensions of 1.5 m by 60 cm and a cover thickness of 7.2 cm.
Instructions “How to make a carpentry workbench from plywood”:
- cut four rectangular pieces of plywood with dimensions 150 * 60 mm;
- if there is a suspicion that the plywood is not flat, you need to check this fact: fold the sheets together or use a rule;
- fold the plywood sheets together so that the convex side of each piece “looks” down;
- apply glue to one sheet and glue it to the second, repeat with all four pieces of material;
One of the options for a wooden plywood workbench (dimensions - in centimeters) Source pinimg.com
By the way! When gluing plywood sheets, for convenience, they can be compressed with clamps. The evenness of the tabletop plane when tightening the clamps must be constantly monitored using a rule.
Where to order and buy a carpentry workbench in Moscow inexpensively
- Call and order by phone;
- Come to us at the address - 141280, Russia, Moscow region, Ivanteevka city, Studenchesky proezd, 5;
- Write a letter by e-mail;
- Place an order through the cart of our online store - Sclad.Ru;
- Order delivery using any of the above methods both in our region and throughout Russia. We work with all transport companies.
Other cities where you can buy our wooden carpentry workbenches
Arzamas, Arkhangelsk, Astrakhan, Barnaul, Belgorod, Bryansk, Veliky Novgorod, Vladivostok, Vladimir, Volgograd, Vologda, Voronezh, Dzerzhinsk, Yekaterinburg, Ivanovo, Izhevsk, Irkutsk, Kazan, Kaluga, Kirov, Klin, Krasnodar, Krasnoyarsk, Crimea, Kurgan , Kursk, Labytnangi, Lipetsk, Murmansk, Naberezhnye Chelny, Nizhny Novgorod, Novosibirsk, Orel, Orenburg, Penza, Perm, Petrozavodsk, Pskov, Pyatigorsk, Rostov-on-Don, Ryazan, Samara, St. Petersburg, Saratov, Smolensk, Sosnovy Bor, Stavropol, Stary Oskol, Surgut, Syktyvkar, Tambov, Tver, Togliatti, Tomsk, Tula, Tyumen, Ulyanovsk, Ufa, Ukhta, Khabarovsk, Cheboksary, Chelyabinsk, Yaroslavl.
We can also offer you prefabricated shelving in Moscow.
Still have questions and need help? Call.
Wood-metal workbench
Let's figure out how to make a bench with dimensions of 2.2 m * 0.75 m * 0.95 m and six drawers (three on each side). For work, in addition to tools and sheets of plywood, you will need a two-millimeter profile pipe with dimensions 6 cm * 4 cm:
- 3 pieces of 2.2 m for both sides of the table top and the lower rear stiffener of the workbench;
- 6 pieces of 0.75 m each for the other two sides of the tabletop (end), as well as to form a frame for retractable drawers;
- 4 pieces of 0.95 m each for the legs of the workbench table;
- 5 pieces of 0.7 m each for assembling frames intended for drawers, as well as for the jumper (foot rest).
To make a workbench out of wood and metal, you need to start by assembling the basic structure. To do this, you will need to weld the future tabletop from two long corrugated pipes and two 75-centimeter ones. At the second stage, four legs are attached to the corners of the structure in the same way (in this example they are 95 cm long). At the next stage, you need to weld the third long pipe at the bottom, in the back of the product so that it is parallel to the floor, 25 centimeters above it.
How to make: instructions
Let's consider the procedure for making a homemade workbench for carpentry using classical technology. The changes made to the design are minor and are intended to simplify and speed up the process. For convenience, we will divide it into stages that need to be described in more detail.
Base
To make the base, a frame is created from thick planks.
Sometimes they use timber, believing that it is much stronger and more reliable.
This is a misconception because solid wood is prone to warping and cracking.
The thicker the part, the stronger the internal stresses in it and the higher the likelihood of deformation. To increase the thickness, it is recommended to use a stack glued together from two or more boards, which stabilize each other and compensate for possible changes in shape.
To assemble, you will need to cut 4 parts for the legs, 4 parts for the upper and lower crossbars. 2 frame structures are assembled from them. The easiest way to connect elements is half-tree, when a layer of half the thickness is removed from a certain area of one part, and the same action is performed on another part. Then a layer of glue is applied to the resulting recesses, the parts are connected, the observance of the right angle is checked and the screed is performed with clamps.
In a similar way, 2 frame structures are assembled, which are then connected by drawers. They consist of two strips with a width of at least 100 mm. They can be connected to the legs either half-timbered or overlay using bolted connections. The main task is to maintain right angles and ensure parallelism of all parts.
Tabletop
To make a table top, you will need ties (wipes) or clamps with a large reach. The tabletop is glued together from planks 70-90 mm wide (usually edged boards are cut lengthwise) installed on edge. It is recommended to pre-plane the planks (waft) so that the gluing is as dense, strong and neat as possible.
Since boards with a thickness of 50 mm are used, after sharpening they will be slightly thinner - 46-48 mm. To set a panel 600 mm wide you will need about 13 planks. This is a lot, but a strong and immovable cover cannot be created from thin boards.
Important! You should not use plywood for the countertop. There are many recommendations online for gluing double-thick plywood sheets. Such a tabletop will flake, scratch the workpieces, and the craftsman will constantly have splinters. A cover made of planks is the best option.
The side (wide) sides of the planks are covered with an adhesive layer, pressed against each other and tightened with weaves or clamps. Ideally, after drying, the surfaces of the boards should be processed on stationary planing and thicknessing machines. If this is not possible, the surfaces are planed with an electric or manual plane and processed with a grinder. It is necessary to strive to create the most even plane possible.
It is not recommended to glue a wide 600 mm board at once; it is better to make two 300 mm halves and connect them with a technological gap that allows you to saw long parts directly on the table. The panels are connected using two or three strips attached to the bottom of the cover with screws. The thickness of the connecting elements should ensure the immobility of the halves, which is also enhanced when the cover is installed on the supports (cross members of the legs).
Video
We invite you to watch an interesting video on the topic.
Part 1:
Part 2:
Video description
This video shows the process of making a carpentry workbench:
At the last stage of assembly, you need to sew up the back and sides of the workbench table with plywood, and also make a tabletop. If you decide to make the top from wood materials, you can use several sheets of plywood securely glued together. To obtain a more reliable, durable bench, you can install a two-millimeter metal sheet as a tabletop. To store tools and various materials that may be useful to a craftsman in his work, it is worth making shelves or drawers for the workbench.