If a project to build a house or renovate a city apartment involves wooden floors, then the contractor will be faced with the issue of choosing lumber. Not every novice craftsman knows which timber to use for floor joists. After all, logs are the support of the floor structure, which will be affected by all loads, from the floor covering to furniture and people. Therefore, the most important condition for constructing a floor is to ensure its long-term operation, based on the high strength characteristics of the materials used. As for the logs, first of all they are selected according to the cross-section on which the strength of the beam depends, and according to the laying step between them.
If you choose the right parameters of the timber, you can save a lot of money on construction activities related to the construction of the floor structure. And although today manufacturers offer logs made of plastic, reinforced concrete and metal, wood remains a popular material, which is cheaper than all the others.
Advantages of wooden logs
In addition to the low price, wooden logs have other advantages.
- Installation is carried out manually without the use of special equipment and complex mechanisms. This again affects cost savings during the construction or renovation process.
- Utility lines can be installed in the space between the lags.
- The insulation is also installed here. Depending on the thickness of the thermal insulation layer, the logs are selected according to their width.
- Wooden beams are a lightweight material, so they do not exert significant loads on the load-bearing structures of the building.
Pros and cons of use for buildings
Before giving preference to floor beams made of laminated veneer lumber, you need to familiarize yourself with the advantages and disadvantages of lumber.
The undeniable advantages include:
- high strength;
- environmental friendliness;
- reliability;
- variety of sizes;
- resistance to ultraviolet radiation and atmospheric factors;
- long service life provided proper installation;
- acceptable price.
However, lumber has weaknesses that are recommended to be taken into account:
- flammability;
- the need to make accurate calculations;
- the need to attract additional equipment for large structures;
- lamellas may burst if manufacturing conditions are violated.
Criteria for choosing wooden blocks for joists
Much will depend on where the joist structure will be assembled. There are several options here, these include floors on the ground, on a concrete base, and on the foundation, when the logs are installed in a canopy. Based on this, the section of the beam is selected, of course, taking into account the distance between the installed elements.
For example, if floors are constructed in a city apartment on a concrete screed, then there are no strict requirements for the size of the bars. The main thing here is to comply with the parameters of the ceiling height, and if necessary, then the parameters of the insulation. If a wooden floor is installed on the ground floor, then the minimum width of the bars used should be 70 mm, because this is the thickness of the insulation that will ensure good thermal insulation of the apartment. In this case, the bars are laid on the edge, that is, on the smaller side of the section, which means that the width of the lumber will be the height of the joist structure.
As for the thickness of the timber, the optimal ratio to its width is 1:2. Since in the example the width parameter of 70 mm was chosen, the thickness of the bar will be either 35 or 40 mm. In this case, the thickness determines the stability of the installation. And the larger it is, the stronger the lag will stay on the surface. But this increases the cost of the product. Therefore, it is necessary to choose the optimal option for the aspect ratio of the beam section.
When constructing a floor in an apartment that is not on the first floor, you do not need to use the standard section aspect ratio. Here you can choose any timber, because the logs are laid on the same concrete floor only without a heat-insulating layer, the dimensions of which are no longer taken into account. These can be bars with a cross section of 40x40, 40x50, 50x50 mm. In this case, the smaller the size of the log height, the higher the ceiling after the construction of the wooden floor.
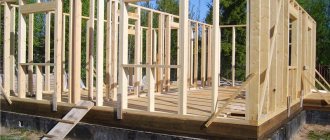
Stages of building a floor in a timber house
Developers are offered many options for arranging floors; they should choose a specific one at the design stage. This will prevent mistakes and violations of building codes and regulations. In this way, it will be possible to install reliable and durable floors.
You need to decide on the type of floor in advance
Table. What types of floors are used in log houses?
| Floor type | Brief description of performance characteristics |
| Heated | Relatively new and quite fashionable flooring options. Heating the room at zero level is the most profitable option from both an economic and operational point of view. If warm air rises from the floor, then the entire volume of the room is optimally heated, and the most favorable temperature is located at the level of 1.5 m, and not under the ceiling. This makes it possible to save significant financial resources during the heating season. The coolant can be water or electricity. But, unfortunately, it is strictly not recommended to install heated floors in houses made of timber. Why? Firstly, in wooden houses the best finishing option is natural boards, this is natural. And they conduct heat very poorly, as a result of which the efficiency of using coolants is significantly reduced, and all the advantages of bottom heating are eliminated. It is not practical to make floors in wooden houses from ceramic tiles or other coatings with high thermal conductivity. They have a very large weight, they are afraid of fluctuations in linear dimensions, and cobblestone buildings are sure to have them. Secondly, if the floor water heating circuit leaks, the consequences for wooden structures are extremely negative. Thirdly, in the event of a short circuit, the likelihood of the structure catching fire increases. |
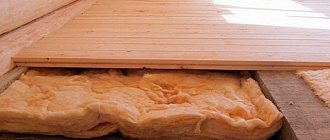
| Insulated | The most optimal option for arranging floors in wooden houses. Mineral wool is used as insulation; using polystyrene foam is not recommended. The floor has several separate elements, each of which performs its own functions. When installing these floors, it is very important to ensure effective natural ventilation of the underground space. Otherwise, the tree is damp and quickly becomes susceptible to fungus and rot. In terms of operational parameters, insulated floors meet the requirements of developers and regulations on heat conservation of buildings. |
| Cold | For use only in non-residential or technical premises. It has a simple device, various options for finishing floor coverings are possible. Can be installed without a subfloor. |
How to make a floor in a house from timber
There are often situations when in one house made of timber there are several types of floors. As an example, we will consider the option of making an insulated floor on wooden logs.
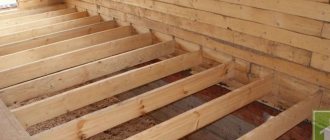
Lag structure on load-bearing beams
The construction of floors using load-bearing beams is common in private housing construction. It is also used to construct building floors and, if necessary, to form floors with a ventilated underground. In this case, the logs are attached to the installed beams only at their ends. The same design is used when constructing the floor of small rooms on the ground floor, when the logs are installed with their ends on the foundation.
In this case, the choice of bars, or rather the choice of their cross-section, depends on the length of the lumber. The longer the beam, the larger its cross-section should be. Here are the recommended values for this ratio.
- The length of the log is 3 m - the section of the timber is 150x80 mm.
- Length 3-4 m – section 180x100 mm.
- 4-5 m – 200x150 mm.
- More than 5 m – 220x180 mm.
If the structure is installed on the ground floor with the installation of logs along the foundations, then the indicated dimensions can be reduced by constructing intermediate racks made of brick, pipes or concrete. But with this arrangement, the distance from the lower edges of the joists to the ground is taken into account. It should not exceed half a meter. If this indicator is greater, then the beams are installed without support posts. This means you will have to purchase lumber in sizes from the list described above.
Frame installation
Floors with joists can be installed both on the floors of the house and on the ground base.
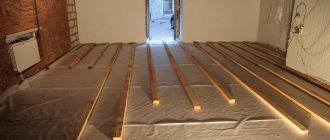
Installing joists on wooden floors
Installation of logs on a wooden floor.
The logs must be fixed to the strapping beams
It should be taken into account that they are unlikely to have an absolutely even level. Therefore, it is best to attach the timber to the sidewalls of the beams. In this case, determine the horizontalness of the joists using a control strip; no backing can be used. Fix the logs with screws with a diameter of 6 mm
They should be 2/2.5 times longer than the width of the beam. To prevent the lumber from cracking, drill holes in the joists and beams. In this case, use a drill that will have a diameter 2.5 mm smaller than the size of the screw. When the beams are located far from each other, you need to install double logs. First, lay the first row of joists on the beams, and on top of them, with smaller steps, another one.
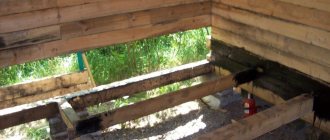
Laying timber on the ground
The photo shows a diagram of the floor along the joists on the ground.
- First, level and compact the soil with your own hands. This work can be done using a large log. Nail a board to it from below and, moving the tamper along the ground with a partner, compact it. The board should be at least 5 cm thick and slightly larger than the cross-section of the log.
- Next, mark the support pillars for the joists. When the supports for the frame are the beams of the lower frame, marks can be left directly on the beams. If the support is a grillage covered with roofing felt, place marks on the waterproofing material.
- The distance from the initial logs to the walls should be 3/20 cm.
Before installing the support posts, you need to make a foundation for them. It can be poured separately under each support or placed under a row of posts.
The dimensions of the foundation for the column are minimum – 0.4×0.4 m, height – 0.2 m, 5 cm of which should protrude from the soil.
The instructions for arranging the foundation are as follows.
Scheme of installation of logs on the ground.
- Set aside 0.2 m from the log axis marked on the strapping beams in both directions.
- Pull the string between the marks.
- Perform a similar operation in a plane perpendicular to the joists to mark the corners of the posts located at the intersection points of the cords.
- Drive stakes into the corners. Next, remove the cords.
- When the foundation is laid under a row of supports, only the edges of the row are marked with cords.
- In marked areas, remove the top layer of soil. Compact them, pour in crushed stone and compact it.
- Assemble the foundation formwork, which has a height of 0.1 m.
- To waterproof concrete, place polyethylene film in the holes. If the soil is clay, then you don’t have to do this.
- Reinforce the foundation with a frame welded from rebar, 0.8 cm in diameter. It should be laid slightly below the center of the future concrete layer.
- Next, fill in the solution. Its composition should be the same as for the foundation of the house.
- Allow the concrete to set for 2/3 days.
- After this, lay the waterproofing. For this purpose, cut pieces of roofing felt according to the size of the supports, in other words, 40x40 cm. You can also make overlaps of 1 centimeter. Lay the insulation directly on the mortar; there is no need to coat it with bitumen.
- Now you can start laying bricks. Two rows of them in height are enough, the top one should be oriented perpendicular to the length of the beam. To fasten the material, use sand-cement mortar, use brick grades not lower than m-100.
- Lay waterproofing along the bricks.
- Place soundproofing pads on top of it. To prevent them from moving, secure them.
This is what the floors look like in general.
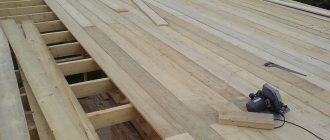
First, lay the lighthouse logs, the first from the walls. Secure them at intervals of 2 meters from each other.
Next, install intermediate joists. You can attach them to the supports with corners using self-tapping screws; they should go 4/5 cm into the wood. The second side of the corner is attached to the support with dowels.
Distance between joist elements
Logs are a support for the flooring, plus everything that will be placed on the floor: furniture, household appliances, musical instruments, etc. These are static loads. There are dynamic ones, which include the movement of people and pets. Both loads must be taken into account when choosing the distance between the lags. It is difficult to do this at the construction stage, because it is not yet known what furniture and in what quantity will be installed in the room.
Therefore, it is recommended to use the thickness of the flooring as a basis for calculating the lag spacing. For example, if it is plywood or OSB boards, then their small thickness (16-22 mm) determines the minimum step - 30 cm. As for floorboards, everything will depend on their thickness.
- If the thickness of the board is 20-25 mm, then the distance between the logs is set within 30 cm.
- If boards with a thickness of 30-35 mm are selected, then the installation step will be within 50-60 cm.
- Accordingly, 40-45 mm – 70-80 cm.
- 50 mm – distance within 1 m or more.
It should be noted that the pitch of laying the logs is the distance between the middles of the bars along the longitudinal axis, and not between the edges of the elements. From the calculation of this parameter, the number of required beams for the logs is also calculated. In this case, one technological point is also taken into account - the distance from the walls to the outer elements of the floor structure is 25 cm.
Parquet board
When installing without an additional rough base, it is necessary to install the sheathing in increments of no more than 50 cm. Usually the base is made of plywood. The parquet board is also equipped with a lock, but is mounted without additional fasteners or using glue.
It should be noted that the use of both floor slats and parquet boards requires additional finishing after installation. All gaps and chips are puttied. The floor is scraped and sanded, and then it must be covered with parquet or yacht varnish in 2-3 layers. To achieve a perfectly smooth floor covering, after applying the first layer of varnish, sand with the finest sanding paper or a paint sponge and carry out wet cleaning.
Laminate
A relatively young floor covering that quickly gained popularity among consumers. Requires a perfectly flat surface. Usually the surface is leveled using plywood, then the backing is laid. The laminate is connected using a lock; no additional fasteners are required.
Wood moisture content
Dry wood is the key to high quality and long-term operation of a wooden structure. Therefore, builders recommend using bars with a humidity of no more than 20%, preferably within 12%, for the construction of a joist structure. In construction stores, all lumber is sorted according to this indicator. But there is no guarantee that this is true, because storage conditions in stores are sometimes violated. This means that the actual humidity of the purchased timber may not coincide with the passport value.
You can accurately determine the moisture content of lumber using a special device called an electric moisture meter. This is a device with two pins protruding from the body. They need to be stuck into the wood being tested. The display shows the humidity values. Everything is quite simple if you have this device in stock.
There is another way. To do this, a piece is cut from the block with a saw, which must be weighed. Then it is placed in an oven preheated to +100C and dried for an hour. The dried piece is weighed again. Now we need to do some math:
- The second value is subtracted from the first weight.
- The result obtained must be divided by the final (second) weight.
- The resulting number is multiplied by 100%.
- This results in the moisture content of the lumber.
All this, of course, is accurate, but difficult. Therefore, craftsmen have long used purely visual criteria for determining the moisture content of wood. For example, you can run a chemical pencil along the cut. If the line turns bright purple, then the humidity is high. And vice versa.
Humidity is also determined by chips. In dry wood it is brittle, in wet wood it is elastic, bends well and does not break. You can knock on the beam with a metal object. If the sound is dull, it means the humidity is high. If it is sonorous, then it is low. Coniferous wood releases resin when processed. If you press it with your finger and it crumbles under pressure, then you can talk about dry lumber.
Wood for logs
Since logs must withstand heavy loads, and at the same time not change their qualities and dimensions under the influence of changes in temperature and humidity, timber made from softwood is most often used as them. Deciduous trees have less bending strength. Namely, the logs are subjected to these loads. Although there are no strict restrictions in this regard.
Everything will depend on the budget for construction and repairs or the location of the floor. As a budget option, these are bars made of spruce or pine. But it is better not to use them in damp rooms, where the wood will be exposed to the negative effects of moisture. Under its influence, the lumber will begin to warp and change its parameters, which will lead to the formation of gaps between the floorboards, lifting of part of the flooring and other types of defects.
More durable materials, such as larch, will withstand any load, but such wood is expensive, which will lead to an increase in the construction budget. But such logs, even in a bathhouse, will last for decades, which will cover the initial costs of their purchase. In addition, larch contains a large amount of resin inside. Therefore, bugs and other harmful insects do not touch it.
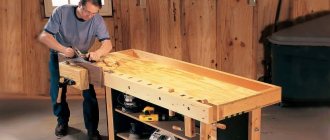
Today, manufacturers offer various easy-to-install devices that determine the speed and quality of lag installation. And if the traditional installation option is logs secured with wooden bosses to the base floor surface or nails to load-bearing beams (sometimes additional fastening is done using binding wire), then the modern approach is special fasteners.
One of the varieties is metal fasteners in the form of profiles of various shapes. These are perforated parts with which the logs are attached to the load-bearing structures of the building. The photo below shows how the logs are attached to the concrete base with metal corners.
Another type is adjustable supports made of metal or plastic. The supports themselves are attached to the base with anchors or screws, and the beams are installed on their structure. In this case, the logs can be raised or lowered by rotating the threaded connection of the supports.
General recommendations
Make sure the wood is dried and treated with antiseptic or bitumen. This will significantly extend the service life of the structure. When the humidity is more than 20%, the tree can become warped, compromising the integrity of the structure. Boards brought from a warehouse should lie at room temperature for several days. This is especially true during the winter season. It is not recommended to lay the floor when the air humidity is less than 60%.
You should not saw or plane boards in the room where the floor is being installed. Sawdust can cause rot.
Use the rule after installation. Lay it across the beams, remove gaps, leveling the height. This is easy to do with the help of special modern adjustable fasteners that have appeared on the construction market. The floor is laid only after all leveling procedures.
The smaller the pitch, the longer the floor will last. However, the main indicator of durability is the material of the coating and base. The most durable wood is larch.
The installation of beams is usually carried out along the window, i.e. across the room. The floor boards are then placed along the length of the room, i.e. from the window. However, this is just a recommendation and a matter of taste.
A board is attached to each beam. Holes for screws should be drilled in advance to avoid delamination.
The most common option for the space between the joists is from 50 to 56 cm. As a rule, it does not exceed a distance of 69 cm.
Removing joists and wooden floors is quite simple. It is necessary to remove all the furniture from the room, remove the baseboards, and open the boards or sheets of chipboard. After inspection, the old boards are replaced with new ones. The logs themselves can be partially replaced. Simply cut out a piece of rotten wood and install a new one.
Don't forget to use a protective impregnation on new boards. Check the ends of the beams for rot, and inspect the base insulation, if any. Repairing the floor can be a reason to insulate your home.
Reviews
Oleg, 34 years old, Novosibirsk
When building the bathhouse, I first used pine logs. At the beginning of construction, we had to save every penny; the family budget did not allow us to splurge on quality material. The savings turned out to be imaginary. Firstly, I forgot to treat the logs with an antiseptic, which ultimately led to the formation of mold. Although ventilation was installed in the floor. Secondly, as it turned out, the moisture content of the wood was high. The masters explained this to me later. That's why there were lags. Three years later, a hand fit into the gap. I had to lift the floors completely and throw out both the boards and joists. After which I purchased timber from Siberian larch. It is difficult to work with, it is very durable, nails cannot be driven in, but the structure is durable. So it is not recommended to save on lags. It’s better to invest a little more money, but be sure that the bathhouse will last a long time.
Alexander Surkov, 28 years old, Izhevsk
I got an apartment in a new building and decided to install plank floors in it. This is where I had to suffer, because the construction of the logs is directly related to the selection of the beam according to its cross-section. Due to inexperience, I purchased 100x50 mm bars and installed them at a height of 100. As it turned out, I did it wrong, and the ceiling height decreased sharply. Then I placed them on edge 50. The height became normal, but why did I need such a width of the joists, since the expected loads in the room were small. It turns out I just overpaid. So think first and then buy.
Maria Sergeevna, 52 years old, Nizhny Tagil
During the construction of the dacha, we chose a project where the floors are installed along joists. The project specified floors made of 50 mm boards. We decided to use OSB. And here we miscalculated the distance between the lags. We used a design value of 85 cm, but the slab bent under the weight of a person. Therefore, I had to add lags between those already installed.