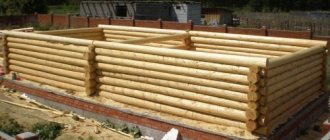
It often happens that on the territory of a country or private house within the city there is a need for a small building, which is most often called a barn. This definition fits a small non-residential building, in which some old and not very necessary things are most often stored. What to do if you don’t want to spend a lot of money on materials and construction, but you still need a building. It is in such situations that material such as business slab comes in handy.
How do you get a croaker?
Freshly cut trees arrive at the sawmill. First of all, they go to the peeling machine, which cuts off the slab. It can be of different thickness and width. Depending on this, it is sorted into:
- business (wide and thick over 35 mm, suitable for the manufacture of small and medium-sized products for construction and household use);
- wood waste is small waste that is used for the production of heating oil or direct disposal in furnaces.
In addition to the size of the scraps, the method of sawing them is taken into account:
- cutting into a shaft - you get 2 wide boards;
- lumber - 4 small width bars come out.
Depending on further use, the cuttings are treated with antiseptics, the cut surface is leveled, and the bark is removed.
Benefits of using both sexes
You can purchase slabs from those enterprises that manufacture boards and process wood. The material has a low cost. Therefore, it is in demand today.
Among its advantages it is worth highlighting:
- functionality;
- cheapness;
- environmental friendliness;
- ease;
- versatility.
The disadvantage of obapol is that for construction or cladding it has to be prepared by peeling off the bark and leveling the surface. This is all done exclusively by hand. The process is labor-intensive and long.
Pros and cons of the material
The advantages of raw materials are:
- Low purchase cost. Even in comparison with a fence made of chain-link or other mesh, this wood material is several times cheaper.
- Fast construction speed. A structure with a small area can be assembled in a day.
- Easy to install. There is no need to use special tools or involve technology. The construction can be done independently.
- Can be repaired. If one of the elements is damaged, it is easy to replace it with a new one without harm to the entire fence.
- Does not require a capital foundation. The finished fence weighs little, so it does not create a load, except when the slab is combined with stone or brick. Then pouring the base is required.
- Of no value to attackers. This is an excellent fence for a dacha, where the owners visit for seasons.
- Externally, it complements a rustic or country style home well.
Disadvantages include:
- Short service life, up to 10 years.
- The need for periodic maintenance - treatment with antiseptics, painting. Otherwise, use will be reduced to 5 years.
- Each board will have to be selected according to width and height. This leaves a lot of unsuitable elements.
- The wood-burning floor is unattractive in appearance, so it is not suitable for areas decorated in modern styles.
The quality of the finished fence depends on the type of wood. Oak and maple trimmings are more expensive, but they also last longer. Obafloor made from pine is popular. It is cheaper, but quickly becomes unusable.
Basic recommendations
When carrying out work on creating a fence structure from a slab, it is necessary to take into account important points. They will ensure the creation of high-quality fencing with an attractive appearance:
When making material calculations, you should take into account that after the wet boards dry, they narrow by 1.5 cm. To prevent this from damaging the appearance of the fence, it is necessary to install the wet boards overlapping. To construct a rigid frame, metal pipes should be used
It is best to choose a material that has a square cross-section with sides of 7 and 8 cm. The optimal wall thickness is 2-4 mm.
This is interesting: a fence made from unedged boards with your own hands.
When creating a fence from a slab with your own hands, you can combine the slab with other materials. For example, it combines well with natural stone or facing bricks. It can also be supplemented with concrete or metal.
When constructing a fence from a slab, all options for such structures need to be considered before starting work. This will allow you to choose the most suitable type of fencing. The use of high-quality material allows you to build a reliable structure. To make it look more attractive, you can decorate it. For this, stain or varnish is used. If desired, you can combine boards with other materials, for example, metal or brick.
Areas of application
Croaker is quite a useful material. It is actively used in decoration, private construction, furniture production and the processing industry.
Made from quality materials:
- fences;
- sheds;
- showers;
- street toilets and other structures.
Baths are built from linden slabs. This material is ideal for covering the ceiling and walls in the steam room. Cedar and oak flooring is used to make stylish furniture for private homes. The products are rough, but original and beautiful. They are even bought for cottages. Croaker is suitable for creating loft style furniture.
The facades of private and country houses and outbuildings are covered with obapol. Such boards increase the thermal insulation qualities of the structure and also give it an original appearance.
They also make various crafts for the garden from slabs. For example, they use it to create high beds in the garden. Various souvenirs are made from valuable wood species.
Both genders are also of great importance in the mining industry. There it is used to strengthen production in mountains and mines. The most durable and reliable structures are made from cedar, fir, pine and spruce boards. To extend the service life of slab products, they are coated with antiseptic substances, varnished or painted.
Industrial enterprises strive for maximum savings. Therefore, they try to find use even for production waste. The largest percentage of waste is observed in the woodworking industry. And it concerns specifically the slab. The enterprise processes thin boards into fuel, and thick ones are used to make timber and linings for sheathing. This approach can significantly reduce costs.
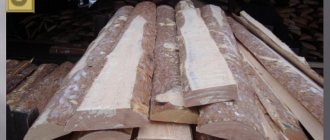
Gorbyl: let's get to know each other better
A slab is the rounded side part of a trunk, which is cut off before cutting the wood into boards or other lumber.
In fact, this is waste that does not represent any value for woodworking production.
Of course, enterprises do not give away croakers for free, but the requested cost cannot be called anything other than symbolic.
First of all, this material is divided into two types:
- wood slab;
- business.
The first category is the lowest-grade wood, having a highly distorted geometry or many defects.
It is sold only as cheap fuel for stoves and solid fuel boilers.
The business slab has a more attractive appearance and can be used to solve many problems:
- cladding the walls of buildings for household purposes, such as: barns, chicken coops, premises for keeping livestock, etc.;
- production of formwork for the construction of foundations and other reinforced concrete structures;
- installation of a rough wooden floor (bottom lining of the logs, intended for laying insulation);
- arrangement of overlap between the upper floor and the attic;
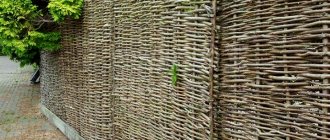
- construction of fences.
This type of croaker is in turn divided into two classes:
- unsorted (sold, as they say, in bulk);
- selected (sold in stacked and tied stacks or bags): sorted not only by quality, but also by width.
The first option costs slightly less than the second, but you never know for sure which part of the batch will have to be rejected as unusable. In addition, it will be difficult to independently select boards of approximately the same width. It is quite possible that in order to purchase a sufficient quantity of suitable unsorted slab, you will have to pay more than the selected material would cost.
Croaker - material for fence
And since wood will have to be purchased, several deliveries will need to be organized and paid for instead of one.
Along with ordinary croaker, a very expensive variety called block house can be found on sale. It is distinguished by very high quality and careful adjustment of dimensions, and it is intended for finishing the walls of residential premises in order to imitate a log house.
The difference in cost is tenfold: if 1 cubic. m of a simple slab costs from 50 rubles, then a block house of the same volume costs from 500 rubles. It is clear that using such material for building a fence is inappropriate.
The sequence of installing a fence from a slab with your own hands
The enclosing structure made of slab consists of the following elements:
• support pillars, the base of which is filled with concrete like a columnar foundation;
• transverse supports;
• casing (slab).
Of course, this includes a wicket and gates for cars to enter, but these parts of the fence will not be considered due to the individual approach to the choice of material and the design itself.
Stage 1: marking
Along the border of the site, the soil surface is cleaned and the plane is leveled. For these purposes, use a level, tape measure, pegs and cord. Shrubs and plants located from the demarcation line must be removed.
Stage 2: Digging holes
Dig holes to install supporting elements, maintaining an interval of 1.5-2 meters. To make the process easier, it is recommended to use a drill. The depth of the hole depends on the type of soil and the level of underground water. You should also take into account the rate of soil freezing in winter. For the middle zone with a temperate climate, a depth of 60-70 cm with a width of 20 cm is suitable.
Stage 3: Preparing the Wells
Next, a sand cushion is poured into the bottom of the pit and compacted with a tamper. Gravel is laid on top of it and compacted as well. The thickness of each layer must be at least 10 cm.
Stage 4: processing supports
Metal pipes are mainly used as supporting elements. Their ends entering the pit are welded so that moisture does not penetrate into the cavity. To give the supports stability, pieces of reinforcement are welded, creating the appearance of a mustache. The part of the pipe that goes into the ground must be treated with bitumen mastic. In order to create waterproofing, roofing felt is also suitable.
Stage 5: installation of support elements
After installing the pipes in the prepared holes, you need to make a gravel backfill. Each portion is carefully compacted to give the pillars stability. The backfill should not exceed a level of 30-35 cm from the ground surface. To ensure that the pipes remain vertical during further work, they should be secured with stakes and supports.
Stage 6: pouring the foundation
Install formwork in the pits. Their height should rise above the ground level by 10-15 cm. The frame box is fixed on the outer sides with stakes. After checking the verticality of each pillar, the holes are filled with concrete. To remove air from the poured solution, it is recommended to walk through the holes with reinforcement, piercing the concrete in several places.
Stage 7: preparing the slab
While the concrete is curing, it's time to start preparing the wood. The croaker needs to be sorted out, cleaned of bark and protruding knots. For work, grinders and various cutters are used, but you can get by with an ordinary ax.
Next, the material is treated with an antiseptic and antifungal agent. After drying the surface, apply the first layer of paint or varnish. In some cases, stain is used for decorative finishing, followed by coating the slab with varnish.
Stage 8: installation of boards
Once the concrete has hardened, the pillars are fixed horizontally with wooden blocks. You can also use metal. When the slab is positioned horizontally, the elements are fixed alternately on each side of the fence, resulting in the formation of a relief surface. The joints of the boards must be covered by creating an overlap (up to 5 cm).
Stage 9: decorative finishing
In order for the tree to last for a long time, it is recommended to equip the enclosing structure in the upper part with a gable mini roof. And a mandatory part of the work is re-painting with paint or varnish. The color scheme looks harmonious, supporting the tone of the main building or its roof.
The slab can be fixed in different ways: vertically, horizontally, overlapping, with a gap. The choice of technologies allows you to create your own fence design.
Calculation of material requirements
Some of the owners are so sensitive to their possessions that they do not like it when the views of strangers fall on their territory. It is for this reason that they erect fences that have no gaps and are up to 2 meters high.
The optimal distance between supports is considered to be 2-2.5 m. With such indicators, the fence has the greatest stability and reliability. To install the pillars in the ground, you need to take the timber with some reserve. For example, if the round timber rises 2 m above the ground, then you need to add the planting depth in the ground, which is about 1 m.
Calculation of crossbars is made by doubling the length of the fence, plus 10% for consumables. The simplest calculation of the consumption of slabs on pickets is to calculate the cubic capacity. Of course, it will not be perfect, but only approximate. You can also calculate by dividing the length of the fence by the average width of the board.
Options for slab fences
A mandatory element of any fence made of this material are posts - metal or wooden posts dug into the ground, to which the canvas is attached. The installation pitch for them is usually taken within 2 - 2.5 m. If timber is used as racks, then its cross-section should be at least 100x100 mm, since the slab is quite massive.
It is very important to protect the buried part of the timber from the effects of ground moisture. To do this, after treating the entire rack with an antiseptic, it is wrapped in several layers of roofing material, which is aimed with a construction stapler or tied with plastic clamps
Another method of protection is tar treatment.
Fence installation diagram
The depth of the recesses for the racks should be at least 50 cm; for maximum reliability, you can go 70 cm deep. The quickest and easiest way to make such recesses is with a garden drill.
Having brought the posts into a vertical position using a plumb line, the hole is filled with earth and sand or broken bricks. Layer by layer, the backfill must be thoroughly compacted.
Metal racks should be concreted for greater reliability. You also need to weld brackets to them (these can be just plates) to fasten the elements of the canvas.
Next, they begin to manufacture the canvas and there can be two options:
- The slab is positioned horizontally: this is the least labor-intensive and material-intensive option, since apart from the slab, nothing is needed to create the canvas. The boards are nailed or screwed directly to the posts. The disadvantage of this solution is low strength, due to the fact that the slab strips are attached only at one point - in the middle.
- The slab is positioned vertically: such a fence is similar in structure to a classic picket fence. Two bars or boards are nailed horizontally to the posts along the entire contour of the fence - one at the top, the second at the bottom. These elements are called veins. Next, a slab is nailed vertically to them. As you can see, more material is consumed than in the first option, but the fence turns out to be more durable. Another “plus” is that its production requires not such long pieces of slab. Consequently, planks with defects, which would definitely have to be rejected if placed horizontally, can be put into use in this option after trimming.
In both versions of the fence, the slab can be attached in two ways:
- with a gap (visible fence);
- without gap (not visible).
Those who want to install boards without a gap should take into account that over time they can significantly decrease in size due to drying. Therefore, raw slabs must be laid with an overlap. Its size with a width of 200 mm is approximately 15 mm.
Bundle of croaker
In addition to the antiseptic, the wood must be protected with a coating that prevents contact with air. It can be:
- facade paint;
- varnish
Varnish coating, unlike paint, allows you to preserve the natural color and pattern of wood. Today, yacht varnish has the maximum durability.
The paintwork needs to be updated at least every 2 years, and preferably annually.
Everything that was said above is, so to speak, minimal execution. You can add some accessories that will make the slab fence more impressive:
- A small gable canopy over the fence along its entire contour. In addition to the fact that this element looks very interesting, it also protects the fence from rain. In this case, the service life of the wood will be longer.
- Round “nickels”, which are a cross section of a log. This simple decoration on the slab looks very harmonious. “Pyataks” are nailed from the outside along the entire fence with equal spacing.
The same “nickels” can be used to lay out a path along the fence or inside the yard.
The top of the slab, when positioned vertically, can be given a beautiful shape with a jigsaw or trimmed so that the upper edge of the fence is wavy.
Design options
The slab differs from the board only in its non-standard shape. A fence can be made from it in both vertical and horizontal directions, using all known techniques.
Horizontal
The most budget-friendly and least labor-intensive option would be a visible fencing made of slabs, mounted horizontally on supports at intervals.
Source na-dache.pro
This is not the most durable structure, and it also does not protect well from penetration into the territory - it is easy to climb onto the fence using the “lying” crossbars, like using a ladder. But it is suitable for fencing a pasture or barnyard. If the veins are sparse, the space between them can be covered with a mesh
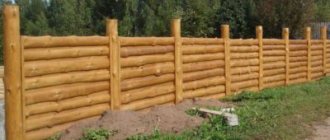
There is another option on how to make a slab fence more reliable and solid. It needs to be cut along the edges and secured tightly. The result will be an imitation of a powerful log fence that can be installed along the facade and perimeter of the site.
Source na-dache.pro
By securing the slab on both sides of the support pillars in a spaced manner, blocking the cracks on the reverse side, we get a fence that is not visible from the outside, but is well ventilated.
Vertical
To position the slab vertically, you will need at least two veins connecting the support posts and serving as a frame for the sheathing. The number of veins depends on the height of the fence: if it is higher than 180-200 cm, two will not be enough.
The planks can also be fastened at intervals, side by side or on both sides. And even with an inclination. Advantages of vertical installation:
- higher strength and reliability of the structure;
- It is more difficult to climb onto the site using such a fence;
- It is easier for him to collect material by cutting out sections of the required length without defects from an unsorted slab.
Note! Like a regular board, the slab dries out and decreases in size. Therefore, after some time, a solid fence will have to be rebuilt, moving the slats to eliminate cracks and adding new ones.
One of the options for making a double-sided fence is shown in the video:
Croaker is a very specific material. In my opinion, it does not combine well with metal and concrete, so it is also better to install wooden posts for a permanent “front” fence.
Choosing a slab
There are two types of slab - wood and business. Wood is not used to create fences. This type of slab has an uneven surface. Horizontal picket fence photo? Often it is a split of unstable wood species.
Business slab is used for cladding sheds, building formwork, fences and partitions.
This type of croaker is also conventionally divided into:
- thick;
- thin.
The price of slabs packaged in packs is much higher than those dumped in a heap. This type of croaker has less debris. The best is the calibrated type, in other words, a block house or imitation log. It is an order of magnitude more expensive than a simple business slab.
However, it also needs careful processing and cleaning.
The croaker attracts attention with its inherent texture, but gradually the bark will begin to peel off, and the bark beetle will most likely grow inside the board. Barked and sanded croaker looks rich and prestigious
After appropriate treatment using special solutions, such a fence is guaranteed to last at your dacha for at least twenty years.
Workers at the sawmill will help you grind the slab for the appropriate money.
Do not buy poplar boards under any circumstances, as it rots very quickly. A fence made of Euro picket fence in a checkerboard pattern photo? The fence from it will be unsightly. Craftsmen do not advise buying birch boards either - they are very hard. After the material is delivered to you, you will need to start sorting and processing it as quickly as possible, because the harmful bark beetle will very quickly ruin all your material.
You will need to be sure to dry the wood after processing it.
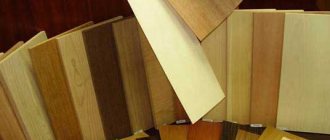
Business croaker - what is it?
When talking about such material, it is no coincidence that the prefix “business” is added. The thing is that there are two types of this wood material, which is obtained when cutting a large log. There is a wood-burning and also a business croaker. The first wood material is used only for lighting stoves, as is clear from its name. This method of application is due to the fact that after cutting the quality of this waste is too poor. Further use of this material is no longer possible.
However, in order not to throw out mountains of waste from the sawmill, they are sold at significantly reduced prices for lighting stoves in the winter. A completely different story turns out with a business slab. Of course, it can also be used as kindling material, but its main purpose in recent years has been the construction of non-residential buildings, fences and fences. It can also be used for the construction of outbuildings in the country. A photo of a business slab is presented in our article. Even in the picture you can see the differences between it and its wood-burning brother. The difference is that the cut side of the commercial lumber is processed and also sanded. The board itself is completely treated with antiseptics and protective agents against moisture and pests.
Ideas for using a slab
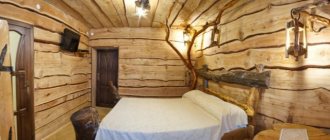
One of the win-win solutions from the point of view of affordability and durability of the selected material can be covering the wall with a slab. When decorating the interior of a house made in eco-style, if there is a desire to emphasize maximum naturalness and natural beauty in the design, it is used quite often in the construction of a summer house, bathhouse, or country house.
In such cases, a slab façade will fit well into the overall concept. At the same time, a wide selection of finishing materials opens up great possibilities in the design of such structures. The material is also widely used
- during the construction of outbuildings, fences;
- installation of formwork for the foundation;
- roof truss system.
Light weight allows you to reduce the load on the foundation, eliminating the need to erect powerful structures, which becomes an important argument in favor of using a slab for cladding and roofing.
Fences are often made from it (and the fencing can be either temporary for the construction period or permanent). If you correctly approach the selection of materials and their processing, the result will be not only practical, but also aesthetically attractive. In such houses, furniture and household items made from similar materials will look organic. Craftsmen make chests, cabinets, shelves, tables, frames, chairs, and beds from slabs. The variety of available wood textures, types and shades of paint and varnish coatings allows you to achieve a wide variety of decorative effects.
We make a fence from slabs with our own hands
The construction of such a structure is in many ways similar to the creation of fences from edged, unedged boards, or picket fences. Therefore, we will not go into detail at some stages so as not to repeat ourselves.
Marking, foundation
After developing a construction scheme and calculating costs, selecting a location, and cleaning the site, you should proceed to marking.
The type of base largely depends on the selected raw materials for the pillars. In the version with a fence made of slabs, pillars made of wood or metal are considered optimal.
Thematic material:
- Wooden fence posts
- Metal fence posts
Preparing material for fastening
To begin with, the selected planks are cleared of bark. This is a mandatory procedure, since there may be insects under the bark that spoil the wood and significantly reduce its service life.
This is done this way:
- This can be done using an axe, a bayonet shovel (suitable for thick and wide blocks) or a scraper. The last tool, which is the most convenient and neat to use, is a steel strip with two handles.
- The slab is placed in a vertical position with emphasis on any reliable structure.
- Use a scraper to remove the bark from top to bottom. In this case, the tool does not damage the wood.
- Knots are cleaned separately. The edges are smoothed with a plane or an ax.
Treatment with protective agents
The next step is the application of a special composition (antiseptic), which penetrates deep into the structure of the wood and creates a film on the surface, protecting the raw material from moisture, the development of fungus, and insects.
A separate category is fire retardants, that is, products that make wood resistant to fire.
Thanks to the treatment, the service life of the slab increases to 15 years.
Drying time is a day.
Tips for choosing a suitable protective agent against rotting, the procedure for processing wood.
Installation of slab
This is done in two ways:
- Horizontally. Simplified fastening option. The boards are nailed or screwed directly to the supports. Material consumption is minimal. Nails and screws should be treated with an anti-corrosion compound. Disadvantage: low strength and stability of the structure.
- Vertical. Outwardly it resembles a fixed picket fence. Two horizontal veins (logs) are mounted to the supports: one 20 cm from the top, the other 20 cm from the bottom. The obapole is fixed vertically. The material consumption is large, but elements of different widths and thicknesses are suitable.
In addition, in both methods, the boards can be fastened either with or without a gap.
Other nuances of installing wooden elements to the structure are described in detail in this article: “Wooden fence on metal poles.”
Decorating a finished fence
An article about choosing paint and the process of applying it to a wooden surface.
The fence will look impressive if you add the following elements:
- gable rain canopy along the entire perimeter;
- flower pots hung on sections;
- carved contours;
- cut round coins from wood, nailed to the fence outside;
- Interesting sawn ends of both floors.
An alternative to painting is brushing, tinting or varnishing the material.
From the remains of the slab you can make a small hedge for a flower bed.
If you use your imagination, even with minimal investment you can turn an ordinary fence into a unique, beautiful structure.
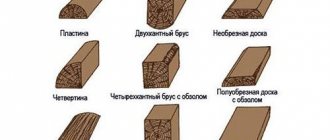
Types of lumber
Croaker is classified into species according to shape, condition, type of wood and a number of other characteristics.
Based on quality and characteristics, they are distinguished:
- Business.
This is a board with a thickness of 3.5 cm, partially covered with bark. It is sorted by surface evenness. Used in finishing and construction work. For example, lumber is suitable for constructing outbuildings or arranging formwork for the foundation of a house. Proper use of a business slab allows you to save on repairs, cladding and construction. - Wood-burning
. The board has a thickness of up to 3.5 cm. It is used in construction as an additive in the production of building materials. For example, wood chips are made from it, which is used to produce wood concrete blocks. Often, wood-burning waste is recycled. Fine charcoal, fuel chips, and cellulose are obtained from it.
According to the type of wood, croakers are as follows:
- fake;
- oak;
- pine;
- birch;
- aspen;
- spruce;
- cedar, etc.
By appearance and condition, both sexes can be:
- uneven (these are boards whose length varies linearly);
- with expansion (width and thickness change smoothly from thin to thick edge);
- flat (boards have the same width and thickness).
Recommendations for choosing timber
The selection of sawing waste depends on the fence design you have chosen. If you need to install a solid picket fence without gaps, then it is advisable to choose slabs with smooth edges, otherwise you will have to work on them with an ax or plane. For a picket fence with gaps, the requirements are not so stringent; uneven boards will also work here. The main thing is to arrange them correctly so that the fence looks aesthetically pleasing.
Not all of this waste is suitable for collection.
When selecting materials, follow these recommendations:
- Try to select wider and thicker croakers. Some of them can be cut to length to make a decent lumber suitable for posts.
- Avoid buying scraps of logs that were cut during the warm season and have been left outdoors for a long time. Under the bark of such material, the wood is often affected by mold and pests. In winter, you can safely purchase stale wood, since bacteria and pests are inactive in the cold.
- Do not take openly damp timber; it will begin to crack and warp as it dries, causing the constructed fence to lose its appearance.
- Do not buy a croaker that is too narrow and thin. To assemble a picket fence, you will need a large number of narrow boards, and removing bark from thin cuttings is very inconvenient.
It is better to use ready-made timber for the pillars
A separate issue is the choice of lumber for poles. For a temporary fence around the site, supports made of two slabs nailed together will do. A structure designed for a long service life (15-20 years) must be placed on poles made of timber with a cross-section of 10x10 cm or round timber with a diameter of 80-100 mm. The crossbars can be made from thick scraps or take 60x40 mm timber. For a more permanent fence up to 2.5 m high, you will need metal pipes of round or rectangular cross-section measuring 40x60 mm (for a solid picket fence) or 40x40 mm (for a fence with gaps).
Preparing the slab for use
Even the highest quality selected material should not be used for the construction of a fence without prior preparation. It must be sanded and impregnated with a rotting and insect repellent.
Removing bark from a slab is more difficult than from whole logs; it is inconvenient to do. For sanding, use an ax, a strong knife, and even a garden hoe. All of them leave marks and stains of the subcortical layer on the wood.
To get rid of the unsightly appearance of sanded boards, they are treated with an abrasive tool, sandpaper. Grinding a “humpbacked” surface also takes a lot of effort and time.
Therefore, a temporary fence made of slabs is built without preliminary preparation: it will stand for 2-3 years, and the extra costs will not pay for itself.
Source fs1.inspider.ru
Many people like the look of croaker with bark. There are also those who regret spending time and money on complex preparation, which significantly affects the cost of cheap material. And it is used as is. Such a fence will not last very long, because it is under the bark that bark beetles and other insects find shelter and protection. If you really want to leave the bark, then you need to thoroughly soak the boards with an antiseptic and biocide. Simple painting, even in two or three layers, is practically useless.
You can do this:
- put together a long box from boards, into which the whole slab for the fence can easily fit;
- line it inside with thick plastic film;
- pour liquid impregnation into the resulting bath;
- “bathe” the workpieces in it, completely immersing it in the solution and letting it sit for at least a few minutes.
This method may require some excess impregnation, but will save time, especially in the case of slabs with their uneven surfaces.
An example of antiseptic treatment of lumber in a bath is in this video:
Sanded material can be processed manually - with a brush or spray. It is advisable to do this twice before attaching the boards to the frame, so that there are no unpainted areas left. The soaked workpieces must dry. If they have to be cut already during the installation of the fence, the cut points are also processed.
Advice! It is better to impregnate not whole whips, but already cut pieces to size. This will reduce the consumption of the product and allow you to use cuttings that are not soaked in “chemicals” for firewood.
If everything is done correctly, products made from slab will last a long time - you can safely count on 12-15 years, especially if you update the protective layer at least once every 2-3 years.
Additional information and useful tips
It is preferable to use wooden supports for installation. If the material is homogeneous, then joints are better. However, other pillars can be used:
- channels;
- pipes;
- concrete;
- stone.
You can easily make such a fence by hand.
For installation you will need:
- grinding machine;
- ax and shovel;
- fasteners.
There are several installation steps. Everything can be done with your own hands. The first is the preparation of the material.
You can always easily buy lumber for your work at a sawmill for a nominal fee.
Wane can be sharp or blunt, edged or unedged. The sharp layer occupies almost the entire width of the side surface of the timber, and the blunt layer occupies only a certain part of the lumber.
A fence made of such material will be durable and high-quality, and if you make every effort, it will be quite beautiful and creative.
This is why a grinding machine or an ax is needed. After removing the bark, the wood planks need to be dried in the sun and sanded. This ensures a presentable appearance of the material. Then, in finished form, it is treated with an antiseptic and coated with drying oil and varnish. This treatment serves as protection against moisture from the atmosphere.
The slab is a board sawn from the side, and its other side has its original appearance. It has the texture of untreated logs.
The posts for installing the fence are buried 70 centimeters or even 1 meter deep. The territory is marked using a cord and pegs. This is how the places for installing support pillars are marked.
The price of such a fence varies depending on the type of wood, its size, and finishing method.
The wood must be treated before installation. It needs to be protected for a longer service life. The bottom is wrapped with thick roofing felt several times. The hole in which the post is placed is filled with broken brick material. You can use crushed stone or construction waste.
Concrete pillars simply need to be installed in the holes and backfilled with solid materials. Pits for installing metal and channels are used to fill with crushed stone and sand. After installing the support, concrete mortar is poured there. They are covered with a primer and two layers of paint to prevent corrosion.
You will need to sand and carefully finish every single board.
For brick and stone supports, a foundation is built under them. Next, the lags are installed. And then the slab is attached. If the fence boards are vertical, then the wooden logs are installed horizontally. Remember! They must be pre-treated and then attached to the support.
If the slab is horizontal, then it is mounted with a vertical beam.
Barked and polished croaker looks rich and prestigious.
Finally, finishing and decoration of the fence are performed.
Such a fence is installed not only because of cost benefits. It is often preferred by people who are attracted by antiquity, connections with past generations, nature and naturalness in everything. Such fences are most often installed at dachas. But this material is increasingly conquering the market, and today you can see corresponding fencing in many private sectors. People realized that it was not only profitable, but also very beautiful!
You are quite capable of cleaning the slab with your own hands - an ax and a grinder.
Few people are any longer confused by the seemingly rustic design of the mounted fence. If the finishing is done well, it ends up looking completely unique. A person with taste and imagination can turn the fence of his property into a whole work of art! Of course, there are countries where they don’t put up fences at all. However, the mentality of our people is difficult to overcome... And why? After all, a fence is not only protection from prying eyes and encroachments on one’s own territory, but also a barrier to strong winds, flying branches and debris.
Selection of unedged boards and tips for choosing
There are two types of croaker - wood and business. The first type is not suitable for constructing a fence, since its surface is uneven and most often it is a split of unstable wood species. Business slab is used to sheathe sheds and is used to construct formwork and outbuildings, fences and partitions. It, in turn, is divided into thick and thin. Croakers formed into packs are more expensive than heaped ones, since they contain less waste. The calibrated type of material, or block house, is considered the best. It is ten times more expensive than a regular business slab. But it will also have to be processed and cleaned.
Unbarked croaker seduces with its texture, but over time the bark will peel off, and a bark beetle may infest it. Barked and sanded material looks expensive and noble, and if it is also treated with protective impregnations, then the durability (20–25 years) of the fence is guaranteed. Grinding services are provided by sawmills for an additional fee, but it is quite possible to clear the bark from the dies yourself - using an ax and a grinder.
There is no significant difference in the species, but poplar (rots) and birch (excessively hard and warps) should be avoided. It is worth remembering that after delivering the material to the site, it should be sorted and processed in a short time, otherwise the bark beetle will very quickly render the wood unusable. Then it is recommended to dry the dies.
If you want to save money, choose croaker
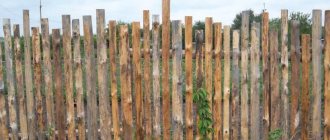
Fence options
- Vertical, or palisade. This is the easiest option to implement, when the dies are packed vertically onto a pre-prepared frame.
- Horizontal, without the use of crossbars. The slab is stuffed horizontally from pillar to post, end-to-end, with gaps or overlapping.
- A double-sided fence in which unedged boards are mounted on both sides. This is the most expensive option, since you need twice as much material.
Gallery of options
Combined fence decorated with slab
Simple slab fence
Double fence made of slab Stylization as an ancient castle Rustic style
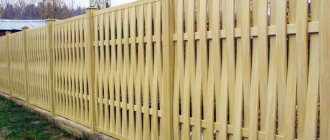
Viewable fence Eurofence made from slab
Combination of vertical and horizontal laying Horizontal packing
Materials for the device
- Gorbyl
- Poles (metal, wood)
- Fasteners
- Cross members - poles or beams, or long dies of the slab itself
- Sand, gravel
- Special composition for wood processing
- Resin or waste
- Dye
- Cement
Tools for building a fence
- Twine and tape measure
- Carpenter's ax
- Sander
- Saw
- Shovel or drill
- Hammer
- Brush
Basic Tools
It is important that the weather is dry at the time of construction of the fence so that the unedged board can dry out after processing. The installation of a slab fence can be divided into three stages.
- Calculation of the fence area and amount of material.
- Site preparation and marking.
- Preparation of lumber.
- Installation of support pillars and frame construction (if necessary).
- Sewing the slab onto the frame.
Calculation of fence area and amount of material
To calculate the number of pillars and building materials, you can use a free online calculator, or do the calculations yourself. The calculation begins by measuring the perimeter of the territory that needs to be fenced. Next, the distance between the supporting pillars is determined and the amount of required building materials, as well as the costs for them, are calculated.
For example, if the area of the plot is 12 acres, then the perimeter will be 140 meters. If the distance between the pillars is 2 meters and the width of the gate is 1 meter, then a total of 70 pillars will be needed. With a board length of 2 m, width of 10 cm and thickness of 2.5 cm over the entire area of the fence, which is 278 square meters. meters, you will need 1390 pieces or 6.95 cubic meters of slabs. The material is taken with a reserve so as not to buy more later. With a fence height of 2 m and a width between sections of 2 m, you will need a metal pipe 76 x 4 mm.
Next, we calculate the depth of burial of the pillars to determine their length. In order for the fence to stand firmly and not be exposed to the force of wind, the depth must be at least 60 cm. A foundation made of a slab fence is not needed, but the metal supports must be concreted. Wooden posts must be treated with bitumen mastic or charred.
In soft soils, the posts are driven into pre-drilled holes. The pillars are set strictly according to level.
Installation of a wooden pole
Pillar concreting
Interesting wooden fences: photos and design features
Fences made of wood have a certain design. The photo shows individual elements of the device. The fence is made from certain components: transverse logs, supporting elements and a picket fence.
Fences can be made in a variety of configurations
You can install the fence yourself. To do this, you need to select the right materials and install supporting elements. For strong racks of the structure, profiled metal pipes or wooden beams are used. Wooden parts require additional processing. The part that is dug into the ground must be covered with bitumen mastic. In addition, the beam is additionally treated with antiseptic agents. To protect iron parts, you need to remove rust, prime the surface and paint it with frost-resistant paint.
Unusual designs, as a rule, are difficult to manufacture and high in price.
Photos of wooden picket fences: design features
To choose a suitable design, you can look at photos of wooden picket fences. Such designs have the following advantages:
- made from different types of wood;
- such designs are distinguished by their originality and attractive appearance;
- combine with any type of landscape design;
- combined with various bases: stone, brick, metal or concrete;
- characterized by durability and strength;
- installation work is simple.
The picket fence is a universal solution for all cases
Picket fence products require simple care. They require quality painting every year.
Construction of a simple picket fence
Board fences: photos and advantages
Fences made of boards are especially in demand. The photo allows you to see the most interesting options. They have the following advantages:
- goes well with any setting;
- environmental friendliness of materials;
- affordable price;
- ease of installation;
- durability and strength;
- large selection of original models.
Any fencing designs can be created from boards
You can make such a fence yourself. To do this, take several pegs that are driven into the ground around the perimeter of the site. Then the boards are prepared. These elements can be made in any convenient shape. In place of the pegs, recesses are drilled into which supports for the fence are placed. The racks are made of beams. They are placed in prepared holes and covered with earth. The veins are nailed down using nails. Then the boards are installed tightly to each other. Then the surface of the structure is covered with drying oil or paint.
Unedged boards are used to decorate a rustic exterior
Video: decorative fencing made of unedged boards
https://youtube.com/watch?v=1rpmP8eZUrw
https://youtube.com/watch?v=1rpmP8eZUrw
https://youtube.com/watch?v=1rpmP8eZUrw
How to make wooden fences on metal posts correctly
High wooden fences on metal posts are especially durable. Wood of such structures is treated with special impregnations. Metal poles are easy to install and have a long service life. For their manufacture, pipes of various profiles are selected.
Construction of a structure on metal poles
Metal supports can be installed in different ways:
- the pipes are driven into the ground, while the verticality of the element is checked;
- a well is drilled in the soil and supports are installed into it, which are well compacted;
- Concreting of each pillar is carried out;
- a concrete base is installed into which metal racks are installed.
Methods for installing metal poles
An example of the simplest design on metal supports