Algorithm for replacing knives on an electric planer
To remove the knives from the electric planer and replace them with new ones (or properly sharpened ones), you will need a set of wrenches, and also, in some cases, a screwdriver. There is no need to completely assemble and disassemble the electric plane to change working attachments. Replacement is performed in the following sequence:
- rotate the drum, placing it in such a position to gain access to the knife mounting bolts;
- loosen, but not completely, these bolt clamps;
- remove the working attachment manually or using a flat screwdriver;
- the rest of the blades are treated in a similar way;
- place new knives in the sockets, securing them with bolts;
- put them in the correct position.
The main point is the need to place the blades exactly in the sockets and securely fix them so that they do not fall out while using the tool. Due to the fact that different models of electric planers may have different attachments for working attachments, it is recommended that you first read the operating instructions for the equipment you are using.
When there are two cutting attachments installed on the drum of an electric planer, both need to be changed at once. This will prevent the occurrence of an imbalance, which results in a decrease in the quality of lumber processing and failure of the electric planer.
Safety requirements
If you use the tool correctly, you can quickly and efficiently complete a fairly large amount of work. However, if you do not adhere to safety requirements, you can suffer significant injuries.
- Before work, the workpiece must be securely fixed, otherwise it may move or even fly off during work.
- During the technical inspection of the blades and their adjustment, the electric planer must be de-energized by unplugging the cord and plug from the socket, because accidental starting can lead to very unfavorable consequences.
- You need to start processing only after the knives have started and warmed up, that is, the cutting elements must accelerate to the required speed.
- The instrument must be placed exclusively on its side.
When working, avoid bending or tangling the cord that supplies power. Electrical insulation and integrity are also required.
Electric planers are an essential tool for modern carpenters, joiners, and all specialists involved in processing lumber. Their prevalence is due to practical efficiency and the presence of significant advantages of this equipment compared to manual analogues. To fully utilize the device's potential, electric planer blades must be pre-adjusted before processing wood. Also, the blades must be sharp. This, together with the correct adjustment of their position, will allow processing significant volumes of boards or beams without any special problems or effort on the part of the user.
How to replace knives on an electric planer
To remove old bits, you need a set of wrenches. A screwdriver may also come in handy.
How to do:
- turn the drum of the electrical appliance so that the bolts become accessible;
- loosen the fixation;
- remove the working attachment;
- insert new blades into the vacated grooves;
- secure them with bolts.
Important! To avoid imbalance, all cutting parts must be replaced at once. It's time for adjustments
To do this you need a complete hexagon and a metal ruler
Now it's time for adjustment. To do this, you need a complete hexagon and a metal ruler.
How to adjust electric planer blades:
- Place the instrument on the table so that its drum faces upward.
- If necessary, wipe off resin from cutting accessories.
- Set the minimum planing depth.
- Place the blade in the slot between the soles.
- Place a ruler on the back plate.
- See if its edge touches the consumable. If not, raise the bar. To do this, you can slightly loosen the fasteners using the hexagon from the kit.
- Tighten fasteners.
All this needs to be done for each nozzle. For balance, the distance between the knives should be the same.
Correctly sharpening the knives of an electric planer yourself is not so difficult. If the situation is not critical, you can do everything manually using a sharpening stone. If the blade is completely dull, a special device is needed. You can purchase it or make it yourself.
How to properly adjust knives
Adjusting the knives on the drum yourself is not a big problem. To set the position of the tool blades before work, you will need:
- hex wrench included with the plane;
- metal ruler or piece of glass of suitable size.
The setup is carried out by performing all operations in this sequence.
- Turn the electric planer over, placing it upside down on a table or workbench.
- If necessary, remove resin deposits from the nozzles using a solvent.
- Set the front part of the sole to a position that provides the minimum planing depth.
- Rotate any blade, placing it in the slot between the plates.
- A ruler is placed on the surface of the base plate.
- If the cutting edge does not touch it, then the knife bar is raised to the desired level, loosening (slightly) the fastening bolts using a hexagon.
- After alignment, tighten the fasteners.
- The procedure is repeated with all attachments, while setting gaps of the same size to prevent imbalance of the drum and vibration of the power tool during operation.
- By turning the drum by hand, determine the ease of its rotation.
- Check the correctness of the settings on the unnecessary workpiece.
Planing process: nuances
For planing to take place absolutely safely, the main condition is rigid fastening of the workpiece. Planing can begin only after the workpiece has been clearly fixed. First, rough processing is carried out. Sherhebel is used for this purpose. The movements of the tool on which the sherhebel is installed must be directed across the grain. Otherwise, a large amount of wood will be spent on planing.
After processing small workpieces with Sherhebel, the surface must be cleaned with a double plane.
Plane sharpening angle diagram.
The movement must be performed along the fibers. The result is a smooth surface, without roughness.
A power planer is often used to chamfer a part. Depending on the width of the required chamfer, the edge of the workpiece is processed with a plane. Moving the tool at an angle allows you to obtain the desired chamfer angle.
If you attach a special side stop, usually supplied, to the electric planer, it becomes possible to perform folding. In this case, the stop must touch the workpiece being processed.
How to sharpen a knife
Of course, a hand plane, like any other tool, requires some care. No matter how good the steel the knife of this tool is made of, sooner or later it will still become dull and will have to be sharpened. Most often, this procedure is performed on a special stone called a touchstone. The latter is pre-wetted with water. When sharpening, it is advisable to moisten the knife itself. You should press it against the stone as tightly as possible.
The sharpening angle of a hand plane may vary depending on the model. Most often this figure is 30 degrees. When working on a whetstone, you usually just pay attention to how the blade was originally sharpened.
Sometimes experienced carpenters sharpen a plane knife on a wheel. In this case, it should be pressed not against the edge, but against the side surface. When using a wheel, you can also get a pretty high-quality sharpening. It will be very convenient to use a hand plane with such a knife. But only if you use an abrasive fine-grained abrasive wheel. After sharpening on such a tool, finishing is usually done. This procedure is performed either on a piece of sandpaper mounted on a table or on a block. Checking the quality of sharpening is quite easy. To do this, you just need to carefully examine the blade. If it does not shine, then the knife is sharp enough to be used.
Stages of preparing the tool for work
To prepare the plane for work, you need to do the following:
- adjust the knife extension;
- adjust the position of the chip breaker (if equipped);
- adjust the mouth gap.
The overhang of the knife affects the thickness of the chips removed, the speed of work and the cleanliness of the resulting surface. For rough processing it should be about 0.5 mm, for finishing - less. The process of setting up a metal plane is not difficult, but it varies greatly between models. In any case, the adjustment is made by rotating the adjusting screw. Typically the screw has a left-hand thread, and when rotated clockwise, the offset increases.
To properly set up a wooden plane, do the following.
- Hit the back of the case a couple of times with a hammer. This will weaken the wedge that holds the blade. Then it must be removed.
- Adjust the knife extension to a shallower depth than required. It is advisable to look at the end of the tool to visually control the position of the blade.
- The knife has a one-sided sharpening. On most models it is inserted into the body with a chamfer backwards.
- Install the wedge.
- Adjust the position of the knife. To increase the reach, hit the upper non-sharp edge of the knife with a hammer. To reduce it, blows must be made at the end of the plane. Using blows on the sides, achieve an even position of the knife and wedge. The tip of the knife should be clearly parallel to the sole of the plane.
If the height of the knife is too low, the blade will not cut, but will slide along the surface. Next we set the position of the chipbreaker. It should be at a distance of 1-5 mm from the sharp edge of the knife. The more, the easier it is to plan, the thicker the chips are and the worse the quality of the processed surface. It is secured with a screw or eccentric clamp. Adjust the mouth gap. The smaller it is, the higher the quality of the product, but the lower the productivity.
Some models allow you to adjust the angle of the knife. It is different for working with different woods.
- 45 degrees – for planing soft wood. Most planes have this angle of inclination.
- 50 – for hard wood.
- 55 – used in profile planes for processing soft materials.
- 60 – in profile planes for hard wood.
The sole of the plane is checked periodically. It should be flat. To check, apply a ruler to it in several directions and look at the clearance. Small gaps are allowed, but not at the “mouth”, not at the beginning and not at the end of the sole. It should be taken into account that these gaps on a metal plane appear larger due to the reflection of light from the shiny surface. In reality they are less than 2 times.
If the sole is not level, do the following:
- remove the blade from the plane;
- attach sandpaper to a completely flat surface;
- Sand the sole until the correct result is achieved.
The quality of the sole is determined as follows:
- if there are many small shiny spots evenly distributed on the sole, it is flat;
- if the shiny spots are large and there are few of them, sanding must be continued.
The main method of verification is the removal of test chips. The chips should be the same thickness across the entire width of the plane. The main thing when working is skillful hands. Therefore, we will tell you how to use a plane correctly.
How to use a hand plane on wood correctly
The rules for using hand tools in general are almost the same as the operating instructions for an electric planer.
Before work, the device is carefully inspected for defects and it is made sure that the sole is not deformed, and the cutting parts are located parallel to it. The process of using a plane looks like this:
- A piece of wood is secured in a workbench clamp and a hand tool is placed on top of it.
- The device is firmly grasped by both handles and begins to move smoothly and with even pressure along the fixed board.
- The body is moved forward along with the tool, with the supporting leg placed forward.
As with an electric planer, when performing complex work, it is recommended to remove layers of wood gradually. This will prevent gross mistakes and protect against the appearance of snags, humps and depressions on the surface of the board.
A hand plane is convenient for planing small narrow boards in small quantities.
We process wood: what do you need to know?
Before processing lumber, you need to determine the direction in which you will plan. Usually planed in the direction of the wood grain. If the lumber is made from several boards, then you need to plan it diagonally.
To prevent the edge of the board from becoming uneven, you need to use a corner stop, which is attached to the base of the electric planer on the side and perpendicular to its axis.
When you have finished planing the wide board, you will need to align the boundaries between the passes. This stage is called scraping. For this, a special grinder is used, which will remove all roughness.
The world's first electric planer was released in Japan in 1958. Its appearance on sale is due to the desire to facilitate manual labor, which is a very tedious, monotonous and time-consuming task when processing wood.
This power tool can significantly save the family budget - untreated wood costs several times less than planed wood.
In order not to damage the tool or the material being processed, or to accidentally injure yourself, you need to know how to properly operate an electric planer.
Sharpening other cutting tools
In addition to knives, it is often necessary to sharpen tools that are actively used in the household. The most popular are an axe, a saw attachment, and scissors.
Scissors sharpening angle, how to choose
Scissors are different from scissors. There are options for fabrics, and there are those that are used at home for any purpose: cutting paper, tape, oilcloth, thread, and so on. But most often it is household scissors that cause the problem. Tailor's items are usually sent to a special workshop.
So, to restore them to their former sharpness, you need to perform the following manipulations:
- open the tool as wide as possible and point the ends upward;
- then take a sharpener (block or sharpener);
- slide along the blade from the ends to the rings;
- repeat slow movements several times;
- After the procedure, be sure to sand each blade in the same direction.
Be careful and remember that moving back and forth is strictly prohibited. This can cause serious damage to the properties of the tool.
PHOTO: tytmaster.ru To restore the functionality of the scissors, you can use an electric sandpaper with low abrasiveness
How to choose an ax sharpening angle
In order for the ax to perform its function properly, it is necessary to sharpen it periodically. This operation is often performed mechanically using an emery stone. You will find details of working with this tool in the video:
Watch this video on YouTube
PHOTO: vodakanazer.ru You can try sharpening slightly damaged scissors with foil folded in several layers
Dear readers of our online magazine, if you know which knife sharpening angle is best, or have personal experience in carrying out such a procedure, be sure to write in the comments. Also, do not forget to rate the publication and ask questions.
Previous DIY HomiusHow to clean a hood from grease and dirt: the most effective methods Next DIY HomiusHow to create a unique design in a small area
Preparation for working with an electric plane and rules for its installation
First, you should read the operating instructions. Next, preliminary preparation is carried out, checking:
- position of the front part of the sole;
- degree of freedom of rotation of the working drum with cutting elements fixed on it;
- presence of various damages to the plug, power cord, housing;
- freedom of movement of the power button;
- correct placement of knives.
The functionality and configuration of the electric planer must be checked at the time of purchase. The rotation of the drum is checked by moving it with your hand. The button operates by pressing it. The integrity of the unit is determined visually. When no defects are found, a test run of the equipment can be performed.
Before planing with an electric planer or performing other operations with it, it is recommended to first practice processing on unnecessary boards or bars. This will allow you to “get your teeth into” and adapt to the technique in order to get an acceptable result in the absence of the necessary practical experience.
It is recommended to start setting up the electric planer by adjusting the position of the front part of the stove with the plug unplugged. To do this, you will need to use a ruler or a suitable size piece of ordinary glass. All actions are performed in this sequence.
- The front (movable) part of the sole, using a special adjusting handle, is set to a position that provides the minimum depth when planing.
- Place the power tool on a level workbench or work table in an inverted position.
- The drum is rotated so that one of the knives is located above its axis.
- A ruler or glass is placed on the sole: they must lie in the same plane.
When the overlay on the slab is tilted, this defect is eliminated as follows:
- remove the adjustment handle and the front part of the sole;
- clean the opened cavity from chips and dust;
- lubricate the mechanism;
- put the stove in its original place;
- install the handle;
- Check the position of the sole using a ruler.
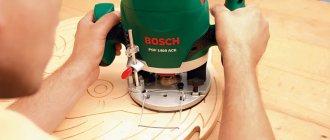
The installation of the blades is checked using a metal ruler. To do this, it is applied to the edge of the slab. Then they look to see if the blades located on the drum touch the ruler. When the knives do not come into contact with the ends of the lining, begin to regulate them. Using the hex wrench supplied with the power tool, loosen the blades on the drum.
Using the described method, the position of the blades is adjusted for models with both one knife and two or three. After completing the regulatory adjustments, they will be installed in the desired position.
When setting the correct position of the blades, they should not touch the sole when the drum rotates.
Some models of electric planes include a support stand. This makes it possible to perform work using this device in two ways:
- placing it in a stationary position, when the power tool is fixed motionless (rigidly) to the workbench or table;
- using an electric planer as portable equipment.
Electric planer with stand included
A rigidly fixed tool is, in fact, a planer. The wooden blank is moved along it, pressing it with sufficient force. At the same time, it is convenient to perform work operations with the help of a partner. You can work with short-length lumber alone.
The easiest option for preparing an electric planer for work is to contact specialists for help at a service center. Self-tuning of the tool should be carried out according to the recommendations set out in the manufacturer's instructions.
Performing various types of work with an electric planer
Electric planers can be used to perform various operations:
- plan wide or narrow boards, as well as other wooden blanks;
- choose quarters;
- remove the chamfer.
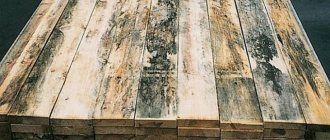
Before carrying out work, you should select lumber of appropriate quality:
- without knots;
- well dried;
- without cavities filled with resin, chips and cracks (longitudinal or transverse);
- with a flat surface that does not contain depressions or protrusions;
- There should be no metal inclusions in the board or timber: nails, screws, bolts, brackets, screws, staples and others.
When using a portable method of using an electric planer, the workpiece is securely fixed on a hard surface. To do this, install at least 2 stops, but it is better to place them on all sides of the part. They also ensure free movement of the power cord so that it does not get caught. The safety of the operator partly depends on this.
Cutting a quarter using an electric planer
Selecting a quarter (removing a fold) is one of the operations performed using an electric planer. To do this, you need to install two stops:
- the first (top), which controls the movement of the tool along the workpiece in the desired direction;
- the second (lateral), which determines the depth of the quarter sampling.
The stops are adjusted to the required dimensions, following the instructions in the operating instructions for the product used. In this case, the distances are measured by focusing on the cutting edge of the blade, which occupies the upper position.
There are two ways to select a quarter:
- moving an electric plane along the workpiece;
- moving the processed wooden part along a homemade machine.
In any case, the movement of the power tool or workpiece must be at the same speed (smooth).
Removing the fold in the first case is carried out in several passes, proceeding as follows.
- On the surface of a well-fixed workpiece, using a marker or pencil, marking lines are applied that determine the depths with the width of the quarter.
- Turn on the electric plane.
- After the drum has reached full speed, the tool is brought to the workpiece. The movement begins with light pressure on the front part of the working unit, leveling the force after the sole is completely on the surface of the part and increasing it at the end.
- Perform passes until the desired sample size is achieved.
Quarter sampling scheme
To mark long workpieces, it is convenient to use a marking cord.
The second option (stationary) is more productive when it is necessary to perform significant work . They work with the workpiece slowly. After its front edge extends beyond the drum, it is intercepted with the second hand, distributing the force evenly over the part.
Sampling a quarter is a fairly complex operation that requires this kind of skill. Therefore, the following errors may occur:
- angle bevel caused by poor clamping of the workpiece;
- “ladder”, which is the result of improper installation or adjustment of the position of the knives;
- curved groove caused by the initial curvature of the side face of the workpiece.
Uneven pressure on the plane and its tilting in any direction when removing the fold leads to the appearance of bulges, roughness, and grooves. Therefore, you should constantly monitor it, which comes with experience.
Planing the surface of lumber
Planing wooden workpieces is the main function of an electric planer. When performing this operation, you must follow these recommendations.
- When processing workpieces by planing, you need to move an electric plane from the edge along the fibers (with a portable method of using the tool) or move the part along the machine, positioning it correctly.
- If the wooden structure consists of several elements, for example, it is a prefabricated panel, then the power tool is moved diagonally (at an angle of 45 degrees) to the fibers, setting a small planing depth.
- You should move the plane, evenly distributing the force and making sure that no chips get under its sole (they need to be removed in a timely manner).
- The ends of timber or boards are rarely processed, having previously set the minimum processing depth and chamfered on one side.
- In order to plan the part as efficiently as possible, it is initially taken to a greater length, and after planing, the ends are cut off.
- Each face of the workpiece is processed separately.
- When performing work on the machine, the part is fed by resting it on the side stop and grasping it in the hands.
- Wide workpieces are planed in several passes.
- The planing depth is set based on the degree of unevenness of the surface of the lumber.
- The sole of the power tool should always be parallel to the surface being worked.
- In order not to overload the electric motor, hardwood is planed at a shallow depth in several passes.
When roughing, it is allowed to move the tool across the grain of the wood. To reduce the appearance of defects to a minimum, the plane must be moved slowly, evenly distributing the working forces. Planing panel structures using homemade stationary equipment is quite difficult. In such cases, it is better to use a manual device.
The ends are planed until the edge of the chamfer is reached. To ensure that the processed workpiece is streak-free, additional passes are made with a plane along its surface, setting the knives to the minimum depth.
If vibration or other manifestations uncharacteristic of normal operation of the plane occur, you should turn it off and figure out the cause of the problem.
How to plan boards is shown in the video:
Chamfering workpieces
Chamfering is one of the additional capabilities of electric planers. A V-shaped groove on their sole is intended for this purpose. To perform chamfering, the tool is placed with this notch on the corner of the workpiece. Then the plane is moved along the part, maintaining the required slope. After the first pass, the rest can be done as normal without using a groove. In this case, the bevel angle is set using a side stop, which must constantly fit tightly to the workpiece throughout the entire operation.
When chamfering, the power tool should be held level, without distortion, so that it does not turn out to be rounded at the end.
To perform any of the considered operations with an electric planer efficiently, experience and skills are required.
Hobby: how to choose a hand plane and set it up for work
What man doesn't love making things with his own hands? This is a process comparable to meditation, and for the result to be no less pleasant, it is important to select a tool and have everything you need at hand. Today we'll answer some of the most common questions about how to complete your home toolkit, and we'll be talking about the old trusty hand plane.
The main one is plane No. 4 (the plane number is usually indicated on the tool itself). The number 3 plane is practically the same and is usually considered a beginner's or women's plane, so its presence in the master's home set, by and large, is not entirely necessary.
Starting from number 5, it’s not quite planes in their pure form, but rather semi-jointers, which usually include tools with a sole up to 60 cm. Number five is quite versatile and is suitable for a variety of tasks, for which English craftsmen, for example, They gave him the name Jack (Jack in English folklore is considered a jack of all trades). Its fundamental difference from the “four” is the longer sole. “Six” is a semi-jointer that already has all the features of a jointer, for example, a wide, long sole. It is usually used to level large surfaces when it is required that it be level, but perfection is not needed. If the strength and weight are enough, choose number 6, otherwise take the “five”.
There are also numbers 7 and 8, but their presence in the home set is at the discretion of the master. “Seven” is still a full-fledged semi-jointer, and “eight” is such a specific tool with a large and long sole for craftsmen with great strength and weight.
If you move in the other direction from the main plane No. 4, then the next plane you need in your set is the so-called end plane, the smallest of the entire family. Its sole is 2 times smaller than that of the “four”, it easily fits in one hand. The main advantage of this plane is precisely its ergonomics - the fact that it fits so comfortably in the hand, while the master’s hands are as close as possible to the area of action of the tool. The closer, the more accurate the movements.
Thus, the minimum set of hand planes for a home craftsman would be a set consisting of a “four”, an end plane and a number 5 or 6 - depending on your personal preferences. The remaining intermediate options are purchased as needed and depending on the work performed. Now let's move on to the setup.
How to set up a plane for work
When buying a new plane, don’t be lazy and immediately buy a screwdriver for it. There are 2 screws on the plane that are involved in setting up the tool - the corresponding slotted screwdriver should be selected. Preference should be given to screwdrivers with a short handle - they will be more convenient to adjust.
When buying a plane, make sure that the so-called eye does not dangle. Then, at home, you need to tighten all the screws on the instrument, since they could have become loose during transportation and storage of the product - due to temperature changes, shaking, etc. The most popular now are double hand planes designed for fine planing. Their knife consists of two parts - the knife itself and the chipbreaker, the gap between them needs to be adjusted so that it is minimal, about a millimeter.
And one more trick in setting: the top screw of the plane, which controls the eccentric, or latch, must be tightened so much that the latch is done with force, but with one finger. If you do not tighten it enough, then the plane knife, or as it is popularly called, the piece of iron, will crawl inside during operation and will cease to perform its function. If you tighten this screw, as many people like to do, then adjusting the knife will become more difficult, and you need to adjust it after adjusting the screws, when the plane is already in a state ready for work.
To adjust the knife, you need to use the latch to adjust it so that it protrudes from the hole in the sole by 1-2 millimeters. Usually the knife is first set with a small margin, its shoulders and angle are adjusted, and then it is gradually removed, visually leaving the desired protrusion. To do this, in each subsequent position you need to look along the sole of the plane until you reach the required 1-2 millimeters of the length of the knife looking out from the opening of the sole.
source
What to look for when choosing
The main element of the planer design is the knife. It is its quality that you should pay attention to first. This element must be made of high quality steel. In this case, the plane can be used for as long as possible without the need for sharpening. Of course, it is visually difficult to determine how well the material was chosen for the plane knife. Therefore, first of all, you should pay attention to the reputation of the manufacturer.
Of course, under no circumstances should it wobble. When purchasing, you should also check the front handle. It must also hold tight. In addition, when choosing a plane, you should pay attention to the size of the handle for the right hand. The length of this element varies. A tool with a small handle may simply not be suitable for a person with large hands.
Safety rules when working with an electric planer
An electric planer is a device that requires safety precautions when working with it. The main damaging (traumatic) factors are:
- a tool drum rotating at high speed with knives located on it;
- electric current flowing through the device.
- The workplace must be kept clean and well lit.
- Do not use power tools in areas where there is a significant risk of fire or explosion due to the presence of flammable liquids, dust or gas.
- Do not allow unauthorized persons or children near the operating tool, and it must be stored in a place inaccessible to them.
- It is forbidden to be distracted by other things while working, as this may cause loss of control over the tool.
- Do not allow water to come into contact with the power tool you are using, and do not carry it while holding it by the cord.
- If an extension cord is used, it must be suitable for the load and also have complete insulation.
- The power cable should be kept away from very hot objects and temperature sources, from moving parts of various mechanisms, as well as from sharp edges and various liquids (especially oil).
- It is prohibited for the body to come into contact with grounded surfaces (for example, radiators and heating pipes) while working with the plane.
- It is prohibited to use power tools while under the influence of alcohol or drugs, as well as under the influence of medications or fatigue.
- Preventive maintenance of the device should be carried out regularly.
- Do not touch the running drum with your hands.
READ MORE: Instructions for adjusting the door closer, how to adjust adjust the door device according to the closing force Adjusting the mechanism with your own hands
Basic rules of work
Proper sharpening of a plane knife primarily depends on the material you are working with. The fact is that when working with soft woods, such as linden, aspen, and pine, it is recommended to bring the sharpening angle of the wood plane to 45-50 degrees. To work with medium-hard wood species, it is recommended to sharpen the blade at a sharpening angle of 60 degrees. When working with hard wood, the cutting edge is sharpened at an angle of 75-80 degrees.
For all types of blades, the first step is dressing with a large-grain abrasive material - this is necessary in order to remove nicks
At this stage, it is important that the cutter maintains a straight edge shape; it is important here that the metal is removed evenly across the entire width of the blade. To check the correct sharpening, a template plate with a perfectly flat surface is used
The blade is placed on the surface of the plate and flaws are identified by the gap between the cutting edge and the plane. At this stage, you can use a regular sharpener with large and medium-grit abrasive wheels.
After the shape of the cutting edge has been restored, the angle between the side edges and the cutting plane is checked with a square. In addition, the cutting edge angle is checked using a template. If flaws are found, you will have to repeat the process.
Sharpening the plane on a fine-grained stone is done at low speeds using a water bath. The metal should not overheat, otherwise it will lose its properties. It will be easier to work on an electric machine if you use a wide grinding wheel and a special attachment.
Sharpening knives for hand planes
If the blade has no flaws in the form of nicks or chips, and does not require changing the angle of the cutting edge, then it is recommended to immediately begin finishing.
First, a medium-grain abrasive is installed on the sharpener. The edge angle is formed on it. The canvas is picked up and, with emphasis on the machine support, formed at the desired angle
It is important here that the blade is sharpened equally across the entire width of the cutting edge.
On a fine abrasive, the blade is polished with periodic wetting in water; it is important to prevent the metal from overheating. Final finishing is done on a high-grit whetstone.
Before work, the stone is soaked in water for 2-3 hours to ensure easy movement and the formation of an abrasive paste on the surface.
The final finishing is done on a high-grit whetstone. Before work, the stone is soaked in water for 2-3 hours to ensure easy movement and the formation of an abrasive paste on the surface.
Movement along the plane is made smooth, the blade is pressed with light force, so as to feel the resistance of the stone. After the initial processing, finishing is done using sandpaper with a grain size of 1000-1200 units. The paper is placed on a piece of glass, after which the final finishing is done without removing the canvas from the device.
Sharpening electric planer knives
Sharpening electric planer knives is done more carefully and accurately. The fact is that there are two of them installed on the drum of an electric planer, and if the balancing is disrupted by removing more metal from one during sharpening than from the other, the balancing of the drum will be disrupted during operation and the entire plane will have to be repaired. The second point is that many models of planes with 5 mm thick knives use special steel plates as cutting tools, which requires precision when working. For such a tool, special abrasives for pobedite plates are used.
Knives for electric planers are immediately clamped in the sharpening device, since it is very difficult to hold them correctly in your hands. The work is carried out using fine-grained abrasive using a water bath.
Sharpening electric planer knives at home
With regular use of an electric planer for processing wooden surfaces (planing, quartering, chamfering), its cutting edges become dull. If the knives are intended for repeated use, then you can sharpen them yourself. Sharpening is carried out according to the same principle as with hand planes. The differences are only in the number of cutting edges that need to be sharpened.
You cannot use power tools with dull blades for the following reasons:
- the load on the electric motor increases, as a result of which its wear accelerates;
- The quality of surface treatment of lumber is significantly reduced.
Specialists from service centers or special workshops will help you sharpen the cutting edges of working attachments correctly. If it is not possible to turn to professionals, then you can do all the work at home. To sharpen your blades yourself, you can use the following tools:
- knife sharpening machine;
- an ordinary whetstone (abrasive stone, whetstone);
- emery;
- metal file;
- grinding wheel.
You will also need a special clamp to hold the piece being sharpened.
Sharpening a blade using an abrasive stone is done as follows.
- Remove the working attachments that need to be sharpened from the electric planer drum.
- The knives are secured using special screws in the clamp so that their cutting edges lie in the same plane.
- The fixed blades, with light pressure, move smoothly along the surface of the abrasive, ensuring that they are sharpened at the same time.
- Inspect the sharpened parts for deviations, repeating the entire process if they are detected.
- Check the sharpness on any piece of board.
- Install the knife plates on the drum, adjusting their position.
Before performing work, it is recommended to pre-moisten the abrasive stone with water. It should be taken into account that coarse-grained abrasive is intended for primary processing, and fine-grained abrasive is intended for finishing. It is recommended to maintain the original sharpening angle of the blade (approximately 30 degrees).
The considered manual method is well suited for sharpening. If the edges are very dull or have jagged edges, then we sharpen them on a machine. When doing this, you should be careful not to remove excess metal from the blades.
With your own hands, all actions should be carried out carefully, carefully handling the blades to avoid injury. High quality sharpening will come with experience and skills.
The condition of the electric planer knives - their adjustment and sharpness - should be checked before starting to process lumber. Not only the quality of planing, but also personal safety depends on this. All operations for replacing, sharpening, and adjusting working attachments must be performed only with the power tool disconnected from the mains. To give initial sharpness to the cutting edges, it is enough to use a regular whetstone.
Today on the construction market there is a huge number of machine tools and devices that speed up and simplify work. These include an electric planer, because it is often used in construction or repair.
Every tool, be it a woodworking machine or an ordinary plane, has some additional elements in its configuration; for a plane, these are considered to be knives. If the blades begin to peel off layers poorly, this means that they have become unusable and need to be sharpened properly.
However, before disassembling the tool, you should figure out how to align the blades on an electric planer. Before adjusting the knives on an electric planer, you need to learn how to disassemble the device.
What is the difference between sharpening a chisel and a plane knife?
These tools are sharpened using the same methods and techniques described above. The difference may be in the size and design of the devices. There may also be differences in the quality of sharpening and final sharpness. Impact chisels do not require the same perfect sharpening as hand plane knives and chisels. Also, for specific tasks, the sharpening angle of the chisel may differ greatly from the standard 45 degrees.
In workshops today you can find both iron and wooden planes of various sizes and designs. Even if the latter have a badly worn wooden sole, the knife itself can remain a valuable part. On old or even antique planes, you may find high quality knives that can be used for other tools: planes, making chisels or chisels.
How to use?
Each master has his own style of work, but the general features are the same.
- You need to plan smoothly, avoiding jerking. You need to stand to the side of the workbench with one leg forward.
- You need to plan along the direction of the grain. If the workpiece is wide, it is better to first move the plane diagonally and then level it flat. To do this you need to use a special ruler.
- The workpiece must stand still. Vibrations are not allowed.
- If the tool is clogged with chips, then they need to be pushed down through the “mouth”. If this does not work, the chips are pushed upward with a sliver. You cannot use metal objects for this purpose, as they will damage the sharpening of the blade. For this reason, the plane cannot be placed with its sole on the workbench.
- Some craftsmen hold the plane at a slight angle in the direction of planing. This improves the quality of processing, but accelerates wear of the sole.
How to sharpen
When using reusable knives on an electric planer, they can be sharpened. To do this, you can use the following devices:
- a machine designed for sharpening knives;
- abrasive wheel or block;
- nizhdak;
- file;
- grinding wheel.
For ease of work, it is recommended to use knife holders. Sharpening the cutting elements of an electric plane is carried out in the following sequence:
- Remove attachments that require sharpening.
- Clamp them in the holder.
- Smoothly move them over the abrasive.
The entire surface of the knife should be sharpened evenly. This is a prerequisite for ensuring effective operation of the tool.