Wooden floors on joists are one of the oldest methods of flooring and the only one used in the northern regions of our country. Modern materials have only improved ancient technologies, due to which the scope of applications has significantly expanded and performance indicators have improved. Before proceeding directly to the consideration of various options, you should familiarize yourself a little with the engineering requirements for calculations.
Installation of wooden floors on joists
Reasons for the popularity of log structures
Technical characteristics of logs and requirements for their installation
Logs are distinguished from beams by their smaller size and mobility. If beams cannot be moved after installation, and repairs are very long and labor-intensive, then logs are a mobile architectural element. They are much easier to install and, if necessary, repairs are carried out faster.
Distance between joists
Optimal section proportions
Before you start building a floor, you need to study the requirements of regulatory documents for the size of the joists and the distance between them, taking into account the thickness of the floorboards.
Table of lag sections at a pitch of 70 cm
| Distance between joist supports | Linear dimensions of logs |
| 200 cm | 110×660 mm |
| 300 cm | 150×80 mm |
| 400 cm | 180×100 mm |
| 500 cm | 200×150 mm |
| 600 cm | 220×180 mm |
Table of distance between joists depending on the thickness of the board
| Thickness of pine floorboard, mm | Distance between adjacent joists, cm |
| 20 | 30 |
| 25 | 40 |
| 30 | 50 |
| 35 | 60 |
| 40 | 70 |
| 45 | 80 |
In order to learn how to independently make calculations based on tables, it will be useful to consider a simple example. Initial data: the length of the room is 10 m, take a floorboard 30 mm thick.
floorboard
Lags
Batten
Calculation method
According to the table, with such a thickness of the board, the distance between the logs is 50 cm; with a room length of 10 m, 20 logs will be needed. The distance between the logs and the walls cannot exceed 30 cm. This means that we will have to increase their number by one piece, the distance between the others will decrease to 45 centimeters.
Important note. During calculations, all roundings should be done only downwards, thus creating an additional margin of safety.
There is no need to calculate dimensions and distances accurate to the millimeter; no one takes such measurements. By the way, during construction, the vast majority of architectural elements and structures are measured in centimeters, the greatest accuracy is half a centimeter. Millimeters are almost never used during measurements.
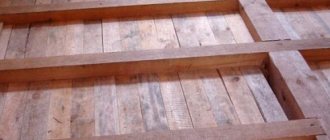
Floor joists
A wooden beam of rectangular cross-section can be used as a log
Stage 1 – select the material
A durable, reliable floor covering, which during operation will not require significant funds for repairs and will last for many years, depends on the initially correctly selected material.
Grooved board (DP)
Parameters of tongue and groove boards
Tongue-and-groove floor beam (BP)
How to choose quality lumber
When producing tongue and groove from high-quality edged boards, the requirements of GOST standards are taken into account, which state that:
- When the board width is from 6 to 14 cm, it has a holistic structure; products with a larger width are produced glued.
- The board to be varnished must have a roughness of 120 microns, the products to be painted have a roughness of 200 microns. For the back side of the lumber, the roughness is 500 microns.
- If lumber is to be packaged in film, its moisture content should be 8%, in other cases – 12%.
DP made of pine
Profile of tongue and groove board
The advantage of wide boards made by gluing is their high strength and resistance to warping. In addition, it is more convenient to use.
As for the type of wood, budget varieties include lumber from pine and spruce, while larch and cedar are valuable species with a higher cost. Their advantage is that the structure of the wood contains a natural antiseptic and is therefore more resistant to negative influences.
Larch board
Note! Wood species that are not acceptable for making flooring material are linden and poplar. Materials made from alder and aspen (BP-27 and DP-27) have limitations - they can only be used for residential premises. It is also worth considering that aspen and alder are not used for the manufacture of DP-35.
Solid oak board
The tongue-and-groove board is equipped on the back side with one wide or several narrow cuts, which provide air circulation and compensate for the internal tension of the tree.
Several undercuts on the back provide natural ventilation
What to consider when choosing
Recommendations for choosing floor boards are as follows:
- A visual inspection is aimed at identifying defects (cracks, splits, stains). If at least one such drawback is detected, you should refuse to purchase these boards.
- Wood moisture content should not exceed 10%.
- It is necessary to pay attention to the geometric parameters of the board, check the tightness of the lock joint - there should be no cracks or gaps.
- A clean floor is usually installed from a board whose thickness does not exceed 2.2 cm, but in some cases, when there is a significant load on the floor, the material can be thicker.
- The optimal board length is two meters or more. Taking less is not recommended.
- The wood must be well-dried - when laying wet material on the floor, the boards will deform.
- Experts recommend purchasing material 15% more than the calculated quantity.
- The boards purchased must belong to the same batch so that they have the same pattern and color.
- It is also important that the shade of wood for the floor matches the color scheme of the interior.
- An important nuance is to unpack the products before storing them. If this is done in advance, the boards may become deformed.
Board grade AB
Video - Which type of wood to choose
Floor subfloor options
These types of floors can be installed on a wooden or concrete base or on the ground. Each option has its own technological features, which must be kept in mind during work. As for the specific purpose of the premises, taking this parameter into account, the base of the floor and its operational characteristics are selected. The technology of the device itself remains almost unchanged. There are, of course, options for warm and cold floors, but these features also have a common construction algorithm.
Alder - durability and benefits
In terms of strength and durability, alder is not much inferior to oak and has healing properties.
Advantages:
- resistance to deformation;
- the tannins contained in wood have a positive effect on the microclimate of the room;
- sufficient resistance to moisture.
Area of use : bedrooms, living rooms, children's rooms, bathrooms.
Installation of a wooden floor on joists on wooden bases
Such floors can be made in both wooden and brick buildings and can have several varieties. The features of flooring need to be considered at the building design stage. Not only the purpose of each room and its size are taken into account, but also the climatic zone of residence, microclimate requirements and the financial capabilities of the developer. Below are step-by-step recommendations for constructing this type of flooring.
Laying a wooden floor on joists in a wooden house
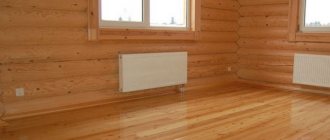
Wooden floor - photo
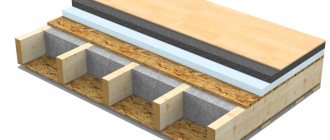
Depending on specific conditions, the algorithm can be slightly modified, but all main construction operations must be completed. The base can be moisture-resistant OSB boards or sheets of plywood. The design of the floor coverings provides for the possibility of laying insulation; the use of rolled and pressed glass wool or polystyrene foam is allowed. If there are insulation materials, then you should definitely install hydro- and vapor barriers.
roll waterproofing
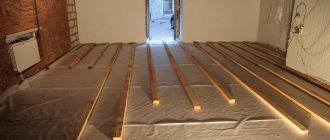
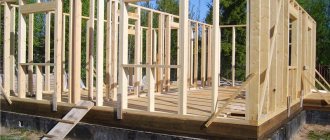
Step 1. Take the dimensions of the room and calculate the number of joists, taking into account the above recommendations. Prepare materials and tools, make markings. Do the work slowly; mistakes made at this stage have extremely negative consequences. Eliminating them will take a lot of time.
Step 2 . Start installing the logs from the outer wall ones. If the room has subfloors, then the logs can be fixed directly to them. To make work easier, it is better to use metal squares with perforations; such elements significantly speed up work and increase the stability of the joists. Using the mark on the wall, taking into account the thickness of the floorboards, align one end of the joist and fix its position.
Installation of floor joists
Practical advice. When installing the outer joists, do not fix them immediately; first, you should only tighten the screws. This will allow you to make final fine adjustments.
Do the same actions at the second end of the log, constantly monitor its level position. Once the lag lays down normally, you can firmly fasten the ends and begin installing intermediate fasteners. The distance between them depends on the thickness of the boards that are used for the logs; it is approximately 70 centimeters.
Step 3. You need to stretch the ropes between the outermost logs; align all the remaining logs along this line. Constantly check with a level; installation accuracy should be ±1–2 mm. There is no point anymore, it takes a lot of extra time. A small difference in height will be removed during finishing of the front surface of the floorboards.
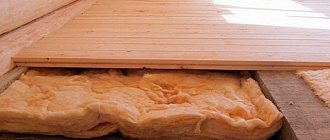
Step 4. If the floors are warm, then you need to lay thermal insulation between the joists; waterproofing and vapor barrier are used to prevent moisture from entering. The distances between the logs must be adjusted taking into account the length and width of the insulation. This can be either mineral wool or polystyrene foam, or bulk types of insulation. If all the preparatory work has been completed, you can begin laying the floorboards.
Laying thermal insulation between joists
Thermal insulation of the floor with mineral wool
There are options for installing joists on floor beams. These are so-called ventilated floors and are most often used for non-residential premises. There is no need to be particularly precise; size alignment is done using lags. The logs are attached to the beams with nails or self-tapping screws from the side. The algorithm of work is the same. First, the extreme ones are placed, a rope is pulled between them and all the others are fixed along it.
Laying lags on the beams of the lower frame
Ventilation is carried out through special vents in the foundations; the distance between the ground and the floor must be at least fifty centimeters. Otherwise, the air exchange rate does not meet the required indicators, and this causes damage to wooden structures.
Thermal insulation
Insulation is usually carried out on the subfloor. If the floor covering is laid without installing joists, then the insulation goes immediately after the waterproofing. In cases where the installation of the logs is completed, heat-insulating materials fill the free space between the bars.
For these purposes you can use:
- expanded clay;
- sawdust;
- Styrofoam;
- mineral wool;
- roll materials.
To avoid condensation, a vapor barrier layer is laid on top of the insulation.
Installation of floors on wooden joists on concrete
Such floors are considered more complex, labor-intensive and expensive; all wooden structures must be reliably protected from direct contact with concrete. Otherwise, the structures will quickly become unusable and will have to be replaced prematurely. There is a chemical way to protect lags from rotting processes using various impregnations. They are quite effective and actually prevent the process of wood deterioration. But unfortunately, impregnated wooden structures can no longer be considered environmentally friendly, and it is for this indicator that most developers install natural wooden floors.
If the logs are laid over the entire area on concrete, then waterproofing is required between them.
Waterproofing is laid between the floor joists and the concrete base
But they can also be secured using metal squares, which allows you to create a gap between the base and the joist. It must be borne in mind that in this case the load-bearing characteristics of the floor are somewhat reduced.
Attaching joists to the floor with corners
Fasteners for joists
- Make an exact marking of the position of the joists on the concrete screed, mark the line with a rope with blue.
- Using a drill and a Pobedit drill, drill holes for the angles; the distance between them is selected depending on the size of the lag.
Fixing corners
- Align the two opposite ends of the lags according to the marks and level, attach them to the squares. Check the position with a level.
- Fix the remaining angles to the joists under the level.
In the photo there are fixed logs
This fixation method has its advantages. Firstly, direct contact of wooden structures with concrete ones is completely excluded. Secondly, logs can also be installed on a black screed. Using corners, you can eliminate irregularities of several centimeters; there is no need to make a finishing screed. This saves a lot of time and money.
Adjustable supports for floor joists
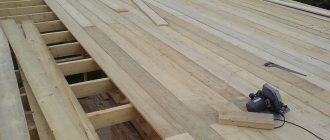
Boards or sheet materials are laid on top of the logs
The second method of laying on a concrete screed is to lay the logs directly on it; a material based on modified bitumen is used for insulation.
Decoration
The floorboards in the house should be in harmony with the interior, so it is rarely left without a finishing coating, which also protects the wood from damage, discoloration, moisture and dirt. To do this, use various tinting compounds that do not hide the texture of the wood, or covering paints.
Tinting allows you to imitate any type of wood. You can change the tone using stains, impregnations, oils, wax, varnish.
Paints provide even more scope for designers. You just need to discard stereotypes and forget that a wooden floor can only be brown.
- White, light gray, beige and other light shades of the floor make the interior light, airy, and clean.
- Black color fits many modern styles, but you need to keep in mind that dust on it is much more noticeable than on a light-colored coating.
- Bright floor shades look great with light walls in minimalist interiors.
You can also paint the floorboards in different colors, create simple patterns on the floor using masking tape or patterns using a stencil.
In short, there are many options for decorating plank flooring. During the next repair, you can cycle it and change the decor.
Laying logs on the ground
The method is used for outbuildings, bathhouses, gazebos, verandas, etc. The wood must be treated with antiseptics. It is better to have a columnar foundation; if you want to make a more durable strip foundation, then it is necessary to provide vents for natural ventilation in advance.
Floor on joists on the ground
How is this floor made?
Step 1. Remove the topsoil. You can use it to fill the beds or level the area in front of the house.
Removing a layer of soil
Step 2 . Mark the columns. The distance between them is selected taking into account the load and size of the logs. The posts can be made of concrete, block or prefabricated. The dimensions of the supports are approximately 40x40 cm, the burial depth is within 30 cm. A layer of sand ≈ 10 cm thick should be poured onto the bottom and compacted.
Step 3. Fill the supports with concrete. To prepare concrete, you should use two parts crushed stone and three parts sand for one part of cement. Water is added as needed. There is no need to make formwork in the ground; formwork from boards or OSB scraps is installed above the ground level. During the manufacture of formwork, you need to use a level; all edges must be strictly vertical.
Wooden floor base
Ready-made concrete pillars
Practical advice. It is much easier to make columns from ready-made blocks. Horizontal alignment must be done along the rope. After the outer ones are aligned with the hydraulic level, a rope is pulled between them. Deviations should not exceed ± 1 cm. This variation is eliminated during installation of the log.
Installation of blocks under logs
Laying columns under plank floor joists, diagram
Step 4. Start fixing the lags; you should also start work from the outermost ones. For precise horizontal alignment, you can use shims. It is not advisable to take wedges made of wood; over time, they will dry out and wobble will appear: the floor will begin to creak unpleasantly when walking. Between wooden structures and concrete surfaces, it is imperative to place two layers of roofing material for reliable waterproofing.
Joists laid on supports
Step 5. After the outermost logs are laid, a rope is stretched between them and all the remaining ones are laid under it. The logs are fixed with metal squares on dowels and screws. To increase stability, it is recommended to install them on both sides. Floor boards can be laid directly on the joists or a subfloor can be laid first. The final choice depends on the characteristics of the operation and purpose of the room.
Wooden floor on joists
Joists laid on blocks and waterproofing
Methods for fastening tongue-and-groove boards
As already mentioned, it is best to make a wooden floor in an apartment from tongue-and-groove boards. It is made from dry calibrated boards, which is why the price is higher. It can be attached in two ways: in a tenon and in a groove. The tenon is considered more reliable, because it turns out that 2/3 of the thickness of the board is “grabbed.” While when fastening a tongue-and-groove board into a groove, it holds only 1/3 or less - depending on the shape of the tongue.
How to lay a wooden floor with your own hands: choose the type of fastening of the tongue-and-groove board
One more thing. Either in a tenon or in a groove, the screws are placed at a small distance from the edge. To avoid peeling/cracking of the wood, pre-drill holes. Yes, it takes a long time, but a cracked tenon/groove is almost a guarantee of a squeak. The fixation is far from being the same, the board begins to “walk”, hence the creaking.
Professional advice on choosing lags
Coniferous wood should be used for logs.
Larch logs
If possible, materials should be impregnated with antiseptics. These are very effective means for protecting wood not only from fungi, but also from many pests.
wood antiseptic
Antiseptic for wood
Antiseptic
Always select joists with a safety margin, especially in cases where the installation method involves bending loads. It must be remembered that correcting mistakes made during the construction of flooring always costs much more than carrying out the work with high-quality materials and in compliance with recommended technologies.
Logs from boards
Choose your joist boards carefully. They must be absolutely healthy without signs of rot. The presence of through cracks and rotten knots is completely prohibited. If there are large healthy through knots, then you need to install the joists in such a way that there is a stop under them.
When attaching the logs, do not allow the possibility of wobbling.
Fix the joists firmly
Most loose joists cause very unpleasant squeaks in the flooring while walking. To eliminate such phenomena, you will have to remove floor coverings; this is time-consuming and expensive; it is not always possible to keep the dismantled materials in a condition suitable for reuse.
Aspen – excellent moisture resistance
Aspen wood is used infrequently and this is primarily due to superstitions. But if you use common sense, you can find a lot of positive qualities. This is both the ability to release useful substances into the air and resistance to moisture, which is why massive aspen boards are often used even for arranging individual areas in a bathhouse.
General rules
All work must be carried out after the end of the heating season, since this is directly related to the humidity of the wood itself and the air in the room. During this period, the likelihood of a wooden floor absorbing a large amount of moisture is unlikely, and it is best to start flooring in the summer in dry and sunny weather. All material must be treated with special impregnations, such as antiseptics and fire retardants.