When carrying out renovations, it is also necessary to replace the floors. Covering plays an important role in creating an interior; in addition, using creaky and sagging boards is not the best solution. To save money and effort, it is necessary to simplify the process as much as possible. For example, removing old coating is a very expensive pleasure. It's best to avoid this. Next we look at how to level a wooden floor without tearing down the boards. There are several methods, the choice between them depends on how damaged the wooden floor is.
Leveling floors under laminate
How can I level a concrete floor under a laminate? In this case, it is best to resort to grinding the base surface. This method is the most inexpensive and simplest. Processing with a grinding machine can only be done if the difference in height is no more than 5 millimeters. After sanding, the surface is cleaned with a vacuum cleaner and primed.
How can you level a laminate floor if the differences in height are large? It is best to resort to using a cement-sand screed. It is poured onto the previous screed or directly onto the ceiling. When using this leveling method, it is necessary to clean the base surface and lay a waterproofing layer. A reinforcing mesh can be installed on top. Also, when using a cement-sand screed, beacons are placed, which are fixed using alabaster mortars.
Is it possible to level the floor with underlayment? It is believed that a substrate can be used if the difference in height is no more than 7-8 millimeters. This leveling method is also used in cases where the laminate is laid on top of linoleum.
As a substrate you can use:
Scheme of laying the substrate under the laminate
- Foamed polyethylene. This material is often used because it is inexpensive and has high thermal insulation properties.
- Polystyrene. This substrate consists of two layers. The first is polystyrene itself, and the second is aluminum foil. The substrate must be laid so that the foil is on top.
- Cork materials. They are available in rolls. When using cork substrates, you must resort to additional application of moisture-resistant materials. For example, you can use rubber, bitumen mastic or ordinary polyethylene.
Is it possible to level the floor with tile adhesive? In construction practice, adhesive compositions are widely used, as they are inexpensive and easy to apply. In addition, tile adhesive can be used to repair cracks on the base surface. Remember that you can use adhesives only if the differences are insignificant. The material must be applied on top of the concrete screed.
Using tile adhesive you can eliminate cracks on the base surface
What is the problem
The words “leveling a wooden floor” can have different meanings. Here's what they might consider:
When they talk about a wooden floor, they imagine something like this:
- bring to a level a coating that generally has some slope;
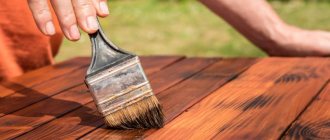
- straighten bent boards, preparing the floor for painting or varnishing;
- prepare the base for laying the floor covering.
The real picture often looks something like this. Sometimes the task is multi-purpose. When you need to do everything described at once.
Sometimes the goal is to solve individual problems. We will explain a couple of solution options for any case, and install the system solution for yourself.
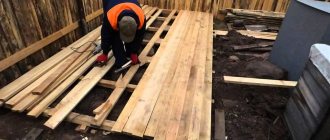
Alignment of logs
The method can be used when unevenness appears due to subsidence of fragile joists or those installed at a large distance. Moreover, they are made of slats no more than 5 cm thick, laid on a solid concrete base. To work, you will need a screwdriver and drill, large self-tapping screws with a diameter of 8 mm or more, a pen for drilling holes in wood (the diameter of the drill must correspond to the size of the screw heads) and a level. Joists and boards must be in good condition without signs of rotten damage.
Step 1. Find a place where the boards sag, determine the location of the lag. They are found by the heads of nails or screws.
Place with board deflection
Step 2. Using a drill with a diameter of approximately 5 mm, drill a through hole in the boards and joists until it touches the concrete base. Measure the distance from the top surface of the floorboards to the concrete base. Separately, find out the thickness of the boards and joists. This can be done after carefully inspecting the hole.
Step 3. Prepare large-diameter screws and decide on their length. The length of the screws should be 10–15 mm greater than the sum of the deflection, the thickness of the log and its distance from the concrete base. Using a grinder with an abrasive disc, cut the tip of the self-tapping screw to the required length. The flat, rather than sharp, end increases the area where the screw will rest on the concrete, which increases the stability of the floor after leveling. The fact that it has become blunt will not interfere with tightening; the hardware is installed in the prepared hole in the joists.
Step 4: Drill a hole in the floorboard with a pen. It should be located strictly in the middle of the log.
Drilling a hole for the bolt head
Drilling a through hole
Step 5. Insert a large self-tapping screw into the hole and screw it until it touches the concrete base of the floor. As soon as the end rests on the concrete, unscrew the screw a little and screw it in again. After each repeated screwing in, the joists will rise slightly and the floor will be leveled.
Screwing in the bolt
The photo shows the leveling of the floor
Always monitor the position of the boards using a level. The distance between the screws on the joists, depending on the expected loads on the floor, is within 50–60 cm. After leveling, the holes are sealed and sanded. This leveling method is also suitable for preparing the base for laminate or flexible finishing floor coverings.
Leveling with sheet materials: step-by-step instructions
Small differences in height up to 10 mm can be leveled using rigid sheet materials - plywood, gypsum board, chipboard, OSB. They are laid in 1 or 2 layers. The optimal thickness of the slabs is 16-18 mm for single-layer coatings and from 9 mm for double-layer ones.
The sheets are laid directly on the floor with an offset of 1/3-1/2 of the width and screwed to the base with self-tapping screws. The pattern is crosswise and along the perimeter, the step between the fasteners is 20-40 cm. It is advisable to treat the floorboards and slabs with antiseptics to prevent the development of mold and mildew.
For unevenness greater than 10 mm, other fastening methods are used. One of them is the installation of a raised floor with adjustable bolts. Hardware is screwed into the floor boards in increments of 20-30 cm. The top is set horizontally using a level and laces.
Logs are laid on this plane, sheets of thick plywood or OSB are placed on them, and the seams are filled with polyurethane foam.
Techniques and methods for leveling plywood
The condition of the floors and the degree of deviation from the horizon directly affects the choice of leveling technology.
Plywood can be used:
- If properly laid, the floorboards are deformed evenly. There is only a difference in levels (five millimeters); the floor can be leveled by attaching plywood sheets to it;
- If the height difference in one square meter is equal to two millimeters, leveling is not necessary. As a preventive measure, you can putty with a homemade mixture of PVA glue and moistened sawdust or treat the floor surface with acrylic sealant.
- Laying is correct when the builders alternated the boards according to technological requirements, i.e. bulges and depressions should fall through one board.
- If in some places the differences exceed one centimeter, the first thing you will have to do is create strip or point supports, and then level them. Only if there are no complaints from the technical characteristics, plywood can be used.
If it is not possible due to large differences in height, then it is better to dismantle it and lay a new one.
Reasons for the formation of irregularities
Wood is a living material that is sensitive to changes in external conditions. Wood fibers sometimes swell and sometimes decrease in volume. Such vibrations lead to uneven deformations of the boards, cracking, warping, and the appearance of cracks between them. The floors begin to creak, sag, individual floorboards become loose, and in some places the fasteners come out.
This often happens if the quality of the lumber was initially low, the boards were too wet or of unequal cross-section. For flooring, it is recommended to use lumber with a thickness of 40 mm or more, with a moisture content of no more than 18%. Blue discoloration, rot, falling or tobacco knots, and deep end cracks are not allowed. The geometry must be correct, without bending or torsion.
The second reason for the fragility of wooden floors is that the thickness of the board does not correspond to the distance between the joists. Because of this, large deflections occur, the floorboards become unsteady and “shaky.” Even an initially flat wooden floor can become warped due to high humidity in the room, lack of ventilation between the boards, irregular protective treatment, improper installation, and incorrectly selected fasteners.
How to choose lags
Logs are rectangular bars laid parallel to each other as the base of the floor. Hardwood and coniferous wood are used. The main selection criterion is strength. Do not use material that shows signs of rotting. The presence of a large number of knots is not scary. For the logs of a country house, timber with dimensions of 50x150, 100x150 mm is suitable. The larger the room, the greater the requirements for the strength of the foundation. Sometimes it is enough to lay paired boards on edge.
How to choose lags
The location and height of the logs are selected.
The height of the log should provide a ventilation gap between the insulation and the finished floor. The dimensions of the lumber chosen as the floor frame and the thickness of the insulation must match each other. For example, with a log height of 150 mm, it is not always possible to lay insulation with a height of 100 mm. It is necessary to take into account that a few centimeters will go under the subfloor board and the skull block. The log can be increased in height with additional slats.
Required tools and materials
The list is as follows:
- lumber;
- linings, reinforced and fiberglass mesh;
- screwdriver, self-tapping screws;
- hammer, nails;
- jigsaw or grinder;
- level, pencil;
- metal or plastic spatula, rollers;
- container for mixing dry mixture, construction mixer.
The list of tools and materials can be supplemented: it depends on the alignment method. It is better to rent equipment to save money.
Features of leveling the floor with plywood
To level the floor, sheets with a thickness of 8-12 mm are suitable. Thinner plywood will bend around uneven surfaces rather than smooth them out. Using plywood thicker than 12 mm is simply irrational.
As a rule, construction stores sell sheets of plywood measuring 1525x1525 mm.
A sheet of plywood 1525x1525 mm laid on top of an old wooden floor.
Cut the plywood using a jigsaw. A jigsaw is also used to make cuts for heating pipes and other “obstacles.”
The process of making a hole for the heating pipe is shown in the photo below:
The sheets must be laid staggered, that is, the joints of the sheets in adjacent rows must be offset relative to each other by about 50 cm:
An example of laying plywood sheets in a staggered manner.
Attaching the sheets to the floorboards is carried out using self-tapping screws with a wide pitch of 40-50 mm in length.
If you need to recess the screw head, then pre-drill a small recess in the plywood with a ⌀8-10 mm wood drill.
It is better to use a mains-powered screwdriver as a tool (or a hammer drill in drilling mode with a bit head). Since you will have to twist quite a lot and under a heavy load, the cordless screwdriver will quickly run out.
To attach plywood, it is better to use a powered tool.
Small irregularities that arise when laying plywood can be smoothed out using wood putty.
The floor leveling method discussed in this article is not a standard one, but it is very widely used when money is tight and there is a lack of time.
Polyurethane foam
Bonding plywood or OSB boards with foam is a fairly common option for leveling the floor. But you need to know about some features of this installation method:
- firstly, the foam may crumble over time, voids will appear, and the floors will become deformed;
- secondly, the foam is attractive to rodents; they do not feed on polyurethane, but are happy to use it to make nests;
- thirdly, this is a sealing material that does not have sufficient strength; it is elastic and compressible, so the position of the slabs is unstable and they can sag under load.
It is rational to use polyurethane foam to seal joints between sheets, but not as the main leveling material.
Leveling a wooden floor with plywood: choosing a method and sequence of work
It wears out over time. When it becomes impossible to restore the appearance of the once attractive coating, the time comes to decide to restore the floor. And the first step towards this goal is leveling the wooden base.
If you want to save money and at the same time want the floor to serve faithfully in your home for a long time, the site recommends using plywood. A dry screed made using this sheet material will not require incredible labor costs or significant financial investments. In the work process, you will not encounter any noticeable technological interruptions that could delay. But there are a number of nuances that everyone should know, especially those who are undertaking such a procedure for the first time. First of all, figure out how to level a wooden floor using plywood sheets so you don't have to redo something five times later.
Fixation to concrete pillars
This method involves fixing beams to concrete pillars, using similar fasteners, but designed specifically for pillars.
- The pillars must be covered in advance with a waterproofing layer (bitumen or mastic is used). Their upper part can be protected from moisture with roofing felt. You need to pre-drill holes in the posts and beams.
- Next, you need to drive dowels or anchor spacers into them.
- Then the beam is attached to the post with self-tapping screws 2-3 times longer than the width of the spacer.
- The timber is attached to the posts using iron plates with screws. They are fixed to the posts with dowels-nails, and to the beams with screws.
Thanks to the study of all these fastening methods, the question of how to install joists on a concrete floor disappears by itself.
Subfloor for “soft” floor coverings
With its help, not only the loads are evenly distributed over the surface, but also the logs or concrete foundations are leveled. Such floors are used under laminate, block parquet and parquet boards or linoleum. The materials used are sheet plywood, OSB or fiberboard; all materials must be waterproof.
It is recommended to lay the subfloor on concrete bases using construction adhesive.
Installation of plywood with glue
The screed must be level, the difference in height cannot exceed ±2 mm.
There are two ways to lay a subfloor over a screed: on slats or directly on the base. The first method is used in cases where the base has significant unevenness, utility networks need to be laid under the floor or additional insulation needs to be done.
Scheme for laying plywood with a layer of insulation
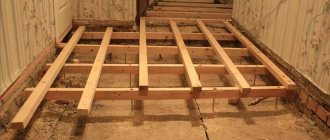
Plywood floor on joists
Leveling a concrete surface using slats is much easier and faster than re-screeding using cement-sand mortars. Waterproofing must be placed between the slats and the screed; the height of the slats is leveled with various pads and fixed with dowels. The subfloor slabs are nailed down; the dimensions of the slabs must be adjusted to the distance between the slats. The side edges should be located in the middle of the rail; two plates are fixed on it at the same time. Make sure that the four corners do not meet in one place; this position of the sheets can cause swelling of the finishing floor covering.
Scheme of laying plywood on wooden logs
The second option for laying a subfloor over a screed is used on flat bases that do not require additional insulation. To achieve an ideal surface, construction adhesive can be used. It is spread with a comb under the slabs and eliminates even the slightest irregularities, the subfloor becomes a single monolith with the screed. Further, the algorithm for installing the floor depends on the materials used.
Plywood laid on the floor
The heads of the hardware must be completely recessed; for this purpose, special or homemade hammers are used. If you plan to lay linoleum on the subfloor, it is recommended to sand the entire surface with an electric machine.
Sanding plywood
Particular attention should be paid to the joints; sudden changes in height are not allowed here.
In the photo, checking the evenness of plywood laying
The holes from the dowel heads are filled with putty.
Putty plywood floor
Remember to always leave a gap of 1-2 centimeters between the subfloor and the wall. To prevent passage bridges from appearing in these places, place pieces of any heat insulators in them.
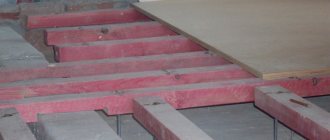
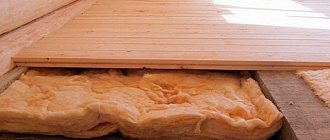
Insulation and sound insulation
Soundproofing and insulating floors on beams is quite simple. For example, you can cut TECHNONICOL into strips and lay it between the beams. In this case, the self-adhesive side section that overlaps the beam must be rolled with a roller. For additional insulation of the floor, you can place mineral wool on top of the TECHNONICOL. This sound insulation allows you to protect your living space from noisy neighbors downstairs.
The height should not exceed the bars. In those places where it is higher than the log, its thickness must be reduced. To do this, the cotton wool needs to be cut lengthwise with a knife. If the result is rags, this will not affect the properties of the material.
How to level floor joists
Hello! How to level logs lying on wooden beams? The house was built in Stalin, with wooden interfloor ceilings. The beams lie at an angle: the width of the kitchen is 2.5 m - the height difference is 5-7 cm. The logs lie obliquely to the beams.
Hello, Radik from Polevskaya!
There are a whole bunch of different ways to level the floor joists.
Professional option. Take a construction cord (sold as one wound on a spool) and stretch it across your kitchen along the highest point of the floor joists using nails nailed to the end of all the joists. It turns out to be like a mesh of several rows of threads. Everything is checked using a liquid construction level. Which is a transparent vinyl chloride tube filled with water.
One end of the level is applied to the mentioned upper point, and the second is alternately brought to all the nails to which the thread is attached.
And the thread is set at this level.
Then measure the distance from the surface of the floor joists to the thread. And it ranges from 5 to 7 centimeters in different places.
Prepare wooden shims to adjust the installation of the joists. They should be about the same thickness. This is achieved by a set of several different-thickness scraps of boards and plywood.
Then mark the installation locations of these adjusting pads on the wooden beams. You tear the joists off the beams and install shims between the beams and joists. Check again using the mentioned threads and level. Fasten both joists and pads to the beams with self-tapping screws.
Another option is by adjusting the thickness of the joists. That is, you remove old logs (their condition in Stalin-era houses is often far from the best). Bring new logs into the kitchen in the form of edged boards with a cross-section of about 150 or 120 millimeters by 40 millimeters and the required length.
Lay these boards on edge (not flat) on existing wooden beams. And you begin to adjust them according to level. By using an ax or an electric planer to trim the joints of the joists and beams.
In this case, it is optimal to use a metal construction level about a meter long and a straight wooden block. The block is placed on top of the lag, and a level is placed on it. Using the method of sampling and numerous fittings, the installation of lags on beams is achieved. With their subsequent fastening.
There are other options using metal brackets, macroflex foam, fiberboard and some others, but they are of little use.
So there is nothing complicated, the main thing is to start, and then everything will work out, if not the first time, then certainly the second or third time.
Other questions on the topic of gender:
Reviews
Nikolai Petrovich, 58 years old, Krasnoyarsk
I was thinking about how to build floors along the joists on the terrace. Our climate is humid, so we cannot do without an underground that would not operate here. I made holes in the brick foundation for vents - this is ventilation. But then I ran into a problem. The bricks were laid so-so unevenly, so the laid logs even visually stood crooked on it. I didn’t know how to do the alignment, so I went my own way. I laid a 50 mm thick board along the entire perimeter of the foundation. I fastened them all together with metal plates with holes. There are two plates for each joint. And so I tried to level these boards by placing pieces of cut boards of small thickness under them. It turned out to be difficult, but after suffering for two whole days, I solved the problem. And I easily installed the logs on the boards. Probably it would be necessary to align the logs themselves as you described. I would have done it faster.
Ivan, 31 years old, Podolsk
We leveled the beams. Logs were used as them. This process cannot be carried out alone without assistants. The logs are heavy, requiring two helpers to lift each end. And since we lifted each end several times, we got tired quickly. It is better to carry out the alignment on the logs themselves. Moreover, for this we used 70x50 timber. They were simply attached to the beams with self-tapping screws.
Olga, 40 years old, Perm
Aligning the floor joists was not so easy. My husband made the floors in the summer kitchen himself. I was tormented myself; I was constantly being torn away from my work. Either give it to him, then hold it, then pick it up. In the end, the padded floor turned out to be uneven. I read your article and showed it to my husband, it turns out he was aligning the joists one by one, laying one next to the other. But it turns out that it was necessary to first align two located and opposite walls. That is, a small difference between the first two gave a large difference at the very end.
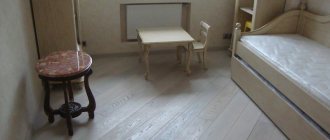
Leveling a wooden floor with a self-leveling mixture
Self-leveling floor on wood
It would be inappropriate to place a classic screed on a wooden floor. It has significant weight; the ceiling simply cannot support it. But you can use a self-leveling mixture, which is designed for finishing leveling. The maximum thickness of a layer of such a mixture does not exceed two centimeters, so if there is a greater difference in heights on your wooden floor, then there is no point in using such a mixture.
Technology for leveling wooden floors with a self-leveling mixture
- Clean and sand your wood flooring.
- Apply a primer coat to the surface. It is advisable to use compounds with deep penetration and protection from moisture.
- Lay a layer of waterproofing film on top of the wooden flooring. It is recommended to use dense strips and fasten the overlapping strips with double-sided tape.
- Check especially carefully for possible leaks. Secure a wooden strip in the doorway to prevent the mixture from spreading.
- Place a reinforcing mesh on the surface of the polyethylene, secure its position with staples or plastic clamps.
- Mix the self-leveling mixture in a container. Pour the dry mixture into the water in a thin stream, constantly stirring the mixture with an electric drill attachment.
- Apply the prepared mixture to the surface and smooth it using a spiked roller, expelling any trapped air bubbles from its thickness. When working with a roller, you need to wear specialized shoes, which are also equipped with spiked soles.
Processing with a spiked roller
- The drying time of the mixture depends on its composition. During ripening, its surface may need to be shed with water to prevent cracking. The room is not ventilated during this period.
Answers on questions
How to remove rotten boards?
If there are a lot of them, then everything can be solved simply - use a crowbar and a nail puller, try not to damage only the joists. And if there are only a few such boards, then the leaky ones should be dismantled very carefully. In order not to damage nearby ones, rotten ones should be cut in several places and removed in parts. Never rest the tool on normal boards, do not leave marks on them. As a last resort, you can use wooden spacers, but they sometimes leave dents.
Boards can be removed using a nail puller or crowbar
Technology for partial dismantling of boards
Is it possible to use a sanding machine to level a wooden floor?
It is possible, but not necessary for several reasons. Firstly, it removes a very large thickness of boards. Secondly, the machine leaves a wide and high untreated strip around the perimeter, which is very difficult to remove manually. Thirdly, modern grinding machines, using sandpapers with different numbers, perfectly perform two jobs at the same time. Fourthly, scraping machines are dangerous units; a flying metal knife causes complex injuries. Fifthly, knives are often damaged by metal objects.
Planing (scraping) machine SO-207
An old floor may have nails driven in not only above the joists; it is very difficult to notice them. Damaged knives need to be sharpened or replaced with new ones. For turning you will need a special machine; such work cannot be done manually. Searching for a sharpening machine or buying new knives is a waste of time and money.
Knife for scraping machine
Video - How to sand a wooden floor yourself
Self-leveling floor on wooden boards
A relatively new type of liquid construction self-leveling compositions has become self-leveling floors - mixtures based on various polymer compositions, which, after hardening, form a smooth, perfectly even horizontal layer on the surface of the base. It is possible to use this type of mixture for leveling wooden floors.
It should be noted that this type is one of the most expensive of all described in today’s review. In addition, the use of such a composition also requires high strength wooden logs. This is due to a significant increase in the load on them. The video clearly shows the process of creating a self-leveling surface on a plank floor.
There is no need to control the filling level; you just need to correctly distribute it with a special toothed device called a squeegee. You need to move around the uncured self-leveling floor on special wooden platforms supported by steel spikes - wet shoes.
Thus, in the framework of this review, we examined the main methods of leveling a wooden floor, provided that the joists and boards for laying one or another type of flooring are preserved. Each of them has its own characteristics, advantages and disadvantages; the choice of the final option depends on specific conditions.
Determination of the size and nature of floor unevenness
The choice of leveling technology is greatly influenced by the actual condition of the wooden floor. We have already mentioned that rotten boards or joists must be replaced; in this case, we are not talking about leveling, but about replacing the floor. The curvature of the floors must be determined according to three parameters.
- Horizontally. To check, it is better to use a laser level; if you don’t have one, then a water level will do; in extreme cases, deviations can be checked with an ordinary bubble level. Place the laser level beam horizontally at a distance of approximately 10–15 cm from the floor level. Using an ordinary wooden ruler or tape measure, measure the distance from the floor plane to the laser beam. Do this around the perimeter of the room and in several places in the center. If the slope of the floor is more than a centimeter, then it can only be leveled with the help of additional logs or special stops. It's long and difficult.
- By deflections. The long rule is to place it on the floor in several places; the deflections are revealed in the light. They can only be in a few parts of the room; below we will talk about a possible option for eliminating such problems without tearing off the boards and without using sheets.
- According to the curvature of the surfaces of the boards. If boards that were too wet were used when laying the floor, they will certainly bend after drying. Apply a rule or level to them and use the light to find out approximately the amount of deflection; the leveling method will depend on its value.
Using a laser level to check the levelness of the floor
Determining the evenness of the floor by light
Practical advice. When choosing a technology, always choose one that will preserve natural boards. Such floors are considered to be of the highest quality, constantly fashionable and environmentally friendly. Experienced builders recommend covering a natural floor with various modern materials only when restoring the original characteristics of a wooden floor is impossible for some reason.
We will consider several options for leveling wooden floors while preserving natural boards and restoring their original appearance. The technology is not very difficult for experienced builders, but it requires a certain skill and a set of special tools. Options for completely dismantling the boards to level them or replace them will not be considered; this is an extreme case and must be used in exceptional situations.
What can you use for repairs?
Dismantling and reassembling a plank surface is a complex, long, labor-intensive process. Therefore, not every apartment owner will decide to do this work. But the longer a faulty floor is in use, the more difficult and expensive it is to fix.
Among the ways to level the floor in an apartment with your own hands:
- looping;
- local alignment;
- dry screed;
- use of self-leveling compounds;
- leveling with lags or pads.
It is necessary to measure the differences with a laser level 2000 mm long. If their indicator is higher than 2 mm per 1 sq. m, then alignment is required. If it’s less, then you can put up with it. But it’s still not worth delaying the repairs.
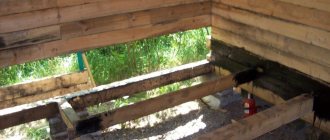
Base surfaces for installing joists
An example of an interfloor wooden floor arrangement.
A horizontal frame of wooden beams can be made in any room. But the base surface that serves as support for the joists is different. If the floor structure is assembled on the ground floor of a private house with a ventilated underground, the supporting elements are columns poured with concrete or lined with brick. In apartments and some houses on the second floor, where a reinforced concrete slab is poured as an interfloor partition, the latter is the base for installing load-bearing beams. When a ground floor is made on the first floor of the house, a rough screed is prepared for installing the bars. Let's look at the installation rules and methods for aligning the load-bearing beams in each option.
Important! If the interfloor ceiling in a house is made of timber, its surface is the basis for plywood, OSB or board flooring on the second floor. The alignment of the beams occurs during the construction phase of the building.
Leveling the floor with plywood
You can level the wooden floor surface with thick plywood, OSB or other particle boards, in other words, create an additional layer. This is one of the popular methods, and it is also a fairly easy way to adjust the base with your own hands. This method is quite simple and does not require enormous financial costs.
There is one most important point: you need to check all the boards for rot. If you hit a board with a hammer and hear a dull sound, the floorboard is most likely rotten inside. Therefore, you should get rid of such a board.
Rusty heads of nails securing floorboards also serve as a signal of the presence of rotten areas. The joists to which the floorboards are nailed also need to be checked. Pierce it along its entire length with a long-pointed awl. If you find rot, be sure to replace that area. In “clinical” cases, it may be necessary to replace the entire joist.
If you had to change boards/fragments of joists, then the new boards must be treated with an antiseptic. If a rough concrete screed is poured under the floor, make sure there are no cracks in it. If you find any, be sure to take measures to eliminate them.
Plywood/OSB/other rigid material can be laid on the joists, but this will take away quite a bit from the ceiling height. But on the other hand, insulation can be laid in the resulting underground space. Nobody forbids simply pulling the sheets to the surface using self-tapping screws. It would be useful to remind you that at all stages of work it is necessary to use a building level.
How to determine the condition of a wooden floor in a house
Even before taking any action, you need to get a complete picture of the condition of the floor. At least in order to understand whether it is necessary and whether it is rational at all to level it at this stage. Maybe it’s easier to completely dismantle it and go a different route?
In a word, the plank flooring requires revision.
To do this, the surface is cleared of debris and the condition of the boards is analyzed. First of all, visually. Definitely need to be replaced - rotten, broken floorboards. There are also boards damaged by insects. Woodworms very quickly spoil the structure of the tree, turning it into dust, and such boards can no longer be saved.
You need to “walk” across all surfaces of the plank floor, with an accentuated load on certain areas. This will allow you to identify areas of instability (unacceptably strong deflection) and areas where squeaks appear. All this should also be eliminated as it is identified. Presumably, there will be no one willing to leave the squeaky floor and simply cover it with a new covering.
Most likely, boards that have “begun” will be identified, that is, they have developed spatial deformation over time. But at the same time, by the way, remain strong, not affected by any nasty things. If it is clear that its curvature can be corrected, say, by scraping, then it is permissible to leave it as is for now. But if the board begins to deteriorate, only replace it with a new one.
Before starting leveling work, the floor should be subjected to a very thorough inspection and, if necessary, repaired.
By the way, it is possible and necessary to determine the condition of the boards not only visually, but also by sound. To do this, in suspicious areas, the floors are tapped with a wooden mallet. If the sound is clear, then everything is fine with the board so far. If the echo is dull, then the board is most likely already affected by biological decomposition and requires immediate replacement.
During the inspection, you should also pay attention to the nails. Sticking out, dangling, bent - must be immediately removed and replaced with new ones.
The worst thing is if there is nowhere to drive these same nails - that is, they simply do not hold after entering the joists. This is already a signal about the unsatisfactory condition of the logs themselves. If they are rotten, have lost stability, and are unable to bear the load, then nothing will definitely come of our venture. And that means you will have to remove all the boards to get to the joists in order to dismantle and replace them. That is, in fact, it is necessary to re-cover the entire floor.
However, let us return to those cases when leveling without dismantling is considered possible. What methods can be used then?
Laying plywood on the floor along the joists
Uneven screeds can be corrected by filling them with fine sand.
It is advisable to seal the cracks in the corners with polyurethane foam (this is especially true in panel houses). When installing on a concrete floor, it is almost always important to use waterproofing, as concrete can release moisture even several years after pouring, and the wood will rot on the underside over time.
- If you want to make good sound insulation, then you cannot rigidly attach the joists to the ceilings or walls. It is advisable to install them on felt or rubber pads so that small vibration noises are damped. The joists should not touch the walls; step back 2-3 cm from them.
- Before installing the first log, you need to find the zero level, relative to which all other logs will be aligned.
- Additionally, for plywood, it is recommended to make intermediate logs so that the cell size is small and the sheets can be pulled well to the frame. To do this, tie the logs together with crossbars made from scraps, screwing them with steel corners. It is advisable to select the size of the cells in such a way that they are a multiple of the dimensions of the plywood, and the edge of the sheet always falls on the joist.
- If insulation and sound insulation are necessary, insulation – mineral wool – is placed in the cells between the joists on the waterproofing. It must be cut exactly to the size of the cells so that the edges are not bent. It is covered with a vapor barrier membrane on top, which will remove moisture but will not allow it to get inside. It is stapled to the joists.
- In any case, you need to leave a gap of at least 2 cm under the plywood so as not to interfere with floor ventilation. If after insulation and fastening of the vapor barrier there is no gap left, a 100*25 mm board is screwed onto the logs, which will serve as a counter-lattice.
- An important point is the correct choice of screws. Regular black hardened screws will not do the job. Bad screwdrivers simply won’t screw them all the way, but good ones will break them. Therefore, you need to use special yellow wood screws with a powerful mounting hole.
- To prevent the floor from creaking in the future and to ensure that the plywood is better pressed against the joists, you need to pre-drill the scrolling area with a wood drill (with a sharp end).
This approach allows you to prepare a reliable base for laying linoleum, vinyl tiles, carpet, parquet, and if the differences are less than 2 mm per meter, you can even lay laminate.
When renovating, very often there is a need to level the base of the floor for laying floor coverings such as laminate, linoleum or.
In old panel houses (and, accordingly, in wooden ones), the floors are lined with boards, which during operation, temperature and humidity changes are deformed, the fastening of such boards to the joists is weakened, resulting in cracks, creaks, and height differences in neighboring floorboards.
Complete or partial re-laying and replacement of floorboards can help correct the situation.
The process of replacing or re-placing boards is quite labor-intensive, expensive and time-consuming. Therefore, today we will look at a more economical option, which is nevertheless suitable for most cases.
You can level wooden plank floors with sheets of regular plywood laid on top of old floorboards.
Scraping - labor-intensive but effective leveling
If, after restoring the flat surface of the floor, you do not plan to lay any material on it, you can use the mechanical scraping technique. Let's figure out how to level a wooden floor using a sanding unit. The work flow diagram is shown below:
We remove all interior items from the room. If any structure cannot be removed, be sure to cover it with polyethylene film. Remove all nails and other fasteners from the floor without exception. If you leave them, the scraping apparatus will very quickly fail. We put on gloves made of thick material, headphones and a respirator. These protective equipment will protect you from vibrations and noise of the machine (quite strong), as well as from fine wood dust entering the respiratory system. We begin the sanding process from the far corner of the room. The first layer of the old floor covering should be removed carefully, moving around the room like a snake. We seal all holes and cracks in the floor without exception, using a putty that matches the color. It will be easy to find the “wood” shade you need, given the huge assortment of modern hardware stores. After the putty has dried, the surface is sanded again.
Mechanical scraping technique
Having achieved the desired result, remove the resulting dust from the floor. You will need a powerful vacuum cleaner. Then, using a lint-free cloth soaked in a degreasing solution, thoroughly wipe the surface. After all these procedures, you can begin to varnish the floor. The wooden base you receive will look, believe me, “as good as new.”
We recommend: House from a house kit: description, features and materials of manufacture
One caveat - theoretically, scraping can be done manually. But without the use of a special machine, work on leveling the wooden base will drag on for a very indefinite period. And their quality will not always meet your needs. Therefore, hand scraping is practically not used these days.
1
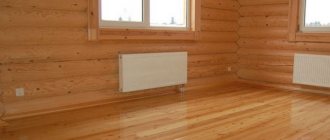
When leveling is required, we analyze the condition of the floor
Wood is a material that requires regular maintenance, as over time it sinks, cracks, and warps. Leveling a wooden floor is carried out in order to give it an ideal look, as well as to install new coverings on it - soft (carpet, linoleum) or hard (parquet, laminate, etc.). The treatment of the floor bases in question is carried out using:
special self-leveling compounds; plywood sheets; scraping; putty made on the basis of PVA glue.
To correctly select the most appropriate leveling technique, you should analyze the level of damage to the floor base. We need to carefully examine it, replace the thinned, rotten boards eaten by the bark beetle. We pay special attention to lags. We lift a couple of boards in different places. If the condition of the lags is satisfactory, there is no need to touch them.
Before starting work, it is necessary to analyze the current condition of the wooden floor
A wooden floor does not need any special repairs in cases where it does not creak or sag underfoot, and there is no rot or cracks on its surface. But this does not mean that the base does not need to be leveled. Assessing real floor unevenness is quite simple:
We take a two-meter building rule with a level; install it approximately in the middle of the room; see if there is a gap between the floor and the tool.
If there is curvature, measure its value with a tape measure. Irregularities smaller than 2 mm are considered normal. Such floor bases do not need to be leveled. If the gap is more than 2 mm, we have to treat the problem area of the surface. Then we shift the rule 100–120 cm to the left or right. We measure the unevenness again. We repeat this procedure until we fully assess the condition of the floor. Based on the results of the analysis, we make a final decision on the need to level the floor base. We also decide what technique we will use to level out its curvature.
We recommend
How to move heavy furniture on linoleumHow to level a concrete floorHow to level a wooden floor under laminate
Wood putty method
Another method of leveling the surface that we inherited from our ancestors. The process is quite labor-intensive, but it has a couple of significant advantages. One of them is that it does not require large investments. And the second thing is that you can re-level the floor, just add more putty in the right place.
But this method also has disadvantages: after puttying, you still need to level the floor with plywood. But this does not make the method economical, and all of the above advantages are neutralized. Putty is a simple mixture invented by cunning folk craftsmen. It consists of ordinary PVA glue and sawdust. There is one tricky secret in preparing putty, which I will, of course, share with you: first soak the sawdust in water, then squeeze it out, and then mix it with glue. The consistency of the mixture should be like sour cream. This little secret will allow you to save on PVA - sawdust will draw less moisture from the glue.
The work process according to this method begins with the installation of wooden planks (beacons). Putty is poured into the resulting compartments. The mixture of glue and sawdust shrinks when it dries, so places where there are large differences in height need to be filled in several layers. As soon as the mixture is completely dry, you can lay plywood on the floor, after which you can lay the “finish” floor covering - linoleum/laminate/parquet.
That's all, I shared with you all my knowledge and experience. I am sure that you will choose something just for you, because the above leveling options will suit any wooden floor. Almost all methods are universal, but you should still take into account the characteristics of the house and specifically the floor you are dealing with.
This article is purely advisory in nature and is not a call to action. These are just my ideas and judgments regarding such repair work.
In conclusion, for visualization, I will add a video, thanks to which you can clearly see the process.
Cycling method
This leveling method is considered the most difficult. This work is carried out using a scraping (grinding) machine. This method certainly has its pros and cons.
Pros:
- minimum tools and materials,
- the opportunity to subsequently do without any floor covering at all - sanded boards can be covered with stain or varnish - it looks very aesthetically pleasing, believe me.
Minuses:
- quite a labor-intensive process (what did you think),
- if the base is significantly uneven, the grinding machine will remove a large layer - the floorboards will become somewhat thinner.
Step-by-step instructions for leveling the floor with a sanding machine:
- remove small debris from the surface,
- inspect the floor, if it is old, then perhaps there will be nails that have become loose and come out - they need to be “drowned.” If you find rotten boards, they should be replaced.
- treat the surface with a sanding machine, start with coarse sandpaper and finish more “delicately”,
- in the corners you will have to sand by hand, since the machine will not penetrate there. You can also use the so-called “boot” - a device designed specifically for grinding in hard-to-reach places. You can rent it in the same place where you rent the grinding machine itself,
- If after sanding defects are discovered, they can be corrected with acrylic wood putty.
Leveling the floor using plywood
Method one. We do not install lags
When the plywood “gets used” to the room in which the work will take place, you can begin leveling. The easiest way is without installing a log. There is no need to install timber, since its function is adequately performed by the tubercles of curved floorboards, distributed evenly over the surface.
For these purposes, in addition to plywood, other materials are also suitable: gypsum fiber boards, gypsum boards.
It makes no sense to use fiberboard for leveling if the floor is wavy, since during operation the material will sag, repeating all the bumps and grooves of the rough base.
If the floor is plank, and the width of its floorboards reaches twenty centimeters, and each of them is curved like the other, then plywood of ten millimeters is suitable for leveling. If boards more than twenty centimeters wide were installed on the floor, then the thickness of the plywood, accordingly, should be greater - up to two centimeters.
- To form a two-centimeter indentation from the walls, place bosses around the perimeter of the entire floor;
- The gap between the sheets when laying them should be three to eight millimeters. Due to this, movement absorption during moisture fluctuations will be achieved. Imitate brickwork by laying several rows - place the slabs of the next row relative to the previous slabs with some offset. There should not be a cross-shaped intersection of four butt welds at one point. The site reminds us that the minimum offset size is a quarter of a plywood sheet, the maximum is half.
- At the points indicated during the inspection, we attach the sheets to the “ridges” of the boardwalk. Try to distribute the attachment points evenly, focusing on the distance between the bulges identified as a result of measurements.
The site recommends pre-drilling holes for fasteners. It is advisable to do this in two steps. To begin, use a drill whose size matches the diameter of the screw. Then work on a hole that matches the diameter of the cap, which can be completely recessed into the plywood sheet. Along the perimeter of this sheet, the dowels should deviate from the edge by at least two centimeters.
Method two. Setting up a strip support
You will need to construct a sheathing using crossbars and longitudinal joists, which are placed in the same horizontal plane. Along the perimeter, the logs should be placed at a distance of three centimeters from the walls. The size of the plywood sheet determines the step of laying the longitudinal components.
Typically this value varies from forty to fifty centimeters.
Algorithm for leveling the floor with plywood:
- Start with fitting. Without attaching, lay the plywood on the base, being mindful of gaps and ensuring a standard brickwork pattern. Outline the slabs. The lines you make will become your guide for the future location of the joists. Don't forget to number the sample sheets.
- Install logs along the walls, following the markings made on the floor. If you want to optimally arrange the strip sheathing under the plywood, then use a square beam with a side of forty to sixty centimeters. If you don't want to raise the floor too much, use second-grade boards or cut plywood into strips to make joists.
- Install the crossbars at a step calculated according to the dimensions of the sheet. Attach them to the joists with self-tapping screws. It is better not to use metal corners.
- We place transverse elements and logs in a single vertical plane. Follow the level readings. Adhere to the requirements formulated in SNiP number 3.04.01-87. It is prohibited to drive wedges from leftover lumber under joists. To level it, just use sand. If the deviations are insignificant, you can use roofing felt or roofing felt for the same purposes. To achieve an even plane of the lag, various wooden spacers are most often used.
- Once the joist system is level, attach it to the base using galvanized metal angles. Dowels can also be used for these purposes. Their length should be three times the thickness of the logs.
- The final stage is laying and fastening the plywood.
Why does the flooring in an apartment become uneven?
Errors during laying of boards are the main reason for its rapid deterioration during intensive use. They are as follows:
- Incorrectly set logs. The decking process involves two stages. The first is the installation of the outer joists, between which the rope is stretched. The second is laying the rest of the material along this rope. If the logs are located in different planes, then the finished surface has strong differences.
- The dimensions of the lags do not correspond to real loads. The result is that areas bend, become deformed, and even break.
- The covering is created from wet or too dry boards. Wet material swells, rots, and cracks over time. Dry - it warps, and large gaps appear between the boards.
- Natural ventilation or waterproofing is arranged with gross violations of technology. Lumber rots, loses its performance properties, and sag. The problem can be eliminated only by completely replacing the floor covering.
These facts are a reason for urgent leveling of the base. To carry out the work correctly, you need to determine the exact cause of their appearance and the nature of the irregularities.
Advice
You can determine the size and nature of the unevenness of the base using one of the following methods: horizontally (laser, bubble or water level), deflections, curvature of the boards.
Gender survey
At this stage, you will have to carry out not only a thorough inspection, but also measurement of irregularities. The wooden floor must meet the following requirements:
- the boards should not be damaged by rot or mold;
- cracks or gaps between elements should not be more than 5 cm (even if they are less than 5 cm, leveling with plywood will be required; other methods cannot be used);
- height differences do not exceed 1-2 cm.
Assessing gaps and height differences between boards
If these conditions are not met, then it will be almost impossible to repair and level the wooden floor without changing the boards. To choose an alignment option, you need to know the height difference. The following instruments are used for measurements:
- construction levels (laser, hydraulic, bubble);
- rule.
The simplest option is to attach a long strip or metal profile to the floor and measure the deviations with a ruler. You can also buy a bubble level at a hardware store to inspect a wooden floor yourself. It determines the slope of the board and costs between several thousand depending on the length of the body.
You can make a hydraulic level yourself. All you need here is a thin transparent tube and water. The disadvantage of such a device is that it is not very convenient to use. The most accurate way to measure a wood floor is with a laser level. This device is used by professional builders, its cost is high, and its use requires special skills. If you need to level the boards in a house or apartment yourself, there is no need for such precision.
Methods of performing work
There are several alignment methods, each suitable for different cases:
- Laying a substrate made of elastic material is used if the unevenness does not exceed a few millimeters. This increases sound insulation. Most often, materials such as isolon or polyethylene foam are used. The thickness is set within 2-5 mm.
- For more serious defects, scraping is suitable. This method is also not capable of leveling out serious differences, but it can refine the surface and give it an attractive appearance. Before starting work, the floor is carefully inspected for the presence of metal fasteners. Staples and screws will have to be removed, and the nails will be sunk into the boards so that there is no chance of damaging the sanding machine.
- The putty is suitable for height differences of 2-3 mm. Sealants or acrylic compounds are used.
- Self-leveling floors or cement screeds.
- The most reliable option that will allow you to level a wooden floor with serious differences and cracks is plywood or OSB boards. For work, material with a thickness of 14-22 mm is used. There are two methods that can handle different sizes of bumps.
It is worth talking about putty and plywood in more detail.
Leveling a wooden floor using this method will require preparatory work. They consist of cleaning the surface from dust and dirt and priming. The primer layer ensures a high degree of adhesion of the putty to the wooden surface.
The material for processing is selected depending on the finishing floor covering. If you plan to lay tiles, linoleum, laminate or parquet on the boards, then acrylic putty is suitable. When using a wooden floor as a finishing floor and then covering it with varnish, use a sealant matched to the color of the material.
Acrylic mixtures are characterized by low strength, so you can replace them with other compositions:
- if the layer does not exceed 1-2 mm, putty on plaster using PVA glue is suitable;
- For a thicker layer, a mixture of sawdust and PVA is used.
The disadvantage of this composition is that it is difficult to distribute over the surface, so after drying it will require sanding until completely leveled.
Laying plywood
The most reliable way to level the boards. After laying the plywood, you can install the flooring (tiles, carpet, linoleum, laminate, parquet). There are two technologies for performing work:
- without intermediate supports for differences of less than 1cm;
- with intermediate supports for differences of more than 1 cm.
Laying without supports consists of securing the sheets with glue and screws. Before starting work, it is necessary to lay out the elements and cut them. The distance between the parts is taken to be 2-4 mm, and between the wall and plywood - 8-10 mm. This is necessary so that the sheets do not affect each other and waves do not appear when the material expands.
Layout options for plywood sheets
Having laid out the parts of the flooring, they are numbered. And they begin to fasten. The adhesive layer should not exceed 2-3 mm. The composition is applied to the leveled surface. Sheets must be laid with a spacing of at least 10 cm.
After the glue has completely dried, you can begin installing fasteners. Before starting work, holes are drilled in the sheets for self-tapping screws, which are located at a distance of at least 20 mm from the edge of the part. The fastening pitch is taken within 15-20 mm. After completion of the work, the surface of the plywood is sanded with a special machine.
The use of intermediate supports increases the leveling capacity . You can use logs or point support points (blocks). The former allow for higher reliability, while the latter save on materials. It is important to provide for the arrangement of the elements so that the joint of the sheets falls on the place of support. The pitch of the elements is determined depending on the thickness of the plywood sheet.
- when using flooring with a thickness of 12-14 mm, the support spacing should be 30-40 cm;
- thickness 16-16 mm – 50 cm.
For OSB and chipboard, other values are accepted:
- thickness 16-18 mm – step 30-40 cm;
- thickness 20-24 mm – step 50 cm.
Laying plywood on intermediate supports
The thickness of the supports is taken on average 15 mm. The width of the boards for making logs is 40 mm. Fastening to the plank floor is carried out using self-tapping screws. Attaching the plywood to the supports can be done with self-tapping screws or glue.
When leveling the floor without removing boards, it is important to ensure that the subfloor is in good condition. If the logs are rotten, then none of the methods described above will help; only replacing the structure will give the result.