Wood floors are one of the best options for environmentally friendly and reliable flooring. They are durable, beautiful and do not harm the health of people living in the house. The disadvantage of such a base is that if it is installed incorrectly or after some time, the floor boards begin to move apart - cracks form between them, which is why the floors look unsightly, and various debris gets underneath them, and an unpleasant squeak may appear. To prevent this from happening, the technology for laying such a coating must be carried out exactly according to time-tested rules. But, fortunately, even old floors can be restored to their original form if you use a tool to screed the floorboards. Now there are a lot of variations on how to join together floorboards quickly and without much expense.
Tool for screeding floor boards
Methods for tightening floorboards
The tool for tightening floorboards, their number, and type will depend on the method by which the floorboards will be tightened. Regardless of the choice, the boards must fit snugly both to the joists and to each other, that is, without cracks or distortions. Otherwise, the occurrence of a squeak cannot be avoided.
The joining of boards together is distinguished by the use of various devices, among which the following should be highlighted:
Regardless of the choice of devices for tightening floorboards, you must strive to ensure that the floorboards can subsequently be firmly fixed with nails or self-tapping screws. Otherwise, all efforts will be in vain; problems associated with poor-quality installation will sooner or later still appear at the most inopportune moment.
How to identify the cause of a squeak
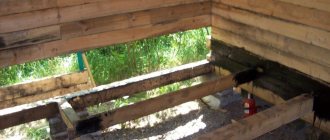
To effectively eliminate the problem, you must correctly determine the cause of creaking floors. To do this, you need to inspect the places where creaking is heard, check the tightness of the connections by pressing hard. If there is movement of the nails or individual floorboards are “walking,” the problem lies in loose fasteners. If the boards are firmly knocked down, but the flooring sags when pressed, this indicates deformation of the joists or subsidence of the soil under the base.
It is necessary to check the flooring by intense pressure, visually inspect the floor, cracks
A building level or rule will help you find the problem area: creaking usually occurs in places of greatest differences in height. In this case, it is best to remove a couple of floorboards and look under the flooring: this way you can accurately assess the condition of the joists, the degree of their wear, and the quality of the rough foundation.
Checking the levelness of the base
Creaks near the wall are often caused by incorrectly fastened or dried out skirting boards. Inspect them carefully, pressing your hand in several places, check whether nails come out of them when pressed, and whether there are cracks in the material. To make sure there is a gap between the boards and the wall, you should carefully remove one of the plinth fragments.
Inspect the baseboard along its entire length
Features of floor screed using various devices
You can buy professional tools at any hardware store. Since it is not cheap, many home craftsmen make do with what they have on hand. Some methods of screeding floorboards are quite labor-intensive and require carefully thought out and precise markings.
As for the popular Bowrench professional tool, the principle of its use is simple: the supporting part is fixed to the joist with 2 pins, the second part rests against the edge of the floorboard. When the handle is pressed, the boards are compressed. In this case, the pins can be adjusted according to the thickness of the log.
To avoid spending money on such an expensive tool, you can use a car jack.
The principle of operation is the same: one side of the jack rests, for example, on brackets or a wall, the other on the edge of the board. The only significant drawback is that such a device is difficult to install correctly. Among the advantages, it should be noted that in this way you can compress several floorboards at once without much effort.
The old method of compressing boards using wooden wedges, which our ancestors used, is also relevant. For emphasis, modern craftsmen use staples rather than bars. The hardware is subsequently easier to dismantle (remove) than to remove the nails to free the persistent wedge or block. And the work process is faster.
If you don’t want to bother with wedges and jacks, then you can use a pry bar: rest it on the joist with the bracket installed and compress the boards. In this case, you need an assistant who will quickly fix the boards. The quality of compression depends on the force applied. If the pry bar falls off, it can damage the floorboard or injure an unwary technician.
As for the clamp, for a one-time job it is too expensive to then lie around in the garage after installation. You also need to make sure that it is securely fixed so that it does not fly off later.
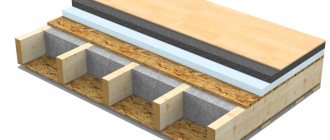
Laying on a plywood base
Joists, screed or an existing wooden floor can be used as a base for plywood. Installation of plywood is done using dowels, screws or glue.
When laying boards on a plywood base, choose moisture-resistant plywood with a thickness of 18 mm or more
Table 5. Laying boards on a plywood base
| Illustration | Description |
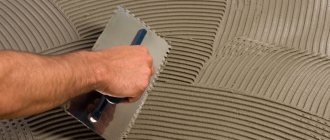
| Plywood sheets are glued to the cleaned and level screed. | |
| For gluing, a 2-component adhesive composition specially designed for these purposes is used. Apply it in a thin layer using a notched trowel. | |
| Plywood is laid with seams staggered in each subsequent row. Holes for dowels are made in each sheet in three places - along the edges and in the center. In this case, the hole should be located at a distance of several centimeters from the edge. | |
| The plywood is pulled to the screed with dowels. | |
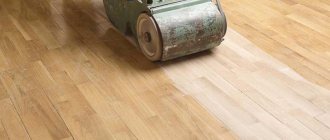
| After laying, the plywood is sanded. | |
| After this, use a vacuum cleaner to remove wood dust. | |
| Before laying the boards, prepare an adhesive solution. | |
| Starting from the corner, apply glue with a notched trowel. | |
| When laying diagonally, work begins from the corner, not forgetting to leave a gap from the wall. | |
| Additionally, the board is fixed with a self-tapping screw to the plywood base. |
Floor fixing methods
After compressing the floorboards, it is important to secure them correctly and carefully. If they come apart, they will start to creak. There are 3 methods of fixing wooden flooring:
However, the secret screed method is considered the most reliable. It is also suitable for working with any substrate.
Thus, when choosing a tool for floor screeding, you need to rely on the feasibility of spending your budget and time. Sometimes it is enough to use the help of craftsmen who already have their own tools and everything necessary for high-quality work. If you want to save money on hiring specialists, then you need to purchase everything you need yourself and decide on the method of screeding. If you have work experience, things will go quickly, because there is practically nothing complicated about screeding a wooden floor!
Source
Spot repair of parquet
Parquet board is an elite option for wooden flooring. Like all wood floors, parquet can squeak when rubbed. In general, it consists of wooden elements assembled into one common flooring. Elimination of damage that causes sounds when walking is carried out pointwise, locally. Parquet repairs take place in several stages.
- They carefully inspect each board, identifying and noting defective and creaking parts.
- Prepare the necessary tools and materials: drill, volumetric syringe, cement or polyurethane glue.
- Find the middle of the plank with a creak, drill a hole with a drill with a thin drill bit.
Parquet boards can also creak over time.
- Dilute the cement mortar to a liquid state.
- Draw up a solution of cement or polyurethane glue with a syringe.
- Insert the syringe into the prepared hole and slowly inject the composition, allowing air to escape.
- Portions are introduced gradually, allowing the composition to gain a foothold and harden.
- Check the work for no squeaks.
- If the repair of one tile is positive, they begin to eliminate the squeak on the rest.
- The last stage is to seal the hole with mastic and sand the parquet.
To get rid of the squeak that parquet makes, you need to fill the space under the plank with cement from a syringe
Interesting device - BOWRENCH
I found an advertisement in a construction magazine and was interested in a device for fastening boards.
They are asking 48-54 dollars for it! Approximately - 1750 rubles! In fact, the “corrugated pipe” is bent and two pins are welded. Our gas workers use similar “keys”. There are options with extensions between the pins.
Comments 34
I’ve been a carpenter and carpenter since I was 18, I’ve never seen anything like this, if necessary, I’ll cook something like this for myself, thank you for the useful advice!
Yes, sure. Suitable for installing floors.
I may not be speaking on topic, but isn’t it easier to immediately find normal material, in this example, not bent, but straight boards?
on this topic. Sometimes you buy straight ones, but when they sit in a warm place they become bent. This is a tree, it is alive, its fibers are arranged differently.
And if they find themselves in the hot sun, they’ll be a total mess, they might become a screw. And all that’s left to do is burn them in a bathhouse or donate them on an airplane.
I don’t argue with this, because I myself, for example, take a very long and careful approach to this process)) and, accordingly, I try not to buy it in advance, otherwise it’s very difficult to store it, no matter what happens to the material))
The post is given to study the concept of this product.
As an option (for vapor barrier), place a rail over the boards on which to rest, and modify the device. In short, you are getting wiser.
I think with a vapor barrier there should be a counter-rail that you can cling to.
Yes, and the tool can be improved.
The rail is 25x50mm, flimsy considering the quality of our material. Yes, and we are considering a ready-made device, not a homemade one. Can a homemade product be designed to suit the circumstances and then rented out?
The post is given to study the concept of this product. By the way, it is patented. I don't see any point in buying it. There are deals for 300 rubles from new metal and 1 kg\20 rubles - the price of metal taken in ferrous metal. I think this is 30 rubles. Two and a drill and four bolts with furniture heads will save those who do not have welding.
Comrades, we are going the right way! They have their own equipment for each type of specific work.
But it’s as if we don’t? It all depends on the wishes of the specialist. Ours grinds out devices for every operation. I personally went there and took the drawings.
Comrades, we are going the right way! They have their own equipment for each type of specific work.
You can increase the length of the stop and that’s it
They brought packs of floorboards, after drying, they were pulled together as expected - these were six-meter rectangles. They unloaded it with cartoons, everything was ok. They began to cut it to fit the size for installation, but 20 percent of it was clearly defective, either the groove was wrong, or the tenon was crap, or the propeller. I would kill him. They pressed with a wedge, the wife was the load, and the outer ones, in the old fashioned way, with a wide chisel.
The quality of the material is a problem. The prices are huge, but the service and quality are lacking.
Well, what country do we live in? Most frame projects are crap, with floor joists and rafters 25x150. The builders are mowing around the black, eye and eye. If you build it yourself, you won’t find good material during the day with fire.
Builders are different. And I agree with the materials/quality.
By the way, in our village a forest costs 6,000 rubles per cubic meter, in the city it was 5,000 rubles. Only in the city I came and picked out what and how much I needed, but here they are showing off, we don’t want to order, take only 1 cubic meter, sizes are only 6 and 3 meters. Quality in favor of the city!
It’s an interesting gadget, but it’s limited in use (floorboards on joists without insulation). IMHO. Probably not suitable for attaching floorboards when insulating the floor. It will tear all the vapor barrier. The skull beam above the vapor barrier is only 25mm.
There are restrictions, of course.
It’s an interesting gadget, but it’s limited in use (floorboards on joists without insulation). IMHO. Probably not suitable for attaching floorboards when insulating the floor. It will tear all the vapor barrier. The skull beam above the vapor barrier is only 25mm.
Yes! I didn't think about the vapor barrier.
A good tool, simple and convenient. If you rearrange the stops, the handle will be on the other side, although the lever will be smaller. Thank you! The ceiling will be fixed soon.
It's good if it's useful. Unsubscribe. The main thing is to do it in advance.
The person says correctly, but what about vapor barrier?
Do you think everyone makes insulated floors?
Apparently I didn't build according to fashion. I have basement floor slabs with “foil” on them, then a beam leveled at the liquid level and bolted to the slab, everything is covered with expanded clay and sawdust along this beam. And the subfloors are already screwed to the timber (50*75) with self-tapping screws. Then chipboard slabs and a finishing coating (linoleum, carpet or laminate).
The slabs also made it possible to pour a “warm floor” connected to the heating system in the bathroom and at the entrance to the house (where the shoes are kept).
Well, this is in modern, global terms. The technology here is still grandfather’s, publicly available.
But I achieved what I wanted - the child plays on the floor, and I walk barefoot, I love it so much. The floors are warm. With parents, friends, mother-in-law, I wouldn’t say that.
Doing it yourself will be cheaper.
If you do this “for life” then there is a point in buying... if you do it for the occasion... then there is no point IMHO
When building a house it was necessary. Nowadays it can only sometimes come in handy at sabbaths.
Source
What is board bonding?
When installing a wooden floor, it is necessary to press the boards as tightly as possible to each other. This is not so easy to do - they will not have ideal geometry. When drying, they bend in different directions. During installation, they must be attracted to each other without gaps, and then fixed. Manually, without devices - this is not possible, because special devices or improvised means are needed.
Screeding floor boards is the elimination of cracks and gaps by mechanically tightening the boards
This process (pressing the boards against one another) is called bonding or floor screeding.
Second stage installation of beacons
Not every instruction describes the installation of beacons, but if you do not have experience and special equipment, it will be difficult to level the mixture relative to the horizon without errors. Not only leveling, but also walking on the loose layer is impossible, since the foot gets stuck and the even layer of backfill is disrupted.
A certain transitional technology using beacons is proposed. To do this, you will need a U-shaped profile, turned upside down with sharp edges. In this position, the profile is laid flat on the floor, and expanded clay is poured between the edges. Then the contact between the profile and the gypsum fiber sheets will be minimal, which means that the soundproofing benefits of the dry screed will not be impaired.
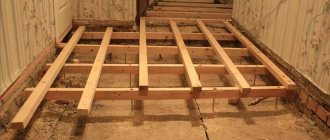
Floorboard bonding technology
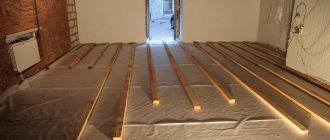
The floorboard is attached to the joists - a wooden beam that is installed at a certain pitch. The installation pitch of the logs and the thickness of the flooring are selected so that the covering is stable, can withstand the planned load (with a certain margin of safety), and does not sag or play underfoot. At the same time, pay attention to the cost. Sometimes it is cheaper to use thicker flooring and install joists less often, sometimes, on the contrary, it is cheaper to install joists more often and lay thinner boards.
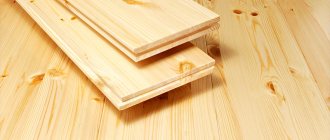
The floor board can be regular - edged, or it can be tongue and groove. The edged one has the form of a parallelepiped (straight edges); a tongue and groove is formed in the tongue and groove along the long side. And it is the second option that has been used almost everywhere over the past decades. And that's why. The presence of a tenon and groove provides a number of advantages:
There are not many disadvantages of tongue and groove boards. The first is that due to the need to cut out additional “shapes”, the cube costs more. Secondly, you also have to track the parameters of the tenon/groove. In principle, there are no other disadvantages.
Tongue-and-groove board: fastened in a tenon or in a groove?
When laying a floor made of tongue and groove boards, there are two methods of fastening. You can install the fastener in a tenon or in a groove. Installation in a groove is simpler, but then about a third of the thickness of the board is fixed. When drying, this may not be enough, the tenon may crack. This happens quite often. See for yourself when redoing the floor.
You can fasten a tongue and groove board either in a tenon or in a groove
Fastening a tongue and groove board into a tenon is more secure. But it takes more time, since you need to find an angle at which the head of the screw or nail will sink into the wood. Otherwise, you simply won’t get the tenon into the groove. With this installation method, you cannot do without pre-drilling holes, otherwise cracks may occur. But two-thirds of the thickness of the board is “grabbed.” This is certainly more reliable than installing fasteners into a groove.
How many times will you have to tighten the floor?
So, floor bonding is the process of attracting floorboards to each other without cracks or gaps. And you will need to do this at least twice. The first one is during initial installation, the second one is during refurbishment. Why is a bulkhead needed? During use, wood dries out and decreases in size. This leads to the appearance of cracks where there were none before. To eliminate cracks, you must first disassemble the entire floor, then pull the boards together again, and add one or two floorboards at the end. This is called “refinishing a wood floor.” And one bulkhead is not always enough. Depends on the initial moisture content of the wood.
When laying and bulkheading, a tool for screeding floor boards will be useful.
When laying a floor from boards, a few pieces are left “in reserve”. The covering will still have to be tightened again and the floorboards, which are usually stored in the attic, have the same geometry and are also dry as those that are installed. So there is less hassle with them than with those purchased specifically for the bulkhead.
For the same reason (the need to weld the covering together several times), the floorboard is fastened not with nails, but with self-tapping screws - they are easier to remove. In this case, the board itself is not damaged. If you use nails, it is almost impossible to remove them without damaging the wood.
Technology and sequence of actions
The principle of plank flooring is as follows:
That, in fact, is the whole technology. It's all a matter of what kind of board joining device you use. There are very simple ones, as they say, made from scrap materials, and there are factory-made ones. Not to say that they are more effective, but everyone chooses what they like best.
The principle of flooring and sequence of actions
The plank flooring technology is as follows:
- The smoothest board is selected. When fixing, a tenon is cut into a groove; when fastening into a tenon, the protrusions are cut off.
- This board is nailed along any wall. The flat side should be facing the wall. They retreat from the wall at least 1 cm, fix the tongue-and-groove board right through to each joist. The second board, into which nails (or self-tapping screws) are driven through, is located on the opposite wall.
- The second floorboard is laid, the tenon is driven into the groove. A piece of board is used, inserted on the other side. Tap it with a hammer to ensure there are no cracks. You just won't get a perfect fit. Adaptations are needed here.
- Using any of the devices, the board is attracted to the one already placed so that there are no gaps. Having achieved a tight fit, the boards are fixed. Then the device moves further, fastening the floorboards along their length.
- The last board is cut along the wall so that there is a gap of 1 centimeter between the wall and the edge. The board is placed at an angle and lowered onto the base. Spacer wedges, which are driven between the edge of the floor and the wall, achieve a tight fit. The end board is fastened, as already written above, with nails all the way through.
Devices for joining floorboards are made from scrap materials, and some are factory-made.
Devices for screeding floor boards
Do not think that devices for screeding plank floors are an invention of recent years. Our grandfathers and great-grandfathers also wanted a flat floor. Old textbooks describe ways to eliminate cracks during installation. For this purpose, metal staples were used - ordinary or of a special design. Modern devices and techniques are just variations of old methods.
You can also tighten the boards using a regular metal bracket. It's the old way
Bowrench and Special Automation
We describe these two devices together, since the Belarusian Spetsavtomatika made some changes to the Bowrench design, which is produced by the Americans. But, in essence, it is also a device.
You can tighten the boards using Bowrench
So, there is a part with two protrusions that is fixed to the joist. A metal stop and a handle are movably connected to it. By pressing the handle, we ensure that the board fits tightly and install the fasteners. The disadvantage of this device is that it blocks access to the end of the board. When laying a tongue and groove board, you will have to move it several times if you need to fix it to each support.
Logs can be of different thicknesses. To be able to “rest” against them, there are replaceable nozzles. The stop can be easily removed: you need to remove the two studs that secure the mounting bolts. However, the set consists of three or four attachments, so there are not many options.
The Belarusians have made some changes to the design: one part of the joist grip is movable and adjustable
In the device produced by Spetsavtomatika, the log grip is adjustable. There is an adjusting bolt at the end that allows you to extend or retract one of the clamps. There are more adjustment options, but there is also a higher chance of damage. In operation, both are quite convenient, although the “American” is more refined. But the difference in price decides the matter - Bowrench costs 3.5-4 times more.
How to tighten floor boards using a clamp and wedges
You can tighten the floor boards using a clamp and two wooden wedges. The clamp is fixed on the joist at some distance from the board being installed. Two wedges are made from a piece of board 40-50 cm long by sawing the piece diagonally.
A device for tightening boards from a clamp attached to a joist and wedges that press the board
The clamp is installed on the joist, turning the arc towards the board. Wedges are installed between the arc of the clamp and the board. They hit the wide side of the wedges with a hammer or sledgehammer until the gap between the two boards disappears. Then you can fix the board. If you need to install fasteners in a tenon or groove, a “window” is made in one of the wedges, which is placed above the joist and through which a self-tapping screw is screwed.
Thrust board and wedges
The previous method is good for everyone, but the board is attracted only in one place. You can, of course, install several clamps, but this is time. And there are usually not many sufficiently powerful vices on the farm. The problem can be solved using boards and similar wedges.
A support board about a meter long is nailed at some distance from those being mounted. They are nailed to the joists above which it is located. It is not necessary to drive the nails all the way to the heads, but the support should hold well. The distance for installing the support is chosen so that three or four boards can be laid without moving it.
Backing board nailed to joists and wedges are another way to hold floor boards together.
A piece of “lining” with a window through which you can tighten the self-tapping screw is attached to the board being installed. In order to be able to tighten the floorboards, scraps are inserted between the support and the wedges. First you need long pieces, then smaller ones. The entire structure is assembled so that the wedges stand in such a way that by knocking them down, the boards can be held together.
Source
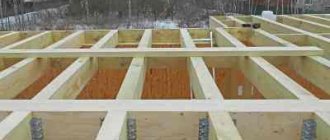
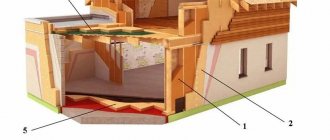
Reinforcement with additional bars
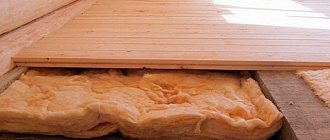
What to do if none of the methods helped? It may be impossible to do without at least partial opening of the upper surface of the floor. In this case, you can repair the sheathing, as well as strengthen it with additional bars, which are simply inserted between the joists. This will create additional support.
Important! If the boards are too thin, the distance between the lags is too large, then they will sag under the weight of the weight when walking. When repairing the sheathing, it is strengthened by inserting additional bars.
When calculating the distance between the logs, the thickness of the board is taken into account.
| Board thickness (mm) | Distance between joists (cm) |
| 20 | 30 |
| 24 | 40 |
| 30 | 50 |
| 35 | 60 |
| 40 | 70 |
To further preserve the reinforced sheathing and prevent the appearance of squeaks, all parts are treated with waterproof solutions, and fabric linings such as geotextiles are laid between the parts and on top of the timber.
Sometimes it is necessary to partially open the upper surface of the floor and reinforce the subfloor with additional bars
Tools for pulling together boards
For quality work, there may be several such items. Here are the main ones:
To use wooden wedges, they must be placed at 90° to the floorboard, then they are helped to secure themselves between the well-fixed boards with a hammer.
The clamp can serve as a spacer. A block should be temporarily attached to the joists. The tool will rest against it to create pressure and press the board against the adjacent die.
Clamp for floor installation
The jack can be placed between well-attached boards to the joists to use pressure to hold the boards together on the floor.
Jack for pulling floorboards
This process may also involve: a mount and a special device called Bowrench. This floor plank tightening device is designed to work with material that has uneven edges. Such a tool is made from a square pipe. It has three main elements - a metal handle, a support bar and a tightening guide. The guide profile and support strip should be secured at a small distance from each other. Metal rods are also attached perpendicularly to the bar. Thanks to them, the tool is firmly fixed to the logs. When the handle is turned, the tightened guide profile creates pressure on the floorboard. Thus, it presses well against the planks that are already fixed.
Elements for fastening
How can I attach a board to the joists or subfloor? Today, manufacturers offer various types of elements so that the flooring material can be properly fixed. The most common are:
Nails are often used to install floors, especially if the material used is oak or larch. But they tend to break out during intensive use, which can lead to damage to the surface.
Self-tapping screws securely fix the wooden base to the joists. But, given the fact that they are made of steel, the fasteners are subject to corrosion.
To protect the metal from rust, self-tapping screws should be immersed in wood, and their heads should preferably be treated with a special sealant.
Screws made of galvanized material have a cutter at the end, which ensures high-quality and fast screwing. You can use these fasteners for floors made of any wood. The coating prevents the screw from rusting even when in contact with moisture.
You can use any type of fastener for wooden floors, the main thing is to take into account some points during work:
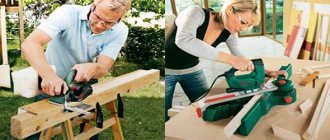
A device designed for joining floor boards together with your own hands is a great help. But, in addition to this, to install the floor you will also need a level that is at least 1 m long. It will be convenient for them to check the evenness of the exposed joists. This tool is also useful for preparatory work. It is very important to have a chisel, a screwdriver, a metal hammer and a hacksaw in your arsenal.
When laying flooring, it is a good idea to have a cutting machine, especially if the flooring will be laid over a large area. This tool will make the job much easier. It performs various functions. They will be able to cut off excess pieces from the boards or make a cut not in a straight line, but along an oblique line. The advantage of this tool is that the blade size can be adjusted. This helps with large and wide boards. The machine makes very precise cuts, which is very valuable when laying floors.
Cutting machine for work
To make a cut at a certain angle, you should set the required angle on the scale and fix the blade in the desired position. If millimeter precision is required, this tool is simply irreplaceable. You need to step back a little from the edge, then mark the line where the cut should take place, fix the disk and only then turn on the machine.
You can use this tool if you have a board that is too wide. To do this, attach a special stand to the cutting machine. The frame will extend and thereby support the long board.
A cutting machine is indispensable on the farm, and it can be useful in the future during the construction of terraces or other structures that require precise cuts.
Choosing good building materials
To avoid problems with the finished floor, you should take a responsible approach to the choice of tongue and groove boards and the method of storing them.
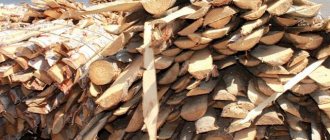
Aspect #1 - wood type
The first thing people pay attention to is the quality and type of wood. Tongue and groove boards are made from:
- Spruce and pine are inexpensive, easy-to-process species. Their main advantage is their low price. In addition, they have excellent heat capacity, so spruce and pine floors always seem warm. However, it is better not to use them for floors in high traffic areas. Women's heels, furniture legs, fallen objects - all this can leave noticeable dents on the wooden surface. Varnishing is required.
- Larch is a hard coniferous species characterized by moisture resistance and durability. Larch boards have a beautiful, clear structure and rich color. Thanks to this, it is not necessary to cover it with stains and varnish.
- Oak and ash are durable, hard woods. Their wood has a clearly defined texture and rich shade. Ash and oak boards are considered the most reliable and durable. However, they are also the most expensive.
Aspect #2 - board sizes
The dimensions of the tongue and groove boards should also be taken into account. They can vary significantly
Ideally, the length of the boards should match (or be slightly less than) the length of the wall along which they will be laid. The thickness of the coating determines the reliability of the coating and the price. The standard sizes of tongue and groove boards are as follows:
- length – 1-6 m;
- width – 70-200 mm;
- thickness – 18-45 mm.
Aspect #3 - quality class
Tongue and groove boards are sorted by quality class. There are 4 classes in total:
- Extra - the highest class or, as it is also called, euro sheet pile. This is the most expensive material, without knots, cracks, with a uniform structure and shade.
- A – material without cracks or knots, some inhomogeneity of shade is allowed.
- B – single stains and cracks are allowed.
- C – economy class, with the presence of multiple knots, single through holes, and cracks. Typically, class C boards are used for subfloor installation.
This is what it looks like:
Aspect #4 - Humidity
The ideal moisture content of tongue and groove boards is 12-16%. If the boards are poorly dried, then deformation of the finished floor is inevitable. Cracks and warping of boards often occur. There will almost certainly be gaps between the boards, so the floor will have to be re-laid.
The moisture content of the boards can be determined using a moisture meter. If this device is not available, you can get by with simpler evaluation methods:
- When tapped with your knuckles, dry (suitable for flooring) wood produces a ringing, clearly audible sound. A wet board, on the contrary, sounds dull, barely audible.
- If you touch a wet board, you can feel the dampness. There is no feeling of moisture on a dry board.
- The color of a wet board is darker than that of a dry board. Also, after high-quality industrial drying, the surface of the board acquires a noticeable shine. A damp board remains matte.
- There should be no condensation inside the packaging film. Droplets of moisture on the film always indicate excessive moisture on the boards.
Additional recommendations for choosing tongue-and-groove floorboards are given in the video:
https://youtube.com/watch?v=QnJ7NdrbbIE