Articles
All photos from the article
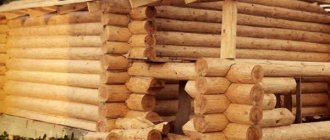
When erecting buildings, their correct fastening and fixation of individual elements is very important. Dowels for timber are a type of product that is not visible from the outside, but has a great influence on the reliability and durability of the structure, so you should understand which products suit you best and how to use them correctly.
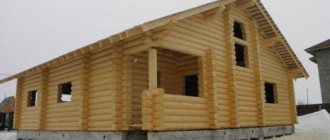
In the photo: a dowel is an important element of any log house, be it timber or log
How to install dowels
Today we’ll look at what a dowel is and how to install dowels.
Nagel translated from German nagel means nail. The walls of any wooden house, even those built from high-quality and well-dried profiled timber, are prone to slight shrinkage and deformation. This is due to residual moisture, the inclusion of heating devices and twisted wood fibers. To avoid the consequences of wood drying out in the form of unattractive inter-crown cracks, builders use dowels.
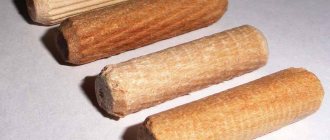
Therefore, the dowel serves to connect any materials, in this case wood. The dowel is a pin and prevents the individual elements from moving relative to each other. It can be round or square, made of metal or wood. The main condition is that the dowel must be smooth. The use of reinforcement, especially corrugated ones, is NOT ACCEPTABLE.
So should you choose metal or wood? The main purpose of the dowel is to prevent the beam from bending and keep it in a strictly defined position. This task is best accomplished with wood, i.e. homogeneous material.
Wooden dowels, unlike metal ones, do not react to temperature changes by forming condensation and do not rust. In addition, wooden dowels do not interfere with the natural shrinkage of timber walls, decreasing in diameter along with them. Dowels, as a rule, have the same moisture content or slightly less than the beams, thereby achieving high joint strength during natural, gradual shrinkage.
For beams made of soft wood, such as pine, it is recommended to use dowels from harder trees. This explains the popularity of birch dowels, manufactured on industrial equipment and ready for installation. As they say, cheap and cheerful.
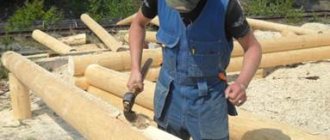
When building a house from timber. Usually the upper crown is attached to the lower one. The assembly stages are as follows: having fastened the first two crowns with dowels, the next row of beams is laid on them and a hole is drilled in order to capture the upper (bottom) beam, already firmly connected to the lower one.
When installing dowels, you should follow some rules:
- The holes for the dowels must be drilled strictly vertically, this must be observed so that during the shrinkage of the timber the dowel does not interfere with sliding.
- The distance from the corner is 300-500 mm. and then after 1500-2000 mm. in a checkerboard pattern.
- A hole is drilled for the dowel in the center of the beam.
- The dowels are driven in with little effort.
- The length of the dowel is 20-30 mm shorter than the drilled hole. So that when shrinking the timber does not hang on the dowels.
- The optimal thickness is F 20 mm.
By following all the technologies for building a house from timber and using wooden dowels as fastening elements for walls, you can completely avoid such common problems as the effect of wood torsion and the formation of gaps between the crowns.
We have discussed how to install dowels. Next in the next article is the arrangement of joints.
Which dowels are better, round or square? I want to install a log house for a 6 3 bathhouse, which is better to choose: profiled or regular timber? I'm thinking of making the corners using the Warm Corner method.
Alexander, it doesn’t matter whether the dowels are square or round, the main thing is that they must be driven in with force and tightly. Which timber is better for you to choose is a matter of price and taste. It is advisable to sheathe square timber that is not planed after installation, because When the protective layer of bark is removed from a tree, it is susceptible to various influences, both weather and fungal. Profiled timber is usually planed and it is enough to soak it with an antiseptic and coat it, for example, with varnish, this will be enough. And it will look good.
I made square dowels myself. I was advised to make sure that the corners cut into the hole. This did not interfere with the shrinkage of the house at all, but I am sure that the dowels there are no longer dangling (they suddenly shrunk even more) and are holding the crowns. As for the iron ones, I am categorically against it! Make only wooden ones!
Materials
You can understand which dowels to choose for building a log house, renovating the interior or other types of installation work if you know about the characteristics of the materials from which the fasteners are made. A properly selected element will increase the service life of structures.
Plastic and fiberglass, as well as the metal variety, are available in hardware stores along with traditional wood dowels. Let's figure out which ones are better.
Metal
In practice, the steel type of fastening can be used in temporary and permanent structures together with wooden pins when assembling wooden houses, as well as in concrete work, installation of fences and as reinforcement. Self-tapping screws for concrete are made of hardened metal and are additionally coated with special protection. The metal dowels are strong and stable. In wooden structures, beams are not at risk of warping.
But it is still worth remembering that during the construction of a log house, such a property as protection against bending remains an important parameter. The tree is deformed and then returns to its original position. But since metal is a rigid material and does not change along with the crowns, the beam hangs, creating cracks through which cold penetrates. The pins themselves have high thermal conductivity, condensation can form, and there is a risk of rusting of the “nails” and rotting of the wood.
Installation of a load-bearing structure (cobblestone wall, window crown) can be carried out using spring assembly technology. The design of this unit, due to the existing spring, allows for a good connection of the crowns. High sealing is achieved. The structure is installed quickly and does not rot.
Tree
Such pins are loved by craftsmen in house construction because the pins are resistant to bending loads and do not interfere with the natural shrinkage of the log house. A truly reliable connection is achieved through gradual integration with beams and logs. If wooden “nails” are used, an exceptional seal is created.
You can make wooden dowels yourself, but manufacturers offer high-quality larch, oak, beech, birch or ash and coniferous dowels. The cost may vary depending on the species from which the pin is made.
Plastic
Plastic dowels have less load-bearing capacity. This material does not take into account the shrinkage and shrinkage of wood.
Flexible plastic is a softer connection than metal dowels, but the fasteners are of high quality, and if you choose the right size in accordance with the loads, the walls will not loosen or sag.
Fastening log beams with wooden dowels
Fastening the log house with wooden dowels #8212; no alternative solution in wooden architecture. All wooden structures of this kind are fastened with wooden nails, which have the construction name dowel . Birch, oak and other hardwoods #8212; they are designed to tie the entire beam into a single structure and not allow the crowns of the log house to move and shift in the horizontal plane. According to their shape, dowels come in square and round sections. Such formats are easier to produce. Other sections of these wooden nails did not take root due to the complexity of production and high cost.
My bath #8212; not an exception. I will also secure the timber with wooden dowels. If I'm lucky, I'll get oak ones. The point is not that oak is very strong. Important properties of dowels should be as follows:
- durable (rot resistant);
- be amenable to machining and maintain linear dimensions;
- do not contain knots and have low causticity (do not crack when impacted);
- maintain the cross-sectional size for as long as possible
As a rule, wooden dowels are made on planing machines. Manufacturing accuracy must be quite high. The cross-sectional size must be precisely adjusted to the specific hole into which the dowel will be driven. And here I will go into more detail.
Some manufacturers of dowels are presented here
Making holes for fastening dowels
In order to simplify subsequent installation on the construction site and reduce construction time, the holes for the dowels were made in stationary conditions. An ordinary vertical drilling machine was used for this. Since the dowel must pass coaxially through two or three #8212; It is necessary that the holes for wooden nails be located on the same axis. This is why a template is used to mark the holes for the dowel.
The template for determining the center of drilling the hole for the dowel is made along the width of the mounting bowl of the timber and allows you to mark the drilling location at the same distance from the center of the bowl (lock).
The template is installed in the bowl and along its edge you can draw the center of drilling the hole. This method is used only with the use of factory drilling. It is most suitable for making through holes in walls for electrical wiring. The template allows you to accurately mark the axes of the holes for the dowel.
When drilling holes for dowels in places other than the frame assembly, it is important that the axes of the holes coincide. If the axes do not coincide, when driving in the dowel, the beam may shift. And this is #8212; may result in crooked log walls. When drilling holes on a construction site #8212; Strict vertical drilling is desirable, but not required! The dowel can be driven in at a slight angle #8212; along the inclined hole. This does not reduce the strength of the connection.
Read also: Do-it-yourself device for sharpening chisels
What should be the size of the hole for the dowel ? Experience in the manufacture of wooden log houses suggests that 30-40 mm is absolutely sufficient. For my bathhouse with timber 120 mm thick, a 30 mm drill was chosen. Section side of wood dowel #8212; 23 mm.
The dowel should fit tightly into the hole. Best way #8212; try driving in test dowels. A dowel with a square cross-section should pierce the walls of the hole with its ribs. But it shouldn't go in too tight #8212; this can lead to splitting of the timber, especially thin ones. The timber must be able to settle along the dowel.
The round dowel completely fills the hole; there is less play during its installation. A slight drying weakens the fastening of the dowel in the hole. It's more difficult to make. But he is no less popular.
Making holes for fastening log beams with wooden dowels in the factory allows you to significantly speed up the assembly of the frame of an outdoor bathhouse, which means protecting the wooden structure from rain, sun and premature damage to the crowns by biological factors.
Related posts:
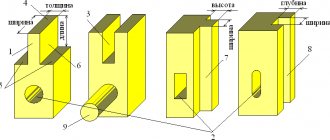
T-shaped types of connections between timber and logs
The connection with the remainder has three types of felling:
- In the oblo "in the bowl"
- In the heat of the moment
- In a huff.
Corner joints of logs “in the oblo” are done as follows:
- Half a tree
- Oval ridge
- In the fat tail.
Half a tree - easy to connect. To achieve stability of fastening, a longitudinal groove is made in the crown. We pre-fill the groove with insulation.
An oval ridge is a fastening with a remainder; here a small oval ridge is made on the bottom of the bowl; it is important that it exactly follows the shape of the laying groove. In this option, the longitudinal groove is cut not from the top but from the bottom of the log. Fat tail - more technically complex
A small protrusion (tail fat) is cut out at the bottom of the bowl, which is placed along the crown and across the bowl. In turn, a recess is cut out on the lower part, which coincides in shape with the protrusion (see picture:)
The fat tail is more technically complex. A small protrusion (tail fat) is cut out at the bottom of the bowl, which is placed along the crown and across the bowl. In turn, a recess is cut out on the lower part, which coincides in shape with the protrusion (see picture:)
In the oblo - this type of connection is almost the same as what we described above (“in the oblo”). The only difference is that the bowl is cut from above, and not on the lower part of the crown. The name oklop appeared because of the characteristic clap when rolling a log into a prepared corner.
In addition to reliable tying of the corners of a wooden building, it is very important to ensure high-quality longitudinal joining of the beams or logs that make up the crowns. For timber, extensions are most often used using a direct or overlay lock. To further strengthen the overhead joint, vertical dowels or dowels are used
To further strengthen the overhead joint, vertical dowels or dowels are used.
In addition, it is convenient to make a longitudinal connection of the crowns “in half a tree”, cutting off part of the end of the connected beams. To increase the rigidity of the joint in the contact area, you need to install two dowel pins.
The connection with a root tenon is also quite acceptable for the longitudinal extension of beams.
The combined “half-tree” joint, on the upper protrusion of which is made of a “dovetail,” is well resistant to the longitudinal tensile forces that arise during the shrinkage of wooden crowns.
If such cutting seems too complicated to you, then make a longitudinal connection of the crowns with an ordinary dovetail, which reliably fixes the timber being built up and the log.
1. Key groove on the main tenon
2. Straight groove on the main tenon
3. The already familiar “dovetail”
Do-it-yourself dowels for timber
The construction of structures made of wood implies the mandatory use of special fastening fragments. Such elements are aimed at ensuring that the design is of high quality, reliable, monolithic, and as durable as possible.
An integral part of the structure are dowels, or dowels. It is the quality of this part that determines the reliability of the entire structure. You can easily make dowels for timber even with your own hands. The procedure is not anything particularly complicated. The main thing is to follow the chosen method.
What are wooden dowels?
First, it’s worth understanding what the dowel itself is. The part is a miniature fragment made to strengthen the walls of a log house made of timber. In this case, it is the diameter of the dowels for the timber that acts as one of the most key characteristics.
The purpose of the dowels may be different. For example, wooden dowels are aimed at fixing log structures. The detail allows you to slow down a variety of negative consequences that invariably accompany the functioning of wooden structures. It could be:
Such peculiar pins, installed correctly and correctly, will make the building stable. The beams of the structure will be placed in such a way that they will remain unchanged after a couple of months and after several decades.
Spikes for fixing timber: which ones to choose and why?
The most popular are dowels made from hard wood. The most durable options are spikes made of oak or birch. It is not possible to deform, bend, or break them. However, there is one condition. They must be properly secured. What are their shape and sizes? The optimal solution is details with rounded contours. Their length should not exceed 25 mm. Wooden dowels must be smooth and even not only at the point of installation, but over the entire surface. It is these nails that guarantee the longest possible service life.
Installing dowels in timber is a mandatory rule for timber and log structures. Birch thorns are the most common option. Such dowels cannot become an analogue of self-tapping screws or primitive nails. If they are used, it is impossible to guarantee the stability and reliability of the structure. It is also worth abandoning the use of reinforcement. Metal versions can lead to a number of negative consequences, which is explained by the direct interaction of materials with different thermal conductivity parameters. What can the use of metal dowels lead to? It could be:
- condensation formation;
- coating the surface of the spikes with rust;
- rotting of the entire layer of wood.
The nuances of creating dowels
How to make dowels for timber? It's actually a simple procedure. It's easy to do it yourself. To do this, you will need to use logs of a certain length. The blanks (ideally made from birch) must be split into many small fragments. It is advisable to make them in the form of squares. Then you will need to trim them. This is done manually. It is recommended to give the workpieces a round shape of the desired diameter.
It is very easy for lathe owners to make dowels. Using it, elements are created quickly and accurately. If there are no wooden logs, you can always use cuttings from shovels that have already gone out of use. To give them the required size and shape, you just need to cut them. Round parts can also be easily created using a circular saw.
Subtleties of fastening dowels made of wood
How is the beam fastened with dowels? You can also do it yourself, without using the services of professionals. The procedure is extremely simple. Using wood tenons will first require finding the middle of the plane being used. At this point it is necessary to make the appropriate markings. This is where the hole will be created later.
Now you need to drill a hole using a drill. It is in this that you will then need to attach the dowels. That is why it is very important to choose the drill diameter correctly. Its dimensions must be identical to the same parameters of the spike. As for the depth, it is 1.5 timber. The question of what dowels for 150x150 timber turns out to be quite simple. In the video you can see how this procedure is performed.
In this case, the task itself disappears: how to drill the timber for the dowels. Of course, the best option is a modern drill. It is much more important to ensure that the hole is processed correctly. The entry angle depends on the position of the drill. It must be strictly perpendicular to the base itself. Competency in performing this step will allow you to avoid problems with the installation of fragments in the future. It is also worth remembering that if the dowel is located extremely loosely in the timber, this will deprive the structure of all the advantages of this type of fasteners. You should also avoid excessive density. The length of the dowel should not be greater than the established dimensions. Protrusion of a part above the surface leads to problems during the inevitable shrinkage of the structure.
Some secrets of the procedure
A dowel made of wood, like the metal versions, is aimed at connecting 2 logs or beams. That is why there are several secrets on how to properly attach them. Professional assembly of timber for dowels implies:
- compliance with chess alternation, taking into account the perimeter of the structure;
- the optimal distance between them is in the range from 1000 to 1500 mm;
- proper combination of openings and bowls of approximately 300 mm;
- coincidence of the degree of humidity of the dowels with a given parameter of the base itself.
The photo shows how to install it yourself without errors. Those holes that needed to be pre-drilled with a drill are now filled with core buttons. They are the ones needed to mark the timber. If you don’t have such a special fragment at hand, you can sharpen it in pencil format. Its diameter must correspond to the prepared hole. They should be attached directly to the center of the base.
The next step is to lay a couple of boards on a perfectly flat and smooth surface. In this case, the parts need to be barely pressed against each other. However, most builders are interested in the question of how to drive dowels into timber. The tenon must be placed as tightly as possible in the groove. There should be no bevels or other defects between the timber and the dowel. In this case, you will not need to drill anything else. Nagel will do his job with ease.
For this purpose, you can use a marking thicknesser. When the tenons are installed, you need to treat the fragments of the boards with glue. This will allow you to connect the workpieces that need to be firmly clamped during the process and then dried.
Read also: Pattern on the handle of an ax
To build a house from timber, special guide elements made of wood or metal - dowels - are used.
Since the log house dries and shrinks for 12 months or more, with dowels it will not deform and will not move.
How to arrange a connection between furniture parts
The procedure for attaching parts to a wooden nail is not complicated. By following the instructions below, you can connect the parts and assemble the furniture without much effort. The assembly diagram looks like this:
- Holes are drilled in the parts to be joined if they were not made at the factory. The diameter of the recesses should be slightly larger than the diameter of the chopper, and the length should be 1-2 mm longer than the dowel. The presence of gaps in this case is by no means a disadvantage. They prevent fasteners from jamming and help compensate for temperature and humidity deformation.
- The protruding part is filed down if necessary.
- Using a mallet, hammer a dowel into the hole so that its surface is slightly below the plane of the part. If you need to connect the furniture frame, then the dowel is driven in half. The protruding part of the wooden furniture chopper is smeared with glue and, having laid the end part of the furniture or facade on top, it is seated on the mount.
At first glance, it seems that this technique does not provide reliable fixation of the structure, but in practice it turns out that when using high-quality, well-dried dowels, furniture, log houses and timber are durable and stable.
Dowels, dowels, choppers, metal fasteners are types of fastening elements used for reliable connections. Without their use it is impossible to imagine the house-building industry and the furniture industry.
Description
Despite the fact that fastening options are different, dowels are most often chosen from wood. For this purpose, hardwood forest is used, often birch.
In addition, the wood is not subject to rust, and even when wet it does not deteriorate, but rather provides better adhesion to the neighboring material.
Under no circumstances should you use screws or nails. They will only worsen the entire structure
The dowel is made slightly shorter than the hole drilled in the beams and of a slightly smaller diameter so that shrinkage occurs more evenly.
This design captures two beams at once and is installed around the perimeter in a checkerboard pattern.
Features of application in the furniture industry
Conductors and templates are needed when assembling furniture.
These things will prevent you from having a common problem that occurs during drilling—the drill hitting the part at the wrong angle. Correcting such an error will take an extremely long time, in some cases it will even be impossible. A jig for making holes will not only allow you to correctly orient the working tool, but will also prevent it from straying from the desired trajectory.
In the furniture industry, jigs and templates are used in the following cases:
- in mass production;
- when assembling structures, when it is necessary to make holes for fasteners in the parts being connected. In this case, a jig for drilling holes for dowels or confirmat is suitable;
- a jig for drilling holes at an angle is used both in such cases and when working with thin boards, for example, MDF or chipboard.
When using such a device, the assembly process will be much easier and faster; you will be able to make the necessary holes regardless of how far they should be located from the edge of the part and how wide it is.
When assembling furniture yourself, you often have to connect parts end-to-end using dowels. Holes for dowels are best made using a special jig. The peculiarity of dowels is that despite the fact that such fasteners, although outdated, are still relevant in furniture production.
The difficulty in their use lies in the fact that the axes of the holes that are made in the parts when connecting must have a right angle with each other. Accordingly, they must be placed strictly perpendicular to each other. It is difficult to do this without a special device. Therefore, if you want to achieve high quality performance, it is recommended to buy a dowel jig.
What are they needed for
The fastener allows you to fasten the crowns to each other exactly along a given path. Some people think that the dowels tighten the frame of the house together, but this is not so. They make it possible, when drying and shrinking the timber, to keep it in its original state so that the structure does not move.
This installation method is used not only in the construction of houses, but also in the manufacture of furniture.
What negative consequences can the dowel combat:
- Drying and deformation.
- Loosening and displacement.
When installing fasteners, the structure remains stable and stable even after several decades. The main thing is to do it right.
Classification of tools
Before you buy a ready-made conductor or make it yourself, you need to decide what problems you will solve with its help and only then you need to select the appropriate option in terms of design and functions.
There are a number of categories of devices that differ in their design and functional features. Here are some of them:
- overhead - such devices are applied to a part that can be processed, then it is attached to it or simply fixed manually. With their help, holes are made in various flat parts, MDF boards or chipboard;
- rotary - these templates are used when processing cylindrical parts. They are equipped with horizontal and vertical axes of rotation, so holes can be made at different angles;
- universal - such devices are suitable for small serial furniture manufacturers, where sometimes quick readjustment of the equipment used is required, they have all the functions necessary for this;
- tiltable - used when the technological procedure is carried out in several planes at once;
- sliding - such conductors do not need to be attached. Simply attach them to the surface area of the workpiece where you want to make a hole;
- fixed - they are more convenient to use, but they limit freedom of action, which is very critical when working with machines where there is only one spindle.
Why is it still a tree?
The finished material should not be made from raw wood and it is better if it is impregnated with a special composition against rotting. Otherwise, it will have to be dried. You cannot work with raw material; it must be harder and drier than timber.
Prices for these products depend on the diameter of the fastener. A lot depends on the volume of purchase, but on average:
- Dowels with a diameter of 25 mm up to 500 pieces will cost 16 rubles, and up to 1000 pieces will cost 11 rubles.
- If the diameter is chosen to be 30 mm, then the prices will accordingly be 25 rubles for 500 pieces and 18 rubles for 1000 pieces.
When purchasing in bulk, prices are reduced by up to 30%, but this is more suitable for construction companies. One package of finished products contains from 30 to 50 pieces of dowels.
Varieties
In fact, a dowel is a small spike - it is a hidden type of furniture fastener. In appearance, it resembles a cylinder-shaped rod, with slightly rounded or simply truncated ends on both sides. Sometimes, to assemble furniture on dowels, not only wooden elements are used, but also plastic ones. They have slightly different purposes:
- Wooden ones are needed for positioning and connecting furniture parts made of MDF, chipboard, plywood, and solid wood;
- Plastic ones mainly connect parts when installing prefabricated panel furniture.
Wooden
Plastic
There are also metal products. They have improved strength characteristics; they are also called dowels or dowels. But the most commonly used are wooden dowels measuring 30 by 8, that is, the length is 30 mm and the diameter is 8 mm. There is also a smaller diameter - 6 mm. You can purchase different types in construction stores or markets. If you wish, you can make dowels yourself.
There are different grooves on wooden dowels:
- Straight vertical;
- Helical – located at a slight angle to the vertical axis;
- Complex ones - there are transverse and longitudinal recesses - they also allow you to make the adhesive joint stronger;
- Horizontal – help to make the adhesive joint as strong as possible;
- Smooth - do not have corrugation.
Corrugation helps air pass during the installation of dowels, improving the adhesion of the glue with the “glue” method of connecting parts.
Vertical straight lines
Complex
Smooth
Making dowels
- If necessary, you can turn them yourself on a lathe from premium or first grade wood.
- Please make sure that it is without a lot of knots and damage.
- Do not make dowels from hygroscopic material.
- The diameter of this rod must be greater than 2.5 cm.
- The length can be arbitrary, from 1.5 to 2 meters, in any case only part of the product is used.
Installation and removal methods
Types and installation of furniture footers
Furniture dowels make it possible to significantly increase the strength of connections. But this is not as simple a method as it might seem at first: the connection cannot be secured if any hole is displaced. Depending on the size of the offset, the result will be unsatisfactory.
As a rule, tabletops on dining tables and desks are secured with a dowel. Put them in working position like this:
- The parts are first marked on the end side, and then holes are drilled to the required depth. The same holes are made in the countertops. They must match;
- A cylindrical fastener is installed in the end hole, the upper end protrudes at a distance equal to the depth of the hole in the covering part;
- To strengthen the dowel in the hole, it is generously lubricated with glue, fixing it in the desired position. Sometimes glue is poured into the holes, where the fastener is then inserted - this will completely cover its ribbed surface with glue, improving the adhesion strength of the elements;
- The second part of the design is superimposed on the installed dowel.
Drilling the material
Hammering the dowel
Connect with glue
The work is ready
There are 3 main problems in assembling furniture using dowels:
It is possible to assemble an edge-to-edge connection, but in this case, the planes of the structural parts do not coincide. Solution: The drill guide holes were not aligned with the center edges of the parts. The device must be constantly aligned with the reference planes of the two parts being fastened. Even in the absence of a central location of holes in the connection, no shifts or sagging are formed; Holes in one part do not line up with another. Solution: to align the holes, use special markers designed specifically for connections. Initially, holes are made in one part with a drill. A marker is then inserted into each hole and the two pieces are pressed together as they should be when assembled. This way, the second part will have marks with markers in the places where you should drill; The holes are made in the right places, but the installation of the dowels is not correct: the fasteners do not fit through or, on the contrary, fall out
Solution: It is important to make sure that the diameter of the fasteners matches the diameter of the holes. Factory fasteners are mass produced and may have a diameter slightly larger or smaller than stated
In addition, wood can swell or shrink with changes in humidity. When the diameter is verified and it is identical, then the problem is the wear of the drilling jig and, as a consequence, the deviation of the drill. This leads to deformation. It is enough to change the bushings or purchase a new device.
To correctly assemble furniture parts onto a dowel, you will need to learn three basic rules:
- To mark, use a sharp pencil or knife. A pencil with a thick lead will not make marks accurately;
- When drilling holes, you need to use drills with a central point. Twist drills with conical sharpening can deviate to the sides during work, setting the wrong direction;
- To ensure uniform hole depths, a locking ring is placed on the drill and firmly fixed. The depth of the hole is made 2 - 3 mm greater than the length of the dowel.
We mark with a pencil
Use center point drills
Use a retaining ring
You can make cylindrical mounts yourself. Here is a short instruction on how to make dowels: To do this, take birch logs and split them into many pieces - you get square blanks. Next, they need to be trimmed by hand or on a lathe to give them a cylindrical shape and the required diameter. Fasteners can also be made using a circular saw.
The correct solution is to take a drill of a smaller diameter and drill in the center of the fragment. Then, using a screwdriver, chisel or chisel, break up the remaining debris and remove it from the hole. If difficulties arise, you can use photo instructions - there are a lot of them on the Internet.
So, when used correctly, a furniture dowel is a universal fastening that guarantees reliability. It is used for assembling different types of furniture in combination with other types of fasteners.
Step-by-step guide to making from wood
To make dowels, you need a lathe and cutters of the required configuration. After which a suitable material is selected.
Manufacturing process:
- The workpiece of the required diameter and size is selected.
- Attached to the machine.
- Using a cutter, the desired rounded shape is given.
- It is necessary to constantly measure the diameter of the workpiece being turned with a caliper so as not to remove excess material.
- The workpiece is cut to length and chamfered.
- We repeat the same action with the other part.
You can make it even simpler - cut the board on a sawmill into thin blocks measuring 25x25 mm. Then use square dowels for construction.
Quantity calculation
To calculate the number of dowels for a log or timber required to assemble a log house, you need to know the following parameters:
- building perimeter;
- the length of the internal walls of the house;
- the number of crowns (can be calculated on a calculator for a log or timber);
- step of installing connecting rods.
To calculate the number of dowels for a log house, the number of dowels is multiplied by the sum of the perimeter and length of the internal walls of the house and divided by the installation step. To avoid wasting time on calculations, simply enter the initial data into the calculator form and click the “Calculate” button. You will receive the exact quantity.
Print or share:
- VK
How to use dowels when building a house from timber
- The dowel must not be hammered in completely to prevent cracks in the timber.
- The holes in the upper crown for fasteners should be slightly wider, this will prevent the beam from sagging.
- The pin itself must fit into the hole freely; this is necessary for the wood to shrink.
- The holes for them are drilled perpendicular to the surface and located along the axis of the beam.
- The distance between the pin fastenings is calculated according to the construction documentation.
Advantages of fasteners:
- Reliable grip and structural integrity.
- Ability to resist shrinkage and natural phenomena.
- Long service life of the house.
- Minimizing gaps between timber.
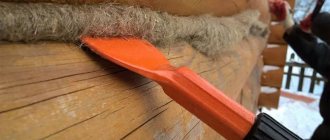
Corrugation of the side surfaces of the dowel
Dowels (either wooden or plastic) can have longitudinal grooves on the side surface - grooves, either straight, located along (parallel) to the cylinder axis, or helical.
The riffles serve to allow air to escape when installing dowels into the part. Since wooden elements are most often placed on glue, this improves adhesion and speeds up hardening.
Types of corrugation on the side surfaces of dowels (in the figure on the right - from top to bottom):
| Corrugation of the side surfaces of dowels |
- straight corrugations - corrugation for dowels for universal use. The most common option.
- helical riffles - located at an angle from the vertical axis. Makes it difficult to loosen.
- complex corrugations - (in this case, screw and transverse corrugations) corrugations for dowels intended for reinforced adhesive connections. Designed for structures subject to high loads that require a strong connection.
- transverse riffles - secures different parts as much as possible. Not recommended for use in cases where furniture may need to be disassembled.
- smooth dowel - made completely without corrugation and allows you to resist the shift of structural elements due to exposure to moisture and temperature.
Some types of plastic dowels have “roughness” on the side surfaces, i.e. they are equipped with projections. This surface prevents the dowel from falling out when disassembling furniture, securely fixing it in the main fabric.
How to install correctly (drilling and fastening)
The number of fasteners is calculated based on the principle of 2 meters between each subsequent fastening.
To secure the timber with dowels you need to:
- Drill a hole along the diameter of the fastener to a depth of 1.5 times the size of the timber.
- The dowel should be 30 or 40 mm shorter than the depth; it is driven into this hole by 10 mm. A distance of 30 mm in the lower of the two beams will be needed for possible shrinkage so that the beam does not hang.
- We hammer in a checkerboard pattern, the distance is from 1 thousand to 1.5 mm.
- The distance from openings or bowls must be at least 300 mm.
- The moisture content of the fasteners should best be the same as the wall material.
Cutting external and internal threads on wood
In order to apply carvings to wood, tools such as a tap (cutter) and a die are used. They are used to apply both internal and external threads. But in order to carry out such work you need:
- take into account the density of wood, since not everyone is suitable for such procedures;
- internal thread requires pre-drilling a hole, the diameter of which should be less than the diameter of the tap;
- after that the hole is cleared of chips;
- For more successful work, you should use oil, for example, linseed, just drop a little of it into the hole, and then insert the tap.
The angle at which the tap is inserted must be straight; under no circumstances should distortions be allowed, otherwise the part will be damaged.
As for external threads, they are applied in approximately the same way:
- the diameter of the workpiece must be equal to the diameter of the die;
- after that oil is applied.
In addition to the die, you can also use a regular nut:
- the oiled workpiece is placed in a vice;
- then slowly screw in the nut using a wrench.
After the required number of grooves have been cut, unscrew it just as carefully.
Advantages and disadvantages of fastening timber with dowels
Dowels, like other fasteners, have their advantages and disadvantages.
The advantages include:
- The dowel prevents the crowns from sagging.
- It does not corrode like metal.
- They are more suitable for the construction of a residential building than for a log house for a country house.
- They work better in bending than nails or reinforcement.
However, there are also disadvantages:
- The assembly of the log house will be slower.
- An incorrect selection of sections will not ensure the strength of the structure, and a larger one can lead to the destruction of the timber.
- Without the proper skills, it is difficult to work with dowels; it is difficult to align the fastener with the hole; the help of 2-3 people is required.
- A lot depends on the quality of the product itself, which must be knot-free, impregnated and non-hygroscopic.
Professionals work best with this fastener; single craftsmen are better off using metal.
Benefits of use
Essentially, such a jig acts as a template for making holes so that they are made as accurately as possible. They can be used for those holes whose axis is perpendicular to the surface of the workpiece, as well as for working at an angle.
This tool is an excellent alternative to sketches and manual measurements. You can place the drill strictly at the desired angle in relation to the workpiece and will not allow any deviation. The result will be especially noticeable when it comes to making deep holes.
If you use such a high-quality device for working with chipboard, then it should have the following characteristics:
- facilitate quick assembly of furniture without the need to use complex tools;
- make it possible to make several holes simultaneously without manual marking;
- significantly improve the quality of work with the drill.
Conductors are made from different materials; there are models based on plastic or organic glass. However, the best option is considered to be steel, which has such advantages as:
- minimal likelihood of deformation;
- the drill is directed as clearly as possible;
- no heating during operation.
Very often, overhead models based on lightweight materials that are easy to manipulate are used as furniture jigs. Many people use factory or homemade tools.
And the most qualified and experienced craftsmen no longer use a jig, since they can easily make a hole in structures on their own as accurately as possible. But not everyone can do this.
The key advantage of such a device is that the work can be performed as accurately and efficiently as possible, even by a person who does not have the proper experience. You don't have to do markings and complex preliminary calculations. You will save a lot of time and produce furniture much faster.
Tips and tricks
- Nails, screws and other metal will spoil the wood from the inside, so if possible, it is better to use wood. Otherwise, due to the different thermal conductivity of the materials, condensation accumulates, and this leads to rust on the fittings and rotting of the wood. It’s not for nothing that ancient ships were built entirely of wood, and examples of architecture speak of the same thing. The temple in Kizhi, built without a single nail, has stood for many centuries, and, nevertheless, is still just as strong.
- Don’t forget about the staggered order of installing the dowels ; this is why you need a house design to calculate not only the number of fasteners, but also the location of its installation.
- To avoid hanging logs and the entire structure of the house, it is better not to use metal and square wooden dowels. Experienced craftsmen advise using a standard round fastening structure made of birch. This will allow you to achieve not only strength, but also the beauty of the building as a whole.
- In addition to dowels, for uniform shrinkage of the log house, you can use such structures as: screw jacks and sliding fastening of metal rafters.
- The moisture content of the fasteners must match the moisture content of the timber.
- To reduce friction when driving the rods, professionals use a soap solution.
Read also: What is sandpaper made of?
If such work seems too labor-intensive, then it makes sense to turn to professional construction companies specializing in the construction of wooden houses. They will help you build a house quickly and competently, and will also be able to guarantee that it will be completed in accordance with all necessary standards.
As a rule, the construction of any wooden structure involves the use of fasteners. They help create a strong, monolithic structure, regardless of the type of building. Dowels, or dowels, are an integral part of any building. Their quality determines the reliability of the structure. You can make dowels for timber with your own hands, following a certain technique.
Scheme of inter-crown connection using a dowel.
The dowel is a small element, but it is impossible to do without this detail. It provides reliable fastening of timber and log walls. These fasteners were called dowels back in ancient times by carpenters from Vyatka. In the 18th-20th centuries, the construction of huts made of timber and logs began to actively develop there. In that era, one could observe the active development of woodworking production, which resulted in a construction boom.
Back then, houses made of natural wood were built using birch spikes. The construction of log houses in those parts and throughout the territory of our country began to be carried out using this particular type of material. Any carpenter knew this.
Types and sizes
Depending on the type of head, all self-tapping screws can be divided into several independent groups.
Varieties with a countersunk head. Such models most often have a conical design with cross-shaped slots. To work with this variety, you first need to prepare a seat. To do this, you need to make a small chamfer, which will allow you to place the end so that it is in the plane of the material. Models with this head structure will not protrude above the concrete surface after installation. Today varieties with a reduced head are produced. They have a smaller diameter and provide a more reliable fastening, but more effort must be applied when installing them.
Self-tapping screws can also be divided into separate categories depending on their protective coating. Many models are produced with a special oxidized coating. The latter has the appearance of a thin oxide film, which gives the parts a black color. Such options can withstand significant loads, but we must not forget that they should not come into contact with moisture during operation.
There are also models coated with phosphated compounds. These varieties, like the previous version, will be painted black. They are also capable of fixing material of significant weight, and at the same time have good resistance to water. The cost of such models will be higher compared to other types.
Galvanized concrete screws can be white or yellow, but they practically do not differ from each other in important properties. These models are most often used for installing products that will be located outdoors, since these self-tapping screws are particularly resistant to various atmospheric influences.
Self-tapping screws are also classified depending on the material from which they are made. The most common option is high-strength and high-quality carbon steel. This foundation is considered quite strong. Most often it is used together with impurities. In addition, this metal is particularly durable. Fastening devices made from this metal are relatively inexpensive.
Also, ordinary stainless steel can be used to produce such self-tapping screws. This material will be the best option if contact of fasteners with moisture is possible in the future. After all, models made from such material will not rust and will not lose their properties.
As a rule, self-tapping screws made of alloy stainless steel are not coated with additional protective coatings. After all, such metal contains nickel and chromium, which already provide excellent anti-corrosion properties of products.
There are also special types of decorative screws. They are most often made of wood, plastic or various non-ferrous metals. But such samples are extremely rarely taken for concrete surfaces, since they cannot withstand too heavy loads.
The sizes of self-tapping screws for concrete may vary. They are selected depending on the thickness of the surface and the diameter of the holes made.
Tools may have different thread configurations.
- "Herringbone". This type is a slightly inclined thread, which is formed by small metal cones nested inside each other. The herringbone model most often has a cross-section of 8 millimeters.
- Universal. This type of self-tapping screw can be used with or without a dowel. As a rule, the tool is available in sizes up to 6 millimeters.
- With a variable pitch of turns. These samples with variable pitch provide the most reliable fastening of materials, while additionally performing notches. It is this type that is most often found on self-tapping screws without drilling. The standard diameter of such devices is 7.5 millimeters.
The length of these devices can vary from 50 to 185 mm. The depth ranges from 2.3 to 2.8 mm. The height of the cap reaches 2.8-3.2 mm. The diameter of such screws can be from 6.3 to 6.7 mm
The thread pitch also plays an important role. For different models it can reach a value of 2.5-2.8 mm. Read with this
Read with this
Purpose and features of dowels
Wooden dowels are specially designed for pinning log walls. They prevent such natural processes in wood as drying out, as a result of which the wood changes its original properties and becomes deformed.
The use of such bolts will help to avoid the process of displacement of logs in the wall. Their correct installation will provide the structure with stability; the bars will be positioned as they were in the initial position.
The most popular are dowels made from hardwood. Birch or oak dowels cannot be broken if they are installed correctly. Most often they are given a rounded shape and a size corresponding to 24-25 mm. Wooden nails should be even and smooth along their entire length.
Pins are a material that helps hold a wall in a certain position. Dowels are used without fail, regardless of whether the building is log or timber. The most widespread are birch thorns.
These wooden bolts cannot be replaced with other components such as nails or screws, the use of which will only worsen the situation. In addition, you should not use pins on a metal base, which are most often reinforcement. As a result, it is possible to observe the interaction of materials with different degrees of thermal conductivity.
As a result, condensation may appear on the inner surface of the beam, and this is completely unnecessary. In this case, the reinforcement will begin to rust and the wood will rot.
Description and sizes of dowels made of different materials
The word "nail" translated from German means "nail". But in this case it is not quite typical. The products are pins without a head or point. The surface is smooth, and threads in such connections are undesirable. The length is usually equal to the limit of 120-150 mm. The length and shape are not regulated in practice. Such a nail can be made of metal or wood. The latter option is more common, because it is used for the traditional construction of wooden houses. The main function of such parts is to resist shear. Logs, beams and boards change their size with fluctuations in humidity and temperature.
The dimensions of the material change disproportionately and depend on the direction of the fibers. The connected parts move in different directions. And if you use retaining pins, they will increase the contact of the dowel with the wood, which will contribute to shear resistance. The connected elements and the dowel itself are not subject to destructive deformations.
If you change the volume of wooden parts, a reverse shift will occur. In this case, the pressure on the nail will decrease, and the pin will return to its original position. The dowel is selected according to the load, otherwise the pressure will be critical and the pin will collapse. This connection is more practical when parts are constantly moving. Metal and wooden dowels for timber are sometimes replaced with plastic ones, but their area of use is small.
The dimensions of cylindrical products are usually equal to the diameter of the rod to ensure a tight connection. Bolts and nuts are tension bolts that have a high load-bearing capacity due to friction. This effect in practice may be less, and sometimes disappears completely, because during the process of drying and shrinking of wood, there may be no friction at the last stage.
If the screws have a diameter of less than 6 mm, then they are screwed in, but this cuts the fibers, so fastenings of this kind are not always practical and are used in extreme cases.
Plate dowels for timber are used to join two or three logs that are stacked in height. The hole for such a pin is cut with a chain mortising machine. The size of the products is determined by the load.
Not all types of wood are used to make dowels for timber. Compared to the elements being connected, the fasteners must be more durable. When joining softwood beams like pine, the dowels should be made of beech or birch. If we take into account the requirements of SNiP, then wood of the highest or first grade is allowed for production, in which there should be no knots or twists. The acceptable humidity level is 12% or less.
We invite you to familiarize yourself with: Finishing a bathhouse made of timber from the outside
The technology involves the use of:
- beech;
- oak;
- ash;
- birch;
- larches.
Pine is used less frequently. Nails made from ash or birch are treated with an antiseptic, since these species are not as resistant to fungus and moisture as oak or larch. The dimensions of dowels for timber are regulated by GOST 30974-2002. The diameter should be 1/6 of the log diameter.
Manufacturing Guide
Wooden dowels should be smooth and round in shape.
You can make dowels for timber yourself; it is only important to know about some nuances. To do this, you need to take birch logs of a given length and split them into many parts, creating square-shaped blanks. Then manually trim them, giving them a rounded shape of a certain diameter.
If you have a lathe, all elements can be carefully and quickly turned. In addition, you can use disused cuttings from shovels as a base for the spike. To give them the desired shape, you just need to cut them and make blanks. Round tenons can also be made using a circular saw.
Homemade conductor devices
Jigs of the simplest design, for example, those used for drilling holes for confirmation, are relatively inexpensive, so many craftsmen do not bother making them themselves and purchase serial models. Meanwhile, there are those who try to make even such simple devices with their own hands. The question of how to make a jig for drilling with your own hands often arises and, if necessary, drill non-standard holes.
To make your own jig for dowels or a jig for confirmations that is simpler in design, you can use drawings and videos on the Internet.
When manufacturing a jig, you will need perfectly accurate drilling of guide holes and hardening of the finished device
To manufacture such a device, naturally, you will need a drawing of it. You also need a minimum set of tools and equipment:
- electric or hand drill;
- a set of locksmith tools;
- Bulgarian;
- welding machine (for the manufacture of jig devices of a more complex design).
The simplest homemade conductor can be made from available tools and materials that are available in abundance in most home workshops or garages. The use of such materials, which include pieces of metal reinforcement, wooden blocks, metal plates, etc., allows you to significantly save on the purchase of a serial model of the device.
Drawing of a homemade conductor for drilling holes for confirmations
Making a homemade jig for a drill or single-spindle machine takes place in several stages.
- Square reinforcement with a cross section of 10 by 10 mm, using a hacksaw or grinder, must be cut into pieces of the required length.
- The centers of the holes through which drilling will be performed should be at a distance of 8 mm from the edge of the conductor plate. It is at this distance that the center of the chipboard or MDF board in which the hole is drilled is located.
- The pitch between the holes on the jig, in accordance with generally accepted furniture standards, is 32 mm, while the diameter of such holes should be 5 mm.
- If you equip a homemade conductor with a stop, then using such a device will be much more convenient. To create such a stop, you need a metal plate 1 mm thick and 25 mm wide, which is bent at a right angle and fixed to a ready-made jig device made from reinforcement.
- After the structural elements of a homemade conductor are fixed with a clamp, they must be securely connected to each other using threaded fasteners.
Ready-made jig with rotary stops
To minimize the amount of dust generated when using a homemade conductor, its design can be supplemented with half a plastic bottle. Such a simple device can also act as a tray in which the chips generated during the drilling process will be collected.
The method described above allows you to make a simple homemade jig, which greatly facilitates and speeds up the process of assembling any furniture structure.
The main fastening element in furniture assembly is the confirmat. It is screwed in with preparatory drilling of the hole. Specifically, we will look at drilling assembly holes in chipboard for confirmations in this publication.
To assemble chipboard parts we will need:
- Screwdriver
- Confirmation bat
- Confirm drill
- Ruler, in other words, roulette
- Pencil and awl
- Confirmations
When assembling furniture, confirmat size 6.450 is usually used. Because The diameter of the thread is 6.4 mm, and the diameter of the body of the confirmat is 4.4 mm, then for high-quality fastening of parts, the diameter of the hole is expected to be within 4.5-5 mm and a depth of more than 50 mm.
If the thickness of the hole is not just indicated, the confirmat will not hold the parts well; if it is less, it can tear the chipboard with its own width.
To perform drilling, use a confirmat drill, 4.5 mm in diameter, which is equipped with an additional head for drilling an enlarged hole for the neck of the confirmat, which also makes a countersink for its head.
This, an ordinary drill with a diameter of 5 mm is also used, but for high-quality fastening in the hole, additional space is made for the neck of the confirmat and its cap.
In order to perfectly fasten two parts, you need to very accurately mark the places of their fastenings.
On the part that will be applied to the end (the one that will occupy the through hole), it is necessary to make two measurements - in length (usually 5-10 cm) and from the edge - exactly 8 mm (this is if the thickness of the plate is 16 mm).
On a part that lies perpendicular, mark the drilling point at the end. Here it is necessary to maintain the same distance in length (5-10 cm from the beginning), and in width - strictly in the center (8 mm from the edge).
Installation sequence
The procedure for working with wooden tenons comes down to the following points: first you need to find the middle on the desired plane and mark the future hole.
- Using a drilling machine, you need to make a recess. A spike will be inserted into it. The diameter of the drill should be the same as that of the dowel. Depth - 1.5 timber.
- If the fastener is too loose in the hole, it will not be able to fully perform its function. If the dowel is too dense and protrudes above the surface, problems may arise as a result of the natural shrinkage of the building.
- When machining a hole, you need to ensure that the angle of the drill is perpendicular to the base. This will help avoid problems when connecting parts. The dowel connects 2 beams or logs, and this must be done in a checkerboard pattern along the perimeter of the log house wall. In this case, the permissible distance between them will be 1000-1500 mm.
- From the combination of bowls and openings it is necessary to make an indent of 300 mm. During installation, the moisture level of the dowels must match the moisture content of the timber itself.
- It is necessary to insert core buttons into the resulting hole, intended for marking the hole on another board. In the absence of such a part, it is quite possible to resort to independent production. To do this, you need to sharpen the rod in the form of a pencil so that there is a needle in the middle. Insert it into the hole.
- Then the two boards are laid on a flat surface and lightly pressed against each other. Thus, markings appear on a clean board for drilling a recess for a tenon.
The dowel must sit tightly and without bevels in the grooves of the timber, otherwise it will not fulfill its function.
For such purposes, you can use a marking thicknesser. Here it is important to correctly find the middle of the desired surfaces.
You need to insert a rod into the resulting holes, treat parts of the boards with glue, connect the workpieces and clamp them into a clamp. Then you need to dry the structure.
- Holes for dowels should be made correctly. This connection has its own peculiarity: it cannot be changed at the time of assembly.
- A prerequisite is to drill the recesses strictly perpendicularly.
- You should not make too deep holes, this can lead to the dowel coming out of the board. They shouldn't hang around.
Basic requirements for this type of fastening
The elements we are considering are called dowels in another way, so if you come across this term below, keep in mind that they are one and the same thing. As for products of this kind, their use is carried out only in compliance with several important conditions:
| Material of manufacture | Many experts recommend using birch as the ideal type of wood, but it is not always possible to find this option, so the same wood from which the structure is built is often used, especially since waste is most often generated during the work, which can be used to make dowels |
| Humidity of elements | It must coincide with the humidity of the base material, this is due to the fact that if the indicators differ, drying will occur unevenly, which can lead to deformation and problems in the future. From this point of view, using waste material used is a reasonable solution, since in this case the humidity exactly matches |
| Correspondence of the hole to the dowel | This requirement means that a pin arrangement that is too loose is just as undesirable as one that is too tight. The fact is that after construction the log house shrinks, so the elements will move down, and in cases of high humidity the material will increase in volume and the structure will rise; the dowel should serve as a guide to prevent deformation, but not impede the movement of the beam |
| Correct arrangement of elements | Remember one simple rule: the dowel should be deepened by about 2 centimeters relative to the upper beam, this will prevent a situation where, with an increase in volume, the fastener lifts the elements located above |
Important! You should not listen to advisers who claim that the tighter the dowel is driven, the better the structure will hold; this option will not allow the frame to move, which will lead to an increase in joints and increased formation of cracks on the surface.
To deepen the fastener, use a spacer of the same diameter
The use of dowels in the construction of houses and baths
Wooden dowels are used in the construction of various structures with log or timber walls. Their use is approved by the standards of construction organizations and projects of wooden houses. In practice, the use of birch tenons provides a perfect connection to wooden substrates. It is distinguished by the mobility of the vertical level. However, this does not prevent the wood from naturally shrinking.
In the process of building wooden houses, they often resort to making dowels for timber with their own hands.
Round birch nails give the building strength and security.
The build quality and reliability of the walls will be at the highest level and will please anyone.
So, although making dowels yourself seems at first glance to be something complicated and time-consuming, in fact it is a primitive task. Here it is important to be clear, planned and follow the instructions.
Conclusion
The use of dowels is mandatory for wooden buildings. With their help, the structure is not only strengthened, but also receives guides for proper shrinkage of the structure. The video in this article will talk about some of the points discussed above in more detail.
Houses made of natural wood have now regained popularity. But wood is far from a homogeneous material, therefore, during the shrinkage process, slight deformation occurs; different parts of the house take on their final appearance unevenly.
This raises the problem of fastening the beams together, which will ensure reliability, on the one hand, and uniform shrinkage, on the other. The solution was found a long time ago - dowels. The element differs in size, cross-sectional shape (circle or square), and material of manufacture.
What is
Before you find out the installation details, you will need information about what a dowel is. This is the name for fasteners that allow you to securely fix different parts of furniture. It looks like a small cylindrical rod with rounded ends. The dowel does not complicate the disassembly of objects, but at the same time can withstand even heavy loads. Any material can be used for its manufacture: plastic, metal, wood. For a tighter fit, its surface should be corrugated (straight, helical, transverse).
The optimal circumference of the furniture dowel would be equal to no more than a third of the wall thickness; this will make the assembly reliable and maximally resistant to high loads. The length is selected individually, taking into account the base. Such parts are used both in the production of factory furniture and in self-assembly of the structure.
Installation methods
Such products are inherently designed for the most durable connection of different furniture elements. However, their installation is not as simple as it might seem. One important nuance must be taken into account - fastening will not succeed if the holes prepared in advance are displaced.
Before making or assembling furniture using dowels, you need to familiarize yourself with the proven diagram:
- At the end of the canvas, points are marked where the holes for the rods will be located.
- Using a drill, drill a hole in the furniture half the length of the dowel. The same must be done in the covering tabletop.
- A rod is inserted into the end - its upper part should protrude to a distance that corresponds in depth to the hole in the covering element.
- The dowel is lubricated with glue, then tightly fixed in the required position. Experts advise pouring glue directly into the hole and only then installing the fastener. This will allow the composition to be distributed more evenly over the entire surface.
- The top part is carefully placed on the protruding dowel. For the best fixation, it is recommended to lubricate the second hole so that the glue secures both sides of the rod.
Preparing holes for dowels Dowels must be driven in as carefully as possible
Additionally, you can attach the part with glue
Marking beams for wall assembly
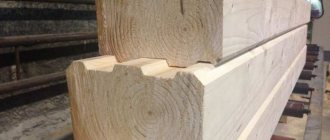
Practical construction experience shows that it is not realistic to keep in mind the sequence of marking the elements of corner joints. Before starting work, draw a diagram of the assembly of the walls of the house, which indicates: the serial number of the crown, the type of connecting element at the ends of the blanks, the position of the openings in the wall. An example of a wall assembly diagram house is shown in the picture:
Scheme for marking corner joints of timber and joints of parts of longitudinal walls, for a house with overall dimensions of 6x9 meters. A and C - longitudinal walls; D and B - transverse walls; E - internal wall made of timber - partition; 1 - joints of beams. In the house, which is shown in the diagram, each crown consists of 7 sections of beams from 3 to 6 m long. The crown of the longitudinal wall consists of two parts: the main beam of a standard length of 6 meters and an extension 3 meters long. On one crown, long beams are laid on the left, and extensions on the right. On the next crown, installation begins in a similar order, but on the right. The parts of the crown of the transverse wall and the partition are made from one beam of a standard length of 6 meters. To eliminate cold bridges in the external walls, the joints of the beams of the longitudinal wall, item 1, are made by making vertical cuts “into the floor of a tree” with an overlap of 15 - 20 cm. The timber in the corners of the crowns is connected in a bandage with a main tenon (see below for more details). How to correctly and quickly mark tenons, grooves and other profiles, to ensure identical sizes of lumber blanks ? Easier All this can be done using templates. The template is placed on the beam and the contour of the template profiles is transferred with a marker to the surface of the beam. It is more convenient, faster to mark and there will be fewer errors if the template completely follows the contour of the part and has the same length as the part being marked. I placed the template on the beam and immediately transferred all the dimensions and profiles to the workpiece. For our example, we will need to make seven templates, according to the number of parts in the crown. One template is used to mark two mirrored wall parts. If you think about it, the number of templates can be reduced. Let's look at how to make universal templates for marking parts of the longitudinal walls of a house (see above for the wall assembly diagram).
Two templates (highlighted in bright yellow) for marking the beams of the longitudinal walls. 4 - groove for the main tenon; 5 - groove for the tenon of the inner wall; 6 - template; 7 - extension beam. The figure above shows a template for marking the main beam in the crown, in which the extension is located on the right. On the wall marking diagram, these are crowns A1, A3, A5 and C1, C3, C5. The lower template is used for marking the main beam in the crowns with an extension on the left - A2, A4, A6 and C2, C4, C6. The templates are identical at first glance, but differ in that the grooves, position 5, for connecting to the partition, are located in different places of templates. The same templates are used to mark the parts of the extensions. To do this, through holes are drilled on the templates at points b and c , and cuts are made at points a and d . To mark the addition, the template is placed on the beam and points are pinned on the surface of the workpiece through the holes and cuts. Remember this technique when making holes in the template. This will help you create universal templates in many other cases. The templates are made from planed “inch” boards. As a result, we manage to reduce the number of templates from seven to three (2 for longitudinal walls and 1 for transverse walls). Two longitudinal templates (right and left) provide the ability to obtain blanks for longitudinal walls, and one transverse template allows you to prepare parts for transverse walls and partitions. Now let’s look at how templates are used. To mark the first beam of the crown (for example, starting from the left), the left template is laid on the beam and the end of the template on the left is outlined with a marker, then two grooves and, finally, a recess for the connection “in the floor of the tree”. The marked timber is transferred to the cutting site, where unnecessary fragments (it is better to shade them when marking) are cut out with a chain saw. How to mark parts with spikes? Obviously, the tenon and groove are elements of the same unit, which means they must match each other in size and location. In a part with a tenon, a tenon is marked in place of the groove. If the dimensions of the groove are 5x5 cm, then the tenon should have dimensions of 4.5x4.5 cm. The gap is filled with inter-crown insulation. The template profile is transferred to the upper edge of the beam. The markings are transferred to the vertical edge of the beam using a square. Accurate cuts are made using these markings.
How to assemble smooth walls from timber of different widths
Technical conditions (TS) for the manufacture of timber allow deviations in the size of the timber in one direction or another from the standard value specified in the documents. If the purchase documents indicate the standard dimensions of the timber, for example, a section of 150x150 mm. and length is 6 meters, then the actual dimensions will differ from the standard. Each beam in a batch of timber brought to the construction site will differ from the dimensions indicated in the documents by several millimeters. The cross-sectional dimensions and length of the bars will be different. The variation in sizes must be taken into account when developing templates, marking the beams and assembling walls. How to assemble even walls if the beams are different in width and length?
b - minimum beam width; delta b is the difference between a narrow and wide beam. Obviously, from timber of different widths, you can make only one surface of the wall flat - either from the outside or from the inside of the building. If you want to make the wall of a house flat from the outside, then all the beams in the wall are leveled along the outer edge. Then, inside the house, the wide beams will protrude from the wall by the amount of “delta b ” (the difference between the narrow and wide beams). Alignment along the outer edge leads to an increase in gaps in the corner joint of the beams (see figure). If the beams in the wall are aligned along the inner edge , then the “steps” from the protruding beams will already be on the outer surface of the wall. The outside of the wall is usually sheathed. And if you chamfer the outer edges of the timber, then the steps on the wall will be invisible even without cladding. The corner joints of the beams are more dense and “warm”.
How and with what to connect the crowns of a log house
Each crown of the log house is connected to the lower crown with metal or wooden dowels. The dowels are placed at a distance of approximately 250-300 mm from the end of the beam and then every 1-1.5 meters of the length of the beam. Each part of the crown is secured with at least two dowels. The length of the dowel must be at least 1.5 times greater than the height of the beam.
The upper ends of dowels made of any material must be buried 2-4 cm into the timber, pos. 1. Pins made of round steel with a diameter of 6-8 mm. - pins with a pointed end or nails (6x200-250 mm), simply hammer into the crown beams, option a in the figure. The upper ends of the dowels made of any material must be buried 2-4 cm into the timber. If this is not done, then when the timber dries and the log house shrinks, the dowels will be higher than the timber and will raise the upper crown. A large gap forms between the crowns. For the same reason, hammer-in dowels cannot be made from reinforcing steel. The corrugated surface of such dowels will keep the crown beams from moving when the log house shrinks, even if the dowel is buried into the timber. The crowns will simply hang on such dowels. Small-diameter steel dowels driven in cannot always provide the necessary wall rigidity, especially with long wall spans. Their use can be recommended for small buildings - for example, baths. To increase the rigidity of the walls of large buildings, it is necessary to install dowels of increased diameter. Steel dowels with a diameter of 10 millimeters or more, as well as wooden dowels, are inserted into pre-drilled holes in the timber. The diameter of the holes is made slightly smaller than the diameter of the dowel. When the dowel fits tightly into the hole, the rigidity of the wall increases, but the risk that the dowels will interfere with the shrinkage of the log house increases. It is recommended to make the hole diameter such that the dowel fits into the hole when hit by a regular hammer weighing 400 grams. Do not drive the dowel into the hole with a sledgehammer! Wooden dowels with a diameter of 25-30 mm are conveniently cut from round cuttings for the tool. Such cuttings are made from hardwood. It is recommended to chamfer the lower end of the dowel - it will be easier to drive the dowel into the hole. You can cut dowels with a square section of 25x25 mm from a regular “inch” board. One end of the workpiece is chamfered. Such dowels are driven into a hole made with a drill with a diameter of 24 mm. The ribs of such a dowel, made of relatively “soft” coniferous wood, are crushed when hammered in, the wood is compacted, ensuring a fairly tight fit of the dowel in the hole.
How to properly drill holes in timber for dowels
The depth of the holes in the wall for installing dowels must exceed the length of the dowel by at least 4 cm.
Moreover, the hole must be free of chips. To drill holes in timber that are sufficiently deep and large in diameter, a low-speed electric drill (drill) is usually used. The passport of a power tool usually indicates what diameter of drilling in a particular material the drill is designed for. Considering the large drilling depth, it is better to choose a drill with a power reserve. To drill holes in a beam, it is convenient to equip the drill with a stop, as shown in the figure. The stop block is attached to the drill with steel clamps. The stop, in the form of a wooden block, is attached to the drill, for example, with clamps. The stop stops drilling at the required depth, but the rotation of the drill does not stop after that. Continuing to rotate in one place, the drill clears the hole from chips, grinds in and then easily comes out of the deep hole. It is convenient to drill holes for connecting the crowns in a beam that is already installed on the wall in the designed position on the inter-crown insulation. But here a problem usually arises - the crown gasket cannot be drilled. The fibers of the gasket material are simply wound around the drill and clamped it. You have to install the beam on the wall in two steps. First, the beam is mounted without gasket and temporarily fixed from displacement, for example, with nails. Drill holes for dowels. Then the beam is moved from the wall and inter-crown insulation is laid. In the drilling areas, the gasket is cut out with a sharp knife . Then, the removed beam is put back in place, this time on the gasket, and secured with dowels. Drilling holes in the beam laid on the wall should be done while standing on a solid foundation - scaffolding, scaffolding, flooring. Standing on a narrow wall and drilling is dangerous. The drill can “bite”, a powerful drill will turn around and easily throw the worker off the wall.
How to make a straight wall from crooked timber
Some of the timber delivered to the construction site may be bent.
The beam can have a curvature in one plane, or it can be twisted with a screw and become diamond-shaped in cross-section. If possible, it is better not to use curved beams for the walls of a house or bathhouse. It is recommended to cut beams with curvature into smaller pieces and use them in other, less critical places. A small amount of beams that have curvature in one plane can be used for mounting walls. You should not lay such a beam into the wall with its convex upward or downward, in the hope that it will straighten under the weight of the house - the beam will not straighten, even if it is placed in the lower crowns. A crooked beam is laid in the wall, straightening it in the horizontal plane as shown on the image. The curved beam is straightened sequentially by fixing it with dowels. The curved beam is drilled, aligning it with the straight beam at the drilling points. After laying the inter-crown insulation, the curved beam is fixed with a dowel at one end and, when unbent, is sequentially fixed with dowels at other points. Unbending the beam does not require much effort. A lever and bracket will help make work easier
Inter-crown gasket - insulation, sealant
To protect against blowing and cold, a gasket is placed between the crowns. Previously, moss or flax tow were used for this. Currently, special cushioning materials based on flax wool or flax jute are available for sale. The material is sold in the form of a roll of tape 20 cm wide. A tape of cushioning material is laid along the entire upper edge of the beam in two or three layers and secured with staples using a construction stapler. If the wall is not sheathed, then the spacer should be 1-2 cm from the outer edge of the beam ., otherwise it will get wet. Some craftsmen lay the cushioning material in one layer and suggest caulking the joints after the frame shrinks, adding additional material to the voids of the joints. In this option, we have less consumption of cushioning material. The work of caulking joints is quite labor-intensive and tedious. It is better to immediately lay a thicker sealant, in several layers (three layers), to eliminate the need to caulk horizontal joints.
How to control the correct assembly of a log house
During the construction of a house or bathhouse, it is necessary to regularly check the correct assembly of the log frame. To do this, it is enough to control the following five parameters:
- Verticality of corners.
- The height of corners and walls.
- Horizontality of the crowns and upper edges of the timber.
- Straightness of walls.
- The quality of installation of inter-crown insulation.
To control the verticality of the corners, use the following method.
To control the verticality of the angle, a vertical line is applied on each side of the crown. 1 - lower trim; 2 — crowns; 3 — control lines; 4 - base. On each side of the crown, at the same distance from the corner edge, draw a vertical line. When laying the crowns correctly, this line should be straight and coincide with the vertical. The verticality of the line is checked with a plumb line. If deviations are found, the work is suspended and the cause is eliminated. The height of corners and walls is measured with a tape measure. The measurement is taken from the base horizontal line, which is applied to the strapping beam using a water level. The horizontality of the crowns and upper edges of the timber is checked by level. The straightness of the walls is determined visually by pulling a cord along the wall. The verticality and height of the corners should be especially carefully and constantly checked. Deviations from verticality are eliminated, up to the replacement of the timber in the crown. The height of the corners is adjusted by increasing the thickness of the gasket between the rims in the sagging corners. Sometimes it helps if you tap a beam with a sledgehammer in a high corner. The quality and thickness of the installation of inter-crown insulation is checked visually by inspecting the walls.
Window and door openings in a log house
From the second crown they begin to form doorways. The distance from the floor level to the window is chosen within 70 - 90 cm. Laying timber in crowns in the area of openings has its own characteristics.
Laying timber in places where there are openings in the wall. a - diagram of the location of openings in the wall, where: 1 - wall; 2 - door opening; 3 - pier; 4 - window opening. c is the diagram for cutting the timber, where c is the remainder of the cutting. d - option for constructing an opening in a log house with the installation of temporary fastening bars, pos. 7. d - option with installing decks in the opening, position 6 - we immediately get an opening ready for installing a door or window. In practice, two options are used for forming openings when assembling a log house. One option is “ d” in the figure. The opening is made in rough form; only preparations are made to create the opening. The opening is not prepared for the installation of doors and windows immediately when assembling the log house. This work is left for later - usually done after the log house has shrunk. This option allows you to speed up the work on assembling the log house. Beams must be installed in the opening to fasten the partition to the log house, item 7 in the figure. At least two such beams are installed in the doorway. During the shrinkage of the log house, the partitions can “lead” inward or outward. To prevent this, the beams in the walls are fastened with vertically installed boards . In another option - “ d ” in the figure, the openings are immediately prepared for the installation of doors and windows. To do this, install decks (windows) in the openings - a vertical beam with a groove, item 6 in the figure. The tenon of the wall beam fits into the groove. In this way, the partition beam is fixed from displacement. In this option, the openings are immediately ready for the installation of doors and windows. Decks (jams) traditionally serve not only to connect timber in the opening, but also serve as window slopes and window sills. To do this, they are carefully processed and chamfered.
Option for installing a window in a wall made of timber: 1 - finishing the window slopes; 2 - a vertical frame board with a tenon strip, fits into the groove of the wall beam; 3 — plastic window frame; 4 - sealing tape PSULV In modern conditions, when installing plastic windows and installing plastic slopes and window sills, the deck (jam) can be omitted. The beams in the opening are fastened like this. At the ends of the beams along the entire length of the opening, a vertical groove is cut out and a batten is inserted there, which secures the beams of the partition from displacement. The length of the deck (the frame) or the batten should be 5-7 cm less than the height of the opening, so as not to interfere with the shrinkage of the log house.
Planed timber Profiled beads. It is also made from a single piece of wood, but has excellent geometry - deviations are minimal. Two of its faces are made with grooves/protrusions - profiles, and two are smoothly and evenly planed. Grooves and protrusions are the locks that connect the upper and lower beams in a log house. They serve as a guarantee that the joint will not be blown through. A log house made from profiled timber can be assembled without any sealant at all, but it is advisable to put it in bowls - just in case. But in practice, they still use insulation, even if it’s a thin underlay for laminate, but they put it...