If your home plan does not include an additional room, garage or other space that you need, you need a frame extension.
The easiest way is to make an extension to a wooden house. You don’t have to hire specialists, because if you have at least some construction experience, you can do all the work yourself.
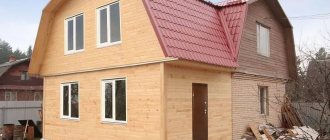
Frame residential extension to the house
Why do you need an extension to a frame house?
Extensions are necessary when, while planning your home, you overlooked the need for any premises, or you did not have enough finances to build additional rooms, a garage or a bathhouse.
When you need an extension:
- Do you want to expand the area of your home with your own hands? You can complete a frame house as much as you like.
- You need a garage, but don't want to make it separate.
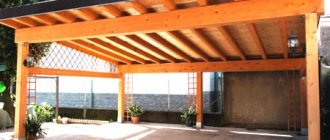
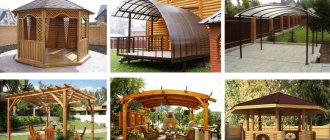
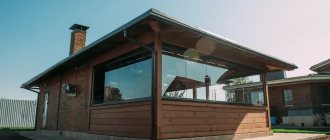
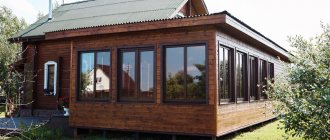
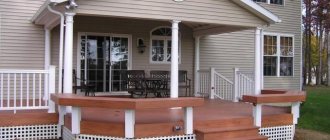
- You have long dreamed of a bright veranda or a summer dining place.
- A small bathhouse attached to a wooden house never hurts
- Do you want to have a utility room to store various things?
Once you have decided what exactly you will build, you must determine the following points:
- Do you need an additional foundation for a new wooden room?
- what kind of roof will be on your extension
- will it have windows or additional doors
- Do you need a supply of water, light and other communications to the wooden outbuilding?
- how and with what will you carry out the insulation?
- you will build with your own hands or invite specialists
Functional
As with the construction of a house, before constructing an extension it is necessary to determine the functionality in advance, since different purposes require appropriate construction manipulations. If you plan to make living rooms, enhanced insulation is necessary. Communications are immediately laid out for the boiler room, bathroom or kitchen. It’s easier to change your mind and plug a couple of plastic pipes into the wall than to decide that another bathroom is more necessary and dig into a newly built one.
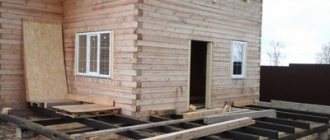
Extension to a frame house: step-by-step instructions
As the name implies, the basis of this structure is the frame. However, even before installing the frame, you may need a foundation.
It can be a lightweight, columnar or strip foundation.
Considering the moment of some shrinkage, it is better not to make fastenings with the foundation of the house already installed. Most often, a strip foundation is chosen.
Its essence is simple: a trench is dug in which the formwork is installed. A concrete solution is poured, consisting of 1 part cement, 3 parts sand and 5 parts granite crushed stone.
After the foundation hardens, the formwork is removed.
Strip foundation for frame extension
If construction takes place on unstable (for example, clay or loose) soils, it is necessary to allow some time for the foundation to settle.
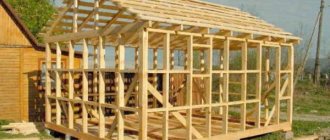
The second stage of building an extension to a frame house is installing the frame. Its basis is wooden beams treated with protection.
The wood must be treated with bioprotection against insects and fire protection, which prevents the wooden structure from burning.
Frame of an extension to a house
Next, we assemble the walls of the future extension to the wooden house onto the frame. It's easy to do it yourself.
The wall will have the following layers:
- external finishing
- OSB sheathing (DSP, SML)
- windproof membrane
- insulation
- vapor barrier
- OSB interior cladding
- interior decoration
Most likely, you will use 15 cm thick material for insulation. These are average values for our region.
Based on this, you will need lumber from the 150 line. The pitch of the frame posts will be 59 cm, where 60 cm sheets of thermal insulation material will fit perfectly.
The frame is installed on a concrete foundation
Common mistakes
When building an extension by inexperienced builders, problems may arise due to construction errors.
These include:
- incorrect and insufficient fastening of load-bearing beams, vertical supports of the lower and upper frames, logs. Negative consequences may arise, leading to the destruction of the extension;
- ignoring antiseptic treatment of lumber at home, hoping that it was carried out by the manufacturer. Illiterate processing of materials will cause wood to rot and harmful insects to appear in it;
- illiterate installation of plastic windows and doors, carried out independently or by unskilled workers, can cause jamming of the window sashes, the appearance of cracks and drafts. The window may warp, deform, or crack;
- the foundations of the old and new houses are incorrectly connected to each other. Insufficient connection between them will lead to negative consequences: the extension may move away from the main house;
- errors appear during the design and calculation of estimates. Due to the desire to save money, cheap low-quality material is chosen, which can lead to cracks and destruction of the house;
- There are also mistakes when laying the foundation. Lack of knowledge about the depth of groundwater and the level of soil freezing leads to the wrong choice of foundation and its illiterate installation.
Insulation of frame extension
Insulation of a frame extension to a wooden house can be done in various ways.
The most commonly used insulation materials are:
- foam sheets
- mineral wool
- liquid insulation
- isover, ursa
- mineral basalt types of insulation
The insulation of an extension is generally similar to the insulation of any frame house, but it also has its own characteristics.
Since in places where new frame walls are attached to existing walls, hard-to-reach places for insulation often arise.
As a result, cold paths appear there, nullifying all work on the general heating of the frame extension.
To insulate such joints, you can use:
- jute
- liquid insulation in the form of hardening foam
Jute is an excellent insulation material that needs to be caulked in the corners.
Be careful: if there is felt in the jute, moths may develop over time and eat this material. Choose jute that contains only plant materials - hemp or flax fibers.
Before laying jute, study the technology and be sure to use personal protection, at least closed clothing and gloves.
Liquid insulation is good because it is extremely easy to apply with a spray can into the most inaccessible places.
The synthetic composition does not attract insects, its service life is several decades. Liquid insulation is attached to almost any surface and hardens very quickly.
Important: liquid insulation materials do not like ultraviolet radiation, under the influence of which they can change their structure and color. Do not work with this material in direct sunlight.
If you are insulating with mineral wool, it is better to overlap it. This way we will avoid cracks that allow cold to pass through.
The insulation for a frame extension must be well fixed; for this, staples or glue are used.
If you decide to insulate a frame extension using foam sheets, then they are placed close to each other, fixed, and the joints are foamed.
It is better not to use foam sheets for internal insulation, since the smell of construction chemicals may be present in the house for some time.
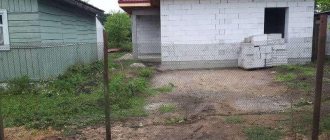
Choosing a foundation
When choosing the type of foundation, you must first of all rely on the purpose of the extension itself. It is also necessary to pay attention to other factors, such as: weather conditions in a particular region, the type of soil on the site, etc. Let’s consider what materials are most often used when installing the base for an extension:
- concrete;
- brick;
- wood (beams);
- metal rods.
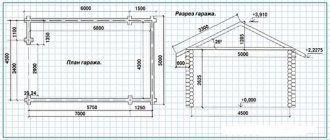
Important! If you plan to build a large structure that includes 2 floors, then the base goes deep into the soil by 0.7 m or more. The foundation is responsible for the reliability of the structure. The service life of a frame structure directly depends on its quality. Without a foundation , over time the structure will become distorted and collapse.
Before starting construction, it is worth determining the type of foundation. Each base option has its own characteristics and requires an individual approach. Let's consider what types of foundations are used for such structures:
- tape;
- slab;
- pile;
- columnar.
Massive frame structures are distinguished by their heavy weight. For such structures, the first base option is suitable, namely: strip. The technology for organizing such a foundation is quite complex, but anyone can master it if desired.
If you decide to add a bathhouse
With the addition of a bathhouse, everything is much more complicated than with an ordinary extension. The reason for this is the need to supply all communications.
And if, as a rule, there are no difficulties with the light, then difficulties may arise with the drainage system and the supply of water to the bathhouse.
Bathhouse as an extension
What to pay attention to:
- All materials for adding a bathhouse must be labeled “for rooms with high humidity.” All wooden elements must be processed with high quality.
- Water can come from inside the house (this often requires raising the floor or otherwise accessing laid pipes) or it can come from a separate water source - a well or borehole. Often the second method is simpler and cheaper.
- Wood for a bathhouse should not release resin when heated, so we do not use coniferous wood.
Otherwise, the extension bathhouse differs little from a regular bathhouse, the construction of which can be read here.
Roof for frame extension
There are two ways to install the roof of a frame extension with your own hands.
The first method is to build a new building under the common roof of the house, and the second is to build a separate small roof (usually a pitched one).
You can use any roofing material, but by far the most common is regular 8-wave slate.
Its length is 175 cm and it is laid with an overlap. You can calculate the amount of roofing material if you know the area of the future roof and the size of the overlap (it should be at least 5 cm, and preferably 10).
Main roof layers
To protect the area where the new roof meets the house, a galvanized iron flashing should be installed.
The iron sheet is bent at an angle that depends on the angle of the roof. The galvanized iron sheet should not be less than 30 cm in width.
One part of such an apron must be attached under the roof overhang, and the second must be attached directly to the slate of the extension to the house.
Important: Use only 100-120 mm slate nails, the ends of which are not bent, otherwise the slate will crack from temperature changes. We leave them as is or cut them with a grinder.
You can calculate the number of nails by knowing the number of slate sheets. 1 sheet will require 5 nails. However, it is better to buy nails with a reserve (5%).
Extension of the roof for placing an extension under the roof
In addition to slate, you can use other roofing materials.
Roof installation
The roof is installed using standard technology, taking into account the characteristics of the building materials used. The roof can be gable or single-pitch. In both cases, the rafter system is made simply: the sheathing is installed along the load-bearing elements, and then the roofing material is attached.
note
In order for a house made of timber to look harmonious, the roofing material must match or be identical to the roof covering of the main building.
Among modern materials there are the following popular varieties: soft roofing, ondulin (Euro slate), metal tiles (in the form of profiled metal plates imitating tiles).
The roof of the extension can be made separately or be shared with the house. The second option is carried out during the reconstruction process, when, for example, an attic room (bedroom, children's room) is built and the configuration and size of the roof of the old house is changed entirely. It is difficult to do such a volume with your own hands; it is better to hire professionals.
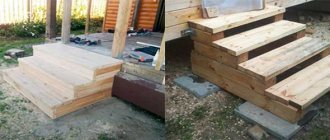
Frame extension floor
After the roof is done, it's time to think in the field. We can also make it ourselves.
In short, the construction of the floor is done in several stages:
- subfloor
- finished floor
The subfloor is arranged like this. A cranial block (5X5 cm or slightly less) is attached to the sides of the genital joists.
Edged boards are laid on the block, the thickness of which should be 2-2.5 cm. The following layers: glassine, insulation, glassine again.
The subfloor is a supporting frame for the finished floor, and also creates an air cushion for even greater insulation. After this, we begin laying the finished floor.
Wooden floors for extension
The finished floor can be of the following types:
- wood
- concrete
If you decide to go with wood, use a milled board. Very convenient are those that are connected by tenons in grooves.
Dimensions can be as follows: 28-44x98-145mm. On the back side they have vents that provide ventilation and air circulation. The size of the vent is about 20 mm.
You can also use for a wooden floor: tongue-and-groove boards, which are sold with tongue-and-groove slats and tenons of various shapes (straight, segmented and trapezoidal).
Important: if you use a board to create a floor, the installation is carried out taking into account the annual rings on the wood. They must look in different directions!
After the finished floor, you can do the finishing.
Concrete floors are easier to make. After a layer of insulation and insulation, a concrete screed is applied.
Finishing can be placed on top of the screed. You can make a screed with your own hands if you know the technology.
However, the concrete floor has one drawback - it is cold. Therefore, it is worth thinking about a “warm floors” system in the extension if it will be a living space.
Ready-made tubes fixed to grid cells - a good move
Warm floors are done like this:
- First, a concrete base or screed is laid.
- A layer of thermal insulation (20-100 mm) is placed.
- Reinforcing layer
- The pipes of the water heating system are being laid. For fixation, they are secured with clamps to the cells of the reinforcing mesh. The pipe laying step should not exceed 3 cm.
- The next layer is the underlayment for the flooring.
- At the last stage we install the floor covering. It can be parquet, laminate, tiles, linoleum and others.
In addition to a water-heated house, you can make an electric one, which is even simpler.
When the floor is ready, we install doors and windows. They are attached using self-tapping screws, spacers, nails and wedges. Installation is done by level.
You can read about wiring electricity to a new room here. Wiring can be carried out either from outside the house or through a common wall with an extension.
Internal insulation of frame extension
The walls of the extension must be insulated not only outside, but also inside. For this, a superdiffusion membrane, foil materials and insulation are used.
The superdiffusion membrane is a modern insulating “breathing” product.
Sometimes, in order to save money, plastic film is used instead, but this material collects moisture, as a result of which mold spreads along the walls of the house.
Foil materials are applied to the wall with an overlapping aluminum surface and secured with conventional slats.
When choosing insulation, it is best to choose mineral wool or ecowool. They are functional, inexpensive and durable.
A layer of insulation covers a vapor barrier, which is covered with sheets of OSB, chipboard, plywood, lining, DSP, etc.
Next comes the interior finishing of the room. For an extension, you can use not a wooden beam, but also a metal profile.
Exterior finishes may vary - you can select options and see pictures and videos here.