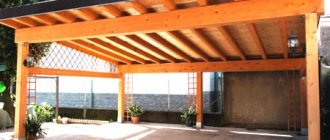
Wooden carports are used as a covered area for a car, used as a veranda for a private house or a pergola for a summer house. Such a building is suitable for protecting a porch or, for example, a barbecue from precipitation. In this article we will tell you everything you need to know to independently build an impressive and reliable wooden canopy.
Advantages of a wooden canopy:
- environmental friendliness of building materials;
- low cost of construction;
- simple installation;
- multifunctionality;
- convenience and ease of use;
- originality of design;
- wide possibilities for decoration.
Minuses:
- the structure must be regularly treated with antiseptics and protected from fire with fire retardants;
- lumber needs to be painted, varnished or oiled;
- it is necessary to carefully select lumber, taking into account the grade and humidity;
- the load should be calculated and construction technology should be followed.
Important! The reliability and service life of the structure directly depend on the regularity of wood care and compliance with installation rules.
Types of wooden canopies
Let's immediately find out how structures similar to a canopy differ:
Pergola is a canopy made of trellises for climbing plants (roses, grapes, etc.). Protects from the sun, but does not protect from precipitation.
A gazebo is a building with a roof, walls and windows. By the way, in our blog there is an article about the nuances of self-building a wooden gazebo.
A canopy is a roof that is supported by supporting pillars. A cross between a gazebo and a pergola: there is a roof, but no walls.
Examples of structures similar to a canopy
The most common types of canopies for their intended purpose are:
Visor . This is a small-sized roof on supports, which is installed above the porch or stairs in front of the entrance to the house. Examples and tips on its installation will help you with the construction of a porch.
Canopy in the form of a covered terrace . It is usually attached to the house and serves as a sitting area in warm weather. The structure is usually large in size (at least two square meters per person), and therefore has massive support beams.
In addition, the canopy can be used as a utility unit : it can be a summer kitchen or a place to store a car. In this case, the building can be located anywhere on the site.
Design options
Based on the method of placing the canopy, the following types of buildings are distinguished:
- isolated;
- built-in;
- adjacent;
- decorative.
A canopy standing separately from timber is constructed primarily as a gazebo. Its design involves the presence of four semi-open or open walls.
When a separate area is installed on the territory of a building, for example, a barbecue area, we are talking about a built-in canopy.
The wooden canopy adjacent to the main building is like a continuation of it. In this case, the additional structure has only three open walls and one closed one.
As for the decorative canopy, it is more of a decorative element than a building with specific functions.
According to the type of construction, canopies can be divided into the following groups:
- straight;
- with a slope;
- complex.
For example, if you need to build a carport from timber, it will be most convenient to choose a straight type of structure.
If it is necessary to prevent snow from accumulating on the roof of the canopy in winter, then it is better to choose a structure with a slope.
Canopies of complex shape are intended to add some zest to the appearance of the building. Such structures may have domed, pyramidal or polygonal roofs, wave or arch shaped.
Roof features
It is difficult to make a gable roof: additional supports are needed, and the structure will be small in size. Therefore, it is preferable to make a canopy with a pitched roof.
Example of a flat roof canopy
Example of a canopy with an arched roof
Example of a shed with a pitched roof
Freestanding carport
The size of the carport should be determined based on the dimensions of the vehicle. The optimal option is considered to be 3x6 m. The height can be adjusted as desired, however, it is worth considering that the higher the building, the more precipitation will fall under the roof. In addition, strong winds will quickly loosen a wooden canopy roof.
To work you will need the following tools:
- Boer;
- drill;
- shovel;
- screwdriver;
- hammer;
- level;
- roulette;
- cord;
- paint brush.
Consumables for building a canopy:
- cement - 3 bags;
- sand;
- small crushed stone;
- wooden supports - 6 pieces;
- board 3×10×60 cm – 15 pieces;
- timber 5×15×60 cm – 13 pieces;
- roofing material - 18 m2 of slate or metal tiles;
- 10 bolts size 10×150;
- 160 screws for metal tiles;
- 0.5 kg nails.
Before making a canopy from timber with your own hands, it is recommended to pre-treat all lumber with antiseptics, which will protect the wood from insects and fungus.
Using a tape measure, we mark the length and width of the building, after which we stretch the cord along which the support pillars will be installed.
One post must be placed in each corner of the canopy, and also placed along the walls every three meters. After this, you need to drill wells to a depth of 40-60 cm.
The posts are lowered into the resulting hole. To ensure that they are evenly deepened, the horizontal line is checked using a level and a long board. After the final alignment of the outer posts, intermediate supports can be installed. To ensure that precipitation does not linger on the roof of a wooden canopy, it is necessary to create a height difference between the left and right sides of the building of at least 4.5 cm. When the supports are fixed, mix the cement-sand mortar. To do this, crushed stone, cement and sand are combined in a ratio of 4:2:1.
To securely fix the supports, they are fixed in the upper part with bolts and boards.
A beam of 5×15×60 cm is laid on top of the racks in increments of 75-80 cm. A similar beam is laid across the canopy. You need to connect the beams in the middle and along the edge with a 3x10x60 cm board and nails.
The next step is to install the roofing. The metal tiles are fastened with special self-tapping screws. At the end of the work, all excess can be trimmed with a grinder.
Low tides around the perimeter of the canopy will allow you to control the drainage of rainwater. To do this, special fastenings for gutters are installed along the entire length, screwing them with self-tapping screws. Drainage drains are installed in the fasteners.
The soil under the canopy can be laid out with stone, paving slabs or concrete.
If desired, the carport can be decorated with any climbing plants.
How to make a shed with a gable roof?
- Make a drawing indicating the dimensions of the frame.
- Prepare lumber and roofing material.
- Dig holes (at least 50 cm deep) according to the number of supports.
- Treat the bottom of the support posts with bitumen mastic. Install them vertically and fill them with concrete (you can make a mixture of concrete and crushed stone).
- Make the top trim from the beams, securing them with bolts.
- Treat the boards (50x200x6000 mm) for lathing with an antiseptic compound.
- Calculate the rafter system.
- Using the template, assemble trusses of the same size. Their number depends on the pitch between the supports. Remember that the edges of the roof should extend 15 cm from the support posts.
- Try on the truss and make cuts in the rafters.
- Install the first truss using 50x50 mm metal corners. Secure the outer truss in the same way. Stretch the rope and mount all the others along it with the same step.
- All trusses are additionally strengthened with temporary spacers (slats, cutting boards).
- Make a sheathing for the roof (from OSB 12 mm for bitumen tiles; from a block of 30x50 mm for corrugated sheets, ondulin or metal tiles).
- Secure the roofing material.
Advice! For a small canopy, timber with a diameter of 10 to 20 cm will be enough for supports, and only rounded logs will support the weight of massive structures. You can also use 200x200 mm laminated veneer lumber; it is made from kiln-dried wood.
Advice! For a pitched roof, lay the rafters on one slope at an angle. The optimal tilt angle will be in the range from 15 to 45 degrees.
There are several options for arranging a floor under a canopy:
- make a bed of fine gravel;
- fill with crushed stone and fill with concrete;
- make a floor from edged boards;
- use paving slabs;
- pave;
- lay ceramic tiles;
- use stone slabs.
An example of using paving slabs as a floor under a canopy
Advantages of log sheds and their applications
The areas of application for such a seemingly simple structure as a log shed are very diverse.
Here are just a few examples of their useful uses:
- If your dacha does not have a place for a garage where you can park a vehicle, the best way out of the situation would be to build a carport from a log.
- Storing firewood for the winter is not always convenient. And a lean-to shed made of wood will provide unhindered access to them, so that you can take the required amount at any time (for more details: “How to build a shed for firewood - the sequence of construction with your own hands”). At the same time, solid fuel will not get wet due to the presence of a roof.
- Sometimes you want to build a small gazebo for summer tea in the garden with your family or guests. You can decorate such a building as you wish, because in the store you can find a large selection of decorative materials for finishing.
- Very often in the summer there is a desire to go out into nature for a barbecue. A barbecue area or a spacious robe can be created in your own yard by constructing a log shed.
- A small extension in the form of a canopy can be used as a porch.
Thus, equipping a flat lean-to canopy made of wood has the following advantages:
- wide field for useful application;
- possibility of decorating according to your own taste;
- using only natural materials;
- ease of installation;
- low equipment costs;
- light weight.
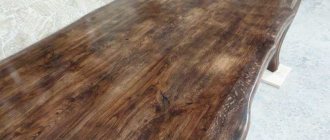
Wood canopy
There is an easier option to build a canopy over the porch for the house yourself - a canopy. A simple small structure that can be simply assembled on the floor and then nailed over the porch. The shape of the visor can be different, it is described in the project:
Installing a simple wooden canopy over the porch
- Arched.
- Single-pitch.
- Curly.
- Gable.
But if you are not a master in this matter, then it is better to make a single-pitch canopy. Dimensions are calculated according to the drawing, which must be drawn up in advance. The width of the canopy should be half a meter larger than the porch. The length of the slope is 80 cm. For consoles it is better to use 7.5x7.5 cm timber, for sheathing - use thinner material, for example, 5 cm. The angle of inclination will be 30 degrees. All parts must be painted or treated with water-repellent impregnation.
The attached structure consists of 3 bars:
- vertical - needs to be fixed to the wall - this will be the basis for fastening the strut with the crossbar;
- fasten the support beam to the crossbar, the sheathing will be mounted on it;
- build a strut to support the roof.
Variant of the design of a wooden canopy
The beam support, located behind the canopy, is attached to the risers. The rafters and supports are connected to each other by slats, forming a triangle. Attached using self-tapping screws. This canopy can be covered with any roofing material.
To minimize noise from precipitation, you need to put roofing felt or insulation under the roofing sheet.
Anchors can be used to secure the structure to the wall of the building. The fasteners must be long so that they fit two-thirds into the wall - otherwise the canopy may move away from the wall. The video shows the step-by-step process of making a wooden canopy over the front door.
Lathing, strapping, anti-corrosion treatment of frame
To make a canopy at the dacha with your own hands from wood, you need to master the level - this is the main tool. It will help make a smooth structure. Since the wooden log (25 cm in diameter) will be rounded, its shape is close to ideal, so leveling will be easy. Let's look at step-by-step instructions on how to properly make a harness.
Take a level and lean it vertically against the support. If everything matches, then you can pile up the first 2 supports. After this, we lean the level again and measure. Repeat the procedure every time a new column is added to the bundle. After you have tied everything together, you need to measure the angle of inclination of the structure in all directions, since after nailing the rafters it will be too late.
The easiest way is to make a lean-to building, then the rafters just need to be laid at an angle of 1 slope every 70 centimeters. But when constructing a gable roof, you will have to take into account another ridge. Using a plumb line and a tape measure, we determine the middle of the room, raise the vertical and attach the ridge to 2 slats. Next, we adjust all the rafters to it at an angle of 45 degrees. This is the ideal angle for a 4x4 meter canopy. Make lathing every 50 centimeters from 35x55 timber.
You can use standard wood stain and varnish, but we recommend treating with exterior stone varnish. It is characterized by maximum penetration into the material, protects the board for many years and protects against biological corrosion.
Pro tip: it is recommended to leave the rafters 30-45 centimeters after the top trim, since moisture can get on the wood during strong winds or snowfall. No matter how good the protection of the tree, it will still rot if it is constantly wet.
Tips for building wooden sheds
Wood protection
Wood, like no other material, needs additional protection. All wooden structural elements must be impregnated with antiseptics.
Moreover, they will be outdoors all the time. Impregnating wood with antiseptics will significantly increase the service life of the structure. At least for 5-7 years.
For buildings such as a wooden canopy or gazebo, it is best to use coniferous trees. Due to the fact that they contain a large amount of natural resin. And the resin, in turn, protects the tree from rotting.
Reliable rafter system
The sheathing and roofing must be fixed as firmly as possible. This is necessary so that the entire structure does not become loose over time.
Read also: How to lengthen the rafters of a gable roof
The fact is that for a canopy this is especially important, since the roof in such a structure remains open. And gusts of wind greatly undermine the roof. Which ultimately leads to the fact that the roof may lose its tightness, which, in turn, will lead to critical mechanical damage to the entire structure, up to and including its destruction.
Which roof to choose for a canopy
Installing a gable roof on a canopy will be very problematic. Preference for a canopy is better given to a pitched, flat roof. It is important to take into account the slope of the roof. The slope must take into account the existing drainage pattern at that location, as well as the direction of prevailing winds. This condition will increase the safety of the structure in general.
Technology of installation and concreting of metal supports
How to install canopy posts using a concrete base? This is not a very labor-intensive and reliable solution that will allow you to install all the supports in one day and ensure their durability. If metal pipes are chosen as pillars, metal flanges are welded to them before installation: they will become a platform for installing trusses for the future canopy.
How to install poles for a canopy? The area needs to be cleared and, if necessary, leveled, after which the locations of the supports are marked with pegs.
First, pegs are driven in at the corners, then ropes are stretched between them, and the supports are measured along this line. The distance between them should not exceed 1 meter.
After marking the territory, it is necessary to drill holes to a depth of 60 cm. A layer of fine crushed stone or gravel is poured onto the bottom, which will become the base of the pillars. Advice: it is better to fill it only after a day, so that the base has time to compact.
The supports are installed in the holes; they must be positioned strictly vertically. To level them, supports made of wood or metal are used. The vertical position is checked with a plumb line: it will make it possible to eliminate even small deviations.
Once the pillars are in place, the holes are filled with concrete. Concrete needs time to gain maximum strength, this process can take about a week.
How to align the height of canopy posts? To ensure they are level, you can use a hydraulic level. This device will show deviations from the horizontal line; it is better to involve assistants when carrying out work.
This method is used on uneven areas. Another solution is suitable for areas with a relatively flat surface.
On metal pipes of equal length, marks are made at the same level of 50 cm. It is at the level of the marks that the pillars are immersed in the ground, this will make it possible to obtain supports of equal height.
Roofing materials
The choice of roofing materials depends on the purpose and location of the canopy, architectural features of the house or cottage, and landscape design.
A canopy attached to a house made of wood, and even a separate structure, is often covered with the same roofing material as the building itself. Of course, unless we are talking about tiles or slate roofing, it is bulky, expensive and impractical for light construction. The most common materials are metal tiles and soft tiles.
And the simplest and most affordable “roofing material” for summer cottage awnings made of wood is awning fabric.
You can order a tent canopy with retractable fabricSource pinterest.ru
Simple wooden awnings for summer cottages can be covered with ordinary awning fabric. There are different types of it on the market, including waterproof ones: tarpaulin, PVC, polyester impregnated with polyurethane, tarpaulin. The service life of such fabrics is short, and they must be removed for the winter, but the fabric canopy is mainly intended to protect the recreation area from the sun and rain. There are different ways to attach an awning to a wooden frame - from “stationary” to movable.
Calculation of the number of pillars for a canopy
Before installing the main structural elements, it is necessary to draw up a project that will include the necessary requirements for the strength of the frame. The canopy must support the weight of the entire roofing system, which includes the truss, sheathing and decking. The average amount of precipitation in winter is also taken into account - snow lingering on the roof creates additional load on the supports.
The design of the canopy must take into account future load Source globuskmv.ru
Most builders recommend using 8 pillars for a small structure measuring 6x3 m, arranged in 2 rows at a distance of 1.5 m from each other. The cross-section of the pipes should be from 80 to 100 cm with a length of 3.5-4.5 m. Each of these supports can withstand up to 250 kg.
When increasing the size of the final structure, you should take care of additional elements that increase its reliability. Increasing the overall width of the project to 6 meters or more requires the installation of a third row of posts in the middle to evenly distribute the weight of the roofing system. The absence of such supporting pillars can lead to the collapse of the entire structure.
See also: Catalog of companies that specialize in the design and installation of metal structures, canopies and greenhouses