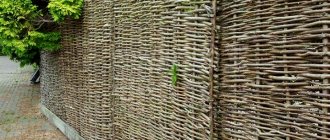
Croaker fences are also rare in rural areas. And in the city it can only be seen in the form of temporary fencing for the construction of a private house - even developer companies use galvanized corrugated sheets or edged boards for these purposes. And the point is not in the strength and durability of the material, which are naturally lower than that of edged boards. The reason is the unusual appearance of the fence, and its inconsistency with most styles of landscape design and architecture of fenced houses.
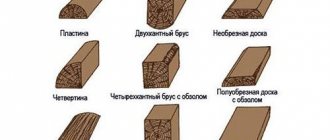
What types of slabs are used for sampling
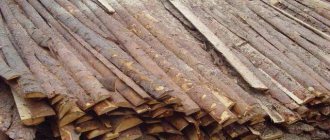
Only commercial croaker or obapole is suitable as a building material. And it, in turn, comes in two types:
- both sexes croaker;
- both floors are plank (with a partially sawn second layer).
The plank obapole for a fence is better than the slab, but often both types are sold mixed.
And when purchasing you need to look at:
- how much the plank slab narrows in the uncut part of the face;
- is the thickness of the slab sufficient to securely fix the fasteners?
- what length will remain if the rejected part is cut off?
And in any case, selection of material is necessary to assess whether it is sufficient for the construction of a fence.
If the selection criterion is the percentage of rejection, then the best choice is croaker from sawing construction pine.
It tapers less than other types of wood from the butt to the top, as a result of which the slab turns out to be more even and uniform in thickness with a fairly large length.
In addition, the cost of pine lumber is lower than that of hardwood. And coniferous croaker cannot even be used as firewood for solid fuel boilers, so its price is minimal.
Calculation of the length of the fence
Before purchasing timber and other auxiliary materials, it is necessary to calculate their quantity. To do this, you need to determine the total length of the fence using one of two methods:
- calculation of the fence according to the area of the site;
- determination of external dimensions based on land documents;
- full-scale measurements of the sides of the site.
The perimeter of a square plot can be easily calculated using the area
The first method is convenient only when you need to calculate the length of the fence on a square-shaped area with straight boundaries. You need to take the area value, take the square root of it and get the length of one side. All that remains is to multiply it by 4 and get the perimeter, this is the length of the fence. For other shapes, this technique is not suitable, since with the same area, the perimeter of a rectangular area is larger than a square one.
Example. A square plot with an area of 1000 m2 will have a length of one side of 31.6 m and a perimeter of 126.4 m. A rectangular plot with sides of 20x50 m has the same area, but the perimeter will be larger - 140 m.
A rectangular area of the same area has a larger perimeter
The second method is also convenient because it does not require time or labor. The documents contain a plan of the land plot, where all the required dimensions are indicated. But if there are no such documents or the calculation needs to be clarified, then the best method is to measure the area with a tape measure or laser range finder, then you definitely won’t go wrong when purchasing timber.
When is a slab fence appropriate?
If you do not take temporary fencing into account, a slab fence is only appropriate in rural areas surrounded by natural landscape and farmland. But even in this case, the landscape design of the site itself must be in a rustic style, and the house must have an architectural appearance that matches it.
And although this does not include the modern European style, which is so popular for cottages and country houses, there are not many options left when a slab fence would be appropriate:
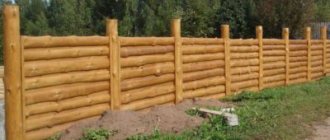
- Russian style. The house was built from “wild” logs or its modern analogue - rounded logs. This also includes houses sheathed with a block house, or its imitation - vinyl or metal siding for a block house.
- Rustic style. The house is lined with plank slabs and unedged boards with sharp wane.
- Combined houses with an upper floor made of logs or with “log-like” cladding, including those in the chalet style.
- Country-style houses with wood siding or American clapboard siding.
And for each style there is its own type of slab fence, which will fit most organically into the overall design concept.
Calculation of material requirements
Some of the owners are so sensitive to their possessions that they do not like it when the views of strangers fall on their territory. It is for this reason that they erect fences that have no gaps and are up to 2 meters high.
The optimal distance between supports is considered to be 2-2.5 m. With such indicators, the fence has the greatest stability and reliability. To install the pillars in the ground, you need to take the timber with some reserve. For example, if the round timber rises 2 m above the ground, then you need to add the planting depth in the ground, which is about 1 m.
To calculate the required number of posts, you need to divide the total length of the fence by the space between the supports. At the same time, do not forget that two of them are installed on the gate at once.
Calculation of crossbars is made by doubling the length of the fence, plus 10% for consumables. The simplest calculation of the consumption of slabs on pickets is to calculate the cubic capacity. Of course, it will not be perfect, but only approximate. You can also calculate by dividing the length of the fence by the average width of the board.
Types of slab fences
If we classify slab fences, then it follows the general rules for wooden fences.
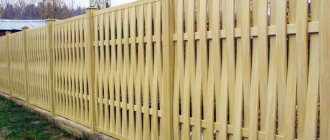
- By arrangement of elements: vertical and horizontal.
- By type of canvas: lattice and blind.
- By location relative to the veins: one-sided and two-sided.
- According to position in the span plane: traditional, herringbone (ladder) or blinds.
“Herringbone” differs from “blinds” only in the absence of a gap between adjacent elements.
In addition, there is another division according to the type of supports:
- Wooden pillars.
- Pillars made of metal profile pipe.
- Combined fences. Pillars made of stone or brick (reinforced with a metal pipe) on a foundation with a plinth.
Tips for finishing and caring for wood
In addition to treatment with an antiseptic composition, it is desirable to further protect the wooden fence from external influences. For finishing wood located outdoors, there are the following methods of exterior finishing:
- Painting with waterproof acrylic compounds in 2 coats of primer.
- If there are no special requirements for the appearance of the fence, then the wood can be impregnated with waste oil or bitumen. For fear of getting dirty from head to toe, local thieves are unlikely to want to climb through such a fence onto your property.
- Cover with homemade Swedish paint, which protects against pests and precipitation no worse than antiseptics.
- For gourmets, it is suitable to open up wooden surfaces with several layers of varnish over an artificial blackening made using stain.
Beautifully painted fence with a canopy
Lovers of beauty and aesthetics can put in more work and carve some kind of pattern on the wood. For example, cut the ends of pickets from slabs with a hacksaw before nailing them to the joists.
The ends of the slabs can be beautifully cut and then painted
Recently, Swedish paint has gained popularity; it has a remarkable red color and can be prepared with your own hands. You will need the following components:
- regular salt - 250 g;
- red lead - 240 g;
- copper sulfate (otherwise known as copper sulfate) – 250 g;
- drying oil - 230 ml;
- flour - 500 g.
Fence painted with Swedish paint
Pour the flour into water (3 liters) and cook the paste. Strain it through cheesecloth, add drying oil, then salt, red lead and vitriol, while heating the mixture over low heat. At the end, add another 1.5 liters of water and mix well. The predicted consumption of Swedish paint is 200-250 g/m2 surface area.
Installation of a slab fence
The most difficult stage in building a fence is installing posts or laying a strip foundation.
If everything is done correctly, then the laying depth, diameter (sectional area) and spacing of the pillars are calculated based on the hydrogeological features of the site and the size of the total loads. And for weak soils and a combined fence, a strip foundation is already calculated in this way.
Installation of pillars
A general diagram for installing pillars looks like this:
- Mark the perimeter. Including for wicket and gate posts, or gates with a wicket.
- Digging or drilling holes.
- The underground part of the pillars is treated with bitumen mastic; for wooden pillars it can be burned.
- Install the pillars in a vertical position in the hole. For additional protection from soil moisture, the underground part can be wrapped with two layers of roofing material (or a piece of any other rolled waterproofing).
- Depending on the type of soil, the pillars are fixed in one of the following ways: by butting (dry concreting with stone, crushed stone and sand) or pouring a concrete mixture.
- The ground part is also treated with protective compounds: metal is primed and painted, wood is treated with an antiseptic or oil.
For vertical fences, two or three veins (crossbars), pre-treated with protective compounds, are attached to the posts. For horizontal fences, the slab is attached directly to the posts.
Laying the foundation for a combined fence
The combined fence also has a combined base, in construction terminology it is a strip-column foundation:
- The underground part of the pillars, in this case a metal pipe, is deepened below the soil freezing line.
- The tape is usually made shallow, with a high base. It can be of any type: monolithic, prefabricated or combined.
- The ground part of the pillars is covered with brick, stone, or stone blocks.
- The base, if it is monolithic, is covered with tiles: clinker, natural or artificial stone.
During the construction of the pillars, a span fastening system is installed - embedded elements are welded to the pipe. For vertical fences, veins are attached to them, for horizontal ones - a mounting beam, for a fence with blinds - this is a profile made of a thick board.
Fence options
The most common option for installing a protective structure is the vertical method of laying the slab. To do this, it is necessary to assemble a frame consisting of pillars and crossbars arranged horizontally.
Vertical installation method
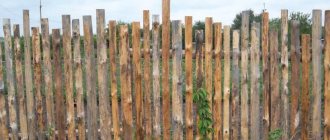
The second option is less common, but still occurs. In this case, there is no need to assemble the frame. To attach the slab, you only need to install supports, and boards are attached to them in a horizontal position. The slab is stuffed end-to-end.
Laying horizontally
There is another option that requires the most material consumption - this is double-sided padding.
Double-sided installation
As a rule, two boards are fastened with the humped side facing the inside of the structure. That is, so that the flat side faces outward. But because it requires material costs that exceed the usual method, it is practically not used.
Preparing the slab for installation
Removing the bark with a scraper
Before treating with an antiseptic or firing, the croaker must be cleared of bark. In decorative terms, the bark is of no value, but under it there may be insects (bark beetles), which over time will spoil the wood and shorten the life of the fence.
Preparation is carried out as follows:
- The slab is placed vertically with the wide part resting on a lying board or placed on a workbench (if there is one).
- Using a scraper or an ax, the bark is removed from top to bottom (towards the butt), trying not to damage the top layer of wood.
- Protruding knots are cut off separately.
- If the slab is attached end-to-end in one row, the edges are trimmed with an ax or planed with a plane, leveling it as wide as possible.
- The surface cleared of bark is sanded with sandpaper or an angle grinder with an appropriate attachment to remove remnants of bark and protruding fibers.
Then the croaker is treated with an antiseptic or stain with an antiseptic. At home this is done with a brush. And this method is not the best, since the impregnation goes to a completely insignificant depth - the moisture and resins contained in the capillaries interfere. Although, if after installation you additionally apply a protective layer of polyurethane varnish for exterior use, the fence will last much longer - the impregnation will not be washed out by rain.
Recommendations for choosing timber
The selection of sawing waste depends on the fence design you have chosen. If you need to install a solid picket fence without gaps, then it is advisable to choose slabs with smooth edges, otherwise you will have to work on them with an ax or plane. For a picket fence with gaps, the requirements are not so stringent; uneven boards will also work here. The main thing is to arrange them correctly so that the fence looks aesthetically pleasing.
Not all of this waste is suitable for collection.
When selecting materials, follow these recommendations:
- Try to select wider and thicker croakers. Some of them can be cut to length to make a decent lumber suitable for posts.
- Avoid buying scraps of logs that were cut during the warm season and have been left outdoors for a long time. Under the bark of such material, the wood is often affected by mold and pests. In winter, you can safely purchase stale wood, since bacteria and pests are inactive in the cold.
- Do not take openly damp timber; it will begin to crack and warp as it dries, causing the constructed fence to lose its appearance.
- Do not buy a croaker that is too narrow and thin. To assemble a picket fence, you will need a large number of narrow boards, and removing bark from thin cuttings is very inconvenient.
It is better to use ready-made timber for the pillars
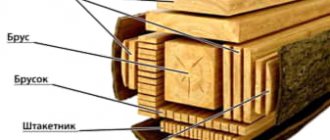
A separate issue is the choice of lumber for poles. For a temporary fence around the site, supports made of two slabs nailed together will do. A structure designed for a long service life (15-20 years) must be placed on poles made of timber with a cross-section of 10x10 cm or round timber with a diameter of 80-100 mm. The crossbars can be made from thick scraps or take 60x40 mm timber. For a more permanent fence up to 2.5 m high, you will need metal pipes of round or rectangular cross-section measuring 40x60 mm (for a solid picket fence) or 40x40 mm (for a fence with gaps).
Manufacturing
The construction stage of the board fencing must begin with assessment work. First you need to decide on the height and length of the future structure. It is necessary to ensure that the vegetation behind the fence receives enough sunlight.
After this, you need to decide on the material itself and decide whether the fence will be completely wooden or mixed, that is, it will contain metal elements. Right now it is necessary to decide on the number of cubic meters of wood that will be used to create the fence. It is worth considering that one cubic meter contains from 15 to 80 boards. Their exact number will depend on the manufacturer and the cross-section of the material. More accurate information can be obtained from the seller.
It is also necessary to purchase poles. Their number should be equal to the number of stakes driven in during marking. If such a structure will be made and installed with your own hands for the first time, then it is better to make a vertical fence from planed wood. So, the procedure will be as follows:
- it is necessary to prepare tools and materials for work. These primarily include brushes, pegs, cord, tape measure and hacksaw, shovel, screws and screwdriver.
- Now you need to mark the area. To do this, it is necessary to install pegs along its entire perimeter with a cord stretched tightly between them. The distance between stakes should not exceed 2 m.
- At this stage, if necessary, you can change the height of the board and round its top.
- Now it's time for excavation work. Dig pits for support pillars. Their depth should be about a meter. The pillars are installed in the hole and reinforced. This can be done by compacting the soil, but for reliability it is better to fill them with concrete. A nail is knocked out at the top of each post, onto which the cord is pulled again. This is necessary in order to determine the evenness of all the pillars, lining them up in one line.
- If everything is in order, then you can proceed to the next stage, but if not, then you need to level the pillars by deepening some of them, or sawing off a small upper part.
- It is necessary to install veins. The first board is fixed with a nail at a height of 25 cm from the ground. This must be done so that the nail sticks out on the other side of the board by 2-3 cm. These protruding ends must then be bent. After another 25 cm upward, the next vein is installed in the same way. This operation is performed at all intervals, along the entire height of the pillars.
- Now, using nails or self-tapping screws, vertically prepared boards are attached to the veins, and you can connect them closely, creating a solid fence, or you can leave gaps of no more than 5 cm between them.
- The final stage of work is painting the finished fence. First, the wood is treated with drying oil, and then either paint of the selected color or a special wood varnish is applied in two layers.
Data
Crocker - often found on shelves in Europe, light croaker, although it lives mainly in Anapa, has become widespread.
The fish is not a commercial fish, it is not bred, but in many countries the species is considered a real delicacy. If finding a croaker in Europe would be a real success, then in the summer season in Anapa, croaker can be freely purchased from fishermen. For many, the light croaker is a real trophy due to its size.
Note!
- Bleak and its catching
Catching mullet: pro tips on how and what to catch a mullet with. The best tackle and bait (110 photos)
Hamsa fish - description, types, fishing and popular habitats of anchovy (115 photos + video)
Catching croaker in Anapa is one of the entertainments, because catching such a specimen while spearfishing is real happiness.
Habits
Croaker fish (light) - begins to spawn in the spring, the species is quite cold-loving. Dark – prefers a warmer season, as soon as the water temperature reaches – 20 degrees. In summer, the dark croaker actively spawns.
In Anapa, females begin to spawn in small portions. It is deposited in the water column so that the eggs are not carried away by the current - females choose small recesses and rapids.
Small representatives of the species begin active activity already on the fourth day. They feed on their own, hide, and actively gain weight.
In winter, dark and light croaker go under the ice and sink to depth, because it is there that the water temperature is least susceptible to change. Fishermen, knowing where croakers are caught, often leave with trophies in the evening.
How to produce
Waste lumber is obtained by processing tree trunks. In industrial conditions, logs are sawed using complex machine equipment with four saw blades. Numerical control is configured in such a way that the logs are cut simultaneously from four sides. The required thickness of the slab and the maximum length of the cut are set.
There are double-sided longitudinal planing machines . First, two opposite sides of the trunk are processed, then the workpiece is rotated 90˚ along the longitudinal axis and the separation of the outer layer of the tree continues.
The trading network has different types of sawing machines for large workshops. It is beneficial to keep the equipment for work in the household.
Advantages
The advantages of the slab are as follows:
- The cheapest lumber. Its use as load-bearing elements brings significant cost savings when constructing lightweight buildings.
- The low weight of the boards when constructing small objects allows you to create cheap foundations.
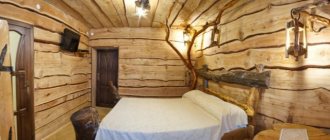
- Cladding with slabs does not require additional finishing of building structures. Walls covered with decorative wood carry an aesthetic value.
- Barked surfaces are varnished or painted, which gives the furniture a special appeal.
- The ease of installation of lumber does not cause difficulties when carrying out facing work.
- Wood waste is widely used in the manufacture of various products - from parquet to the design of accent walls.
- Using industrial wood as lining will allow you to avoid unnecessary costs for purchasing a factory profile.
Features of use
A small wood slab is suitable for fuel chips. No further benefit can be derived from this species, as it is heterogeneous and has defects.
Compared to boards, logs or beams, slabs have a large number of advantages. It is inexpensive, can be used almost anywhere you need to build something, and is lightweight. You can make a decorative finish from the slab, which is really inexpensive.
Of course, this material is not without its drawbacks: it has an ugly appearance. You need to work hard to make something aesthetic out of it.