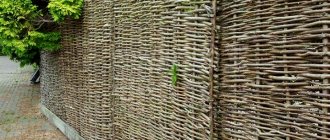
Croaker fences are also rare in rural areas. And in the city it can only be seen in the form of temporary fencing for the construction of a private house - even developer companies use galvanized corrugated sheets or edged boards for these purposes. And the point is not in the strength and durability of the material, which are naturally lower than that of edged boards. The reason is the unusual appearance of the fence, and its inconsistency with most styles of landscape design and architecture of fenced houses.
Using a slab - pros and cons
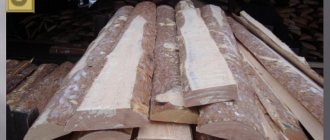
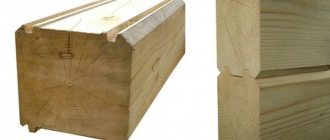
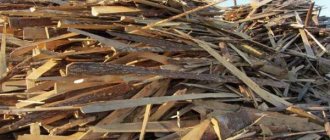
When logs are sawed into boards of different thicknesses at a woodworking enterprise, the side parts of the trunks, which have a hemispherical shape on one side, go to waste. These are the slabs that zealous owners most often buy for firewood due to their cheap price.
Classification of lumber
The slab should not be confused with an unedged board. The latter has both sides flat, and differs from ordinary boards in having untreated side edges. This material is much more expensive than semicircular scraps sold at the price of woodworking waste.
Croaker - waste from sawing tree trunks
As a material for constructing a fence, slab has the following advantages:
- Low price is the main advantage of timber. If you consider that you plan to build the fence with your own hands, then its total cost will consist only of the costs of purchase and transportation plus money for fasteners (nails).
- Any tree, including the side parts of logs, is easy to process.
- Although slab is classified as sawing waste, it remains wood and retains all its properties - environmental friendliness and durability with proper processing.
- It is difficult to choose more suitable timber if you need to quickly make a temporary fence.
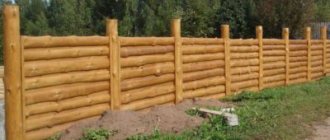
Finished fence span made from slabs
The advantages of the material also depend on the type of wood that was cut at the sawmill. In terms of hardness and durability, oak, larch and beech take the lead, followed by coniferous species and aspen. In construction, timber from coniferous species - pine and spruce - is most often used.
If you decide to build a fence from slabs, get ready to put up with its shortcomings:
- the unsightly appearance of the material will require significant labor costs to improve;
- it is not easy to select the required number of products with smooth sides and approximately the same width, from which it is more convenient to build a fence;
- Without sanding (otherwise known as debarking) and special antiseptic treatment, the service life of the fence will be significantly reduced.
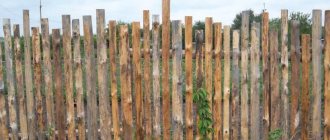
A fence made from untreated material looks rather unsightly
From the above, the conclusion suggests itself : although croaker is cheap and available, you will need a lot of effort and time to make a decent fence out of it. As a result, you will get as nice and original a fence as you wish. An example of this is a photo gallery of similar fences made with your own hands.
Briefly about the main thing
Croaker is one of the most accessible and inexpensive materials for fencing. If you know how to choose it, you can find the ideal compromise between price and quality, spending a minimum of money and time on a temporary fence or getting a very reliable, beautiful and unusual fence for a suburban area. With imagination and skillful hands, slabs from waste material are transformed into exclusive designs to the envy and surprise of your neighbors.
Question
Write in the comments if you have a fence, barn or any other building finished with slab? If you want to show off the beautiful finish, attach a photo.
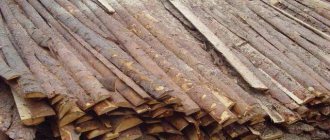
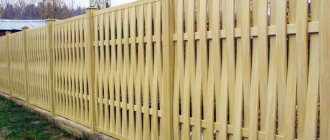
Options for fences made from unedged boards in the photo
Here the croaker serves as a nice filler for the gate frames
A successful combination of a concrete eurofence with wood filling
Even a crooked and knotty slab can be successfully used for a picket fence
An elegant fence made from slabs placed between the posts
Here the slab is inserted into a frame of metal pipes
Option for a fence with a stone base
The slabs can be attached to the posts horizontally, and the joints can be covered with vertical strips
Paths
Another use for rounded boards is garden paths and driveways. The croaker is placed across the path. Earth, sawdust or sand are scattered on top of the boards, which help compact the coating during rainfall. The path turns out to be slightly raised above the general ground level, does not get wet and does not hide under water during heavy rains.
Wood always looks advantageous when decorating open garden spaces. Paths made of slab look quite harmonious in combination with a lawn or flower beds.
Recommendations for choosing timber
The selection of sawing waste depends on the fence design you have chosen. If you need to install a solid picket fence without gaps, then it is advisable to choose slabs with smooth edges, otherwise you will have to work on them with an ax or plane. For a picket fence with gaps, the requirements are not so stringent; uneven boards will also work here. The main thing is to arrange them correctly so that the fence looks aesthetically pleasing.
Not all of this waste is suitable for collection.
When choosing slabs for a fence, consider this point: the lower the cost of the material, the more knots and irregularities there are.
When selecting materials, follow these recommendations:
- Try to select wider and thicker croakers. Some of them can be cut to length to make a decent lumber suitable for posts.
- Avoid buying scraps of logs that were cut during the warm season and have been left outdoors for a long time. Under the bark of such material, the wood is often affected by mold and pests. In winter, you can safely purchase stale wood, since bacteria and pests are inactive in the cold.
- Do not take openly damp timber; it will begin to crack and warp as it dries, causing the constructed fence to lose its appearance.
- Do not buy a croaker that is too narrow and thin. To assemble a picket fence, you will need a large number of narrow boards, and removing bark from thin cuttings is very inconvenient.
When choosing timber at a woodworking enterprise, take the time to sort through the waste piece by piece in order to select the most suitable trimmings. This will save your time and labor costs when installing the fence.
It is better to use ready-made timber for the pillars
A separate issue is the choice of lumber for poles. For a temporary fence around the site, supports made of two slabs nailed together will do. A structure designed for a long service life (15-20 years) must be placed on poles made of timber with a cross-section of 10x10 cm or round timber with a diameter of 80-100 mm. The crossbars can be made from thick scraps or take 60x40 mm timber. For a more permanent fence up to 2.5 m high, you will need metal pipes of round or rectangular cross-section measuring 40x60 mm (for a solid picket fence) or 40x40 mm (for a fence with gaps).
How to choose?
By type, this material can be commercial or wood-burning.
- Wood-type material is not used in the construction of wooden structures because it has a poor-quality surface and due to the use of soft wood.
Wood type
- Business-type slab, quite suitable for cladding sheds, constructing formwork and household items. buildings If such material is sold in packs, then its price increases, because when stacking the material undergoes preliminary sorting.
Business
- The highest quality slab is considered to be calibrated. Its other name is block house. The price is significantly higher than the business type of croaker, but, unfortunately, it requires pre-processing (bark removal and grinding).
Calibrated
It is necessary to carry out mandatory rooting of the croaker, otherwise over time the bark will fall off on its own. In addition, it can serve as a refuge for bark beetles, which will ruin the entire tree.
After the material is freed from bark and has undergone the grinding process, it acquires an aesthetic appearance suitable for further work. Sanding can be done directly at the sawmill for a fee, but in order to save budget funds, you can do this work yourself. To do this you will need an ax and a grinder.
If you select according to the type of wood, then it is better to immediately abandon two species - birch (because it is a hard type of wood that deforms over time) and poplar (it is susceptible to rotting).
Advice! After purchasing lumber, it is necessary to carry out sorting and processing as soon as possible. If this process is delayed, the tree may be infested with bark beetles, which will very quickly reduce the strength of the material and make it unsightly.
If the croaker is heavy, it means it is not fully dried. To do this, it is necessary to dry it, otherwise it will subsequently lead. Drying is carried out in the open air, but in an area shaded from sunlight.
Drying
If you place it in the sun, the drying process will be more intense, which will cause the wood to delaminate (crack).
Calculation of the length of the fence
Before purchasing timber and other auxiliary materials, it is necessary to calculate their quantity. To do this, you need to determine the total length of the fence using one of two methods:
- calculation of the fence according to the area of the site;
- determination of external dimensions based on land documents;
- full-scale measurements of the sides of the site.
The perimeter of a square plot can be easily calculated using the area
The first method is convenient only when you need to calculate the length of the fence on a square-shaped area with straight boundaries. You need to take the area value, take the square root of it and get the length of one side. All that remains is to multiply it by 4 and get the perimeter, this is the length of the fence. For other shapes, this technique is not suitable, since with the same area, the perimeter of a rectangular area is larger than a square one.
Example. A square plot with an area of 1000 m2 will have a length of one side of 31.6 m and a perimeter of 126.4 m. A rectangular plot with sides of 20x50 m has the same area, but the perimeter will be larger - 140 m.
A rectangular area of the same area has a larger perimeter
The second method is also convenient because it does not require time or labor. The documents contain a plan of the land plot, where all the required dimensions are indicated. But if there are no such documents or the calculation needs to be clarified, then the best method is to measure the area with a tape measure or laser range finder, then you definitely won’t go wrong when purchasing timber.
Gordwood - construction technology
It is unknown when the first log houses appeared. The remains of similar wood-burning buildings found in northern Greece and Siberia, which are several thousand years old, have survived to this day. Traditionally, the heyday of Cordwood technology dates back to the 1800s and notes that residential buildings and commercial buildings were built using this method in the northeast of America. Some of these houses and gazebos made of firewood have survived to this day. The thickness of the walls in most buildings is 15-20 cm, sometimes up to 45 cm.
However, similar buildings have also been discovered in Asia and Europe. There is evidence that in Russia, houses were built from firewood back in the time of Leo Tolstoy. This technology gained particular popularity in the United States during the Great Depression. In those difficult years, the experience of many people showed that in order to successfully complete the construction of houses, their firewood stored for the winter was quite enough.
And all thanks to inexpensive or even free materials and simple design.
How much materials and tools to prepare?
As a rule, owners of country cottages and private houses erect solid picket fences 2 m high from slabs so that passing people are less likely to look into the yard. The location of the pickets is vertical, this is the simplest option. The distance between the pillars is taken to be 2.5 m, and the length of the bars for the supports is 3 m (the third part is immersed in the ground). The calculation of the amount of timber is carried out as follows:
- The number of posts is equal to the total length of the fence divided by the distance between them. Here you need to add supports for gates and wickets.
- The total length of the horizontal jumpers is equal to the length of the fence multiplied by 2 plus 10-15% for trimmings, overlaps and other waste. The number of boards depends on their size and is determined by dividing the resulting figure by their length with a small margin.
- The number of pickets for a solid fence can be found by dividing its length by the average width of the slabs.
It is better to purchase wood with a small reserve, since during the process of sanding and further processing some of the boards will have to be rejected.
Antiseptic to protect wood
Other materials will be needed for construction:
- antiseptic for pre-treatment (for example, Biosept or Novotex);
- nails 10-15 cm long depending on the thickness of the lumber;
- M400 cement, sand and crushed stone for concreting supports;
- bitumen mastic or resin to cover the underground part of the pillars.
Mastic for wooden posts
Fence posts can be installed without concreting; in this case, cement and sand do not need to be prepared.
To make a fence from a slab with your own hands, you need to have the following tool:
- devices for measurements - tape measure, building level, laser range finder (if available);
- cord with pegs for marking the area;
- scraper and ax for debarking and processing wood;
- plane, hammer and hacksaw for wood;
- wide brush;
- drill or shovel for digging holes;
- concrete mixer or sheet of iron for manual preparation of the solution.
Set of tools for installing a fence
Preparing for construction: calculating the area for a wooden fence
Before starting construction, you need to take all the necessary measurements and prepare a design project. The fence can be entirely wooden or combined. It is installed both on a strip foundation and mounted on poles. The slab is combined with metal, brick, stone, concrete.
To make a fence, calculate the number of posts required for fastening. The width between them should be at least 2 m. If they are placed further apart, the structure will be less durable. You also need to determine the method of attaching the dies and calculate their exact number in one span. When mounting vertically, it is necessary to determine how many transverse purlins will have to be installed. They can be made from slabs, after sawing them lengthwise.
The combination of slab and stone looks great
How to make a beautiful slab fence at your dacha with your own hands: the whole step-by-step process
The process of erecting a wooden picket fence from woodworking waste is divided into the following stages:
- Laying the route of the future fence, marking places for installing poles.
- Cleaning the croaker from bark and antiseptic treatment.
- Installation of supports.
- Fastening crossbars and picket fence strips.
Each of the steps will take you a lot of time, so expect to complete them in a few days. The process can speed up if you can attract assistants who simultaneously perform other operations. It is not recommended to build a fence in winter, since it will be difficult to drill holes, and the whole work will take a long time due to the cold.
Site marking
End peg with attached cord
Before you start measuring and installing pegs, check the land documentation and coordinate your actions with your neighbors, so that later disputes do not arise due to an incorrectly installed fence. Then work in this order:
- Determine the location of the corner points of the allotment and drive stakes there.
- Stretch a cord between the pegs.
- Walking along the cord with a tape measure, mark the installation locations of the supports (standard - every 2.5 m). You can do it differently by dividing the entire length into equal intervals of 2 to 2.5 m in size, so that at the end you do not end up with one short span.
- Without removing the cord, drill holes 1 m deep at the designated points.
Pole installation locations
If you plan to build a fence 2.5-3 m high, then you need to take into account the increase in windage and wind load on the fence acting from the side. The installation step of the supports should be reduced to 2 m, and deepened into the ground by 1.2-1.4 m.
Using a gasoline drill, making holes is more convenient and faster than using a hand drill
Barking and processing of croaker
As practice proven by many generations of Russian residents shows, it is best to remove bark from a tree with a scraper. This is a sharpened steel strip with two handles, by which you need to pull the tool along the trunk, tearing off the bark - scraping. Unlike an axe, a sharpened shovel and a power tool, the stapler does not damage the top layer of wood during operation, thereby increasing its service life.
Debarking with a sharpened shovel is quite quick when it comes to logs. Lighter slabs are inconvenient to clean in this way, as they drag along with the tool.
Debarking with a stapler
At this stage, work is carried out in the following sequence:
- Place the croaker vertically, resting it on any structure.
- Perform debarking by moving the scraper from top to bottom.
- If necessary, clear the knots and level the plank along the edges using an ax and plane.
- Apply antiseptic to the wood with a brush and let it dry.
This is the most labor-intensive procedure when constructing a fence. The longer your fence, the more material you will have to recycle. Together with an assistant, things will move faster.
Wood debarking video
Installation of pillars
Fence posts can be installed in the following ways:
- driving into wells whose diameter is slightly smaller than the cross-section of the timber;
- installation with backfilling;
- concreting;
- deep concreting with soil replacement.
When using wooden supports, the first 2 options are most often used. First, the ends of the pillars are covered with a layer of bitumen mastic or resin, after which they are driven into the finished wells. Then the earth is filled and compacted around the column. In the second method, a hole is dug, a support is installed in it and wedged on all sides with stones, after which a liquid clay solution is poured into it.
Rubble is added under the counter
Both steel and wooden pillars can be concreted; only anchoring parts are welded to the former - pieces of corners or reinforcement that firmly hold the pipe in the concrete. A combined method is also practiced - a steel pipe is concreted in the ground, and a wooden support is attached to it on top. Regardless of the chosen option, work is carried out as follows:
- Fill the bottom of the hole with crushed stone to a height of 5 cm and compact it.
- Using a level, place the stand strictly vertically and secure it by nailing the support strips.
- Mix 1 volume of M400 cement with 4 equal volumes of sand and 6 parts of crushed stone, add water and prepare M100 concrete.
- Concrete the posts, filling the holes to the top with the mixture. Further work is carried out after the concrete has hardened (at least 2 weeks).
When installing a pole, you must maintain the vertical
Metal posts can be secured using a so-called concrete collar. With a pit depth of 0.5 m, the pipe is driven another half meter below its bottom, and the top is filled with concrete.
Concrete stand
In the vastness of the Federation, there are often super-wet soils that are susceptible to frost heaving. In winter, they push out any objects located in the soil freezing zone. In such conditions, concreting is carried out below this boundary, and from above, the wet soil near the pillar is replaced with a mixture of crushed stone and sand.
In heaving soil, concrete is poured below the freezing line
Construction of a fence
The final stage of construction consists of installing logs (crossbars) and attaching pickets. Wait until the concrete mixture has completely hardened and proceed with installation, following the following procedure:
- Nail the cross members to the posts. If you use wooden beams as joists, they should be leveled. It is better to align the slabs “by eye”, for which the assistant needs to move a few meters away and adjust the position of the crossbar.
- Adjacent timber crossbars can be attached end-to-end or stacked vertically on top of each other. Slab logs can be nailed together with an overlap.
- Nail the first picket, aligning the vertical with a level. Drive at least two nails at each attachment point to the joists.
- Attach the remaining pickets, pressing them together and periodically checking the vertical position.
Wooden picket fence installation diagram
In the case of metal racks, the logs will have to be bolted, making through holes in the pipe. Another option is installation with self-tapping screws, which will cost much more.
Installation of picket fence strips
To protect the upper end of the planks from precipitation and rapid destruction, stuff a canopy from the same slab on top. At this point, the construction of the fence is considered complete.
Video material on slab fences
Bench
A bench made of slab is a quick, cheap and fairly simple way to arrange a small recreation area. You will need bars or metal supports for the legs, and a thick slab for the seat and back. It is advisable to find a board no thinner than 15 cm.
There are many design options. You can make comfortable armrests, add a table, or settle on the simplest option with two supports and a seat. The finished product must be sanded, coated with a protective compound and varnish.
Tips for finishing and caring for wood
In addition to treatment with an antiseptic composition, it is desirable to further protect the wooden fence from external influences. For finishing wood located outdoors, there are the following methods of exterior finishing:
- Painting with waterproof acrylic compounds in 2 coats of primer.
- If there are no special requirements for the appearance of the fence, then the wood can be impregnated with waste oil or bitumen. For fear of getting dirty from head to toe, local thieves are unlikely to want to climb through such a fence onto your property.
- Cover with homemade Swedish paint, which protects against pests and precipitation no worse than antiseptics.
- For gourmets, it is suitable to open up wooden surfaces with several layers of varnish over an artificial blackening made using stain.
Beautifully painted fence with a canopy
Lovers of beauty and aesthetics can put in more work and carve some kind of pattern on the wood. For example, cut the ends of pickets from slabs with a hacksaw before nailing them to the joists.
The ends of the slabs can be beautifully cut and then painted
Recently, Swedish paint has gained popularity; it has a remarkable red color and can be prepared with your own hands. You will need the following components:
- regular salt - 250 g;
- red lead - 240 g;
- copper sulfate (otherwise known as copper sulfate) – 250 g;
- drying oil - 230 ml;
- flour - 500 g.
Fence painted with Swedish paint
Pour the flour into water (3 liters) and cook the paste. Strain it through cheesecloth, add drying oil, then salt, red lead and vitriol, while heating the mixture over low heat. At the end, add another 1.5 liters of water and mix well. The predicted consumption of Swedish paint is 200-250 g/m2 surface area.
Distinctive features of the designs
Croaker is a building material characterized by:
• natural origin and environmental friendliness; • budget cost; • accessibility; • increased strength; • long service life (more than 10 years); • ease of installation; • many different design solutions; • possibility of recycling; • resistance to external mechanical influence.
Unfortunately, in addition to the advantages, wood waste has serious disadvantages. These include insufficient height, the need for regular treatment with special chemical compounds, and the risk of rot and fungi.
Due to the unevenness of the selected croakers, the processing period may be very long. This is often facilitated by a lack of experience in carpentry. If the building material is not sanded, the finished structure is unlikely to have an attractive appearance. When applying chemical mixtures, safety precautions must be observed.