Purpose
The main purpose of pushers for circular saws is to protect the craftsman’s hands from injury from the saw blade when cutting wood. When longitudinally cutting logs or plywood, cases often arise when the disc passes through the wood faster than expected, dragging the master’s hand along with the wood. This is extremely dangerous.
In order to move the disc away from the carpenter’s hands, there are special guides of various types.
Varieties
For convenience and various operations when sawing, the following types of pushers are used:
- With increased length. They are used for processing small pieces of plywood and are a simple guide plate.
- With a protractor. A protractor scale for processing wood at a certain angle is mounted on the guide body. The angle is selected relative to the plane of the saw blade horizontally.
- With a screen. The screen is installed at the front and provides a wider plate for feeding wide workpieces.
- 3D. Such devices allow you to feed the workpiece frontally forward, or holding it from the side with a special feeding buffer. The guide itself in this case is located to the right of the workpiece.
Materials and tools for making jigs for a circular saw
To make guide bars and other accessories for working with a circular saw you will need:
- scraps of plywood or hardwood, at least 10 mm thick;
- screws, self-tapping screws.
Tools needed:
- jigsaw or hand-held circular saw for cutting workpieces;
- carpenter's square for marking workpieces;
- drill for drilling holes for fasteners;
- screwdriver or screwdriver with a set of bits;
- clamps.
The production of various devices can be divided into several stages:
- development of a sketch and elaboration of product details;
- selection of materials;
- marking and cutting of material;
- assembly of products and their adjustment.
How to make it yourself
For manufacturing you will need a minimum of materials and tools - plywood, a vice, a jigsaw and a grinding machine. To do this you need to follow simple instructions:
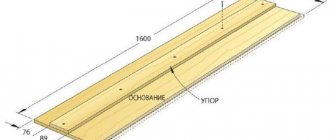
- It is necessary to prepare a sheet of plywood up to 15 mm thick. and draw a sketch on it as shown in the image. The length of the sketch is no more than 20 centimeters, and the width is no more than 5-7 centimeters.
- A convex rounding is marked at the bottom of the guide using a metal ruler. This is necessary in order to make the contact surface with the workbench or table of the circular saw as small as possible. Important - a continuous fit of the guide can lead to the appearance of curvature when cutting.
- The contour of the future device is cut out with a jigsaw exactly along the contour, and an allowance can be made at the rounding point.
- The ends are cleaned with a grinding machine. You can use tape or disk. Otherwise, sanding can be done with simple sandpaper.
- The result should be a design like this, as shown in the image. The split by which the workpiece is fed to the disk is called a “dovetail”.
Do not use dried plywood or chipboard. In extreme cases, solid wood is used, and impregnation can be used to strengthen its structure.
For those wishing to make a more complex and professional product, we recommend watching the following video instructions:
What's happened
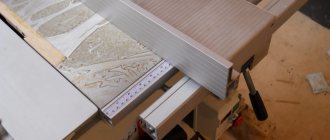
The rip fence is also called a guide bar. Designed to make cuts strictly to a given size. It is called parallel because the thrust guide plane must in all cases be located strictly parallel to the plane of the saw blade. Otherwise:
- if the emphasis is “narrowing”, the disk will jam in the workpiece;
- “for expansion” - the disk will move away from the specified size, the cut will not be accurate.
In the first case, the hand-held power saw itself moves along the workpiece.
When sawing on a stationary circular saw, on the contrary, the workpiece moves relative to the saw blade.
How is it different from a guide bar?
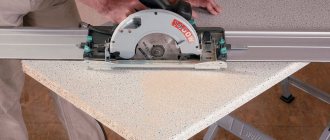
The guide rail is a more complex device compared to a one-sided stop. It is used only for hand-held circular saws, which move along the workpiece when sawing. Unlike the stop, they can limit the electric saw platform on both sides.
If, when sawing along a stop, a hand-held circular saw must be pressed manually so that it does not move away from the bar, then when sawing along a guide with a bilateral restriction, the saw goes strictly along it. This is a long device and is sold extremely rarely together with electric saws. Collapsible solutions consisting of several elements, which are connected along their length during operation, are also offered.
An example of such a tire is in the following video.
A rather flimsy device is shown. Suitable exclusively for thin workpieces. Under severe loads, the connections may crumble, the persistent plastic sides or the base itself may not be able to withstand. However, in some cases the device can serve and be beneficial.
In addition, there are many design options for homemade guides for such tasks, with one- and two-way restrictions.
Model for hand-held circular saw
The stop is included in the sales package of almost all manual circular saws. Similar stops are used in conjunction with hand routers and jigsaws. They can have different designs: two pins and a short guide bar itself, or a bar on one plate.
Complete stop for Makita manual circular saw:
This stop is attached to the base of the electric saw itself and moves along the smooth edge of the workpiece (board, beam). Its use is limited - only on workpieces with at least one flat plane along which the guide bar can be guided.
There are also restrictions on the width of the workpiece. On a workpiece that is too narrow, it is also impossible to set such a stop; the smooth edge goes under the frame of the circular saw and is inaccessible to the guide bar.
It is also impossible to place such a stop on a board or sheet of plywood that is too wide, since the length of the pins or plate on which the stop bar rests is not long enough. In such cases, markings are used (pencil, marker) along which they are sawing, a guide bar or a separate bar along the entire length of the workpiece, which are not included in the electric saw kit.
Model for a table-mounted circular saw
The guide bar (parallel stop) is mounted on the surface of the work table at the required distance from the disk. What is the distance of the bar from the disk, this is the width the workpiece will be cut.
When accurately installing the guide, plus/minus 1-2 mm. With a “wobbly” disk of large diameter – plus/minus 2-4 mm. Therefore, after a test cut, the width of the cut workpiece must be measured. Significant deviation from the specified width is possible.
This parallel stop is attached to the table in different ways:
- the table may have grooves for threaded clamps (bolts) to move the stop left/right;
- often the stop is attached to the table with clamps;
- There are models with a positioner. Its platform is attached to the edge of the table, and the bar extends from the platform and back on two guides.
Model for hand-held circular saw with table mount
When the hand saw is used as a stationary one, upside down and secured in the frame, the guides are used in exactly the same way as those described above for a stationary circular saw. If the hand saw is used in a normal manner, moving along the workpiece, the use of guides may vary.
- The parallel stop is attached to the workpiece being cut. For example, I press a corner to a sheet of plywood with clamps or a wooden block with self-tapping screws. Having made the cut, the stop is moved under the next workpiece.
- The workpiece is placed on the work table, and the workpiece and parallel stop are simultaneously secured to the table with clamps.
In all options, you need to carefully monitor where the circular saw blade will pass. Under no circumstances should it touch the edge of the work table or foreign objects when cutting. Having placed the stop, you should look down and once again make sure that the cut line will pass over the void.
Which one to buy on AliExpress
Let's conduct a comparative analysis of the two pushers and draw a conclusion about which product is of better quality and more convenient to work with.
High quality set of 5 pieces
Set of orange plastic pushers, consists of 4 items:
- Pusher with screen.
- Frontal guide with one handle.
- Front guide with two handles.
- A guide with an internal groove for gripping the workpiece sideways from the end.
Each product is a one-piece cast structure; in addition, they are distinguished by the following advantages:
- Ease.
- Handle-friendly handles.
- The height of the pushing profile guarantees safety.
- Durability.
- The ability to compactly store all products in one place.
There is one minor drawback - over time, the plastic loses its presentation, and from long-term use its surface can “swirl” (become covered with scuffs).
Discounted price – 1701 rubles.
Cheaper option
The set includes two yellow plastic products:
- Front pusher with dovetail.
- Straight end guide.
Advantages:
- Molded one-piece construction made of durable plastic.
- Durability.
- Ergonomics.
The kit is practical and meets the requirements for its functionality, but it also comes with a significant drawback - inconvenient thin handles.
This set is recommended for non-professional carpenters who use a circular saw over and over again.
Discounted price 659 rubles.
Two sets that provide kits for carpentry professionals and beginners. For those who frequently work with wood, we recommend purchasing a more expensive set.
As a result, we see that a pusher for a circular saw is a simple device that you can make with your own hands from a piece of plywood in a couple of hours. At the same time, it is useful, because acts as an intermediary between the dangerous disk and human hands, thereby significantly increasing the safety of working with the tool.
Disc sharpening
An experienced master usually immediately understands when the teeth begin to deteriorate. This can be determined by the following signs:
If the teeth become dull, it is advisable to sharpen the saw as quickly as possible. Many home craftsmen mistakenly believe that you can get injured from a sharp saw much faster than from a dull saw. In fact, the opposite is true. This paradox can be explained simply: when a sawyer operates a dull saw, he has to apply physical force. If you miscalculate the force or apply it in the wrong direction, it is very easy to injure your hand. And if the sawyer uses a well-sharpened tool, no effort is required, the main thing is precise and careful movements.
Using a special machine
Of course, the easiest way to sharpen a circular saw is on a special industrial machine. Such machines are quite expensive. Purchasing a sharpening machine for personal use is only beneficial if the home craftsman works daily and saws large volumes of wood . Sharpening services are also available in many specialized stores.
. A saw sharpening machine is somewhat reminiscent of a pottery wheel on which a saw blade rotates, placed strictly in a horizontal plane. The sharpening process consists of the following steps:
Sharpening saw blades on a machine is very convenient. The main thing is to follow safety precautions and under no circumstances adjust the saw blade while the machine is running. All manipulations with the disk are carried out only when the sharpening machine is turned off.
Self-sharpening
Many home craftsmen do an excellent job of sharpening circular saws without a special machine. Most owners of circular saws have long been accustomed to sharpening saw blades on the fly, using an ordinary file or other available sharpening tools. However, this method is very inconvenient and traumatic. In addition, when sharpening by hand, you can accidentally miss individual teeth. Therefore, this method should not be used.
Experienced sawmills usually make a round wooden stand for sharpening saws, on which the saw blade is placed. The operating principle of such mini-machines is approximately the same as the operating principle of industrially produced machines.
Masters believe that before sharpening saw blades should be slightly damp - this makes sharpening much easier. To do this, sharpeners wet the saw blades with water.
th and various chemicals. However, experts say that in fact this method only brings harm. Any liquid corrodes the metal and causes it to corrode, that is, contributes to the appearance of rust.
When sharpening yourself, you need to be careful not to miss a single tooth. Even if only a few teeth have become dull and the rest remain sharp, absolutely all teeth need to be sharpened. It will work correctly
only if all sawing elements are sharpened equally.
Sharpening a circular saw yourself is not as difficult as it seems. How exactly to sharpen a saw, on an industrial machine or on a primitive stand, is up to each home craftsman to choose for himself. However, in any case, it is necessary to strictly observe basic safety precautions and sharpen the teeth as sharply as possible. If you encounter difficulties associated with sharpening a circular saw at home, you should consult a specialist. If you regularly maintain your circular saw, it will serve faithfully for many years.
Any cutting tool tends to become dull during use. This also applies to carbide saw blades, which must be sharpened regularly in order for wood to be sawed quickly and efficiently.
The easiest way to sharpen teeth on a circular saw is to use a regular file. But when working with your own hands, to bring the cutting tool into working condition, many difficulties arise that only a good specialist with sufficient experience can cope with. It is much easier, faster and more efficient to use a homemade machine for sharpening circular saws or a sharpening machine for circular knives for this operation.
If you have a homemade electric sharpening machine for circular saws, regardless of whether it is a factory tool or a homemade one, you should know the basic principles of using such equipment. Especially when there is a need to sharpen the teeth of saw blades that have different geometries and sharpening angles.