Every person who has used a circular saw at least once knows how difficult it is to make an even cut. To somehow simplify this task, some use a special guide. This design will help you make perfectly straight cuts. Create a guide for a circular saw with your own hands.
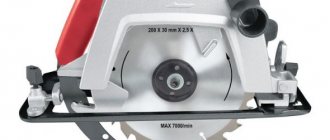
A circular saw is often used in the household for cutting wood.
Guide bar - what is it?
Before you create such a design yourself, you need to familiarize yourself with its main features.
A guide bar is a special rail that is responsible for sliding the saw forward and backward. At the same time, it limits the movement of the tool and therefore it cannot be directed to the left or right.
This device is used not only to ensure an even cut. It also helps reduce the number of chips in places where the saw came into contact with the wood being cut.
Additional Information! Sometimes guides are included with circular saws from Bosch and Interskol.
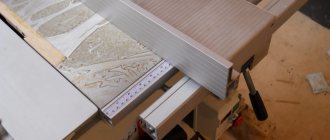
A guide made from a rule, clamps and a piece of polypropylene
Implementation of this design will require:
- construction rule (used for finishing work);
- fastening clamps (the number is determined by the number of attachment points);
- pieces of propylene (thickness is selected depending on the thickness of the entire structure).
A guide made from a rule, clamps and a piece of polypropylene
The manufacturing procedure is as follows:
- If the selected rule has handles, they must be removed. Clamps will be fixed in their place.
- Adapters are cut from a piece of dense propylene. The thickness of the adapters must be greater than the depth of the rule groove.
- The holes remaining from the handles are drilled through along with polypropylene adapters.
- The resulting structure is fixed to the processed bar.
- The finished tire is glued with soft tapes. This allows you to avoid the formation of chips in the workpiece at the time of completion of the cut.
It will ensure quality work. The use of a ready-made building rule requires periodic adjustments to its location. Fastening should be done at a close distance from the cutting line. This allows you to guide the circular saw blade exactly along the intended line.
Guide rail functions
There are several main functions that these structures perform:
- increased accuracy when sawing large materials;
- improved quality when creating a curved cut;
- simplifying the creation of parts in accordance with a certain standard;
- the ability to manufacture several parts using one template;
- increasing safety when using circular saws.
Also, with the help of guides, it will be possible to make cuttings with high accuracy.
Rail miter box for manual circular saw
This device allows you to cut boards of a given length, bars, small workpieces in large quantities quickly enough and with high quality.
To make such a guide you must have:
- Metal corners of the same shelf size and length.
- The base is made of any available material: boards, plywood, chipboard. Its thickness must be more than 15 millimeters.
- Set of fasteners (bolts, nuts, wood screws).
Before cutting the workpieces, markings are made. Mark the length of the future tire and attachment points. The main conditions when choosing sizes are:
- the board should move freely under the guides;
- The selected circular saw blade should not be too high.
Rail miter box for manual circular saw
Bolted connections are used to secure the structure. The parallelism of the fixed corners should be carefully checked. Ensure that the circular saw blade slides freely. To do this, fluoroplastic strips are glued. They significantly reduce the coefficient of friction and reduce the load on the circular saw.
Another option is to install small wheels. Small-diameter bearings can be used as a finished product. Additional time and tools will be required. The created design will significantly simplify the cutting operation and ensure proper safety.
Advantages of a homemade guide bar
The guide allows you to make straight cuts.
Many people think that homemade splints have no advantages. However, in fact they have a number of advantages:
- ease of use;
- repeated use;
- durability;
- versatility.
Homemade designs also have their drawbacks. The main disadvantage is that they are not easy to make. Therefore, to avoid problems, you need to figure out in advance how to make guides for a circular saw with your own hands.
The simplest option is a cutting stop
The device is actively used when cutting with a jigsaw.
It works quite effectively, but is limited in its suitability for a hand-held circular saw. The tire is pressed against the workpiece using a clamp. The bracket protrudes above the work surface both from below and from above.
As a result, we get restrictions on the length of the cut. The circular motor rests against the clamp, and you have to make the cut in two steps. In this case, the quality of the edge deteriorates and a step may form.
Any craftsman will tell you that a high-quality cut is obtained when the saw moves continuously from the beginning to the end of the workpiece. In industrial designs, the fasteners are placed outside the ruler and do not interfere with the free passage of the tool.
A homemade guide is made from a ready-made tool of a different profile, which has a low cost. We buy a long aluminum rule (emphasis on and) for plaster or screed.
Its cost is 3-4 hundred rubles. The tool is a profile of a complex shape with a smooth groove on the reverse side for adjusting the position of the handles. The fastening is clamping, with hex nuts. Not suitable for our purposes.
Popular: Do-it-yourself circular saw - reliable, practical, cheap!
As a donor for hidden clamps, you can use screwless quick-release clamps, which also have a reasonable cost. Their main advantage for our design is the removable upper leg.
Let's delete it. At the same time, the tool can be returned to its complete set at any time and used for its intended purpose. Instead of paws, we make and fasten runners from a piece of fluoroplastic or polypropylene. The main criterion when choosing a material is strength and low coefficient of friction.
You can process the workpiece using a milling cutter or a hacksaw for metal with a fine-toothed blade. In the second case, you will have to, as they say, “finish it with a file.”
We adjust the runners to the groove. Sliding should be without sticking, at the same time, strong play is also not needed. There is no need to try too hard; this unit will be fixed during operation.
We screw the sliders to the top of the clamp rail. The connection must be strong, since there should be no spontaneous release during cutting, as this can lead to injury or damage to the workpiece.
We check the functionality of the design. The homemade guide ruler holds securely, there are no backlashes.
This design can be used to process flat workpieces of any size, as long as the length of the ruler is sufficient. In our case it is 2 meters. Taking into account the margin at the edges for fixing the clamps, the working length is 1.5 meters. More than enough for most household jobs.
If your requests are longer, you can use the 2.5 or 3 meter rule. The most reasonable set is a three-meter ruler. You can cut a piece 50 cm long from it, and you will have two rulers - for large-area workpieces and narrow boards.
We are conducting tests. The cutting line is perfectly straight, nothing interferes with the free passage of the circular saw.
And most importantly, the purchased tool is not damaged during the manufacture of the device. Both the clamps and the rule are returned to their original state at any time and used for their intended purpose. Labor costs are minimal - in fact, only the sliders are manufactured.
Required materials and tools
Before you begin manufacturing the structure, you need to familiarize yourself with the list of necessary tools and materials:
- wooden blanks: boards, plywood, laminate;
- wooden bars with a thickness of 10 cm;
- self-tapping screws, screws, bolts or nuts;
- drill with drills;
- screwdrivers or screwdriver.
Additional Information! The above tools must be prepared in advance so that they are at hand while creating the guide.
Circular saw guide
Achieving high-quality processing of parts is often achieved through the use of additional devices and devices. One such device is a circular saw guide, a device that allows you to make an even cut of the required length. Thanks to this device, it is much easier and more convenient to cut large sheets of plywood, chipboard and other materials where high accuracy and high quality are required.
Detailed instructions for manufacturing
To make a circular tire yourself, you need to familiarize yourself with the basic rules for its manufacture in advance.
From plywood
Plywood is often used to create a tire.
The plywood structure is made in several sequential steps:
- Disconnect the circular saw from the power source.
- Measure the distance from the saw blade to the groove located on the support platform.
- Cut the plywood strip so that its width is a millimeter less than the distance obtained in the previous step.
- Fasten the strip to a wide piece of plywood.
- Attach the second strip parallel to the base of the instrument.
Important! Before you make a guide yourself, you need to create a drawing with accurate calculations.
Aluminum profile tire
Some people want to make a more durable and high-quality structure. For this they use an aluminum profile. The only serious difference between such products and plywood is that a U-shaped aluminum profile is installed in the guide gap. With its help, it is possible to significantly increase the rigidity of the entire structure. Thanks to this, the cutting accuracy also increases.
When creating aluminum busbars, thick plywood is often used as restraints. However, it is better to install several fluoroplastic plates instead. This material is more efficient because it has a low coefficient of friction.
Other varieties
The construction rule is often used as a guide.
You can make a guide bar for a circular saw with your own hands from a miter box rail. Most often, this device is used for cross-sectioning materials. It consists of two corners that are connected in parallel to each other. Their ends must be attached to an iron or plywood base.
If the rail miter box will be used in a circular saw, it must be attached using metal pins or bolts. The structure must be installed higher so that it does not come into contact with the work surface.
Additional Information! Some people use a ruler from the building code as a guide bar. However, this design is not very convenient, since it must be configured before each use.
Features of the circular guide
The capabilities of hand tools are often limited. To make a cut in a wooden workpiece, you need to firmly press the sole of a hand-held circular saw onto it and smoothly move it forward along the markings. But immersion of the working disk in wood is accompanied by vibration. Therefore, it is quite difficult to hold the tool in your hands along a given path of movement.
It is for such operations that a parallel stop for a circular saw is used. It is attached to the part next to the marking line. And by resting the side of the hand saw sole against it, it becomes possible to achieve a perfectly even cut. Such a device becomes extremely necessary when jointing boards. Without it, it is very difficult to do such work.
Purpose of the guide bar:
- Ensure cutting accuracy and quality of work.
- Create safety in the work area.
- Allows you to make cuts of various configurations.
The tool allows you to make not only longitudinal cuts, but also transverse ones. Using it you can adjust the parameters of the workpiece. And also process several elements at once. For example, perform batch trimming.
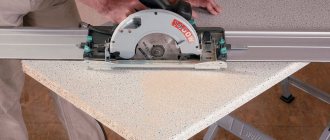
Universal guides Source pockethole-shop.nl
An ordinary wooden plank or block of sufficient length and thickness can act as a guide for a circular saw. The only condition is that the part must be perfectly processed. And all its sides are perfectly aligned. The bar can be clamped to the work table with clamps along with the workpiece. This simple device will greatly facilitate long cutting operations.
But the master sometimes faces difficult tasks. For example, process a part at a certain angle or make a cut of a complex configuration. And in this case, you can’t do without a special device.
The side stop for a circular saw is available in various types:
- unilateral;
- double-sided;
- symmetric;
- asymmetric;
- complex configuration;
- for specialized tasks;
- for cutting crossbars;
- universal.
Most often, millimeter markings are applied to the working side of the tool. A ruler for a circular saw greatly simplifies the work process. It can also be necessary if you need to cut grooves into parts.
Guide with markings Source glapris.no
See also: Catalog of companies that specialize in doors, windows and related work
The universal tire can be used both on a stationary circular saw and when working with hand tools. It is useful when using a jigsaw or mechanical saw on wood. Well, of course, when working with a circular saw.
Additional guide bar functions
Using a guide bar, it is extremely difficult to damage the material being cut.
Such designs have a number of additional functions that you should familiarize yourself with before using a homemade guide bar for a hand-held circular saw:
- protects the sawn material from damage;
- allows you to adjust the exact length of the cut;
- significantly speeds up the process of sawing wood;
- securely fixes the wood to the work surface.
Additional Information! Both branded guides and homemade designs can boast of the above additional functions.
What is it, types and main functions
The guide bar is a rail with longitudinal perforation into which the saw blade is placed. The rail prevents the saw from deviating left and right, and the longitudinal perforation allows the saw to move smoothly back and forth.
Important! If the tire is assembled correctly, it also helps reduce the amount of chipped wood when the saw touches its surface.
Various designs are available for homemade guides, and they are made from the following materials:
- Plywood.
- Metal corner.
- Aluminum profile.
By design, the tire can be made in the form of:
- Miter box structures.
- Constructions from building regulations.
- External movable carriage on bearings.
Guides must provide the following functions:
- High accuracy and quality of cuts.
- Performing cuts of various geometric configurations.
- Longitudinal and transverse cuts were made.
- Adjusting the depth of cutting with a saw.
- Chamfering and trimming wooden fragments.
- Safety of cutting production.
How to adjust correctly
Before you start working, you need to properly adjust the structure. You will have to independently choose the optimal location and point for further fixation.
It is necessary to position the device so that its edge lies flat against the cut line and without distortion. After this, you need to adjust the placement of the saw blade. It must be torn off from the casing and aligned perpendicularly to the cutting line.
When the disk and guides are adjusted, the structure is fixed with clamps. This is done to minimize vibrations that may occur while the saw is running.
Important! To cut wood at an angle of 45 degrees, you will need to adjust the saw blade or adjust the angle on the bar itself. This must be done very carefully to avoid mistakes when adjusting the tilt.
Design features of tires for circular saws
A circular saw guide has several basic design elements. The main element is always the guide (regardless of the selected material). Installed stops that determine the length of the permissible cut. Set of fastening elements. Ordinary bolts and nuts, clamps or wing fastenings can be used. The differences between the various guides are: the selected material (wood or metal), geometric dimensions.
Scheme for making a guide bar
Useful tips
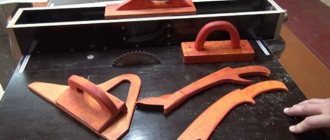
Blank templates make the work much easier.
There are several useful recommendations that will help beginners use a circular saw with a guide:
- It is necessary to use special blank templates. With their help you can quickly make identical parts.
- Before starting work, you need to adjust and configure everything in advance. Only with a properly configured tool will it be possible to cut wood efficiently.
- Do not work at the circular saw for too long. The tool must be turned off periodically to prevent it from overheating.
- The tire must be securely attached. It must not slide on the work surface. Bolts or screws can be used as fastenings.
- If, during sawing, the circular saw begins to sharply slow down, it must be turned off. This often happens when a tool works continuously for a long time and begins to overheat.
Important! If you need to cut an even cut, you must use a guide. Without it, it is quite difficult to do this.
A circular saw is an indispensable tool that allows you to quickly cut wood products. People who want to do quality work should use special guides. Such designs can be purchased or made independently.
Making a tire with your own hands
The main task is to make a geometrically accurate product with your own hands, which is not easy. I would like to make a convenient and reliable device, spending a minimum of time.
The following can be used as a base: a channel, a corner, a rectangular pipe and even a laminate. Wooden and pressed guides have a serious drawback - they are sensitive to moisture.
Option 1
The guide rail is made of laminate - the simplest and most affordable material.
- We cut two pieces of laminate of the same length along a ruler (for example, 50 cm).
- We mill one edge at a time.
- We attach it with self-tapping screws to the base, also made of laminate.
- The width of the groove is checked using a sheet of A4 paper, approximately 0.11 mm thick: the paper is inserted into the device and screwed.
- The guide is fixed to the sole of the circular saw with your own hands through the mount for the side stop. You can drill a special hole in the case, if you don’t mind and the warranty period has passed.
- When working with the guide bar, it should be extended as far as possible in front of the hand-held circular saw. And the nose of the sole should extend a few centimeters onto the guide. Now let’s take a disk for sawing laminate and saw off the edges of the guides on the spot so that they align perfectly with the markings;
This device eats up the cutting depth a little (by about 1.5 cm), but it is very convenient and easy to do with your own hands.
Option 2
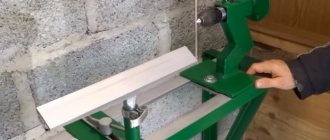
Now let's take the construction rule as the basis for the tire. A model with handles that move along a groove is suitable.
- We remove the handles and instead select soft-locking clamps with spring handles. There are models with a removable top - they are just right. Having removed it, the clamp is fixed to the rule using an adapter.
- The adapters will have to be made yourself from polypropylene on a milling machine. As a result, you should get parts that resemble the letter “T” in cross-section; they are tightly inserted into the groove for the handles.
- We make holes in the “leg” of the adapters and screw clamps onto the screws.
- The guide is placed on a sheet of material with the groove down and securely pressed with clamps from below. There is not a single part on top that slows down the operation of the circular saw. There is only one limitation in the work - the length of the rule, so you need to take the longest one.
rule profile
clamps
guide assembly
Stop ruler is a simple and clear element
This type of tire as a thrust ruler is the simplest, easiest to manufacture and use. When manufacturing it, it is necessary to remember that no matter how simple the design is, it must ensure reliability and safety. A high-quality stop ruler can be used for an electric jigsaw, a hand-held circular saw, or a simple hand saw. Manufacturing is carried out according to the following sequence.
- Prepare a wooden or plywood strip. The width should exceed the width of the platform of the circular saw used by 20 centimeters.
- A ruler is made from this strip. The remaining sheet of plywood is used to make the base.
- The finished structure is screwed to the base. For this purpose, wood screws are used.
- The protruding part of the ruler is carefully trimmed. The edges should be milled.
When starting to work with a finished tool, it is advisable to carry out several test cuts on secondary wooden products. You need to get used to the fact that when moving the saw along the length of the ruler, you need to apply different forces. Therefore, you should gain some experience. Then proceed to the finishing cut.
What are miter saw stops for?
All kinds of additional devices: stops, clamps, fasteners are used to securely fix the workpieces. The miter saw guide helps you make precise cuts across the grain of the wood. The factory stop has one drawback, which significantly reduces the scope of application. The cut cannot be made larger than the width specified by the manufacturer. This parameter is individual. Cutting boards of greater width requires rigid fastening of the stop.