In wooden construction, logs, beams, and boards are used (in frame construction), but wood has several rather serious natural disadvantages, which today manufacturers of lumber for building houses are trying to mitigate.
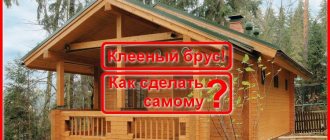
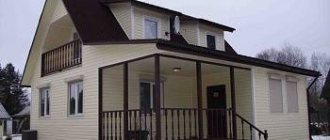
One of the most high-tech materials for the construction of a country house for permanent residence is profiled laminated veneer lumber. We offer an overview of how to build a house from laminated veneer lumber, with a description of all stages of assembly.
Technology of building houses from glued profiled timber - step-by-step instructions
Advantages and disadvantages of a house made of laminated veneer lumber
A house made of laminated veneer lumber has a number of advantages that are unique only to buildings made from this material.
Advantages of houses made of laminated veneer lumber
- low thermal conductivity. A private house built from laminated veneer lumber does not require insulation;
- possibility of implementing a project of any complexity. Thanks to the geometry of the timber, it is possible to make long walls without splicing. In addition, it is possible to purchase bent laminated veneer lumber. At the same time, using laminated veneer lumber in construction, it becomes possible to assemble walls of different thicknesses, which is a source of savings during construction;
- there is no need to seal the walls. The tight fit of the timber and minimal cracking make it possible to avoid caulking and sealing joints;
- antiseptic. The manufacturing technology of laminated veneer lumber involves unraveling the timber into boards and then gluing them together. This makes it possible to cut out knots and other defects, as well as dry the board to the desired humidity. The glue that connects the lamellas acts as an antiseptic. In addition, laminated veneer lumber is treated with fire retardants;
- environmental friendliness. The adhesives and wood used are certified for compliance with standards and safety;
- biological inertia;
- high speed of construction, which reduces construction/commissioning time and allows you to move into the house faster;
- minimal shrinkage, which makes it possible to begin finishing immediately after completion of construction;
- aesthetic appearance. Glued laminated timber does not crack like logs or natural timber. This reduces the requirements for external finishing;
- strength and long service life.
Disadvantages of houses made of laminated veneer lumber
There are much fewer disadvantages, but they are there:
- higher, in comparison with profiled timber of chamber drying, the cost of timber;
- the need for constant care of wood (a feature of all wooden houses) in order to reduce the rate of its aging and color change.
As you can see, there are more attractive aspects than negative ones, which is why the construction of timber houses is popular in Europe.
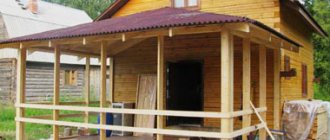
Laying the first crown
When laying the first crown, you should pay special attention and take your time: the quality of this work determines how level the walls of the house will be. Before laying the first crown you must:
- check the horizontalness of the foundation. The difference should be no more than 1 cm across the plane. Otherwise, the foundation is additionally leveled and filled with concrete;
- waterproof the foundation. It is recommended to lay out two layers of waterproofing material, then a laying board and another layer of waterproofing material.
When choosing timber for laying the first crown, you must give preference to only high quality material: smooth, with maximum ring density, without blue stains or knots.
The timber is coated with bitumen mastic, leaving the ends untreated. Laying the first crown:
- slats treated with antiseptic (thickness - 15 mm) are laid on a layer of waterproofing at a distance of 30 cm;
- beams are laid on top of the slats, forming the first layer;
- the distance between the foundation and the beam is filled with polyurethane foam;
- the surface is checked with a hydraulic level, all identified irregularities are eliminated.
The beams of the first crown in the corner joint are half a beam thick. The floor joists on the ground floor of the building cut into the first or second contour.
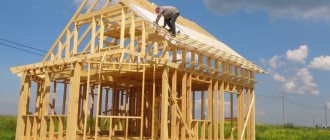
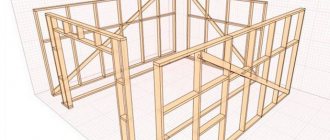
Stages of building a house made of laminated veneer lumber
As already mentioned, laminated veneer lumber is a relatively easy-to-work material, and step-by-step instructions that describe each stage in detail will eliminate mistakes and outline a plan for starting to build a house with your own hands or hiring a contractor.
| Stage number | Name | Content |
| 1. | Project development | – individual or standard project. |
| 2. | Pouring the foundation | – calculation of the type of foundation depending on the characteristics of the soil, terrain, groundwater level, project, etc. factors; – arrangement of the pit; – arrangement of formwork with reinforcement; – concrete pouring and strength building. |
| 3. | Laying the first crown | – waterproofing; - first row of timber. |
| 4. | Installation of logs | – installation of a subfloor above the plinth; – installation of a subfloor above the basement; |
| 5. | Construction of the box | – laying the remaining rows; – arrangement of interior partitions; – installation of interfloor ceilings. |
| 6. | Roofing | – installation of the rafter system; – installation of roofing pie (insulation and finishing). |
| 7. | Installation of individual elements | – installation of vertical structural elements (pillars, columns, supports); – filling openings (window and door frames); – installation of stairs. |
| 8. | Interior decoration | – communications; – decorative finishing |
| 9. | Exterior decoration | – point sealing; – wood protection. |
Proper preparation for assembling a house and a clear sequence of work guarantee a high-quality result.
Which profile is better to choose – German or Finnish?
Before you start building a house, you should decide on the type of profile. There are two main modifications:
- Finnish;
- German profile.
The Finnish (Scandinavian) profile is a flat surface with a wide tenon at the bottom and a groove at the top. When using it, be sure to use an insulating gasket. The Finnish profile is easier to install. The German profile (comb) is distinguished by the presence of many spikes. It can be installed without additional thermal insulation, but violation of storage rules at the construction site or poor drying can greatly complicate the installation process. The main thing you should remember is that if the material is of high quality, then there is not much difference when choosing.
Cost of building a house from laminated veneer lumber
The price consists of the following factors:
- house dimensions;
- type of foundation;
- cross-section of the timber used;
- complexity of the project;
- number of floors of the house;
- presence of a balcony;
- roof configuration;
- complexity of laying utilities;
- the cost of obtaining permits;
- fare;
- cost of material.
If you do the work yourself, most of the costs can be eliminated. And the price will be determined only by the cost of the project, the material used, consumable tools, rented equipment, transportation and, possibly, payment for consultations of specialized specialists.
We hope that this instruction explains in sufficient detail how to build a house from profiled laminated veneer lumber. A little effort - and excellent results are guaranteed!
Project development
Any house construction project must include:
- architectural part. Includes a house plan by floor: placement of the kitchen, hall, living room, bedrooms, children's and bathrooms. The layout of the attic or attic is indicated here;
- structural part. The layout and sections of the walls, which determine the construction technology, are indicated. There must be a plan for the floor and ceiling beams, the placement of stairs in a two-story house, a three-dimensional view of the finished building with dimensions. The location and dimensions of windows and doors should also be in the plan;
- engineering part. Here is a description of the communications necessary for the life support of the house: power supply, water supply, drainage, and heating systems;
- additional buildings and landscaping of the local area. Utility buildings, garage, boiler room are indicated in the project. Sanitary standards regarding the distance of the house from such buildings must be taken into account.
The project should be thought out as much as possible, which will reduce further costs of maintaining the house. A competently and carefully designed and built house will be durable and reliable.
Choosing interventional insulation
The first thing you need to do is prepare everything you need for assembly. A set of timber comes from the manufacturer already cut to size, but the insulation, dowels, and screw ties will need to be prepared.
Thermal insulation material for laying between the crowns should be chosen based on the type of timber you have. If there is a special recess on the body of the beam for insulation, you can take almost any type of caulk, the quantity or thickness of the layer is 3-5 mm thicker than the depth of the recess. Flax or jute, linen batting, tow, and sphagnum moss are suitable.
Sphagnum is a moss that forms peat bogs.
It has long been used for caulking log huts and bathhouses. It has an antiseptic effect, reliably seals seams, but often attracts birds that line their nests with it.
For lumber without cutting for inter-crown insulation, take thin rolled material no more than 5 mm thick; jute or flax-jute fabric will be the best option.
Insulation works
External insulation involves:
- selection of material for thermal insulation;
- caulk cracks in the walls (designed to minimize airflow);
- installation of sheathing for fastening insulation (frame made of bars);
- installation of thermal insulation material;
- wind protection fastening;
- installation of additional sheathing;
- external finishing of heat-insulating material;
- applying a protective composition to the walls of the house.
It is recommended to insulate a house from timber from the outside: internal insulation work takes away the usable area of the object and is impractical.
Floor design
The basis of a wooden floor is beams that are supported on load-bearing walls and serve as a kind of “foundation” for the remaining structural elements.
The following types of floors exist:
- An interfloor ceiling that does not require good insulation, since it separates residential areas. The main requirement is good sound insulation.
- Attic, separating living quarters from the attic. Depending on whether the attic (attic) is heated or there is no heating in the room under the roof, the flooring is made of the necessary insulating material. But a vapor barrier layer is required to prevent the formation of condensation.
- Basement or basement, serving as the boundary between the basement. Here, thermal insulation comes first, cutting off the cold coming from below.
For beams, they usually use solid or laminated timber, logs, and sometimes boards (single or fastened in thickness with nails or staples). For floors, it is advisable to use beams made of coniferous trees (pine, larch), which are characterized by high bending strength. Hardwood beams perform much worse in bending and can deform under load.
Rough boards (OSB, plywood) are fixed to the floor beams on both sides, on top of which a facing covering is sewn. Sometimes the floor of the second floor is laid on logs, which are secured to beams.
The wooden floor on the side of the first floor will be the ceiling, and on the side of the second floor (attic, attic) it will be the floor. Therefore, the upper part of the ceiling is sheathed with floor materials: tongue-and-groove boards, laminate, linoleum, carpet, etc. The lower part (ceiling) - clapboard, plasterboard, plastic panels, etc.
Thanks to the presence of beams, space is created between the rough boards. It is used to give the ceiling additional properties.
Depending on the purpose of the second floor, heat-insulating or sound-proofing materials are placed between the floor beams, protected from moisture by waterproofing or vapor barrier.
In the event that the second floor is a non-residential attic that will not be heated, thermal insulation must be included in the ceiling structure.
A vapor barrier film (glassine, polyethylene and polypropylene films) is placed under the thermal insulation layer (from the side of the first heated floor).
Attaching beams to the wall
In wooden houses, beams are buried into the grooves of the walls by at least 70 mm. To prevent squeaks, waterproofing material is laid between the groove walls and the beam. In some cases, beams are cut into walls, making dovetail connections, etc. Beams can also be fixed to the wall using metal supports - steel angles, clamps, brackets. They are connected to walls and beams with self-tapping screws or self-tapping screws. This fastening option is the fastest and most technologically advanced, but less reliable than when inserting beams into wall grooves.
Beams can be installed end-to-end with a load-bearing wall; joints of crossbars and short beams can be assembled using special brackets made of perforated metal,
Crossbar - a support beam on which other load-bearing elements of a building structure (beams, racks, columns, walls) rest.
This connection has certain advantages:
- The T-shaped unit is reliable;
- installation is done quickly and without cutting out a seat in the timber, which preserves the strength of the structure;
- there is no need to create a cavity in the wall to support the beam, which does not violate the thermal insulation properties of the wall;
- it becomes possible to use beams of shorter length than the width of the opening being closed.
We make the roof
In modern construction, a large number of different roof shapes are common. Along with the traditional gable, the following are found:
- single slope;
- hip (hatched);
- half-hip;
- broken line (attic);
- hipped (hipped);
- multi-pincer;
- cone-shaped;
- combined.
The final choice depends on the project and your preferences. Each type has its own manufacturing characteristics. In general, the process of constructing a roof consists of installing a rafter system, covering it with lumber or sheet wood materials and laying the roof.
TYPES OF ROOFS OF PRIVATE HOUSES:
A flat roof is the simplest type of roof. This is a flat roof that rests on walls of the same height and forms a minimal slope (1-3%), or does not form a slope at all. This type of roof is used in regions with strong winds, where there is a small amount of precipitation, since due to the small angle of inclination, precipitation accumulates on the roof surface. This type of roof is also used in the construction of garages or outbuildings.
A pitched roof is a type of roof that is formed by one plane that provides drainage for storm and melt water. Shed roofs are perfect for garages and outbuildings. The disadvantage of this type of roof is the lack of an attic space.
A gable roof is the most popular type of roof in the construction of country private houses. A gable roof is formed by two slopes, which rest on load-bearing walls of the same height.
A mansard roof is a type of roof that is one of the varieties of gable roofing. This type of roof is suitable for those who plan to use the attic space for living space. The difference between an attic roof and a gable roof is the presence of a broken line on the roof slopes themselves.
Hip roof - this type of roof is used in regions with strong winds. A hip roof is formed by a pair of hips and a gable roof. Since the gable roof does not cover the entire area of the building, the remaining part is covered with a hip. This type of roof is most often used in the construction of verandas, wells, and gazebos.
A multi-gable roof is a type of roof that is used in the construction of private houses with a complex polygonal shape, as well as with extensions and side attics.
Installation of a roof in a house made of laminated veneer lumber usually takes place in several stages:
1. Installation of rafters 2. Installation of house sheathing 3. Construction of a steam and water barrier 4. Insulation of the roof 5. Installation of counter-lattice 6. Installation of the roof 7. Installation of additional elements (ridges, gutters, etc.)
Roof frame Construction of the roof frame
The following roofing materials are most in demand in private housing construction:
- metal tiles;
- profiled sheet;
- soft tiles;
- corrugated bitumen roofing;
- ceramic tiles;
- flat roof made of steel or copper sheets;
- wooden roofing (shingles).
How much does it cost: prices per cubic and m2
Good quality laminated veneer lumber, made in accordance with GOST, with a quality certificate costs good money. On average, in the Russian Federation the cost per 1 m3 is 25-28,000 rubles per 1 m3 . The price is influenced by the urgency of the order, seasonality (in summer the price may be higher), delivery to the location, remoteness of the facility, depreciation services, quality of drying and production of wood material.
Some manufacturers produce such high-quality timber that they have a large number of orders, and many customers even have to wait in line. The most expensive material is in St. Petersburg, Krasnoyarsk, Novosibirsk and Moscow Region, and cheaper in the central regions of Russia.
So, for example, 1 m2 of a two-story house in the Moscow region, completed on a turnkey basis, which includes all types of work from start to finish, according to the price lists provided on the official websites of companies, costs from 40,000 rubles per 1 m2. Hiring a team of workers under a contract can be cheaper and provide a guarantee. Without a contract, various difficulties may arise.
Before starting construction, it is necessary to calculate your financial capabilities, since the timber will need to be purchased with an advance payment first of all.
Erection of the roof and laying of the roof
The simplest and most practical option is a gable roof with frame fronts and rigid fastening of the rafter system. The more complex the roof geometry, the higher the likelihood that it will require repairs after a few years of operation.
To ensure that the weight of the roof is distributed evenly across all supporting structures, additional supports are installed. The strapping is reinforced with ties made of timber, which are cut into the opposite beams of the walls.
The main structural element of the roof is the rafters, combined into a single system. Roofing materials are fastened from bottom to top from one of the gables. To cover a house made of timber, you can use ceramic tiles, metal tiles, seam roofing and other materials.
Interior work
Internal installation work involves the installation of stairs, windows and doors. Thus, the staircase installation scheme is determined when designing the building. No changes are made to such designs; installation is carried out by professionals using special tools.
Window installation is carried out taking into account the following features:
- the window sill must be leveled;
- for the strength of the window sill, cuts are made from the sides of the frame;
- then the window sill is installed with self-tapping screws;
- in accordance with the markings, create holes on the side window posts;
- install windows in the opening;
- a spacer bar is installed between the frame and the window;
- fix the window block with self-tapping screws;
- the space between the window and the frame is filled with polyurethane foam;
- install platbands and drainage.
Installing doors in a house made of timber requires special care: mistakes will be difficult to correct. First, the doorway is marked in the wall, then the opening is sawed and the door frame is secured.