Thanks to the ability of wood to “breathe,” a special microclimate is created in wooden houses. However, the flip side of the coin is the gaps in the seams and cracks that appear during operation. Let's find out how to restore the walls' tightness and minimize heat loss - let's figure it out with the FORUMHOUSE craftsmen. Consider:
- Why do wooden walls need to be sealed?
- What is caulk?
- What is a warm seam?
Instructions for sealing seams
High-quality insulation of a wooden house is possible only with strict adherence to technology, which includes preparation and the main stage of sealing cracks.
Materials and tools
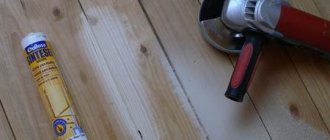
To work, you should buy sealant in a cartridge or other form that is well suited for the mounting gun. You also need to prepare:
- foamed polyethylene in the form of a cord;
- narrow spatula;
- paint brush;
- water;
- a rag;
- masking tape;
- wood primer;
- spray.
You can also apply sealants manually, but using a gun will make the job faster and more comfortable. In addition, the mounting gun helps to squeeze out the product in a strictly dosed, even and beautiful strip, whereas without it it would be difficult to achieve a similar effect.
Preparation
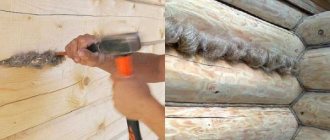
Old buildings most often have rough caulking. It is better to remove it to reduce the risk of mold development and insect nests. Afterwards, the log house is cleaned of dirt and dust, the old paintwork is removed, and if there is oil impregnation, the base is sanded.
The wood is treated with degreasing compounds, then primed and allowed to dry thoroughly. If you ignore the preparatory measures, the sealant will lie unevenly, and its adhesion to the base will decrease.
Next, a special polyethylene cord is placed in the seams between the logs. It is designed to fill the inter-crown space, since completely sealing the entire gap with sealant is expensive and ineffective. Joints that are too large are first caulked with tow or jute, then a cord made of polyethylene foam is attached with metal staples. Both joint surfaces are covered with masking tape to ensure an even layer of sealant.
Application of sealing compound
The agent for creating a warm seam is applied using an assembly (glue) gun. You need to act this way:
- cut the tip of the tube at an angle of 45 degrees;
- insert the tube into the gun;
- pour the product, not packaged in cartridges, into a special gun designed specifically for such sealants;
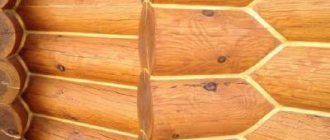
- press the “trigger”, applying the sealant with an even tape of the required thickness (the layer of the product should cover the logs by 0.5–1 cm on both sides);
- spray the seam with water from a spray bottle, then smooth it with a spatula and remove excess;
- moisten a small brush and finish the joint;
- Use a rag to remove stains and drips, then remove the masking tape without waiting for the sealant to dry.
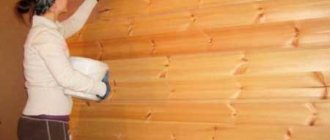
Typically, for complete polymerization, the sealing composition needs from 2–4 days to 2 weeks, depending on its type, brand, and weather conditions. Only after this period has been completed can the seam be painted.
Material consumption
Sealants are produced in tubes of 300 and 600 ml, as well as in plastic buckets of various sizes. Consumption varies greatly depending on the width and depth of the seam. For example, with a standard seam 5 mm deep and 20 mm wide, 200–250 g of product will be needed per 1 linear meter.
Drying time
You need to work with sealants using the “warm joint” technology in dry weather at temperatures within +5...+35 degrees. The optimal humidity for work is considered to be 60%, temperature + 20…23 degrees. Under such conditions, the product cures at a rate of 2 mm/day, and the primary film appears after 30–60 minutes. In damp, rainy weather, sealing a wooden house should not be done, as well as during snow. This will negatively affect the quality of the resulting seam.
Corners and cuts
The most difficult work in forming warm seams concerns the junctions of wooden walls. To seal corners and cuts, insert a polyethylene cord of the required thickness and length into the cracks and push it through with a spatula. This process usually takes a long time, is labor-intensive and painstaking. After applying the sealant, level its layer with a wet spatula.
If the corners were previously treated with oil impregnations or fire retardants, you will have to first sand the wood with a grinder, otherwise the sealing compound will not achieve the required adhesion.
Sealant storage conditions
The product must be stored at a temperature within +5...+30 degrees without access to the sun, protected from moisture. The sealant can withstand up to 7 cycles of freezing and thawing (each lasting no more than a day, temperature not lower than –18 degrees). Before use, the frozen composition is kept at room temperature for at least a day.
Is it possible to minimize the risk of splits?
The only condition that guarantees minimal cracking is prolonged drying of the logs under natural conditions.
Long-term drying of wood:
- Increases the strength of the log.
- Significantly extends its service life.
When drying logs naturally, it is important to ensure their uniform drying, that is, the same drying rate for both the outer and inner layers of the log house.
This can be achieved by creating certain conditions for complete drying. This is a cool and completely dry place in which the logs are allowed to dry out for at least 2 years.
From the appearance of the cracks we can deduce how long the wood has been drying:
- 1.5-2 years: crack size up to 2-2.5 mm.
- 1-1.5 years: the splits are already expanding to a width of 7-12 mm.
- Several months: the cracks become larger and occupy a distance of 12-25 mm.
To minimize the risk of faults, a compensation (unloading) cut is sometimes formed on raw logs. This measure relieves the growing stress on the wood fibers and ensures they dry out faster.
The cut is carried out according to special standards:
- it is performed along the log;
- has the appearance of a neat, even groove;
- has a thickness of 7-10 mm;
- it is made with a depth of no more than 1/4 of the diameter of the log itself.
When cutting, to protect the tree from moisture, when collecting, the timber is laid with the cut facing up so that the cut is covered by the log lying on top.
Overview of wood sealants
Currently, the market offers products from both Russian and foreign manufacturers:
- Acrylic American Perma-Chink sealant is designed for sealing wide joints. It is the absolute leader in elasticity and fits perfectly on wood, creating a durable film. The sealant is not susceptible to UV radiation, humidity, extremely low and high temperatures. The color palette includes ten different shades. Perhaps its only drawback is its high price.
- Another American representative is Energy-Seal sealant, produced for narrow gaps up to 25 mm. The product is fade-resistant and can be used in the most unfavorable weather conditions.
- German sealant Remmers Acryl 100 is designed for wide joints up to 50 mm. It has good adhesion, resistance to UV radiation, and retains its properties for up to 25 years. The color scheme includes eleven tones.
- Wepost Wood sealant comes from Slovenia; it has increased ductility and can withstand several times more tension/compression cycles than other sealants. Prevents the appearance of insects in the tree, tolerates temperature changes from -50 to + 60 degrees.
- Domestic acrylic sealant Eurotex is designed for use in a wide variety of climatic conditions. The material forms an elastic film that reliably and firmly closes the seams of a wooden house and protects the wood from pests. The product is available in four colors and allows you to create beautiful and tight seams.
This is not a complete list of manufacturers. On the shelves of construction supermarkets you can find Polish, Finnish, and Canadian sealants that can be used to caulk the crown joints of a wooden house
When choosing a product, you must first pay attention to the expiration date, composition, recommended conditions of use.
Technology FAQ
Will the sealant be beneficial if it is applied to already caulked seams?
Certainly. The answer has already been given at the beginning of the article. Correct application of a warm seam includes caulking, laying of Valiterm and cord
However, it is important that the insulation does not come into contact with the sealant
Should smudges be removed immediately after leveling or after drying?
To avoid leaving traces, it is better to remove it immediately, but carefully so as not to touch the sealant. Which sealing should you choose, inside or outside?
The short answer is that both types are needed. External, will protect the house from moisture, insects and blowing. External sealing also serves as waterproofing. However, the seams also need to be protected on the inside. For example, from moisture formed in the room itself.
Can it be applied in winter?
This depends on the type of sealant. For example, Accent-136 can be used at temperatures from -10 degrees. There are also more “heat-loving” analogues.
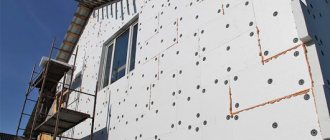
Wood sealant “Warm seam” can become the basis for the thermal insulation protection of a building. Undoubtedly, there are other ways, but this one is the most convenient. If you have started to think about insulating your home, then you should resort to this technology. When making a comparison with the traditional system of thermal insulation of inter-crown gaps, which uses hemp, jute or flax batting insulation, it is worth noting that filling cracks in the inter-crown space with sealant increases the thermal resistance of the walls and reduces heat loss. If we are talking about natural insulation, then they are able to let cold air inside, which significantly reduces the thermal resistance of log walls.
Traditional methods
How to seal the seams between the logs of a log house from the point of view of the grandfathers - the best solution is moss. Previously, gaps and splits were caulked. More often, a common plant was used as a material. If it was dry, then the moss was pre-soaked in water for 30 minutes and squeezed out before use. The mass must be rolled into rolls and pushed into the crack. In order to compact the aggregate, it is tapped using a caulking spatula and a hammer or mallet. It is important to achieve a spring-like result.
It takes about 72 hours for the moss to dry. During this time, the volume of material increases to 20-30%. As a result, the cracks are clogged, the filler breathes, and the excess is cut off using a petal circle.
SEALING CRACKS USING PUTTY
If you don’t want to mix a complex composition or don’t have time for this, you can purchase wood putty at a specialized store and seal the cracks with it. This method is used when surface imperfections are minor. You should know that this material can be filling (up to 5 millimeters) and finishing (up to 1 millimeter).
The disadvantage of this method is that the putty begins to crack and crumble over time. For this reason, puttying cracks in a wooden floor is used when the old boards will be covered with plywood flooring.
In stores and on the market you can find ready-made putty solutions for wood. They are easy to use and dry quickly, are durable and give the wood additional properties, such as moisture and cold resistance. Putties vary in composition and consistency. Thick water-based mixtures have good adhesion to wood and are more suitable for small cracks in a log house. And with the help of liquid putty, which contains solvents, you can seal wide and deep cracks.
Gypsum putties are best suited for interior work. They are plastic, environmentally neutral and maintain a comfortable atmosphere indoors. In addition, gypsum compositions are easy to apply and last a long time.
If you plan to work on sealing cracks in a log house from the outside, choose a waterproof putty with increased protection from dampness, precipitation and temperature changes.
Oils, polymers or adhesives can also be used as a base.
- Oils, polymers or adhesives can also be used as a base.
- The adhesive is characterized by increased strength and long service life.
- Oil putty is indispensable for sealing cracks in timber if it is planned to be treated with oil coatings or paints in the future.
Briefly about the main thing
The obvious question that arises for a person who discovers cracks in the logs of a log house is: how to repair them. But first, think about whether you need to do this. Small cracks do not have a negative impact on the strength and integrity of the structure, but they do spoil the appearance of the walls. Serious breaks - long and deep - can weaken the frame, cause its uneven shrinkage, and freezing. Such defects must be eliminated by driving tow, jute or moss into the cracks, filling them with elastic bands and sealing them with sealant on top. Small internal cracks can be filled with putty.
How to apply sealant and fill the seams
Let's consider the use of acrylic sealant using the example of logs.
Step 1: Think ahead
It would be good to know about the future use of acrylic on wood at the stage of laying a log house. Modern construction methods suggest that a competent craftsman will place thermal insulation tape (PSUL) or jute between the logs. Many people use silicone paste for this. This will complement the insulating properties of the sealant and save its consumption.
Step 2: Prepare the surface
When the frame is installed and has undergone minimal shrinkage, for which you have the patience, you can begin work. The basis for success is a properly prepared surface
There will be no special work with the wood; it is important to simply clean and sand the logs. If you built carefully, then there should be no stains of oil, grease, paint or any other coating on the surface, because the degree of adhesion will be significantly reduced
Maximum adhesion will be to clean and dry wood, so do not work in rainy weather.
Step 3: Open the sealant
It makes sense to start working when the room is warm and dry. Do not do this at temperatures below 5 degrees Celsius or above 32 degrees
It is important to take care of good ventilation. It should be said that when working you will need gloves and glasses
If you fail to protect yourself from applying acrylic to mucous membranes, do not hesitate to consult a doctor, and hurry to wash off the material from your skin as soon as it gets on it.
So, depending on the form of your sealant, you will need one or two steps. When the gun is loaded, do not rush into battle, first test the composition in action on the same, but unnecessary piece of wood. Check how hard you need to press, how quickly you move the gun along the seam, whether thick contents spread, etc. When you have assessed and adapted to the behavior of the sealant, you can turn to the finishing option - the walls of the log house.
Step 4: Sealing the Logs
Now we proceed to the logs, but do not rush to fill the seams, first the cord is laid there; extruded polyethylene is popular for this task. This just saves you money, because you will need a lot of sealant for the whole house, and the cord will significantly reduce its consumption. Now we fill the seams with acrylic. Depending on your goals, you may need to level the sealant - this is done with a thin spatula, it is better to moisten it with water. Any excess can be easily removed with a rag at this stage.
Step 5: Polymerization and storage
In the first day, the outside of the seam will be covered with a film, and for some time the composition will polymerize inside. This depends on the type of sealant, for example, the type with increased elasticity finally hardens after 4–8 weeks. During polymerization, colored acrylic also changes its tone a little, as if it becomes saturated. You can try to store the remaining sealant by tightly closing the container and placing it in a well-ventilated area.
Someone even manages to freeze acrylic, this is really possible, because its basis is a water emulsion. But no more than 7 freezing cycles are allowed, and with each subsequent freezing its quality is expected to decrease
It is also important to defrost the sealant correctly. First, the container is placed in a dry and ventilated room with a temperature no higher than 10 degrees Celsius
Then it needs to be moved to a room with a higher mark on the thermometer. As soon as the composition itself reaches a temperature of 17–20 °C, it can be used for its intended purpose.
Sealing according to the warm seam type
Insulation using a “warm seam” sealant for wooden houses is applicable in many cases. First of all, the technology is suitable for inter-crown spaces in houses made of timber. First, the gap is filled with a special cord, because placing such a quantity of sealing mass is expensive and impractical.
At the next stage, the sealant is distributed over the entire joint surface. This must be done with a pistol into which the product is drawn from a bucket. If the composition is purchased in a tube, then it is simply inserted into the gun. A corner is cut off at the tip at an angle of 45° so that the open part is equal in size to the size of the seam.
Sometimes performers put tape around the joint so as not to stain the adjacent parts of the surface. Experienced performers apply the mass from a gun in one step without misses, without using tape.
If the product gets on adjacent areas, they should be immediately wiped off with damp rags of any fabric. A large amount of excess can be obtained from novice installers; in this case, all flaws are removed with a spatula.
Of decisive importance is the thoroughness of the final alignment of the seam, which is carried out with a spatula, brush, sponge, or rag. This should be done soon after applying the product, after no more than two hours. If the finishing is done correctly and on time, the seam acquires a decent appearance.
Complete formation of the seam ends a few days after the polymerization of the mixture is complete. The speed of the final process is determined by the weather in general, air humidity and raw materials in particular. Only after the joint compound has completely hardened does the final color appear on the surface, which will remain for a long time during the operation of the building until scheduled repairs.
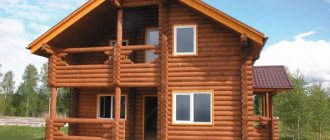
Advantages of log houses
But first, I would like to go through the many advantages of such buildings, which made them so popular among our compatriots, and on a global scale in general. So, let's focus on the main ones:
- Environmentally friendly. Houses made from natural materials are completely safe for the health of the people living in them. Moreover, a person in wooden houses gets sick less, has higher body tone and vigor;
- Walls made of wood, with similar durability and strength, will be much thinner than their brick counterparts. So these houses have more space;
- Wood is a very mediocre conductor of temperature. Thanks to this, such a home is cool in summer, and heat loss to the outside is minimal in winter. Consequently, such a structure warms up faster, and less resources are spent on maintaining comfortable temperature conditions;
- Wooden houses are lighter than concrete or brick ones, so the construction of a massive foundation is not required;
- Wooden walls are very pleasing to the eye, so you can save a lot on finishing activities.
And this is only a small part of the advantages that such buildings have. Listing all or even most of them would be a very lengthy process. But already what is mentioned above is enough to understand the reasons for the newly increased popularity of the tree. It is important that much of the above may not be available if the joints between the logs are not properly insulated.
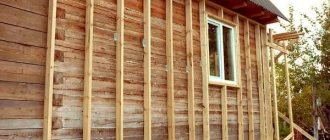
Application technology
The technology essentially consists of 6 main stages:
Laying insulating cord. Its task is to fill the inter-crown space. It makes no sense to use a more expensive sealant for this, and filling the space with it is quite problematic. It is reasonable to use sealant as a top, fixing layer.
Applying sealant using a gun. For this purpose, the tube is inserted into the cavity of the gun (or the sealant is drawn directly from the bucket). After this, the nose is cut off at 45 degrees, to the size of the seam. Next, the sealant is applied as polyurethane foam. Some installers use tape, gluing it as a frame for the borders of the seam. This allows you to avoid staining the timber and collect excess after application. After application, the tape comes off almost immediately. However, after gaining experience, you are unlikely to need such a procedure. Professionals apply the “Warm Seam” without tape to a length of 1.5 to 2 m in one pass and very evenly.
If excess sealant gets on the crowns, immediately remove them with a damp rag.
Wet a small brush and use it to smooth out the seam layer.
If there is a lot of excess, you can use a small spatula to remove it.
Now all that remains is to go over the seam with a slightly damp cloth for final alignment.
Some people use a sponge and spray for these purposes. In this case, the seam becomes glossy.
Corners and cuts
The difficulty, especially with the first experience, is the corners and cuts. In fact, sealing such areas is carried out in the same way as straight seams.
- Measure and cut pieces of cord of the required length in advance;
- Place the cord (you can use a spatula or brush to tuck it in);
- Apply sealant;
- Carry out the alignment procedure described above.
It can be noted that in general, the application process is not particularly difficult. Although, making a warm seam for wooden houses is a very tedious job. So be patient and/or the reliable “Russian way”.
Below in a series of photographs you can see the entire process step by step.
And a video with step-by-step instructions:
What tools and supplies will be needed?
This type of work requires tools that are available to almost every home craftsman, and consumables are not in short supply on the construction market.
To complete the sealing you will need:
an ordinary spatula, but it is better to have 2 types - a narrow one with a width of no more than 100 mm for applying the material and a wide one for the final leveling of the layer;- caulk, shaped like a large chisel;
- two types of chisel: narrow and wide;
- electric drill with drill sets;
- sharpened knife;
- regular hammer;
- a small, completely clean container for preparing putty;
- primer brush, with a shape for deep penetration into the crack;
- a brush with hard bristles, used to prepare the surface before applying the material, thoroughly cleaning it from dirt and fine dust;
- reinforcing mesh (serpyanka) for large cracks;
- sandpaper;
- jute tow;
- antiseptic impregnation.
Types of sealants
Compositions for isolating holes, cavities, and cracks differ in the number of functions.
Some provide impermeability only to water or heat, others exhibit many abilities. In addition, insulating agents are divided into groups according to the scale of application: industrial or household. Products for home use are offered for sale in smaller packages, they are easy to use, and have affordable prices. It is possible to insulate a wooden house using the “warm seam” technology using industrial or household insulating composites.
There are several types of polymer substances used for the production of sealants. For wood, silicones, polyurethanes, and acrylates are chosen.
Silicone sealants
Compositions with silicone polymers as a base are characterized by high thermal resistance in the temperature range from -50 to +140 ℃.
In practice, such thermal loads can only be encountered in industrial installations; for wooden structures, a smaller range of temperature values is sufficient.
Silicone has elasticity, which allows it to successfully withstand deformation loads, can be used for both internal and external work, in particular for sealing crown joints, and does not allow heat and moisture to pass through.
Silicone-based compounds have an acidic or neutral environment because they contain acetic acid or other organic substances as additives. The acidic mass has a characteristic pungent odor that evaporates as the sealant hardens. Products with acetic acid are inexpensive and suitable for wood and some other materials.
Neutral sealants with silicone are universal, can be used for any structure, and have a higher price than acidic products. In addition to those indicated, silicone mixtures for sealing joints containing disinfectant additives are commercially available. Such composites will be able to protect wood from biological damage when implementing the “warm joint” technology.
If the need for repairs arises, you will have to remove all the frozen mass and carry out the work again. If you want to get a seam to match the wood, you should immediately choose a product that matches the color, fortunately there are many of them on sale. After applying the mixture, upon subsequent drying, it decreases in volume (shrinks) by approximately 15%.
Polyurethane sealants
Polyurethane-based products have a high price and are characterized by very high strength and durability. The sealant adheres well to any substrate, even with high humidity, and withstands the influence of the external environment, including chemically active substances. The mixtures do not decrease in volume when dried, are easy to apply, can be painted in any color if necessary, can withstand temperatures in the range from -60 to +120 ℃, and are used in the “warm joint” technology.
Among the existing disadvantages, inconvenience to consumers can be caused by the limited color range of silicone sealants offered for sale and not very high resistance to ultraviolet rays. The seams of log cabins treated with silicone in sunny meadows in the southern regions may, after some time, partially lose their tightness.
Acrylic sealants
Due to their affordable price and good performance characteristics, compositions based on polyacrylates are most often used in practice. They do not allow water to pass through, are elastic, do not emit harmful fumes, and can be easily painted. Acrylic sealants without special additives can peel off from the base in a humid environment, so for outdoor work, products containing silicone additional components are used.
The combined compositions are elastic, provide complete insulation, and adhere well to the surface of the wood. Such wood sealants are presented to consumers in a wide range of colors and are used in the “warm joint” technology.
Causes of cracks
When cracks form in the walls of a log house, most owners of such households think about the reasons for their occurrence. In fact, they depend on many factors that affect the tree from its birth to the harvesting of the log.
The key root cause is the uneven shrinkage of logs from the end and sides, under the influence of which internal stresses are created in the fibers, leading to rupture. Especially massive cracking occurs during sudden temperature changes.
On the sunny side of the wood, the density decreases due to a rapid decrease in the level of moisture, and on the cold side it will remain high.
Important! The log has a hygroscopic structure, which strongly absorbs natural moisture, especially if the log house is built from very dry material. The first year for such a house will be critical. In the area of logs where the annual rings have been damaged, a small “network” of small cracks will initially be created, which will eventually merge into a common deep crack.
Main reasons:
- The place where the tree grows determines how much the tree has defects - curliness of the wood. Usually, any natural defects are later overgrown with new fibers and hidden by layers of the most ancient growth rings, but during the drying process of the felled tree they are revealed, appearing on its surface in the form of cracks.
- Uneven drying of logs.
The layers closest to the surface dry faster than the inner layers. A situation is created when the outside of the log is almost dry, but the core remains saturated with moisture. As a result, stress occurs on the fibers. The surface layer is subject to a tensile force, and the internal layer is subject to a compressive force. They literally explode the wood from the inside. The process depends on the drying speed; the higher it is, the more cracks there are, and their sizes are wider and deeper. - Shrinkage processes. As a result of such influences, wooden parts twist, changing their shape and linear characteristics.
- Sudden changes in temperature and humidity levels in a finished house as a result of operation. Trying to properly “heat” a home in the first winter season will most likely result in the formation of through cracks due to the difference in temperature and humidity of the walls of the log house.
- Time of year for logging. If it was a warm period, cracking will be high; the best period for harvesting wood for felling is winter.