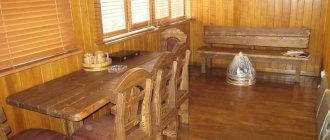
Shrinkage processes occurring in a wooden structure during the first years after construction inevitably lead to the formation of cracks. Previously, there was only one way to insulate a log house - caulking. Today, many owners of wooden houses prefer the more modern method of thermal insulation using the “warm seam” technology to traditional caulking. This technique allows you to efficiently and quickly isolate the cracks formed in the inter-crown seams of logs during the shrinkage process of the log house. Usually, specialists are hired for this work who competently and professionally perform sealing. In this review, you will find practical recommendations on how to properly make a warm seam for wooden houses with your own hands, and also find out what typical mistakes non-professional craftsmen most often make.
The essence of the technique
Joints between logs in a wooden house require sealing, as do joints in concrete and brick buildings. However, the insulation process is very different from others and requires the use of different materials. Conventional building compounds will not last long, and as the wood shrinks, they may begin to crumble and collapse, and they will have to be changed quite often. But the sealant from the “warm seam” series works much more efficiently and is more reliable.
The “warm seam” technology is multi-stage and implies the following:
- first, the gaps between the logs and beams are sealed with any heat-insulating material;
- caulk the joint on top with a special cord, which will prevent the insulation from coming into contact with the sealing compound;
- At the end of the work, a layer of warm joint is applied - a special sealant suitable for wood, based on acrylic, silicone or polyurethane.
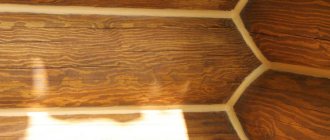
The finished seam can be painted with any available materials. The joint will be strong, will not allow moisture to pass through and will prevent the house from blowing through. Sealant is rarely used in isolation, without additional caulking, because the gaps between the logs are quite large, and it can fall out when the material is displaced.
Process methodology
The gaps between the beams in a wooden structure must be sealed, like joints in concrete and brick walls.
However, sealing logs occurs differently and using other substances. The service life of simple sealants is short; due to shrinkage, they crumble and fall apart, and require frequent replacement. The so-called “warm seam” fixation element is much more effective and durable.
The stages of forming a “warm seam” are carried out in the following order:
- First of all, the gaps between the beams are filled with some composition with thermal insulation properties;
- A special cord is placed over the connection; it prevents contact with the sealant;
- The final stage is the formation of a “warm seam” using an acrylic, or silicone, or polyurethane fixation element, which is used for wooden surfaces.
The treated warm joint is painted with one or another composition. The seam will become airtight, waterproof and draft-proof.
The sealer is usually applied along with adding a layer of caulk, since the spacing between the beams is wide, so the sealant can bleed through as the logs shift due to shrinkage.
Features of joint sealants for wood
Professional wood sealants are considered universal and highly effective products. They are great for creating warm seams in a log house, for filling cracks and holes in brickwork, concrete, natural stone, and are suitable for working on gas and foam concrete, plastic, and plastered surfaces.
Warm joint sealant 100% protects wooden buildings from wind, precipitation, and temperature changes. All products additionally contain antifungal additives that prevent mold from growing.
Properties and characteristics of sealants:
- safe for humans and the environment;
- suitable for external and internal work;
- have good elasticity (the elongation rate of some sealants can reach 700%);
- have a high degree of adhesion to wood and other building materials;
- are resistant to atmospheric factors and UV radiation;
- do not suffer from yellowing or darkening over time.
Good sealants have the property of thixotropy. This means that they can be used on vertical bases and inclined surfaces without any problems: they do not flow in a calm state.
Distinctive features of fixatives for wooden coverings
- Harmless to people and nature;
- Suitable for indoor and outdoor use;
- Very flexible (can increase in length by 7 times);
- Easily bonded to wooden surfaces and other building materials;
- Resistant to ultraviolet radiation and atmospheric influences;
- They do not turn yellow or darken over time.
High-quality fixatives are thixotropic. They can be applied to inclined and vertical surfaces, since they do not flow when at rest.
Choosing a sealant for a warm seam
The choice of means for sealing joints must be carried out with special care. If you purchase a low-quality wood sealant, you risk wasting effort and money on its application. When purchasing, you need to make sure that the product is really suitable for the “warm joint” technology and has excellent adhesion to wood.
Its service life in outdoor conditions should be 15–20 years or more, and shrinkage after drying should be absent or minimal. Good elasticity of the compositions is also important, as well as ease of application: they should be produced in a tube that is ideally suited to the mounting gun.
Seam sealants are produced in a wide range. Acrylic compounds are considered the safest and most inexpensive. They are great for interior work because they are environmentally friendly, do not emit toxins, and do not contain solvents.
Acrylic quickly adheres to porous wood, and after polymerization it can be painted to resemble wood. It is also suitable for outdoor use, but is considered less resistant to moisture and ultraviolet radiation than other compounds.
Silicone sealants are also good for warm seams. They last 20–25 years, are durable, flexible and reliable. Acid-based products are inexpensive, and those that are neutral (do not contain acids) boast higher adhesion to building materials.
Silicone has few disadvantages. A dried seam cannot be painted, although ready-made tinted mixtures are available for sale. It is not recommended to add pigments to the composition yourself; this can only be done using a special vacuum mixer.
Another type of “warm” sealants is polyurethane compounds. They have the following characteristics:
- optimal strength and adhesion to wood;
- tolerance to mechanical stress, moisture, chemicals;
- no shrinkage after drying;
- suitability for painting as the seam polymerizes;
- resistance to UV radiation;
- excellent elasticity, resistance to deformation.
Most polyurethane sealants contain solvents, so it is best to work with them outside. When choosing a product, you should give preference to formulations from well-known brands. Examples of good products:
- Neomid Wood Professional Plus - acrylic sealant, elastic, tear-resistant, low-flow;
- BARTONS “Warm House” - a silicone composition that does not shrink, contains a high concentration of fungicidal additives;
- Perma Chink is a fast-setting acrylic sealant that boasts durability and minimal consumption;
- Energy-Seal is an acrylic-based product, suitable for processing seams up to 25 mm, and easily tolerates deformation.
Hardening time
It is recommended to treat wooden surfaces with sealant when it is dry outside and the air temperature is from +5 to +35 C. The most suitable weather is when the humidity is 60% and the air temperature is from +20 to +23 oC.
In such weather, the drying speed of the sealant will be two millimeters in 24 hours; after half an hour or an hour, the seam will be covered with a primary film.
It is not recommended to form a “warm joint” in a wooden structure if it is raining, snowing, or there is high humidity outside.
The sealing process will be poor.
Instructions for sealing seams
High-quality insulation of a wooden house is possible only with strict adherence to technology, which includes preparation and the main stage of sealing cracks.
Materials and tools
To work, you should buy sealant in a cartridge or other form that is well suited for the mounting gun. You also need to prepare:
- foamed polyethylene in the form of a cord;
- narrow spatula;
- paint brush;
- water;
- a rag;
- masking tape;
- wood primer;
- spray.
You can also apply sealants manually, but using a gun will make the job faster and more comfortable. In addition, the mounting gun helps to squeeze out the product in a strictly dosed, even and beautiful strip, whereas without it it would be difficult to achieve a similar effect.
Preparation
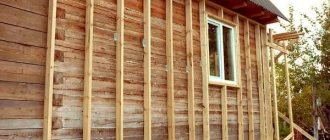
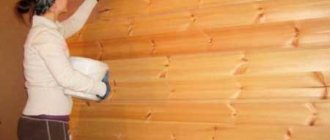
Old buildings most often have rough caulking. It is better to remove it to reduce the risk of mold development and insect nests. Afterwards, the log house is cleaned of dirt and dust, the old paintwork is removed, and if there is oil impregnation, the base is sanded.
The wood is treated with degreasing compounds, then primed and allowed to dry thoroughly. If you ignore the preparatory measures, the sealant will lie unevenly, and its adhesion to the base will decrease.
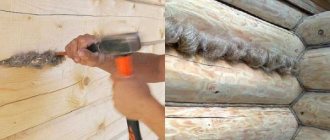
Next, a special polyethylene cord is placed in the seams between the logs. It is designed to fill the inter-crown space, since completely sealing the entire gap with sealant is expensive and ineffective. Joints that are too large are first caulked with tow or jute, then a cord made of polyethylene foam is attached with metal staples. Both joint surfaces are covered with masking tape to ensure an even layer of sealant.
Application of sealing compound
The agent for creating a warm seam is applied using an assembly (glue) gun. You need to act this way:
- cut the tip of the tube at an angle of 45 degrees;
- insert the tube into the gun;
- pour the product, not packaged in cartridges, into a special gun designed specifically for such sealants;
- press the “trigger”, applying the sealant with an even tape of the required thickness (the layer of the product should cover the logs by 0.5–1 cm on both sides);
- spray the seam with water from a spray bottle, then smooth it with a spatula and remove excess;
- moisten a small brush and finish the joint;
- Use a rag to remove stains and drips, then remove the masking tape without waiting for the sealant to dry.
Typically, for complete polymerization, the sealing composition needs from 2–4 days to 2 weeks, depending on its type, brand, and weather conditions. Only after this period has been completed can the seam be painted.
Material consumption
Sealants are produced in tubes of 300 and 600 ml, as well as in plastic buckets of various sizes. Consumption varies greatly depending on the width and depth of the seam. For example, with a standard seam 5 mm deep and 20 mm wide, 200–250 g of product will be needed per 1 linear meter.
Drying time
You need to work with sealants using the “warm joint” technology in dry weather at temperatures within +5...+35 degrees. The optimal humidity for work is considered to be 60%, temperature + 20…23 degrees. Under such conditions, the product cures at a rate of 2 mm/day, and the primary film appears after 30–60 minutes. In damp, rainy weather, sealing a wooden house should not be done, as well as during snow. This will negatively affect the quality of the resulting seam.
Corners and cuts
The most difficult work in forming warm seams concerns the junctions of wooden walls. To seal corners and cuts, insert a polyethylene cord of the required thickness and length into the cracks and push it through with a spatula. This process usually takes a long time, is labor-intensive and painstaking. After applying the sealant, level its layer with a wet spatula.
If the corners were previously treated with oil impregnations or fire retardants, you will have to first sand the wood with a grinder, otherwise the sealing compound will not achieve the required adhesion.
Sealant storage conditions
The product must be stored at a temperature within +5...+30 degrees without access to the sun, protected from moisture. The sealant can withstand up to 7 cycles of freezing and thawing (each lasting no more than a day, temperature not lower than –18 degrees). Before use, the frozen composition is kept at room temperature for at least a day.
Tools and raw materials
To start treating cracks with sealant, you need to purchase a retainer in a form suitable for the installation gun. For work you will also need:
- polyethylene foam in the form of a cord;
- narrowed spatula;
- brush for painting;
- a piece of fabric;
- water;
- spray;
- masking adhesive tape;
- primer for wood.
You can process the seams by hand, but using a mounting gun will speed up and simplify the process.
The device helps to comply with the consumption rate, treat the cracks with sealant, applying the fixative evenly in strips. It is almost impossible to achieve this manually.
Is it possible to do the sealing yourself?
The creation of warm seams is carried out once for many years, and therefore requires special care and strict adherence to technology. Non-professionals, beginners and those who ignore important rules often make mistakes that entail a serious decrease in the quality of the finished seam. The most common mistakes are:
- incorrect selection of sealant;
- carrying out work in damp, cold weather;
- applying thin seams;
- poor preparation of the base;
- making rough, interrupted seams;
- poor quality smoothing of joints.
If the technology is broken at any stage, the sealing layer may crack, rupture or swell. This will cause depressurization and the entry of cold air into the wooden house. Also, moisture will penetrate into the cracks, which will cause rotting of the material and the appearance of mold and mildew.
The conclusion is this: if you fully follow the technology and purchase only high-quality compounds, you can do the work yourself. In the absence of time, skills and desire, it is better to invite professionals to create warm seams. In this case, you won’t have to redo the work, which is even more expensive and difficult, and the finished seams will last faithfully for decades.
Preliminary stage
In outdated wooden buildings, the seams are usually sealed with rough tow. It is recommended to get rid of it to reduce the likelihood of mold and insect nests.
Next, dirt and dust are removed from the building, the previous layer of paint is removed, if there was impregnation with an oil solution, and the base is sanded.
The log house is coated with a solution that removes grease, a primer is applied, and left to dry. If there is no preliminary step, the fixative will not be applied in an even layer and will not adhere well enough to the surface being treated.
The next step is laying the polyethylene foam cord. It is necessary to seal the crown space, since it is not advisable to fill the entire gap with a clamp.
Large gaps are first filled with tow and fibers, then polyethylene foam is secured using metal staples. It is necessary to secure the treated surfaces with masking adhesive tape in order to apply the sealant evenly.
Current issues
See also:
Decorating windows with siding from the outside: making slopes with your own hands
There are several common questions that are associated with this insulation and insulation technology.
I'll try to answer them.
- Is there any point in using sealant if the joints are caulked? Yes, it makes sense. The efficiency of insulation will be much higher;
- When is the best time to remove excess? This needs to be done right away. It is undesirable for the sealant particles to dry on the wood. This can ruin the appearance of the walls when scraped. It is better to moisten dried residues with warm water and then rinse with a rag. Do not use abrasives;
- Which side is better to apply a warm seam? It is best to apply the composition on both sides. So the quality of waterproofing will be much higher;
- What compound should I use to treat internal seams? It is believed that any sealant is suitable for these purposes. Not certainly in that way. It is better to use acrylic composition. It is the safest and also environmentally friendly;
- At what temperature is work carried out? Here, each composition has its own limitations. You need to read the instructions. But in general, single sealants allow you to work in cold weather. One of them is Accent 136.
Yes, indeed, many orders had to be completed in winter. And the seams were sealed with Accent.
Characteristics
Compound
Accent 125 is a non-viscous thixotropic paste based on polyacrylate.
The sealant contains the following ingredients:
- Aqueous dispersion of acrylic polymer.
- Special auxiliary substances that improve the properties of the material (to accelerate the process of film formation, improve adhesion, extend service life, etc.).
- Coloring pigments to give the sealant a certain shade.
- Filler to create volume.
Drying time
After applying the sealant, a film forms on the surface within an hour. It will take a day for the 2 mm thick material to harden. Complete polymerization occurs within a week. The sealant can be applied at temperatures of – +5 – +35 degrees. Optimal weather conditions: temperature - +23 degrees, humidity - 60%. The sealant begins to perform its main functions already during the hardening period.
It is not recommended to treat the surface under the following conditions:
- temperature below +5 degrees;
- humidity – above 80%;
- in very hot and dry weather;
- during rain;
- under direct sunlight.
High humidity and low temperatures can cause the sealant to take longer to dry and wash off. Too dry weather contributes to accelerated film formation and the appearance of bubbles and blisters on the surface.
Consumption
The consumption of sealant depends on a combination of three indicators:
- seam width;
- sealant thickness;
- specific gravity.
So, with a material thickness of 5 mm and a seam width of 10 mm per 1 running meter. 100 g of sealant will be required. The instructions provide a formula for calculating the material, as well as a consumption table for standard seam parameters.
The sealant goes on sale in 310 and 600 ml cartridges, as well as in 5 and 10 liter buckets. On average, one bucket with a capacity of 5 liters is enough to cover 70 linear meters.
Service life and storage
The sealant forms a strong and durable coating that perfectly withstands any weather conditions. The manufacturer guarantees a service life of the sealant of at least 20 years.
The product should be stored in a tightly closed container at +4 – + 40 degrees. Shelf life: 2 years from the date of manufacture.
The sealant can be subjected to repeated defrosting/freezing (up to 7 cycles), provided that the cycle is no more than one day. In this case, the maximum temperature should not be lower than -18 degrees.
Single long-term (up to 7 days) freezing of the product is also allowed. Defrosting should be carried out under natural conditions without heating at a temperature of + 22 degrees.
Color palette
The manufacturer offers 13 natural shades, from light larch to dark brown teak and wenge. A wide range of colors allows you to choose the tone for any design and color of the log house. If the buyer does not find anything suitable in the catalog, then he can order custom tinting.
Professional insulation of houses
In a short time and at an affordable cost, he carries out work on insulating houses made of timber and any wooden buildings. We offer our clients convenient service, high quality sealing of building joints, and stage-by-stage payment for work. We accept payment including by card. We work in Moscow, the Moscow region, and surrounding areas. We are ready to consider the possibility of cooperation with other regions of the country.
"Master Srubov" is the official representative of many manufacturers of premium sealants - Ramsauer, Remmers, Wooden Wood, the domestic enterprise "Oliva" and other Russian and foreign companies. When choosing materials for work from those manufacturers whose dealers our organization is, we have the opportunity to offer you the most favorable prices for them. But at the customer’s request, we are ready to work with any materials, including VGT sealant.
Our craftsmen have all the necessary knowledge and experience, and have many positive reviews about their work. But our company’s specialists do not stop there, constantly improving their skills, including on an ongoing basis attending practical classes and seminars from leading manufacturers, getting acquainted with new products and technologies for working with them.
For advice, more information or to order sealing services for your home, please contact our employee by phone. You can also leave a request in the “Contacts” section, and a specialist from our company will call you back shortly.
Calculate the cost of painting and insulating your home right now
Do you have accurate measurements of the house?
I measured it myself. I have a house design. Measurers came. I want to call a measurer.
By clicking on the button, you consent to the processing of personal data
How to properly sand the interior walls of a timber house
Preparing materials and installing a window sill when installing windows in a wooden house
How to insulate a basement yourself
Price
Sealant prices vary widely. The cost of products is influenced by the popularity of the brand and the place of production (domestic or foreign companies). To carry out large-scale work, it is recommended to buy sealant in a large container. It's cheaper than buying several compact tubes. The average consumption of 600 ml of composition in a cartridge is 4-6 linear meters. The cost of the popular German product Remmers is 430-450 rubles.
Eurotex sealant is supplied in plastic buckets of 25 kg, at a price of 7,000 rubles. But this amount of mixture can be processed 250 linear meters. seams.
Cuts and joints
The most labor-intensive process is the process of sealing cracks in the joints of the walls of a wooden building.
To seal cuts and warm joints, the gaps are filled using a spatula with a polyethylene cord of a certain length and thickness.
In many cases this takes a long time. Next, the seam is covered with sealant, leveling the applied product with a damp spatula.
In the case where the joints were impregnated with an oil composition (fire retardant), it makes sense to sand the wood with a grinder in advance, otherwise the sealant will not polymerize properly.