In order for a wooden house to retain its original appearance, be reliable and attractive for many years, it is necessary to prepare it for long-term use. To do this, you need to go through all the required finishing stages, among which one of the main ones is treating the inside of a wooden house with special protective agents. Many owners of wooden log houses believe that if the structure is treated from the outside, treatment of the wooden walls from the inside of the house is not necessary; the wood already has reliable protection. However, this is not the case, despite the fact that indoors the wood is in more favorable conditions, however, it can also suffer from moisture, insects and other negative factors.
No. 1. When can I start interior finishing of wooden walls?
Alas, immediately after the construction of a wooden house you cannot proceed to finishing work. A newly built house must be given time to shrink . The duration of this process depends on many factors . If the house is built from laminated veneer lumber, then you can start finishing the walls in 3-4 weeks , but owners of all other types of wooden houses will have to wait at least 10 months , and for a guarantee - a year.
The shrinkage time depends not only on the material used in construction, but also on the climatic conditions in the region and the initial moisture content of the raw materials. During shrinkage, active drying of the wood occurs, it decreases in size, and the insulation used is crushed under the weight of the logs and beams. It’s easy to imagine what will happen if you start finishing the walls during this period - the facing material will either fall off or become warped. In any case, after a few months everything will have to be redone, and this again means money and effort, so it is better to wait until the main shrinkage processes take place. But you won’t be bored with nothing to do, since it is at this time that it is necessary to ensure the tightness of all joints, which is achieved through proper caulking .
No. 2. Features of caulking the walls of a wooden house
Caulking is carried out in two stages : the first time several months after the construction of the house, the second time after 6-8 months. The essence of the process is to fill the cracks with insulation , which is usually jute or tow . The thermal insulation of the house and its tightness depend on the quality of this work.
Caulking is carried out immediately inside and outside, going around the perimeter of the house and caulking each crown from the bottom up. Each time after this, the structure will rise by 5-7 cm and then settle, compacting the insulation, which will completely fill the cracks. You can proceed to finishing work only when shrinkage occurs after the second caulking. In order to know exactly when it is possible to carry out cladding, it will be necessary to regularly measure the height of the walls: if within 2-3 months the obtained values remain practically unchanged, then the main shrinkage processes have passed, and you can proceed to finishing. The next time caulking is done is after 5 years, and then only if necessary.
Caulking is performed in one of the following ways:
- "to the set." First, long thin strands are made from insulating material, and then they are wound into a ball. The gaps are filled with such strands, and the larger the gap, the greater the number of strands needed;
- "stretched" . This method involves the use of individual strands, which fill the gaps. A roller is formed from them, which is pushed into the gap.
To perform caulking you will need a simple set of tools : a hammer, chisels, a rubber mallet and a caulking spatula.
No. 3. Nuances of choosing finishing material for wooden walls
A distinctive feature of wooden walls is their ability to maintain optimal temperature and humidity levels inside the room. To preserve these unique properties, it is necessary to use natural materials . The choice of a specific material is influenced by many factors:
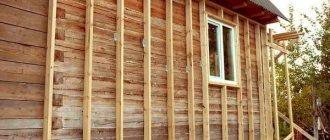
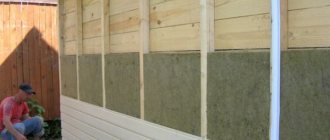
the climate of the region and whether the owners of the house will live in it permanently or only in the summer . If the climate is mild or you plan to relax in a wooden house only in the warm season, then you can do without additional finishing materials and admire the natural beauty of the log house, although do not forget to cover it with protective agents. If the house will be used constantly, and the winters in the region are cold, then it is better to use finishing, and install it on the sheathing, so that insulation is used between the wall and the cladding;
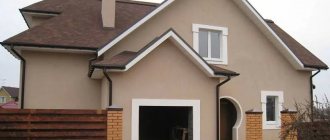
condition of the house . The walls of a brand new wooden house have an attractive appearance, beautiful texture and color, so if possible it is better not to hide them under decoration. In this case, it is better to sand the log or timber and tint the surface. For this, water-based paints , which do not paint over the color of the wood, but only give it a certain shade, or tinting antiseptics . Antiseptics will still have to be used in order to preserve the original appearance of the wood for a long time and provide it with reliable protection. Varnish can also be used, but more often it is used to cover floors. If the walls are old and already have an imperfect appearance, then it is better to hide them under the decoration. The lining is perfect , in particular the one that imitates a log house - a block house;- features of the room . In some rooms, wood walls can be covered with tile, stucco, or even drywall and siding. Of course, this is only justified for kitchens and baths to ensure maximum protection for the wood.
Lining, drywall, wall panels and many other finishing materials are attached to wooden walls using lathing ; it is best made from wooden beams. insulation is placed in the sheathing , but if the house is not cold and little money is spent on heating, it is better to do without additional thermal insulation and vapor barrier, because wood itself copes with these tasks perfectly, and excess materials can only upset the natural balance. It is better to leave the space between the wall and the cladding free, ensuring normal air circulation , which is very important to prevent wood rotting. The resulting gap behind the finishing material can be used to organize communications , incl. electrical wiring. When it comes to wooden walls, electrical cables must be laid in non-flammable pipes, so a fair amount of space will be required.
Regardless of what material is chosen for installation on the sheathing, it is necessary to leave a gap to the ceiling of 2-4 cm . If the house was recently built, this will become insurance against shrinkage, and for an old wooden house - in case of changes in the geometry of the wood, because this material absorbs moisture and releases it throughout its entire service life. The gap will allow the wood to breathe calmly without disturbing the cladding. To prevent this safety distance from being replaced, the plinth is attached only to the surface of the ceiling and leaned against the wall.
Types of compositions
How to cover the lining inside a house is an easily resolved question, because there are many products on sale for different climatic zones and types of buildings.
Composite impregnations are designed to perform several functions, the main ones of which are the following:
- decreased flammability,
- protection against microbes,
- improvement of appearance,
- increasing mechanical strength.
There are products designed primarily to protect the lining, and compositions created for a decorative effect. Many drugs perform multiple functions equally successfully.
No. 4. Painting or varnishing
If possible, it is better to leave the wooden walls inside without finishing at all, because they already have an excellent appearance - it is better not to spoil it unless absolutely necessary, but only to emphasize it. For these purposes, paints, antiseptics and varnishes . Only not very aesthetic caulk seams , but in this case there is a way out - they can be sealed with a twisted cord . It turns out very original and cute, and the cord will also serve as additional protection from drafts.
Before varnishing or painting, it is important to properly prepare the walls . The initial stage is grinding . Many are afraid of this process, fearing to disturb the natural texture of the wood, but if everything is done correctly, the appearance of the walls will only improve. Sanding helps get rid of cracks that may have occurred as a result of shrinkage. After this, treatment is carried out with antiseptics , which prevent the appearance of fungus and mold, and with film-forming compounds (varnishes and oils), which create a reliable protective layer on the surface of the wood, protecting the material from dirt, darkening and mechanical stress. It is also advisable to use fire retardants - substances that increase wood resistance to fire.
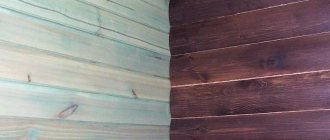
The paint can be glazed or tinted . The first option is used when it is necessary to preserve the natural color of the wood, but give it a certain shade. Paints with a dense color shade completely cover the color of the wood, but before painting the entire wall or part of it, it is better to try applying the material to an inconspicuous area of the wall. If it is necessary to hide the relief of the tree, then a primer is used for painting.
Most often, the following compositions are used for painting wooden walls:
Water-based acrylic paints are ideal. These are safe and environmentally friendly materials that form an elastic, durable coating that allows the wood to “breathe.” The structure can be transparent and dense. Disadvantage – high price;- alkyd paint allows you to provide wood with additional protection from fungus and moisture. The material is resistant to temperature changes and frost, is inexpensive, but such a coating dries for about a day, and then an unpleasant odor may persist for several more days;
- Oil paints are being used less and less for finishing wooden walls. They are well absorbed into the wood, due to which it receives additional protection from moisture and dirt. The coating is safe, has a lot of rich shades, but it dries for about three days, and over time it may turn yellow.
The use of nitro paints and polyurethane paints is strictly not recommended - they violate the environmental friendliness of wood.
An alternative to paint is varnish . They have a transparent structure and do not hide the natural beauty of the wood, but now there are also tinting varnishes on sale that can slightly change the shade of the wood. According to the type of surface obtained, varnishes are divided into matte and glossy - depending on who you like. If necessary, the transparent varnish can be tinted. Another good option is wax , it allows you to get a velvety, glossy finish.
All described coating options can also be used to decorate lining . Do not forget that it is necessary to treat wood with protective agents even if you use lathing and facing material.
Manufacturers of wood treatment products
Not all products on the market are of the highest quality. But there are a number of manufacturers who have been receiving positive recommendations from consumers for several years. Among the many offers on the market, the following brands of varnishes and wood paints stand out:
- Finncolor (Russia). Acrylate gloss and semi-gloss varnishes are easy to dilute with water while working. Pigments can be added to them. They are great for covering ceilings, walls, niches, door openings, and windows. Not for use on floors or furniture. The main function of protection is to stop the natural destruction of wood, to create a barrier when dirt, moisture, and harmful microorganisms (mold, mildew) get on the surface. Average costs - 1 liter per area of 5-12 square meters. m. Blend – 9 l. Approximate price – 2000 rubles.
- Composite (Russia). A quick-drying varnish without color or pungent odor is suitable for walls, ceilings, wood materials such as lining, non-laminated chipboard, fibreboard, OSB and MDF. One liter of product will cover an area of 8-12 square meters. m. Price for 1-3 liters – from 300 rubles, 10 liters – 2200 rubles.
- Commander (Finland). Varnishes with a ready-made coating of varying degrees of gloss. They are environmentally friendly, do not have a sharp specific odor, and can be used in children's rooms. The layer of varnish on the lining easily repels dirt and water and does not absorb fats. Consumption – 1 liter per 8-12 square meters. m. Small containers of 0.9 liters priced from 350 rubles. Medium (2.7 l) and large (9 l), respectively, cost more.
- Eurotex (Russia). The “Sauna” modifier is an ideal solution for rooms with high humidity. The product is used for bathrooms lined with lining, kitchens, baths, saunas. The composition contains wax, densely distributed over the surface, capable of withstanding high temperatures and humidity. The average price for 2.5 liters is 500 rubles.
- Colorex (Sweden). “Panellac” is an excellent primer for processing lining from new boards and an ideal finishing coat for already finished euro lining. Can be used on walls, ceilings and even furniture. Well protects wood from discoloration and aging, scratches due to mechanical stress. It has a hardening effect on wood. For 8-14 sq. m. only 1 liter is spent. Cost for 0.9 l - 750 rubles, 2.7 l - 1800 rubles, 9 l - 5000 rubles. “Supisauna” is an effective matte varnish for rooms with high humidity. Protects the lining from rot and darkening. Prices - 600-4000 rubles, depending on the volume of displacement.
- Belinka (Slovenia). Due to the fact that there are no biocides in the composition, the paint can be used inside the house. Thin-layer and colorless coatings are suitable for wood. They only give a matte shine. Very economical consumption - for 3 layers of 10-12 sq. m. area is enough for 1 liter. The approximate cost for 1-2.5 liters is from 600 rubles.
- Pinotex (Estonia). The “Interior” collection was released specifically for treating surfaces inside the house. The impregnation is a transparent, odorless liquid that is easily distributed over the surface of the lining. Composition: alkyd resin, light-resistant pigments, water. Blend volumes – 1.3-10 l. Costs on average are 1 liter per 8-16 square meters. m. Price – from 650 rub.
Translucent varnish “Commander” Source ales-spb.ru
Belinka brightening varnish is applied in one layer over untreated lining Source bsm21.ru
Varnishes and paints are applied with a brush and a roller made of a fur coat. On large areas, the lining is processed using special pneumatic devices - spray guns. They allow you to distribute the product evenly by spraying.
Consumption! The amount of material spent depends on the quality of the board, the number of layers, as well as the primary processing. The very first layer will be absorbed fastest and most deeply. If the structure of the wood is too “porous”, then the varnish or paint on the first layer goes deep into the microspace between the fibers.
No. 5. Lining for finishing wooden walls
Most often, lining is used to decorate wooden walls - a completely natural material, a type of cladding board, which is made from different types of wood. Environmental friendliness is not the only advantage of lining. This is an inexpensive and easy-to-install material with excellent decorative qualities. Lining, unlike, for example, drywall, can withstand loads - you can hang something on it.
For internal wall cladding, you can take 1.5-2 cm thick - it copes with its tasks perfectly, is inexpensive and weighs little. Thicker material will require powerful lathing, which will take up a lot of free space. The lining slats can be mounted horizontally, vertically, at an angle, or used in different directions at the same time, creating beautiful panels.
Lining can be made from different types of wood , but the wood is well dried beforehand (humidity should not exceed 12%). Deciduous trees (birch, ash, linden) can be used in any premises, incl. and in the bathhouse (linden, alder), and cheaper conifers are suitable only for living rooms, since they release resin at elevated temperatures. Experts advise, if possible, to select lining from the same rock from which the house is built. In this case, the walls and trim will have approximately the same expansion coefficients.
The lining is made from edged boards - boards from the core are less durable and are not suitable for these whole ones. Based on the quality of wood, lining is divided into the following classes:
- extra - material without cracks, knots and other defects, with a uniform color;
- class A. One knot or blind crack is allowed for every 1.5 linear meters;
- class B is a lining, 1.5 linear meters of which can have 4 knots and 2 resin pockets. The presence of contrasting spots is also allowed;
- class C - This is a lining with a lot of spots of stripes, cracks, resin pockets and knots. Not suitable for wall cladding.
The surface of the lining can be as follows:
- flat _ Only such lining was previously sold. Looks good, but many may find it boring;
- softline - almost the same flat paneling, but with rounded edges;
- block house - a lining that imitates a log house. This is an ideal option when it is necessary to preserve the style and atmosphere of a wooden house as much as possible;
- panel - imitation of timber cut from a log;
- American - lining with a wedge-shaped profile, due to which the wall will look as if the panels were overlapped.
Before installation on the sheathing, coniferous lining can be deresined with special means or a 25% acetone solution. If necessary, you can lighten contrasting stripes and spots.
All modern lining has special fastenings that facilitate its installation. Do not forget to leave 2-4 cm gaps at the top and bottom to compensate for the expansion of the wood. Previously, the lining was fastened to the sheathing with nails, which were driven into the front surface. At best, finishing nails or nails without heads were used. Today, for installation, they use clamps or drive nails at an angle into a tenon or groove.
No. 6. Wall panels
Thanks to the use of wall panels, walls can be transformed beyond recognition and completely any design idea can be realized; with their help, only certain areas are often decorated: above the bed, kitchen apron, near the bathroom. Wall panels are made from different materials:
- wood and bamboo;
- veneered and laminated MDF;
- glass (transparent, frosted, printed);
- leather;
- plastic.
Panels can be type-setting or panel . Stacked ones have a large length and a small width, and are connected according to the tongue-and-groove principle. Wooden lining , in fact, belongs to panel wall panels, but its wide distribution and unique properties have made it possible to distinguish it into a separate class of finishing materials. Panel panels already have a more comparable length and width.
Wall panels are attached to the lathing, the pitch of which depends on the parameters of the finishing material. The variety of designs cannot be described in words, but not all such panels meet the requirement of environmental friendliness: leather and glass will not disturb the microclimate, which cannot be said about plastic panels. However, even plastic panels , incl. and plastic lining have the right to be used for finishing a bathroom, toilet or kitchen.
Useful video
An advertising video listing the entire range of paint and varnish products that could be used to treat a steam room in a bathhouse:
***
You may also be interested in materials about the steam room, where we talk about finishing the steam room and separately about finishing it with your own hands, about insulating the steam room, and electrical wiring in it. And for those who are just starting to build their own bathhouse, it will be useful to learn about the structure of the steam room, its design, the layout of the bathhouse as a whole, the ergonomics of the steam room and its optimal size.
No. 7. Drywall
Drywall for cladding wooden walls is used quite rarely for obvious reasons. Its use is justified when it is necessary to erect a partition , hide communications , or when the surface of the wood has significant defects. Installation of plasterboard sheets is carried out on a frame , for the construction of which you can use a wooden beam or a metal profile; you cannot do without gaps near the ceiling and floor.
Finishing with plasterboard can only be done after the house has completely settled and provided that the room is heated in winter. Gypsum is a sensitive, fragile material that can become severely deformed when walls shrink or undergo sudden temperature changes. To extend the life of such a finish, you can use a floating frame , and glue all sheet joints and corners with a reinforcing polymer mesh . To decorate the walls in the kitchen and bathroom, you must use moisture-resistant plasterboard.
Why do you need to paint?
Many owners do not paint the walls of their house. Logs look quite aesthetically pleasing, giving the premises a colorful look, but special processing of wooden structures is still necessary. This is done for a number of reasons:
- The use of specialized mixtures will help reduce the risk of fire.
- Preventing the process of rotting. By covering the wood with special solutions, you can preserve it in its original form for a long time.
- The paint coating prevents the appearance of various mechanical defects.
- Coloring will hide minor imperfections in the material.
- Applying a paint coating will prevent the appearance of various wood beetles and parasites in the wood.
No. 8. Stone, tiles and plaster
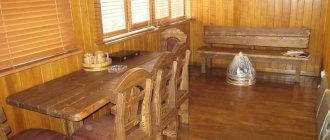
Artificial and natural stone, as well as tiles, are environmentally friendly materials that will not disturb the microclimate of a room with wooden walls, but they are rarely used as the main independent cladding. Stone, for example, is suitable for finishing the area near the fireplace , tiles will be appropriate for bathrooms and kitchens . By the way, tiles and artificial stone can imitate wood so accurately that the appearance of the house will not suffer at all.
Wooden walls plastered , but individual plaster compositions that withstand moisture and high temperatures can be used to decorate a kitchen or toilet work area.
Wood bleaches
Bleach is used to treat already infected wood and prevent it from darkening. They come in different types; in Russia they usually use chlorine, oxygen, oxalic acid-based and combined ones. Their task is to neutralize the infection and decay that has begun. It must be remembered that even high-quality wood materials that have been dried and processed in a factory can develop fungi if they are stored outdoors. However, this may not affect the appearance. But the wood will continue to deteriorate after construction. Therefore, experts recommend treating all materials that will be stored for a long time with bleach for prevention.
No. 9. Features of the interior decoration of old wooden walls
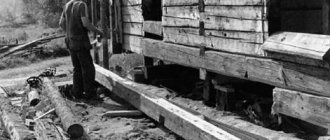
Finishing work in an old house made of timber or logs is preceded by dismantling the cladding and assessing the condition of the wood. All light and dark spots, areas that differ in texture and structure must be checked for strength with a chisel, screwdriver or knife. If there are no signs of destruction, then all that remains is to coat the wood with protective compounds and begin finishing work.
When the wood has lost its strength in places, crumbles or dried out, it is better to consult with a specialist who will help determine the cause (insects, fungus, microorganisms) and select a set of measures. Most likely, damaged parts will have to be replaced, paying special attention to treating adjacent areas with antiseptics. After the restoration work has been completed, you can proceed to finishing, choosing one of the options listed above. The main advantage in this case is that there is no need to take shrinkage into account.
Preparatory work
After sanding, the wood absorbs protective compounds better.
Compounds should not be applied to old paintwork, dirt, tar or damaged timber. Before treating a wooden house outside and inside, the surface is prepared. Old paint or varnish is heated until softened and removed with a scraper. Then the log house is polished with a special machine. The procedure allows you to remove unevenness and defects, dark spots, and improves the appearance of the material. Removing the top layer opens the wood pores, allowing deep penetration of the impregnation. Grinding occurs with coarse and fine abrasives. After the procedure, the surface and surrounding objects are cleaned with a vacuum cleaner.