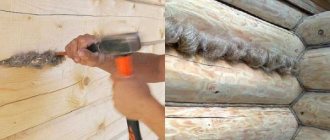
Wooden lining is often used for interior or exterior decoration of housing. Its main advantage is the excellent type of coating with the highest environmental friendliness. Particular attention should be paid to the type of product, as well as the type of finishing material. This will make it much easier for the individual panels to fit together lengthwise and with each other. The article describes how to properly fasten the lining and what nuances should be taken into account so that the fastening retains its strength for a long time.
Mounting methods
We will look at how to properly fasten the lining to a wooden frame in different ways. Each of them has its pros and cons, so please read all the information below carefully.
Option 1 - using finishing nails
This fastener for lining is traditional and has been used for several decades; for this work we will need special nails with a reduced head. The length should be such that 2/3 of the nail fits into the bar; most often, products with a length of 30 to 40 mm are used. The price of 100 grams is 40-50 rubles, so this is also the cheapest method of fastening.
Finishing nails - the most budget-friendly solution
Let's figure out how the lining is attached in this case:
The first installation option is fastening into a groove, that is, into a recess on one of the sides; in this case, the nail is driven in at an angle of 45 degrees and covered with the next element. Below is a diagram of this technology;
This is what the groove mount looks like
You can also fix elements through a tenon; below we show how to properly fasten the lining with nails in this case. Here the nail is also covered by the next element, ensuring the perfect appearance of the finish;
This method is even simpler, but it is suitable for materials with a wide tenon
- Having chosen the option that you will use, you can get to work. Before attaching the lining to the wall, it is necessary to cut the elements to the required length so that there are gaps of several mm to compensate for deformations of the material due to temperature changes;
- The first element in the corner on one side is fixed through the top; anyway, the corner is covered with a plinth or other decorative element. On the other side, a nail is driven into the tenon or groove; this is done very carefully so as not to split the material or damage it. This way you can finish walls and ceilings quickly and reliably.
Remember that when fastening into a groove, the nails are located at an angle
Option 2 – use of clamps
It is impossible to discuss the question of how to fasten a wooden paneling without mentioning the clamps, which are special staples that are placed on the tenon of the elements and secured with nails. For lining, option No. 4 is used, and for block house and imitation timber - No. 5. The products are sold in packs of 100 pieces and cost about 50 rubles per pack; carnations are included.
The photo clearly shows how fastening is done using clamps
Instructions for doing the work yourself include the following steps:
- First, the number of fasteners is calculated, they are located on each edge of the frame, you need to multiply the number of structure edges by the number of lining panels;
- The location of the clamps when the elements are arranged vertically does not matter, but if the finishing is located horizontally, then they should be at the bottom;
It is important to position the fasteners correctly
The working process is very simple: the lining is put in place, fits well with the previous element, after which clamps are placed and secured with small nails. To make it easier to hammer them in, use a spacer.
Clamps can also be screwed on with self-tapping screws
Option 3 - use self-tapping screws
If you are thinking about how to fix the lining to the wall as securely as possible, then self-tapping screws are best suited
Their use is associated with some difficulties, but the fixation strength will be maximum, and if necessary, the finish can be disassembled without damaging it, which is also important
For work, fasteners of small thickness are selected
The workflow in this case looks like this:
- In the groove connection of the lining, holes are drilled at an angle of 45 degrees with a 3 mm thick drill;
- The element is attached to the sheathing, tightly joined, after which a self-tapping screw is screwed into it. The work should be done very carefully: the cap should sink into the material so as not to interfere with the joining, but at the same time you should not press too hard so that the wood does not crack.
In this case, accuracy is important
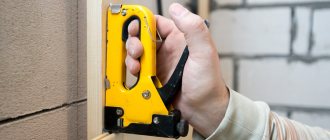
The question is often asked about what to attach PVC lining to; in this case, all of the above options are suitable. In addition, you can use a simpler option - a construction stapler, it is perfect for plastic.
Before attaching PVC lining, stock up on a stapler and staples
Tricks when working with lining - advice from an experienced carpenter
Covering walls and ceilings with wooden clapboard is one of the simplest and cheapest methods of interior decoration.
Lining is not a scarce commodity, and its use does not require professional skills or complex tools. However, as in any business, there are subtleties and peculiarities here. Dmitry Tokarev shares some of them. Wood is a capricious material. Even if you buy the lining in a package during the dry season and make sure of its ideal geometry, do not rush to rejoice. In a room with new temperature and humidity characteristics, this material quickly takes on the shape it needs, not you. The longitudinal planes are bent, and the worst trick is to tighten the paneling with a screw.
Trick 1 – Conditioning the lining
My first trick. Having printed the lining, I put it in piles, lay it with spacer boards and tape it together along the edges and in the middle. Sawn strips of fiberboard are convenient as spacers. In this form, the lining remains for 6-7 days in the room where it is planned to be used. In the future, the geometry of the aged material will not float away.
EVERYTHING YOU NEED FOR THIS ARTICLE IS HERE >>>
Trick 2 – Crooked lining
And yet crooked lining comes across. During installation, it does not obey and fits into the joint with difficulty. For installation, it is sometimes necessary to apply impact forces, and this can lead to damage to the fragile side ends.
ADVICE It is easier to install curved lining in places where it will come in pieces - corners, window openings, short partitions.
If, after all, the curved lining is long and needs to be driven into the groove of the previous one, I use a simple tool. The weighty beater is assembled from a 60 * 60 mm block and a wooden railing trimmed from a staircase. As practice has shown, working with such a mallet is a pleasure. It is especially convenient when working on the ceiling. The impressive width of the impact surface does not allow the side end of the lining to be crushed. You can hit with all your heart - even the most obstinate lining will fit tightly into the groove.
Trick 3 - so that the lining does not warp
It’s easier and faster to fasten the lining with nails with a small head.
However, this is not always the best option. In rooms with variable humidity (baths, bathrooms, open verandas), lining fixed in this way begins to swell or dry out over time. And no nails will hold it.
A lining that is completely dry to the touch, unpacked and immediately installed, can shrink up to 12% in width. Unfortunately, to correct such defects, the work will have to be redone.
Outdoors, the situation can be even more complicated: the lining gets wet and swells so much that it comes off, squeezed out by its closest neighbors. The torn element will no longer fit back into place, so it will be necessary to trim (move, reattach) it or the remaining planks.
In saunas and steam rooms, clamps are often used when finishing: in rooms with high humidity, rusty halos and streaks stretching down quickly form around the heads of nails and screws. In addition, you can get burned on protruding metal parts.
TIP: Before using the clamps, they should be wiped with a dry cloth to remove a layer of protective lubricant and metal dust. Otherwise, you can stain the snow-white linden lining, which will not be easy to wipe off.
Trick 4 – to avoid chipping
Chips and burrs around the heads of screws can be avoided if you pre-drill a hole with a diameter of 3/4 of the diameter of the screw at the fastening point. In this case, it will tighten so that the head is pressed into the body of the wood without the formation of defects.
If there is a large amount of work, this operation can be simplified - just mark the place of fastening with an awl. We insert an awl and countersink the injection site in a circular motion.
Trick 5 – lining with screws...
In rooms with unstable humidity, it is advisable to fasten the lining with self-tapping screws: screw it on and it won’t go anywhere. And so that the heads of the screws do not spoil the appearance, you can use yellow screws 41-45 mm long. Curled exactly under the cut of the wood, they are almost invisible.
Trick b - pin in the clasp A small nail securing the clasp is nailed close to the edge, so there is a high risk of hitting the edge with a hammer and leaving a dent or chip. For comfortable fastening of the clamp, a small 50 mm pin or a center punch with a sharpened tip will help.
Trick 7 – spacers for fastening clamps
In places where a perfectly flat surface or corner joint is required, I use thin spacers for the clamps. It is convenient to make them from pieces of fiberboard left after drying the lining. It has a layered structure, and with the help of a mounting knife it is easy to cut off excess layers, achieving the desired thickness.
The use of clamps is appropriate for lining made of linden, aspen and other noble wood. But pine lining, which is prone to drying out, will easily disengage with the clamp. If a gap is too large, the soft blade of the clamp will not be able to keep the lining from falling out. In this case, a simple nail is preferable.
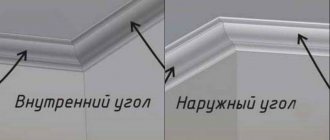
If the walls do not have a plane, such as the walls of a log house, then it may be impossible to nail a regular plinth tightly, which is why gaps remain. In addition, at corner joints the skirting boards may not meet due to deviation from the right angle in all three of its planes - two walls and the ceiling.
Door trims can also be made from clapboard. This way you can save on expensive figured elements made of linden, which, moreover, are not on sale everywhere. Using a plane, carefully remove the side grooves of the lining at an angle - and you get an excellent platband!
TIP: Instead of a plinth, it is better to use a flat platband. It will always lie tightly against the wall - at any angle of the log’s circumference. There are no such platbands on sale, but they are easy to make from clapboard.
Trick 8 – masking the chip
It happens that in the most visible place when connecting a groove with a tenon, the latter breaks off. The cosmetic defect can be removed by inserting a sliver of appropriate thickness into the existing gap between them.
Was there not enough lining or a whole number of it did not fit on the wall? You need to cut and fit the desired piece. Or maybe that's okay? If we sewed in the right direction, then the remainder of the unsewn area will be covered by another element - a platband, for example.
TIP: We always sew the lining from the corners to the center, where there are door or window openings.
Trick 9 – masking leaks
Leaks at the junctions of the planes of walls and ceilings can be easily covered with decorative elements.
TIP: If you need to insert the last plank by adjusting its width, do it in the least visible place - where the boards have a minimum length.
Trick 10: Disguising a chip from a self-tapping screw
It often happens that a self-tapping screw screwed into the edge of the lining splits the wood. If the crack is small, then by loosening the screw back a little, you can reduce the defect to the point of being invisible. If this does not help, I drive a small nail into the end of the split paneling at an angle towards the crack. The two halves are pulled together, making the crack barely noticeable.
And here the screws are screwed into the very edge of the lining - and not a single split board. Don't be lazy to drill holes for the screws. By the way, screws screwed in at the very edges of the joints of two planes will close the baseboard.
Trick 12: Masking the joint behind the pipe
If a thin pipe comes across as an obstacle, then you can make sure that the joint of two adjacent boards hits the pipe. It is easier to cut a semicircle to go around the pipe from the edge of each board.
And here is an option to bypass curved obstacles. Thick twine as a decoration successfully covers the joint with the log and creates the complete illusion of a log stitched through with clapboard.
I hope my tricks will help the reader decorate their home carefully and at minimal cost.
Installation of eurolining on walls or ceilings
Leading product manufacturers usually indicate how to fasten eurolining in the instructions included with the packaging. The sequence of work is as follows:
- A preliminary division of the sheathed surface into rectangular zones is carried out. This allows the boards to be optimally laid during the sheathing process.
- The required number of fastening brackets - clasps - is prepared. It is believed that 20 pieces are required per square meter of eurolining, but it makes sense to purchase clamps with a margin of 5-10%.
- Eurolining is installed from the bottom corner of the room, where there are no door or window openings. At the same time, horizontal placement of boards visually lengthens the room, and vertical placement makes it taller.
- The direction of laying the material is determined by the method of finishing the ceiling and floor: when subsequently installing skirting boards, it makes sense to move from top to bottom, and in the case of finishing with eurolining and the ceiling - from bottom to top.
When purchasing clamps, pay special attention to their quality: the clamps should not have traces of mechanical surface damage, dimensional instability, uneven thickness, etc.
It is important that when installing eurolining, clamps with a thickness of no more than 1 mm are used. The fact is that the panels of this material are thicker, and the reduction in the area of the room after covering will be more significant
It is unacceptable to use clamps that do not have a protective anti-corrosion coating.
The fact is that the panels of this material are thicker, and the reduction in the area of the room after covering will be more significant. It is unacceptable to use clamps that do not have a protective anti-corrosion coating.
Finnish
This is a rather interesting version of the lining. If the owner prefers smooth lines that convey tranquility, then this finish will be the ideal solution. The front side has no sharp corners or lines. The profile has a slightly rounded shape, but its radius is minimal. Thanks to this material, it is easy to create a feeling of comfort and warmth in the home. Both vertical and horizontal laying of such lining is allowed. Moreover, in the second case, you can visually expand the space due to the joint lines and wood pattern.
Horizontal mount
Wooden panels are rarely mounted in this position, but if the need for this configuration does arise, then it is advisable to initially prepare a special false beam. This material is better suited for horizontal fixation than standard eurolining. False timber differs from traditional models in size - thickness 2.2 cm, width on average 14 cm, and length varies from 2.1 to 6 m.
Now you can consider how to fasten the lining horizontally to ensure the same reliability and attractive appearance. First of all, a sheathing is provided on which the sheathing is attached. It can be fixed without the use of hardware - as a rule, your own fastening system is sufficient. But there are also differences in panels designed for horizontal fastening. There are chamfers on the edges of such timber. The installation features are due to the fact that the material should imitate the surface of a classic beam, so during joining there is no intermediate groove.
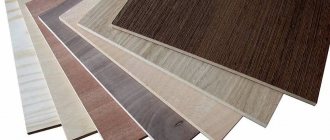
What do you use to cover it with?
This kind of cladding is now made from 3 materials:
- Plastic.
- MDF.
- Tree.
Plastic and MDF cladding are often of the same type, but with wood it is a little more complicated; in addition to wood species, the lining is also divided into classes and types.
Plastic lining
The width of the planks varies from 100 to 380 mm, and the length from 2000 to 6000 mm. The thickness varies around 10 mm.
PVC lining is most often used; it has a wide range of models and a reasonable price, but there is one serious drawback: polyvinyl chloride fades in the sun. Acrylic panels are more expensive, but they do not fade, plus the colors are brighter and the material itself is stronger.
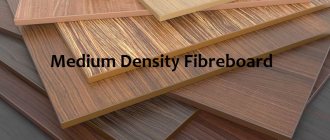
MDF planks
MDF planks are used only for interior decoration, but unlike plastic, they cannot be installed in wet rooms.
Modern MDF lining differs from laminate flooring in its density, but otherwise these materials are similar.
Wooden lining
This cladding is regulated by two standards:
- Domestic GOST 8242-88.
- European DIN 68-126/86.
As for wood species, linden, spruce and pine are considered popular. Elite finishes include oak, larch and Karelian birch.
The name eurolining does not guarantee that the material was made abroad. It’s just that the planks are made according to the DIN standard, and they could have been made at the nearest sawmill, which has the appropriate equipment.
- Dimensions according to domestic GOST . In stores, the length of wooden lining ranges from 1500 - 3000 mm, the minimum width is 76 mm, the maximum is 200 mm. The thickness depends on the configuration, so thin strips such as Standard, Shtil, etc. have a thickness of 12 - 16 mm, and semicircular lining (Blockhouse) reaches 40 mm.
- Dimensions according to DIN standard. The most common length of eurolining is 2.7 m, width 80 - 120 mm, and thickness 12.5 - 19 mm.
In theory, both of the above standards allow for the production of planks up to 6 m long, but due to difficulties with transportation, such material is usually made to order.
The configuration of the planks is also very different, both in price and in appearance:
- Standard, Shtil and Softline are considered the most popular and affordable.
- Eurolining is the same Standard, only with different sizes.
- Semicircular lining or Blockhouse is more expensive, now this model is very popular.
- Landhouse and American models are considered specific in the domestic market. Their price is average, but their popularity is lower than that of traditional lining or Blockhouse.
Contours of different types of lining in section and appearance in the photo
Features of lining installation
In most cases, lining panels are not attached directly to the wall, but to the sheathing, which eliminates the occurrence of deformations and premature destruction of the finish.
The distance between the bars should not exceed 60 cm
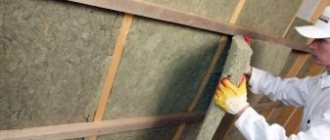
Between the beams of the sheathing, as a rule, heat and waterproofing material is laid.
The thickness of the bars depends on the thickness of the insulation
Several lamella layouts are used:
- Vertical. Laying begins from any corner (preferably in the direction from the light, so that the joints of the panels are not obscured), the first board is installed with the groove outward. This scheme is used when finishing rooms with high humidity (baths, saunas, opening verandas), since moisture is less likely to accumulate in vertical seams.
- Horizontal from bottom to top. The panels are positioned so that the groove points up and the tenon points down.
- Horizontal from top to bottom. The groove looks down and the tenon looks up.
- Diagonal and combined. Complex designs can give a unique look to a room, but require professional execution.
Fastening elements must not only securely fix the parts, but also be as inconspicuous as possible so as not to spoil the appearance of the decorative coating. In practice, several types of fixing the lining to the sheathing are used.
Types and features of material
The origin of the name of the material has its own history. Previously, freight cars were finished with such groove boards. For other purposes, the material was practically not used, not to mention the cladding of living quarters.
However, over time, they learned to use it for finishing baths and saunas, which provided comfortable operating conditions for the room, since the surfaces did not heat up to such high temperatures as the air (how to line a bathhouse with clapboard?).
Lastly, the panels migrated to the interior of residential apartments, in particular for finishing the kitchen, hallway and corridor, but the name “lining” is used to this day.
Depending on the type of wood, the panels are:
- conifers, usually pine;
- fake;
- alder;
- from larch.
Different types of wood have different properties, so they may not be suitable for exterior decoration or use in rooms with high humidity, such as larch or cedar.
By standard size there are:
- narrow canvases with a thickness of 13 cm;
- wide stripes up to 24 cm;
- thin from 1.5-1.9 cm;
- increased thickness up to 2-2.5 cm with a shortened tongue.
Important To choose the right material, you should take into account not only the type of wood, but also its size. This way you can save a lot if you correctly calculate the dimensions of the room.
here
Categories:
- block house with a rounded surface contour;
- American - with several grooves on the inside of the profile;
- regular with different widths;
- Eurolining with standardized dimensions.
Type of veneer covering:
- MDF;
- PVC;
- tree.
Lining made of wood or MDF belongs to the category of wooden or natural panels, and PVC belongs to plastic or artificial coverings.
The following classes of panels are distinguished:
- A;
- IN;
- Extra.
The differences between the material of each category are the presence of knots, their number and type.
- Category A lining has a small percentage of these formations that do not fall out over time.
- Group B includes materials of the lowest quality, most often for rough or facade finishing.
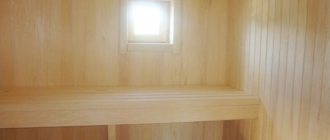
- The highest quality panels are in the Extra category, where not only are there no knots, but the surface of the material is perfectly smooth. Such products are intended for cladding inside saunas and baths.
Based on surface type, materials are divided into:
- processed;
- unprocessed.
Advice If the board already has some kind of protective coating, then it is very difficult to repaint it without damaging the existing appearance. If you need to implement your own design using various means and compositions, then it is better to purchase untreated panels.
We invite you to watch a video about the types of lining:
What to consider when choosing
The first step is to decide which lining profile will be used. It is important to combine it with the interior that is planned for the room. Eurolining goes well with almost all types of finishing materials. In addition, it is necessary to decide whether the finishing will be done in fragments or all planes will be covered with clapboard. This is necessary to calculate the required amount of material. The latter is performed by dividing the total area of the cladding by the area of one lining strip.
Next, you need to decide on the type of wood that underlies the lining. If we are talking about the need to finish the interior of a regular room, then you can easily use coniferous wood. Their advantages have been described above. In this case, it is necessary to check whether the wood has been dried correctly. Otherwise, excess resin may eventually appear on the surface and leave yellow stains. When finishing the steam room, it is better to choose hardwood. This is due to the same resins. At high temperatures, they can protrude to the surface, leading to burns.
All types of lining are divided into classes. Budget options have various disadvantages such as chips, cracks or a large number of knots. For some types of interior this may be acceptable, but in most cases it is better to pay attention to class “A” and “premium” lining. There are no imperfections in them and the sanding is done in the best possible way. Tips for installing lining are in the video below.
Creation of sheathing for lining
Lathing under the lining with your own hands is impossible without preliminary marking.
To do this, use a building level and a pencil. You need to decide on the direction of the lining in advance.
It can be placed vertically - this visually increases the height of the room, or horizontally - it expands the space.
As an option, you can use a mixed finish or diagonally. In any case, the bars must be perpendicular to the chosen direction.
Video - how to attach timber to concrete:
The choice of lathing step width depends on your goals. Of course, the smaller it is, the stronger the structure, but the higher the price. Typically used from 40 to 60 cm.
If you will also insulate the room, take into account, first of all, the size of this material.
In this case, the pitch of the sheathing should be slightly smaller than the insulation so that it fits more tightly.
To make the frame even, we will use a fishing line and a plumb line. Using the building level, we will use the tools described above to create a visualization. We will install bars along these edges.
The fishing line will serve as a guide. Depending on the chosen direction, it is pulled either horizontally or vertically. The bars are fixed close to these guides. If necessary, add wedges or wood chips, or, conversely, grind down the surface of the wood.
You can use a laser level in place of the fishing line.
If there are window or door openings around the perimeter, it is mandatory to secure the bars around them.
When you secure the structure, do not forget to check the level.
Installation of the frame on the ceiling is carried out in the same way as on the walls. The only thing is that a beam of slightly larger diameter can be used. This is due to the difference in the thickness of the insulation used.
If you are going to sheathe semicircular or oval rooms, do not use solid timber. In this case, carefully monitor the proportions.
Video - how to install correctly:
https://youtube.com/watch?v=-qXMF7ZpSSs
Features of installation of cladding in steam rooms under lining
The lathing for the lining in the steam room is done according to special rules.
First you need to attach foil to the walls.
It traps steam. It also implies the use of larger rack bars.
In order to install slats of a smaller diameter, recesses are cut out in the larger ones, where they are placed
This method allows you to create greater rigidity, which is especially important in such conditions.
Due to the harsh conditions this frame will be exposed to, the wood may become warped. By using this design, the likelihood that the finish will float is practically eliminated.
Features of installing lathing on the walls of log houses for lining
How to make lathing for lining on the walls of log houses?
The complexity of the design lies in the significant differences in the walls. It is more difficult to level such a surface. What to do in this case?
The frame in this case is installed on the basis of beacons.
They involve the use of pads
It is important to maintain the level when installing them. If the surface has strong protrusions, they can be cut off with an ax or plane
To summarize, let's focus on the important points. During installation, the choice of fastening depends on the surface. They are different for wood and brick. Do not forget to treat the surface with compounds against fungus, mold and rot.
Option #3
Installation in a running manner. This option is the most difficult to install with your own hands.
It is being built in several stages:
- No one is going to hide the joints; on the contrary, they are highlighted , so they must be perfectly even. To do this, the ends are cleaned and ground at 90º before installation.
- To ensure that there is no gap at all when joining, lay the planks on top of each other and use a miter saw to cut off the edges of both at once.
- A grinder or electric planer is used to chamfer the outer part of the cut ; the bevel should be the same as the side bevels on the plank itself.
- The planks are connected end-to-end and the cut no longer spoils the view, but is part of the interior.
When installed staggered, symmetrical seams look better
You can do it simpler - when you reach the end of the row, you cut off the excess plank and start the next row with this trimming. But here it will not be possible to build a perfectly symmetrical picture of the joining seams.
Horizontal cladding
Horizontal cladding
First step
Proceed to attaching the lining. Start sheathing the walls from the ceiling to the floor. At the same time, try to direct the grooves downward - thanks to this, various debris will not get into them in the future, which will help to significantly increase the service life of the skin.
Horizontal cladding
Second step
Fix the clapboard sheet onto the sheathing bars. Use convenient fasteners. Insert the tenon of the next sheathing element into the groove of the fixed board. Secure it. Cover the entire planned space in this order.
Every 5-10 sheathing elements, be sure to check the evenness of the surface using a plumb line or level.
Cladding
Third step
Having reached the last board of the lining, adjust it to the width with a regular hacksaw or other suitable tool. Nail the board and hide the gap under the decorative baseboard.
Fourth step
Clean the finishing surface from dust using a damp sponge. If you wish, you can finish painting the lining, but this is not necessary - the wood already has an attractive appearance and a beautiful shade.
If a special lining will be used for the cladding, which outwardly imitates a rounded log, start finishing with the groove facing up - this way you will hide the joints.
Horizontal cladding
Additionally, the panels can be adjusted using a hammer, placing a piece of board under it - this way the finish will be fixed without gaps.
To fasten the “rounded” lining, use self-tapping screws. Twist the fasteners at 45 degrees. Place treated timber between the panels of such sheathing. This will create a beautiful finish without gaps.
Installing the first ceiling strip
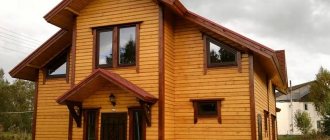
Block house
Traditionally, this type of lining was used for exterior decoration, but it was successfully transferred to the inside of the house. The material was developed in order to give houses assembled using frame or other technology the spirit of log buildings. Therefore, the lining is very similar to a rounded log due to the rounded front side. Due to the significant thickness of the material, it can act as an insulator to reduce heat loss, as well as protect against excess noise. The structure is assembled using a locking connection. There are also options for ventilation on the back. This is a necessary measure, since often insulation in the form of mineral or stone wool is often laid under such finishing.
How to install wooden lining
To install wooden lining with your own hands, two types of sheathing are used - wooden and metal. Also, the installation of such panels can occur with preliminary insulation, which is also done in several ways. And finally, the lining itself can be installed either on clamps, or on nails or self-tapping screws.
Types of sheathing
Wooden beam sheathing
- For wooden lining, a horizontal sheathing is most often made from wooden beams, although if the panels are mounted horizontally, then the sheathing will naturally be vertical. If the wall is flat, then the slats are screwed directly onto it and only in some places thin plates of wood or plastic are placed to level the overall plane. In the case where the frame will be supported by an uneven wall, then U-shaped perforated hangers are used for its installation for the consoles, as was done in the photo above.
- The distance between the beams on the sheathing for wooden lining should be 50-60 cm and no more. And with the same step, the beams themselves are fixed on nails, screws or consoles. In order for the plane of the sheathing to be level, first of all the upper and lower profiles are screwed, and all the rest are installed along them using a plumb line, a rule or a long level.
- Exactly the same sheathing can be made from galvanized CD profiles, only they must be mounted on the console. Metal has its advantages over wood - such a profile does not rot or rust, it will never suffer from changes in humidity and, moreover, its service life is immeasurably longer.
Metal lining on the ceiling - do-it-yourself installation. Read here.
The insulation can be installed under the profiles by putting it on the console
- If the wall is cold, then insulation is first installed on it and this can be done in two ways. The first is when mineral wool or polystyrene foam is mounted between the sheathing profiles, if possible slipping the material under the slats, and the second method involves pinning the insulation directly on the console.
- The top of the insulated surface is covered with a vapor-permeable film or a hydrobarrier (depending on the purpose of the room). All this is additionally secured either with self-tapping screws with a homemade press washer, or with dowel mushrooms, and then the profiles are installed. When the insulation is laid between the profiles, the film is attached directly to them with a stapler, nails or screws with a wide head.
Installation of lining panels
To fasten the lining, you can use stainless nails
You can fasten the lining to the sheathing using clamps, self-tapping screws and nails. If you are doing external installation, then it is better for you to use stainless nails or the same self-tapping screws, because when there are changes in temperature and humidity, clamps are ineffective. Keep in mind what nails you use will affect the appearance of the finish, as regular metal will rust and this will cause yellow-brown stains on the wood.
Shtil lining is a stylish solution for any decoration. Read here.
To install the lining, clamps are used
Indoors, wooden lining is installed using clamps, which are also attached either to nails or to self-tapping screws. In fact, the instructions provide for fixing the clamps onto stainless 20 mm nails, since they are supplied in one set, but they are extremely inconvenient to use, and installation with self-tapping screws is more reliable.
You cannot hit the lining lock with a hammer
- The panels often do not fit into the lock when pressed or struck by hand and have to be driven in with a hammer. But if you hit the lock with a hard object, its shelves will break, so in order not to damage the groove, insert a cut piece of lining into it and hit it. You can then easily pull out this scrap (the panel goes in worse than it comes out).
- To hide the gaps in the corners for wooden lining, no finishing or corner profiles are provided, so ordinary strips are used. A carved or planed baguette is nailed or screwed into a corner on one or both sides - the result is a rough, but very beautiful natural composition. A wooden plinth is also quite suitable for such decoration - it is mounted at the top, bottom, and in the corners.
- Wooden lining is installed quite easily, and you will see for yourself by watching a video of its installation. To install it yourself, you just need to be careful and careful - the panel may crack if hit.
Installing eurolining
To the question of how to properly fasten eurolining, you can answer the instructions, for which you will not need any additional knowledge and skills, the main thing is to follow the steps exactly and carry them out without deviations.
If you find it difficult to take advice aurally, but you perceive it better visually, then watch the video, which shows the entire process of installing wood panels in detail.
Preparatory process
If you decide to install and create a wooden structure with your own hands, then you should know some rules that will help you quickly cope with the task.
To start:
- carry out all the electrical wires and wiring that are necessary to provide electricity to the room or room, place them in special corrugations. They are made of material that does not burn, this will ensure the safety of living in such a room;
- Do not forget that any finishing material needs acclimatization, which means that the material must be brought into the room where you will carry out construction work a day before the start of the work process.
If the question arises - how to fasten the eurolining, then in the instructions you will find all the answers, including a list of fasteners that will be needed for such a process. It should also be taken into account that the sequence of arrangement and direction of the panels affects the appearance of the entire structure.
Eurolining can be located:
- horizontally,
- vertically,
- diagonally,
- combined arrangement.
Installing the sheathing
- The sheathing is made of small bars, onto which it will subsequently be attached;
- The material of the beams does not matter, the main thing is that the wood is impregnated with protective compounds for the durability of the entire structure;
- The frequency of fastening the sheathing beams should not exceed 0.8 meters;
- All fasteners must be checked constantly using a building level (photo below).
The sheathing is installed depending on how the eurolining is attached:
- If the eurolining is placed vertically on the wall, then the sheathing should be horizontal;
- If the sheathing material is attached to the wall horizontally or diagonally, then the sheathing must be vertical.
We insulate the walls
To keep the room you decide to cover warm, you can insulate it yourself. Insulation must be installed before you begin installing the eurolining - between the wall and the sheathing.
If the room must be isolated from water and moisture, it is necessary to use, in addition to cotton wool, a special film that will serve as protection against water and moisture. The photo below shows the method of its application.
Hidden fasteners
Eurolining can be fastened with various fasteners: nails, clamps, self-tapping screws. The best option from those listed are clamps, because this type of fastener is considered hidden.
Another advantage of the selected element is that the fasteners for eurolining are completely protected from rust, because the material from which it is made does not lend itself to a process such as corrosion.
If we consider the cost of all fastening materials, then we can say that the highest is the price of clamps, but the result with the use of such elements is better.
Eurolining is gradually beginning to increase its popularity as a modern, high-quality material for finishing walls. Despite its higher price compared to conventional lining, this material is characterized by increased dimensional accuracy, stable humidity characteristics and more convenient fastening to walls. How to install eurolining with optimal labor costs and high quality installation?
Eurolining is a convenient and aesthetic finishing option
Sequence of finishing work
The first step is choosing a wall decoration option. Fastening the lining can be done in two ways:
- Along the walls;
- Along the sheathing.
The first option is preferable in a wooden house, since wood tends to expand or shrink in size and “breathe”. If the base material is the same as the coating, their joint oscillatory motion will not cause multidirectional stresses leading to deformations and the appearance of defects on the surface.
In brick and concrete houses, before attaching the lining, a sheathing is installed, which can also serve as a frame for laying thermal insulation. It is convenient to place corrugated hoses for electrical wiring and heating pipes in the space between the covering and the wall.
The second is the correct measurement of the room and calculation of materials. This will help you avoid unnecessary expenses or waste time on additional trips to purchase missing components. The amount of lining is determined based on the area of the walls, excluding openings. The length of the ceiling and floor plinth is equal to the perimeter of the room. To decorate the corners you will need shaped strips. Materials are purchased with a margin of 10-15% for defects or other defects.
Wood is a living structure, sensitive to fluctuations in humidity and temperature.
Before starting work, it is unpacked, allowed to “get used” to the new conditions, and treated with antiseptics and fire retardants, if there is no factory preparation.
Before installing the sheathing or directly attaching the lining to the wall, prepare the surface - clean, level, seal the cracks, and coat with antiseptic compounds. This will protect the structure from the appearance of mold and fungi.
The third step is installing the sheathing. Most often it is made from wooden blocks with a cross-section of 20x30, 40x50 or larger. The thickness of the element depends on whether insulation will be laid under the lining. A ventilation gap is left between the thermal insulation layer and the coating, which prevents condensation from accumulating.
The frame pitch is 40-60 cm, the direction is perpendicular to the finishing boards. The space between the bars should be filled tightly with insulating roll or slab material. For residential premises this is usually mineral wool; outside, expanded polystyrene foam or other polymers are more often used. They are not afraid of moisture. Before attaching the lining, perform a vapor barrier and waterproofing. A film or membrane is used that allows the liquid to evaporate, but does not allow it to pass in the opposite direction.
The geometry is controlled using a bubble or laser level. Dowels or construction nails are used as fasteners for the sheathing.
How to make sheathing for lining
Using a screwdriver, we install slats with a cross section of 20×40 mm horizontally in increments of 40-50 cm, regularly checking with a level whether they are installed correctly. Using slats allows you to level the wall (so that the boards fit comfortably), as well as create a gap between the wall and the lining, which is needed to create ventilation.
If the wall is uneven, then you need to put something under the sheathing (or take a thicker sheathing). A mounting wedge, a piece of wooden beam or plywood is usually used as a lining. The sheathing is secured with long-length self-tapping screws and dowel nails. The lower slats are 5 cm from the floor, since the floor plinth will be attached below, and the upper ones are the same amount from the ceiling.
.
Installation of the sheathing should also be done around openings, windows and doors. It is worth noting that the battens are made of plastic and metal. More information about installing the sheathing can be found here:
Required: processing solutions
Do not neglect antiseptics and insecticides. This step extends the durability of the sheathing. The minimum level of treatment is a solution against fungus, rot, and mold. And insect control products should be used in houses standing on the ground - dachas, utility rooms. By the way, the cost of the compositions is not too high, and the right thing to do would be to play it safe and treat both the wooden frame and the wall with the ceiling in any room where the sheathing under the lining is being installed. The rules for using solutions are usually written on the packaging - read before you start spraying.
This is what a timber frame looks like