Articles
All photos from the article
When the owners begin to make repairs on their own, at least some of its fragments, then all beginners who are inexperienced in finishing have a standard question about how to correctly adjust the corners of the ceiling plinth. By the way, it’s very good that people are still interested, and don’t start experimenting and translating the facing material, because finding out about it on the Internet is so simple and accessible!
Therefore, we bring to your attention two methods of joining and the basic rules for installing such edging, and in addition, we give you the opportunity to consolidate your knowledge with the help of a thematic video in this article.
Joining ceiling plinths in the corners using fittings
What you need to know
Ceiling plinth, also called fillets, is an integral part of modern interiors. Their use allows you to hide imperfections at the junction of walls and ceilings and give the interior a finished look. Ceiling moldings are made from different materials, but the most popular are polystyrene foam and polyurethane. They are quite easy to work with - they weigh little and are easy to cut.
Skirting boards are attached before the walls and ceiling are finished, but the surface must be prepared, leveled and primed. If the walls are not perfectly even, it is better to take a narrower plinth - it will be much easier to join. Accordingly, wide baseboards are best used on smooth walls.
If the joining of the plinth does not go without gaps - this often happens when adjusting non-standard joints - they can be sealed with sealant. It is best to use acrylic - you can paint over it. After the gap is sealed, you need to form a joint. The sealant can be smeared with your finger and the residue can be wiped off with a sponge.
Trimming the plinth depends on the type of corner: external or internal
Installation sequence
The baguette must be glued in the following sequence:
- The ceiling plinth in the corners is attached first;
- then the smooth areas are glued.
The fillets need to be joined on level areas. Therefore, installation begins from the corners. If you glue the plinth sequentially, there will be difficulties with fitting, because... on straight sections it is much easier to cut fillets to the required size. It is best to place the joints in that part of the room where they will be less visible.
Sequence of work
First of all, you need to prepare all the necessary tools. However, there is not much of it:
- construction knife or hacksaw for metal;
- pencil, tape measure;
- miter box;
- goniometer;
- rubber spatula, sponge.
Before installing the baguettes, you need to do two things:
- Check the angle - if it is 90 degrees, then you can use a miter box to adjust it; if not, you will have to cut the baseboards manually.
- Attach the plank to the ceiling and measure with a tape measure: how far the plinth extends onto the ceiling.
This distance serves as a guide for proper fitting and installation of baguettes. Since installation begins from the corners, each plank must be aligned to this level. Otherwise, you can get a situation where the baseboards are glued at different heights in different corners.
It is necessary to use a level so that the corners are at the same height
Why you shouldn't buy trimmed items
Manufacturers of ceiling plinths decided to make life easier for finishers by producing already trimmed elements. It would seem that the question of how to join ceiling plinths in the corners can be closed - just purchase ready-made parts and glue them. Unfortunately, it's not that simple.
Disadvantages of ready-made corners:
- high price;
- Most often, the corners in the rooms are not even, i.e. not 90 degrees, but more or less. Therefore, ready-made connecting elements are not suitable.
You can purchase them only after checking all the corners in the room.
Why do you need to glue fillets before wallpaper?
Many beginning craftsmen ask themselves this question - after all, if you glue the fillets first, the wallpaper will be more difficult to adjust. And if after that, the uneven joint between the wallpaper and the ceiling will be covered with a plinth. You can glue in any order, each person decides for himself what is more convenient for him. But there is a difference.
If you glue the baseboard after the wallpaper:
- all uneven seams between walls and ceilings will be closed;
- when changing wallpaper, you will have to change baguettes;
- there is a high probability of smearing the wallpaper with glue during installation of the baseboards;
- During installation, gaps may form between the fillets and the walls, which need to be sealed with putty. If you do this on finished walls, they can get dirty.
When installing the baseboard, the glue may leak a little
If you glue the baseboard before the wallpaper:
- you can dirty the wall as much as you like - there is no final finish yet;
- all cracks are sealed without problems;
It turns out that it is better to glue the fillets before finishing - this makes the work much easier and faster.
The nuances of cutting skirting boards depending on the material
The different densities and strengths of the material do not allow the use of the same cutting tool for all occasions. What and how to cut the ceiling plinth in the corners, taking into account the material it is made of?
Knife. It is most convenient to use a construction knife or a sharp kitchen knife to cut foam baseboards, as well as products made of PVC, polystyrene, rubber and flexible polyurethane.
Hacksaw for metal. A cutting tool with a fine tooth, like a metal cutting blade, is used to trim corners on moldings made of plaster, polyvinyl chloride, polystyrene and rigid polyurethane.
Wood saw. You can saw down the corner of a wooden fillet with a fine-toothed wood hacksaw, resulting in an even, burr-free cut.
Saws are used when working with a miter box, where a knife is useless. When using other devices, it is more convenient to cut off the corner of the baguette with a knife.
Skirting boards
Installing skirting boards may seem like a simple task, but difficulties can arise. If you follow our advice, you will resolve all the difficulties and get a perfect connection of the skirting boards with the walls and floor. If in life all structures were absolutely rectangular, then there would be no problems with their joining. However, to install a skirting board beautifully, it is not enough to just cut it at an angle of 45°. Anyone who has installed skirting boards at least once knows this.
We asked our best master to tell you in detail how this is done. And he actually had a lot of advice on installing skirting boards in both new and old houses.
As you know, walls are not always absolutely flat, and the same goes for the angles between them and the floor. As a result, the baseboards become slightly bent. The profile of the new baseboard may differ slightly from the old one. The baseboard may be shorter than the wall to which it needs to be installed. And the corners of the walls are not always straight.
When installing skirting boards, you often have to improvise. But you will be able to cope with this task if you know the basic working techniques and the 6 most difficult places that our carpenter will tell you about.
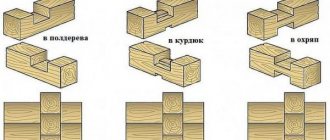
INNER CORNER
Corner with joint...
To join two skirting boards in the inner corner, they should be sawed at an angle of 45°, which is quite enough if the wall angle is completely straight. But most often the joining angle of the skirting boards has to be slightly adjusted. The joining ends of the skirting boards must be cut at the same angle, otherwise they will not match.
...you can make a counter-profile
The junction of the skirting boards in the inner corner can be made using a counter-profile. The carpenter installs one end of the plinth in a corner, and saws the second so that its end exactly matches the profile of the first. The task seems difficult, but such a connection is invisible, since the joint gap is not visible. To create joints using counter-profiles, we cut the first plinth (A) so that its end matches the profile of the second plinth (B), and a “bundle” is formed between them. We used a jigsaw and got very precise joints. The gaps between the joints are almost invisible. Creating counter-profile joints is the best solution when the skirting boards are not intended to be painted.
OUTSIDE CORNER
Outer corner connection
If in the inner corners the carpenter joined the skirting boards at an angle or using a counter-profile, then on the outer corners he advises making only oblique joints. And in this case, the corner of the wall must be divided in two to determine the size of the cutting angle. Our wall angle is 90°, the cutting angle is 45°. It is necessary to take into account uneven floors.
JOINTS
Miter cuts hide joints
Of course, the easiest way is to install one long plinth from corner to corner. But more often than not, junctions cannot be avoided. And it is best to hide them with the help of oblique cuts. If you plan to paint the skirting boards, you can putty the joints. But if you plan to leave it unpainted, then it is more difficult to disguise the unevenness. A quick and simple trick: we saw the folded skirting boards in a miter saw, regardless of whether we want to get an angle of 42°, 48° or 45°. Of course, the last option is ideal.
ALONGSIDE THE DOOR
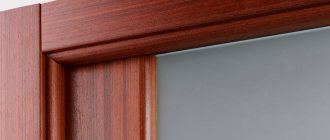
We adjust it to the platband
The door casing is always installed close to the floor at the junction with the plinth. And all that remains is to adjust the plinth to the casing. A classic decorative platband usually has a straight, wide edge, with which it is easy to join the plinth. To fit the plinth to the new platband, it must be cut at an oblique angle so that it fits as closely as possible to the beveled edge of the platband.
CONNECTION TO THE FLOOR
Trim the bottom edge
If the floor is not very level, you will have to adjust the baseboard. Place the baseboard in the desired location and, using a pencil along the bottom edge of the baseboard, mark the profile of the irregularities. Then cut off the excess pieces.
ATTACHING Attaching the skirting board to the wall
In order not to interfere with the natural movement of the floor, the skirting boards are attached to the wall. Usually they are installed close to the wall, but since it may be uneven and slightly inclined, the skirting boards should be adjusted, for example, with wedges, but so that they remain straight in the corners. If an oblique joint is made in the inner corner, then first the skirting boards are glued and nailed in the corner and only after that - to the wall.
How to join straight sections - complete gluing!
Once the corners are completed, it's time to start gluing the baseboard on the straight sections. The work is carried out in exactly this sequence - first the corners, then everything else! Check the planks before gluing - sometimes they are cut inaccurately in production, in which case you will need to trim them at a right angle. When the fillet is ready for use, apply a dotted strip of glue to the back side and place it flush against one of the corner strips at the end.
Surely, one plank will not be enough for you, but the second fillet needs to be glued not end-to-end with the previous one, but end-to-end with the corner one at the other end of the room.
As experience and practice show, inserting the desired piece in the middle of the room is much easier than gluing it to a corner. To ensure that the parts fit together perfectly, sand their edges thoroughly with fine-grit sandpaper. During the gluing process, press not with your fingers, but with the edge of your palm - this is especially true when gluing soft foam baguettes, on which dents can easily be left. It is necessary to press down onto the surfaces for at least a minute so that the glue has time to set, then run a rag along the joints and remove excess glue.
- Author: Mikhail Malofeev
Rate this article:
- 5
- 4
- 3
- 2
- 1
(4 votes, average: 4.8 out of 5)
Share with your friends!
Preparing for work
In many ways, the successful installation of skirting boards both on the floor and on the ceiling depends on how thoroughly the surface is prepared for attaching the molding to it. Make sure that the surface of the floor or ceiling is completely dry and clean; get rid of construction debris and dust. The plaster should be coated with a special water-based solution to prevent it from falling off.
The next important step is measuring the toe angles of the walls. It is very rare that corners in rooms turn out to be perfectly straight, so you should not rely on luck and cut the corners of the baseboards, focusing on 45 degrees. To measure the angle, you can use a corner, and then divide the resulting value in half - the result will be the desired angle at which we will cut the edge of the plinth.
Another method can be used: the plinth is applied to one wall, and its edge is indicated by a line on the floor. Similar actions are performed with the second wall; Thus, we get the angle drawn on the floor, and measuring it with the help of a protractor is not difficult.
Required materials and tools
To install a ceiling molding you need to buy:
- baseboard;
- glue (screws for wooden fillets);
- connecting corner, if you do not plan to cut the corners;
- putty (not needed for smooth walls);
- water-based paint for painting the baguette, if required by the interior design.
Tools and equipment you will need:
- stepladder or strong table (chair);
- miter box for cutting 45o corners at the baseboard;
- cutting tool (construction knife, hacksaw or wood saw);
- construction pencil;
- roulette;
- a hammer drill or electric drill when working with wooden baguettes;
- putty knife.
How to join skirting boards on the ceiling
It is important to remember that it is best to install the cornice before finishing the ceiling and walls, that is, before painting and wallpapering the wall. Particular difficulties may arise with how to join the corners of the ceiling plinth and its elements along the entire perimeter of the ceiling
The length and width of the plinth strips may vary depending on who is the manufacturer of this finishing material. The width of the plinth is, as a rule, influenced by the size of the room being equipped. As for the length of the bar, it can range from one to several meters. The material itself from which the plinths are made, be it wood, plaster, foam, etc., does not in any way affect the process of joining the cornices (for more details: “How to join a ceiling plinth - options”).
Of course, the modern building materials market also offers examples of skirting boards that are completely ready for joining in the corners of the room. When installing such material, the connecting cuts will have to be made straight, not oblique. Of course, the cost of such cornices is higher compared to standard skirting boards.
The surface for installation must be properly prepared. It must first be cleaned of dust and dirt and allowed to dry. Before joining the planks, you need to level the attachment point, and also treat it with putty and primer. When installing a plinth on plaster, it is recommended to pre-treat the surface with water-based paint.
Without knowing how to join ceiling plinths in the corners, if the corners themselves are uneven, you should remember that such a device is quite possible to implement, it is only important to strictly follow all the installation instructions (for more details, see the article: “How to cut down a ceiling plinth - methods”). You need to start installing the plinth from the corner of the room near the entrance to it.
To properly cut the material at an angle of 45 degrees, it is best to use a device such as a miter box. This tool has the form of a box, which is equipped with slots at a variety of angles.
Irregular corners
A good option for semicircular corners is the use of polyurethane plinth.
Sometimes you may encounter a situation where you have to glue fillets at non-standard corners. For example, how to join a ceiling plinth if the corners are semicircular? This is done quite simply.
Since it will not be possible to give the desired shape to a whole baguette, it needs to be cut into pieces of 3-5 cm. The size depends on the radius of the corner.
Using a miter box
A miter box is a special tool used for cutting corner elements of ceiling and floor plinths. It is made in the form of an inverted letter “P” with slits in the walls at different angles.
It's quite easy to use
It is important to remember the rule - that part of the plinth that is pressed against the side of the miter box is glued to the wall. And the one that is attached to the bottom will stick to the ceiling
To make it clearer, you can imagine that the bottom of the instrument is the ceiling, and the walls of the room are its vertical parts.
The joint of the ceiling plinth is done in this way:
- The baguette strip is turned over and inserted into the miter box. The ceiling part is pressed to the bottom, the one that is glued to the wall is pressed to the vertical part. The plinth is pressed against the near wall of the miter box;
- the cut is made carefully, without pressing - otherwise you will get torn edges.
The difference in trimming external and internal ceiling corners lies in the correct placement of the left and right strips:
- left internal and right external corners are cut in the same position;
- accordingly, the right inner and left outer are also adjusted in the same way.
Therefore, the main thing when working with a miter box is not to confuse the left and right slats. To make the work easier, and not have to remember every time which grooves to make the cut through, you can make the appropriate signatures on it for each joining position. It will take a little time, but in the future it will become much easier to work.
It is good to trim the plinth using a miter box
Joining external corners
The joining of skirting boards in the outer corners is done in the same way as in the inner ones. If the angle is even, use a miter box. If not, cut it by hand.
Sequencing:
- on the ceiling, the distance of the plinth for both planks is marked;
- the left and right baguette are applied alternately, marks are made with a pencil along the upper edge of the plank opposite the corner;
- the intersection of lines is the upper cutting point, the angle is the lower;
- panels are applied and marked;
- The baguettes are carefully cut, and they must be kept in the same position as they will be on the wall.
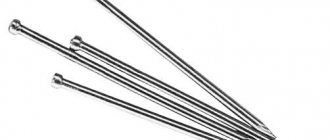
When joining ceiling skirting boards at external corners, one unpleasant feature may appear. When the baguettes are already adjusted and glued, they begin to move apart. To fix them, it is good to use long syringe needles. To do this, the fillets are connected at the top and bottom. When the glue dries, you need to remove the needles - small holes will remain that can be easily repaired.
Main types of ceiling fillets
There are several main types of ceiling fillets that are used to mask the joint between walls and ceiling.
Expanded polystyrene products
Such ceiling plinths are made either by extrusion or injection, and models made of extruded polystyrene are smoother and more durable. In addition, they are unable to crumble, unlike elements produced by injection. They are quite easy to work with, however they are subject to deformation and may break during installation. These elements can be easily cut using a hacksaw or construction cutter;
Polyurethane models
Highly durable, resistant to mechanical stress, flexible and dense, these varieties are in great demand. In addition, they are resistant to high humidity, so they can be used in bathrooms, washrooms and swimming pools. The only drawback of such elements is that they are quite heavy and, if not secured correctly, can sag over time. In addition, in places with large temperature differences, polyurethane can deform and crack.
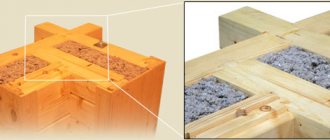
Wood moldings
This option has high aesthetic qualities and looks especially impressive in some interiors: wood always looks expensive and beautiful. However, this option also has its drawbacks: since wood is a natural material, over time it can become unusable due to drying out or, conversely, rotting and fungus. The wood is quite heavy, so it is usually attached with self-tapping screws. To find out how to properly cut a ceiling plinth, you should study in more detail two cutting options - using a miter box and manually.
Gluing prepared parts
When installing, glue or liquid nails are applied to the back side of the plank at the points of contact with the wall and ceiling, and the ends of the product to be connected are also treated.
The glue-coated strip is applied to the installation site, carefully and not pressing it too hard. It is recommended to do this with the edge of your palm, especially if the baseboard is made of foam plastic, since dents easily form on it. In this case, glue may appear along the edges; it must be immediately removed from all surfaces with a clean rag or napkin. While the glue dries, the parts are fixed with masking tape.
After the glue has completely dried, the paper tape is carefully removed, the joints of the planks are filled with a sealant of a color that matches the baseboard material, or the cracks are filled with putty. The installation process is now complete. If necessary, the installed plinth is painted.
The process of installing ceiling plinths on internal and external corners with your own hands is quite simple, but the stage of cutting products requires great precision. If it is carried out incorrectly, the entire structure will be installed incorrectly, the planks will not fit tightly to the wall, and large gaps will form at the joints of the fillets.
The first method using a miter box
Professional miter box with a rotating hacksaw Long ago, carpenters came up with such a special box with slots - a miter box. It is easy to recognize it, among the variety of repair equipment, by its characteristic appearance. This is the most convenient and indispensable device in solving the question of how to cut the corners of the ceiling plinth.
The miter box usually looks like a tray with vertical holes for a hacksaw. It can be made of wood, metal or plastic. This tool represents the most ancient and simplest carpenter's tool for cutting wooden parts at an angle of 90 and 45 degrees. There are types of such devices for professional work, with a rotating mechanism, in which the cutting tool can be rotated and fixed in any position.
How to properly cut a ceiling plinth Ceiling corners can be divided into internal and external; the joining method is slightly different.
If necessary, you can make a miter box with your own hands. To do this, you can use 3 scraps of plywood or boards of the same size. First, to do this, you need to attach them in the form of an inverted letter “P” and mark the corners. Then, according to the markings, slots are cut for a hacksaw almost to the very bottom, and the boards are twisted.
Internal corner
- We take the correct measurements.
- After this, we install the plinth strip in the miter box so that this position exactly coincides with the placement on the ceiling.
- The plinth should be pressed tightly against the opposite wall of the miter box. We hold and press with our left hand.
- We place the hacksaw at an angle of 45 degrees in a special hole and cut off the part.
The adjacent part must be cut in the same way, only in a mirror image, as shown in the photo.
When cutting soft materials (PVC, polystyrene foam), use a hacksaw or a regular construction knife. Then your work will be neat and with smooth edges. For precise cutting, you need to start cutting it from the front part.
External corner
- Measure the length of the baseboard from the nearest wall to the outer corner, leaving a pencil line on the inside to indicate the desired length. Keep in mind that the edge (its upper part) should extend slightly outward.
- Move the baseboard into the miter box and cut it away.
- The adjacent strip also needs to be measured with a margin and cut in a mirror image to the first part.
We try on the ceiling plinth - the joining of the parts should be perfectly even. If the result is not achieved, and there are protrusions at the joints, you can trim the edges with a regular knife until the joint is perfect.
Checking for smooth joining The video in this article describes all the nuances well:
Joining flat areas
The final stage in the installation of ceiling moldings is gluing straight sections. Everything is much simpler here. Even planks are attached end-to-end to each other from one corner to the other.
Sometimes skirting boards have to be trimmed - the edge may be damaged or unevenly cut at the factory. The most convenient way to do this is to use a miter box. In order for the plank to stick well, you need to press it down and hold it with your hand for several minutes. It must be remembered that baguettes are quite delicate and can easily leave a dent on them.
Thus, making neat joints of ceiling plinths is a feasible task. The main thing is not to rush and act carefully. The old saying comes in handy here: measure twice, cut once. It’s better to make sure once again that the markings are done correctly than to cut the baguette again.
and also Methods of installing ceiling cornices for suspended ceilings - we will analyze them together with experts
Features of the formation of floor edging catch
The plinth for framing the floor not only gives the covering a finished look, but also hides the joint along the perimeter of the wall and improves sound insulation in the room. The perception of the room as a whole will depend on how correctly and accurately you manage to join the planks in the corners.
How to cut a baseboard in a corner? Required tools:
- tape measure and pencil;
- miter box;
- a hacksaw or jigsaw for cutting the product;
- sandpaper;
- sealant or putty.
Step-by-step instructions for forming corners and joints of floor planks
First, the required edging material is marked and calculated. In order to get a neat angle, parts of the joined elements should be cut at an angle of 45 degrees. To do this, the part is placed in a miter box, fixed, and cut on one side with a hacksaw or jigsaw.
The opposite end of the second plank should be sawed in the same way.
Advice: first it is better to practice on small sections, making joints at their ends.
To connect the baseboards along the perimeter of the wall, they are cut at an angle of 90 degrees. The cut edges of polyurethane products are treated with sandpaper to ensure their complete alignment and better adhesion.
Joining two planks cut at right angles
Before installing the skirting boards, first check the accuracy of their joining. Then glue the first part, join the second one, cut at an angle of 90 degrees, with it.
Advice: it is recommended to strengthen the junctions of polyurethane and plastic strips with special glue, and if your floor is framed by wooden baseboards. Then the places of their joints are fixed with glue and additionally strengthened with nails.
A special PVC connector is used to mask the joints
During installation, you can cut out part of the edging in order to lay communications in it. These could be sockets for sockets and switches.
Socket box embedded in PVC baseboard
Corners, internal and external, are formed in the same way as when installing ceiling moldings. Cutting baguettes is carried out in the same way.
In order to close the joints of trimmed PVC products, there are special decorative corners
In order to cut and install baguettes quickly and efficiently, you should plan all the work in advance and prepare the necessary materials and tools.
After taking measurements, write down the length of each wall, adding 50 mm to it on each side (to trim the corners of the plinth). Try to cut the planks so that there are as few leftovers as possible. To save material, cut it end-to-end.
How to easily cut baguettes
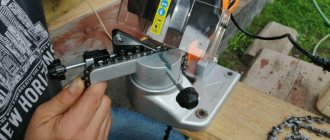
To securely secure the workpiece for further cutting, you can use a tulaga. This is a special bench clamp with a bar with a groove attached to the back wall. This furrow is made at an angle of 45 degrees. Therefore, it can be used as a deep template for cutting skirting boards.
To do this, you should take a block whose thickness is slightly higher than the required thickness. To cut the plank most accurately, use a special precision saw. Use it to cut grooves in the template at the required angle.
Beautiful ceiling and floor plinths complete the interior of the room. They not only decorate the room, but also protect surfaces from damage. You can make skirting boards yourself (wooden), or buy ready-made products. In order for such a frame to look beautiful, it is necessary to correctly cut the edge parts when installing it. By following simple recommendations, you can cut baguettes and form corners yourself.
If it was not possible to fit the fillets perfectly
Let's seal the gap with sealant.
It may very well be that the first time not everything will go as smoothly as we would like. In this case, it is better to leave a gap between adjacent elements of the baseboards, which can be masked using silicone sealant. To do this, carefully fill the gap with the compound, smooth out the sealant with your fingers, and remove excess mass with a wet cloth.
If the cut is smaller than necessary, and when you try to join the plinths, one of them “goes” to the side, take a utility knife and trim the cut, or sand it with fine-grained sandpaper.
Features of cutting catch ceiling plinths
Installing a baguette on the ceiling, at first glance, is very simple - most of them are attached with glue. But the most important stage is the preparatory work: cutting strips and corner elements for the ceiling plinth.
In order for the room to be beautifully framed and not have to redo the renovation, you should know how to make corners of baguettes. Having mastered the knowledge of how to cut the corner of a ceiling plinth, you will not only save building materials and time for installing the product, but also money that you could spend on a good craftsman.
Forming and cutting the inner corner of the ceiling molding
When edging surfaces, the question arises: how to join the corners of the ceiling plinth. They can be:
Joining ceiling fillets - external and internal (external) corners
Let's take a closer look at how to cut the corners of a ceiling plinth. An ordinary rectangular room, without protrusions and columns, has 4 corners, in which the internal joint of the baguettes is made.
Therefore, before gluing them, markings are made, during which you need to measure the perimeter of the ceiling, mark the places of connection and joining of parts.
Cutting points are marked on the baguettes
How to saw down a ceiling plinth to form an internal corner? First, the angle between the ceiling and the wall is checked. If the surfaces are flat, then it should be 90 degrees. In this case, the corner elements are cut at an angle of 45 degrees. To cut them, you can use a stationery knife (foam molding, polyurethane, a hacksaw, but it is most convenient to use a special carpentry tool - a miter box for the ceiling plinth (groove with slots) and grinding.
Miter box for cutting baguettes, photo
Tip: before cutting off the ceiling plinth. You should check whether the blade of the tool is sharp - dull knives leave uneven edges. A wide baguette must be held on the other side.
Then the first plinth is inserted evenly into the miter box, fixed, and cut on the right side at an angle of 45 degrees.
Cutting skirting boards at an angle
Before gluing the baguettes, cut the second corner piece in the same way, making a cut on the opposite side.
The trimmed parts are tried on, checking the tightness of the connection.
After cutting all the parts, you can begin installing the plinth on the ceiling.
Recommendation: if the angle between the wall and the ceiling is uneven, then the fillets are applied along the walls, markings are made for their placement and intersection in the corner, and then they are adjusted manually using a knife (the joints will need to be adjusted during the work).
Cutting and joining ceiling skirting boards at external corners
If the room has a ceiling of complex shape, or walls with protrusions, external corners are formed. How to properly cut down the ceiling plinth in this case? A miter box is also used for these purposes.
How to properly cut a ceiling plinth to form an external corner? First, the fillet is inserted into the tool with the side that is closest to you. The edge that will be adjacent to the ceiling should be located at the bottom of the miter box. Next, cutting is done at an angle of 45 degrees.
Important: keep the baguette straight, otherwise, if you cut it unevenly, a gap will appear during the joining process, which is quite difficult to repair
Diagram - how to cut the corner of a ceiling plinth to form an external corner
Before making the corner of the ceiling plinth, you should bring the baguettes together and check the evenness of their connection. The two trimmed parts are placed together. If there are no gaps and the edges of the products fit tightly, the cutting was carried out correctly.
An example of how to correctly combine edging parts in a corner
If you do not have a special device for cutting baguettes, you can use a square, or make patterns from cardboard. Any unevenness can be carefully trimmed with a stationery knife, and if small recesses appear, they should be filled with sealant.
Many people are concerned about the question: how to connect skirting boards if the walls are uneven? In this case, the first fillet can be cut on a miter box, and the second one can be adjusted to it manually until the cuts match.
Important: in this case, all cuts are made inside the fillet
Using plastic corners you can neatly arrange the joints
It is important to know
A carpenter's miter box is a tool with which you can cut a fillet exactly at an angle of 45 °. The connected planks will form a right angle. A miter box of simple design is suitable for such work.
Miter box for joining skirting boards
If this tool is not available, you will have to mark using a ruler and a protractor. The cut lines are marked using a pencil. You need to understand that a fillet with internal cavities cannot be accurately cut in this way.
To make the cut perfectly even, you should use a jigsaw - when performing the operation with a hacksaw, the edges of the plinth will be torn.
The area where it is planned to install the plinth must first be leveled, cleaned of construction dust, and primed.
Selecting a new baseboard
We already started talking about this at the beginning of the article; the most important condition for choice is, of course, your personal preferences. You can choose any material and color. But our case has its own specifics. Since the old baseboard was not removed before sanding the floor, the floor underneath is not level and there are depressions and rough spots that need to be covered. During the installation of the old plinth, the joints and cracks were sealed with alabaster; after we remove it, quite large recesses will remain. Plus you will need to cover the bottom of the glued wallpaper.
A dilemma arises here. Modern skirting boards are rarely wider than 70-100 mm. You can, of course, specially order wooden skirting boards with a larger width. But this will result in very large expenses. Let's use a little trick. Let's buy a regular plastic plinth and install it on an additional wooden batten.