Home / Wood processing / Wood marking
Before processing materials (logs, beams, boards, bars, plywood, wood boards, etc.), as well as the workpieces obtained from them, their quality is assessed, measured and marked. Marking consists of drawing lines (scores) on the surface of the material or workpiece, which determine the dimensions (shape contours and dimensions) of future workpieces or parts and elements of their connections according to the drawing. At the same time, the amount of established allowances (dimensional reserves) for mechanical processing along the length, width and thickness of the workpiece, as well as unacceptable defects and defects of wood, are taken into account.
A part is a separate structural unit of a carpentry product or structure, made from a homogeneous material without the use of prefabricated operations. As a result of assembly (connection and fastening) of parts, assembly units (frames, sashes, transoms of windows) and finished products (door and window blocks) are obtained.
Machining allowance is the difference between the dimensions of the workpiece and the part obtained from it. The size of the processing allowance includes the width of the cut, which is made with a saw when cutting the material into blanks. When marking, it is necessary to take into account the moisture content of the wood used. If the wood moisture content is more than 20%, allowance should be added for shrinkage along the width, length and thickness of the workpiece. The amount of wood shrinkage along its length (along the fibers) is insignificant.
When manufacturing small-sized parts, it is advisable to use blanks that are multiples of length, width and thickness. In this case, from one workpiece, several one-time workpieces are then obtained by cutting it. For multiple workpieces, it is necessary to take into account allowances for cuts to divide them into single workpieces. When marking wood boards, plywood and veneer produced in dry commercial form (humidity 8±2%), their standard thickness is selected and allowances are taken into account only for processing along the length and width of the workpieces, as well as the width of the necessary cuts to obtain single workpieces. Allowances for processing and drying wood and processing wood boards are regulated by standards.
| Control and measuring instrument |
Tools for marking and fixing wood
Any work with wood should begin with markings. To do this, you can use rulers (Fig. 1), marking squares, tape measures (Fig. 2) and other measuring devices. To mark the circles, you can use a drawing or homemade compass.
Without the use of control and measuring instruments, it is impossible to perform even the simplest operation. The most common instrument of this kind is a tape measure, which is used to measure linear quantities.
| Rice. 1. Tools for marking and fixing wood Ruler and pencil | Rice. 2. Tools for marking and fixing wood Tape measure |
When marking on a workbench or desktop, you must have a ruler. It is most convenient to attach it to the end of the workbench board, in this way you will protect the tool from damage. The line should be secured at the ends, so you can remove it if necessary, and then put it back in place.
A tape measure is a measuring tape made of thin flexible steel, enclosed in a metal or plastic case (Fig. 3).
For most tape measures, the tape rewinds automatically under the influence of a spring. Tape measures come with measuring tape of various lengths. We recommend that you purchase a tape measure 10 m long; it will be useful to you not only for carpentry and carpentry work, but also when renovating an apartment and working on a summer cottage.
To measure linear quantities, rulers and folding meters can be used. The latter are convenient because in hard-to-reach places they can have a variable length and in some cases it is more convenient to work with them than with tape measures or rulers.
Figure 4 shows a method for marking a 78° angle on a workpiece.
| Rice. 3. Tools for marking and fixing wood Corner | Rice. 4. Tools for marking and fixing wood Compass |
To establish an exact right angle and to measure the angle between the sides of the parts, squares are used. They are most often made of metal or wood. On one “arm” of the square there are markings in increments of 1 mm.
To create markings on the workpieces at an angle of 45°, a device called a “marker” is used. This is a square made of two plates, one of which is fixed in the middle of the other at an angle of 45°. It is convenient to use when determining an angle of 135°. To accurately measure the existing angle and transfer measurements to the workpiece (or from the workpiece), there is such a device as a small tool. It is very reminiscent of an arm, however, in its design, in the place where the sides of the corner are fastened, there is a fixed hinge.
For marking arbitrary angles, there are special devices, more like drawing equipment (drawing board).
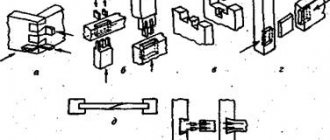
The following marking tools can be combined into one group. These include a thicknesser, a cutter and a carpenter's clamp. All of them are designed for marking lines parallel to the edges of workpieces using sharpened metal rods that leave marks on the workpiece.
For convenience during further work, apply markings to the workpiece in such a way that it is clearly visible and easy to read.
The fact is that when sawing wood, a lot of sawdust is formed, which quickly covers the applied markings and can negatively affect the quality of the work.
To avoid this, take regular breaks in sawing to remove sawdust from the markings and make them visible. Otherwise, you risk deviating from the pre-designated sawing line and ruining the workpiece or an almost finished product.
If the wood after sawing is subject to further processing, then it makes absolutely no difference how you apply the markings. This can be a regular pencil, a special marking pencil, a felt-tip pen or a marker.
Marking marks will be removed during subsequent processing of the wood.
But if the workpiece is already clean, you must be extremely careful when marking the product. This can be done with an ordinary sharpened pencil, an awl (Fig. 5) or a special core (Fig. 6).
| Rice. 5. Tools for marking and fixing wood Shilo | Rice. 6. Tools for marking and fixing wood Breakdown |
In addition to marking, fixation is very important when processing wood workpieces (in particular when sawing). One of the most common methods of fastening wooden blanks at home or in an impromptu workshop is the method of fastening with clamps.
Rice. 7. Tools for marking and fixing wood Clamp
Many people know what a clamp is and have used this simple but effective device more than once (Fig. 7).
Currently, in stores and in specialized markets there is a large selection of clamps of various sizes and purposes, made from both metal and polymer materials rials.
For working with wood, you can use various clamps.
For example, to make it more convenient (and safer) for you to saw a workpiece without a partner, you should secure it with one or two clamps on a workbench or table top.
If you don’t have calipers and need to accurately determine the diameter of a bolt or screw, insert the item to be measured into a vice and clamp it tightly with jaws. Measure the distance between the jaws with a millimeter ruler. This measurement will be much more accurate than directly measuring the object, especially if its end is incorrectly ground.
In the event that the workpiece is small and you are afraid of damaging it, we recommend using polymer clamps. The fixing cheeks of this tool are equipped with plastic pads that cannot damage the wooden workpiece (Fig. 8).
When marking wooden blanks, make sure that large knots and wood defects do not get into the cutting area. If you do not take such factors into account, you may encounter difficulties during further sawing and processing of the workpiece.
If you don’t have the opportunity to purchase a miter box, don’t despair. You can make such a device yourself from three bars or boards. The main thing is to choose even blanks for making a miter box (Fig. 9).
| Rice. 8. Tools for marking and fixing wood Using a clamp | Rice. 9. Tools for marking and fixing wood Hacksaw |
For stronger fixation (more effort when sawing hard wood), it is recommended to use metal clamps.
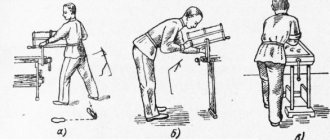
Another way to fix the workpiece is to secure it in a special layout designed for carpentry and carpentry (Fig. 10).
The working surface of the workbench consists of two halves that can be moved: moved apart to the desired amount using special handles.
Through a threaded mechanism; nor set in motion one of the parts of the workbench.
By inserting a workpiece (beam or board) between these halves, you can secure it using the handles (Fig. 11).
| Rice. 10. Tools for marking and fixing wood Layout | Rice. 11. Tools for marking and fixing wood Fixation using a handle |
Rice. 12. Tools for marking and fixing wood Level of fixation of wood workpiece
On the working surface of the workbench there are holes into which you can insert the special plastic stops included in the kit; they will help you choose the right size and level of fixation. spring harvesting (Fig. 12).
In addition to the fact that this small workbench will greatly help you in your work, it is also ideal for an apartment, since it folds up and takes up little space in this state. Using a workbench like this, you will not only save energy, time and nerves, but also avoid damaging your home furniture by trying to saw something off on a kitchen table or stool.
In general, when working with wood, you should set up your work space as carefully as possible, since the better the work is organized, the easier it is to process the wood and make from it what you have in mind.
The main element of a properly designed workplace is a workbench, or workbench. It is necessary for performing all basic work with wood - marking, sawing, planing, painting and assembly. At the workbench, it is recommended to always keep a ruler at hand.
It is most convenient to attach it to the end of the workbench board, in this way you will protect the tool from damage. The ruler should be secured in the recesses at the ends, this way you can remove it if necessary, and then put it in place.
Talking about the process of marking and sawing wood at given angles and not forgetting about the topic of fixing the workpiece, we must mention the so-called sawing box, also called a “miter box”.
This is a tray consisting of a bottom and side parallel walls nailed to the bottom at a right angle. The walls of the miter box have cuts made at different angles.
It is enough to simply place the workpiece in the sawing box, fix it and, inserting the hacksaw into the cuts corresponding to the desired specified angle, begin sawing (Fig. 13-14).
| Rice. 13. Tools for marking and fixing wood Cuttings | Rice. 14. Tools for marking and fixing wood Using a cut |
The most common angles in a miter box are 45 and 90°, however, there are miter boxes with specified angles of 30 and 60°.
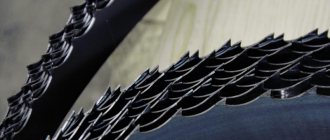
The workpiece (board, block) is placed in a sawing box with its end facing the cut line and pressed against one of the side walls of the “gutter”. The secret to smooth, chip-free sawing is a sharp, well-cut saw.
The workpiece should be sawed using smooth movements, without sudden changes in the speed of the hacksaw blade, lightly pressing the blade to the bottom of the cut and not swinging the hacksaw, but moving it in parallel o the bottom of the “gutter”. When sawing, you do not need to exert much physical effort. All movements should be made in full swing, that is, fully use the length of the hacksaw blade.
Saw boxes are available for sale in large quantities and come in various sizes and options for sets of specified angles. The material for these simple devices is mainly plastic.
The surface of the workbench will last longer if it is made of a thick hardwood board and covered with linseed oil. The base for the workbench can be made from coniferous wood.
Recommended Posts
Rollers for painting walls
Homemade garden shredder
Attachments for walk-behind tractor
Knife sharpening device
How to cut ceramic tiles
Homemade soldering station
Submit Comment
Click to cancel reply.
Marking devices
One of the different types of devices for marking parts is scribers. These are pointed rods used for applying marks. This bench marking tool is used with guide tools. There are several types of scribers, among which the following three are the most common. Round options are represented by rods with one hardened and pointed end and the other bent into a ring. Tools with a bent end are sharpened on both sides, and one of the ends is bent perpendicular to the rod. In addition, the middle part is thickened. These scribers are designed for marking hard-to-reach areas. Models with an insert needle are similar in design to watch screwdrivers.
Gauge gauges are designed for drawing parallel lines and checking the installation of the workpiece during spatial marking. This device is represented by a scriber mounted on a stand with a base. The latter can be placed on the rack in any way. For precision work, use a height gauge with a scale. For conventional options, scale rulers or gauge blocks are used to increase accuracy.
Marking compasses are designed to transfer linear dimensions to a workpiece, create circles for curved parts such as propellers, divide angles and segments, and measure. These products, used for marking, are presented in regular and spring versions. The former have the ability to fix the legs to size, while the latter allow for precise installation. In any case, they are equipped with an arc and a screw for fixing the legs. The latter are sharpened and their ends touch, and the needles are hardened over 15-25 mm. Like scribers, compasses are tools for planar marking.
A marking caliper is designed for particularly precise marking and drawing of large circles. It differs from the usual one by the presence of a micrometric screw. Includes a ruler with two legs equipped with hardened, replaceable needles. The movable leg is equipped with a vernier, and its needle moves along the scale, providing the ability to draw circles in various vertical planes.
Tools for marking metal were discussed above.
The drawbar is designed for marking wooden parts by applying marks to their edges. It is represented by a wooden block 40x5 cm. At one end of it, 1/5 in size, there is a movable scriber in the form of a needle, a sharp pin or a nail. The remaining part of the bar has a thickness of 5-7 mm less.