- June 5, 2020
- Tools and equipment
- Igor Nezhvinsky
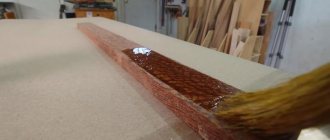
The quality of the tool always plays an important role, and especially when working with wood. Wood is a soft and warm material, responsive to handwork. The market offers a wide range of machines for precise and high-quality wood processing, but to this day only the hand of a master can create a masterpiece.
The art of wood carving has a long history that has given the world unique works of art. Working with wood and creating beautiful things is easy. All you need is patience, perseverance and a good tool. Experience and knowledge will come with time.
The beginning of time
The woodworking master begins with a wooden block, which for an unexpected and incomprehensible reason attracted his attention, and a sharp kitchen knife. The situations can be very different:
- needed a spice rack in the kitchen;
- the door fell off the closet in the bedroom;
- you need to make a rack for children's toys;
- decorate a jewelry box with an ornament;
- you need to put a lock on the front door, etc.
Such tasks are not wood carving, but you will have to cut, drill, saw, sand, etc. If the result is in demand and it has captured the attention of the beginner, then a new star lights up in the sky, and the young master begins his journey of transforming wood into unique and practical products.
Main tool
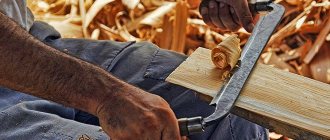
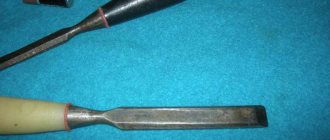
A kitchen knife can easily cut out a whistle, a simple toy or a spoon. Many people start with a pocket knife for the purpose of carving a spoon. This is not woodworking or creativity - this is a memorable beginning. Tools for wood carving need special and, most importantly, sharp ones.
A beginner can start his practice only with this instrument. This is a blunt knife. If you want to cut out simple designs or give the desired shape to a wooden surface, this knife will help you do it perfectly. You don't need to specially learn to work with it. Once in your hand, this knife “will show you” how and what to do. There are only two conditions for the first tool:
- very sharp made of high quality steel;
- fits very comfortably in the hand.
There is no need to think about what tools are needed for wood carving and spend money on beautiful sets at the very beginning of practice - they will all be waiting in the wings. One sharp corner knife with a straight blade is enough.
Drilling machine for home workshop
You can make a drilling machine attachment from a drill with your own hands. The drawings will help you understand the design. For such a design you will need the following elements:
- base or frame;
- rotation device;
- mechanism for ensuring supply;
- stand for fastening the door.
Installing the machine in the workshop
Here are the main steps in making a homemade drilling machine with your own hands:
- Chipboard is used for racks. In this case, you need to choose a thickness of at least 20 mm;
- To maintain the accuracy of the drill machine, it is necessary to use guides. In this case, you can use steel strips;
- For the pads, steel clamps are used.
To make a drilling machine you will need a rotary tool feed mechanism. The design uses springs and a lever. There are various tools for sharpening drills.
Assembling a drilling machine with your own hands: drawings with dimensions
The design will also require the manufacture of a homemade vice for a drilling machine. The simplest device can be assembled from a drill, without a steering rack. To minimize vibration processes, it is necessary to build a more massive table. The stand and table are connected at right angles. In this case, the drill can be attached using clamps. A vice is mounted on the table surface.
Complex drawing of a drilling machine
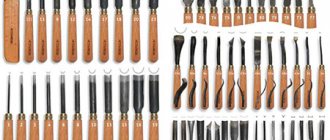
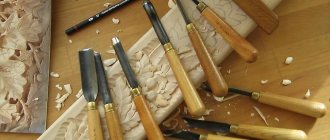
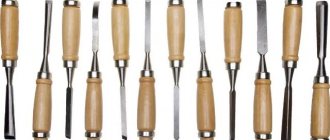
Chisels and mallet
A set of chisels and a good mallet increase the capabilities of a novice craftsman. When choosing a set, you need to pay attention to the material of the blade and the quality of the handle. These are essential wood carving tools for beginners and professionals.
Having chisels of different shapes is an opportunity to make ornaments, cut grooves, make straight lines, and select recesses of the desired shape.
A mallet is a special hammer. It can be rubber or wood. It is recommended to have both options in your arsenal. A metal hammer will quickly destroy chisels.
The handle of a chisel does not necessarily have to fit well in your hand. But when working with a chisel, the hand must be protected, and it would not be superfluous for a beginner to have a robe made of durable fabric that protects the body from a sharp object. For example, a leather apron or a regular robe inlaid with leather, plastic or other inserts.
When working with wood, movements are often directed towards oneself or the auxiliary hand. To avoid scratches and puncture wounds, it is advisable to protect yourself.
Belt sander
This type of sander is used for rough grinding. Used for rough surfaces or for removing paint, it allows you to remove a fairly thick layer of wood. After the belt sanding, it is necessary to treat the surface with an orbital or eccentric sander for more precise processing.
What you need to know when choosing
- Sanding is a tedious and tedious process, often in an awkward position. A more powerful device will reduce the pain a little;
- But don’t overdo it: unskilled hands can easily make dents in the wood, which will take a lot of time to fix;
Lessons from a recognized master
Meeting an experienced carver is a rare success. Just one visit to a professional carver’s workshop leaves a lasting impression on a beginner. The workshop has everything: from the smell of wood to a clear understanding of what tools are needed for wood carving. The first impression falls on the subconscious, and the beginning carver “already knows” what and when he should purchase or make.
A professional does not use standard sets of tools. He prefers to make his own instruments. This point is important to keep in mind. No manufacturer will make what you need. Any tool on the market is a tribute to established traditions, the shape of blades, handles, and accessories.
If you have a chance to become an apprentice to an experienced carver, this is a rare success. You can learn not only the technique of wood carving, but also the logic of making a tool, and master important rules for sharpening and using it.
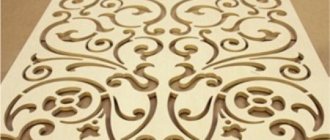
Types of thread
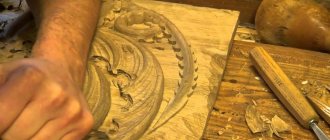
There are many techniques for processing wood, with the help of which craftsmen create real works of art from it.
As such, a strict classification has not yet been created, but conditionally all techniques can be divided into several types.
Flat socket carving: a flat wooden surface acts as a background. The pattern is formed using notches of various shapes.
Flat grooved threads are:
- Geometric has a pattern in the form of a bizarre combination of various geometric shapes.
- Contour forms a pattern in the form of a rigidly drawn outline, as if pressed into the surface.
Flat-relief carving highlights a convex pattern on a background deepened with the help of a tool.
Flat relief carving can be:
- Oval - the pattern on it is located in the shape of an oval, often filling the entire space of the canvas with small recesses.
- With a selected background, a large ornament appears against the background of the space scraped out by the tool.
Relief carving: three-dimensional paintings, practically devoid of a flat background.
Relief carving can be:
- The bas-relief has protruding figures of medium height (about half of their volume).
- High relief - the background is deeply recessed, the figures are very voluminous and protrude greatly.
- “Tatyanka” - a convex pattern fills the entire space of the product, the elements merge, turning into each other (usually the theme is botanical).
The slotted thread can have the appearance of flat-relief or relief. The pattern is made by completely removing wood fragments and leaving through voids between the elements of the pattern.
The slotted thread is:
- Openwork: has protruding parts combined with cut holes, widely used for decorating furniture sets in the Baroque and Rococo styles.
- Overlay: made up of figures cut through and with protruding elements, processed only on the front side.
Sculptural carving - the depicted objects are separated from the background and represent a full-fledged sculpture.
House carving is the creation of elements used to decorate wooden buildings.
Wood surface and sanding
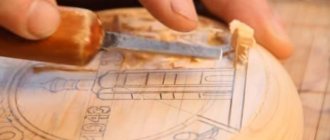
Depending on the item being manufactured, one or another surface treatment is required. A shelf or rack for the kitchen, a table or bedside table for the bedroom requires a perfectly flat and smooth surface. A toy figurine, panel or box does not need sanding, but a drawing made with a chisel cannot be sanded at all.
Cutting wood with a knife and shaping the surface with a chisel does not require preliminary sanding, and once the work is completed, the surface simply cannot be sanded.
In the creative process of wood cutting, the idea often arises: not to cut out what you want, but to refine a natural solution. When a fancy piece of wood (a branch, a stump, a trunk) falls into the hands of a craftsman, the idea arises of adding to it rather than cutting it out.
Work surface and vice
Wood carving tools should be within easy reach. The desktop must have a perfectly flat, horizontally leveled surface. At least one vise must be firmly fixed to the workbench.
A metal corner, a level, clamps, and wood glue must be purchased immediately, and they should always be at hand.
Auxiliary equipment is a sharpening machine, a hand-held circular saw with the possibility of stationary installation, a grinding machine, and an electric jigsaw. A hand jigsaw, a set of needle files and files will come in handy.
Additional equipment and tools are not associated with wood cutting, but without this you will have to spend time doing auxiliary work elsewhere.
A good master should have everything at hand.
Do-it-yourself knife sharpening device: drawings and nuances
To make a sharpener from a washing machine engine with your own hands, you can take parts from old Soviet appliances. To build a sharpening machine you will need the following parts:
- tube for turning flanges;
- grindstone;
- special nuts;
- steel elements for the construction of protective casings;
- cable cord;
- launching device;
- a block of wood or a metal corner.
Homemade unit for sharpening knives.
The flange section must match the dimensions of the sleeve. A sharpening stone will also be placed on this element. This part will also have a special thread. In this case, the flange is pressed onto the motor shaft. Fastening is carried out by welding or bolting.
The working winding is fixed to the cable. Moreover, it has a resistance of 12 ohms, which can be calculated using a multimeter. A frame is also made, for which a metal corner is taken.
Types of knife blades
A classic jamb knife can have blades of different widths, blade angles and a conveniently shaped handle for a specific type of work. The blade of the knife can be made in the form of a triangle (the flag knife is very popular) or have another shape.
The knife can have different sharpening options, smooth or sharp cutting edge shapes. Understanding which blade is needed depends on the specific type of work, the design being performed and the experience of the craftsman.
As in the case of a blunt knife, the prerequisites for the quality of a knife with any blade shape are the sharpness of the blade and the comfort of the handle. The attachment of the knife blade to the handle must be perfect and reliable.
Random orbital sander
Also known as orbital.
For finishing and polishing, it is very convenient when dealing with curved products.
The selection principle is similar to choosing a surface grinder,
What you need to know when choosing
- Power speeds up the process and reduces the precision of carpentry;
- There is a fastening of sanding sheets of the “clamp” type - the consumables for it are cheaper, while the “Velcro” type is more expensive, but can be removed faster.
The sanding process is one of those woodworking operations that takes a long time, so be patient and wear a protective mask as there will be a lot of dust.
Bogorodsk knife “Tatyanka”
The name “Tatyanka” and the Bogorodsk knife were formed historically. They are associated with carving with only one cutter by hand. This knife works on soft wood for cutting small sculptures and figure cutting.
Bogorodskaya carving came out of peasant craft. Her most recognizable scene is "man and bear", and her carving technique is often called power. One knife, one workpiece. A carver of this style is a unique master. He doesn't wonder what tools are needed for wood carving. He just takes his knife and makes unique things with it.
There are many options for making a Bogorodsk knife. There are many options on the market, even a folding product. The best will always be your own.
Power carving with one knife is creativity, and creativity never fits into the framework of a standard manufacturer. When a beginner decides to devote himself to Bogorodsk carving, he will not have a question about what tools are needed for wood carving, he will not have a desire to purchase them, but he will have a clear understanding of how to make his own version of a knife.
Household ornament and “kitchen” cutting
The kitchen is the most popular place in the house. The whole family often gathers here, friends come here, and the interior of the kitchen should always be at its best. A kitchen tool is important for a good housewife, and its quality should be better than others.
To decorate a shelf, rack or cutting board, there is no need to perform figured cutting. Household ornaments should be beautiful, simple and easy to clean quickly. Here it is necessary and sufficient to have a simple set of wood carving tools.
As a rule, a set of chisels will be enough to give a unique look to any wooden item for use in the kitchen. Any surface in the kitchen must be clean. From this point of view, it is more convenient to use an electric tool for wood carving - this will allow you to get straight and smooth lines, an easily cleaned ornament and avoid grooves and recesses in which dirt can accumulate.
The choice between manual work and the use of a machine is up to the master, but the cleanliness and “cleanability” of the product should be in the foreground.
Metal workbench for a mechanic
All useful homemade products and devices simplify the processing of workpieces. Such devices include a workbench for a mechanic. Its minimum dimensions are:
- length – 1800 mm;
- width – 700 mm;
- height – 900 mm.
The table is created in the following sequence:
- frame assembly;
- installation of 2 cabinets, covered with metal;
- securing a working surface consisting of a wooden base in the form of a shield, on which a sheet of metal of a suitable size is placed on top;
- assembly and installation of a rack at the back of the workbench to strengthen the entire structure and accommodate tools.
When assembling a bench, use:
- beams as racks - four corrugated pipes 40*60 mm with a wall thickness of at least 2 mm;
- three beams 50*40 mm to connect the racks and ensure longitudinal rigidity of the structure;
- corrugated pipe 40*30 mm with a wall of at least 1 mm in the amount of 9 pieces to create the frame of the cabinets;
- metal corner 50*50 mm for the manufacture of shelving racks, the height of which will be a maximum of 2000 mm;
- board 50 mm thick for the tabletop panel;
- a sheet of metal no thinner than 6 mm to cover the top surface of the workbench.
Sheet metal Source glavmetall.com
See also: Catalog of construction companies that have their own production of materials and components for the construction of houses
Children's room and bedroom
The surfaces of shelves, cabinets, tables, chairs are smooth and even. This does not apply to legs, arms or ornaments. As a rule, artistic cutting can be applied along the edge of the surface of a table or bedside table, but most often it consists of making additional elements.
A carved handle for a cabinet door, a carved leg for a table or a horse chair for a child will require a simple tool. For example, a set of chisels of various shapes can be used to mark a horse’s mane or make a tail.
Types of tools and wood carving for household use is a technique of personal creativity. A person does not set himself the goal of creating a masterpiece. In his opinion, a masterpiece will be a children's room in which his child will feel comfortable; a set of simple wooden toys that will develop motor skills and imagination. The bedroom will be decorated with a unique lamp made from a tree stump modified with a Bogorodsk knife or a book shelf with a light ornament.
Wood cutting for the interior of a living space is significantly different from cutting figurines, sculptures or artistic paintings. Everything here is simple and easy to use: the most affordable materials and tools. Wood carving in everyday life is the art of designating, clarifying, and decorating.
For a beginner, “household cutting” is an excellent school of skill.
Electric planer
The main task is to plan. Can also be used for trimming boards and trimming.