This story began with a burning desire to have my own home and a rather small budget. It was the availability of small funds and great enthusiasm that made us decide to renovate an old house in the village with our own hands. This task required patience and relentless optimism. If an ordinary construction project lends itself to at least some plans and calculations, the restoration of an old house will inevitably throw surprises at you again and again.
We, Nikita and Nastasya, the creators of this site, will tell here our story of a budget overhaul of a 100-year-old house.
Where to start renovating an old house?
First of all, we took all the trash out of the house and sorted it. Something to burn, something to hand over, something that was even useful for the local history museum - curtains and tablecloths with embroidered flowers. They opened all the windows and vents - the house began to breathe. But the fresh air was blocked by a huge lilac bush on the south side and an elm bush on the west. These powerful plants not only shaded the house and contributed to the spread of dampness, but also began to destroy the foundation with their roots. They started mass cutting. On the eastern and northern sides there were extensions - a veranda and something like a woodshed.
For three days we had a fire burning with branches and rubbish: rags, broken furniture, rotten boards from outbuildings, floors, picket fences. Here everything fits into one paragraph, but in life we were engaged in persistent clearing for at least two weeks from dawn to dusk. But this was only the first stage of clearing.
Cutting down lilacs
Second phase. Electrical and plumbing
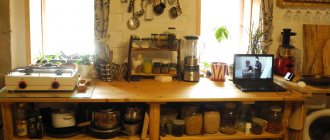
Photo 3 - Second stage of repair - we are building walls for wiring and pipes
This work is the dirtiest, but at the same time responsible. It will be very difficult, and sometimes impossible, to redo such work later without carrying out a new major overhaul.
Important!
Saving on plumbing, as well as electrical, is not wise. Wires and pipes hidden in the wall cannot be repaired. Wall nailing should be done according to a pattern that will need to be saved so that later you do not accidentally drive a nail in a dangerous place.
All that remains is to lay the wires of the required cross-section and pipes, preferably propylene, and carefully seal the grooves.
Repairing the walls of an old house begins with stripping
Next came the most difficult time. Difficult – psychologically. We noticed that the plaster was falling off in places. Anything that is loose needs to be torn off and a new layer applied, strong and even. We started cleaning the plaster on the walls, inside and out. And in some places huge cracks and loose bricks were discovered.
Everything looked in such a way that it seemed: “There is nothing to repair here.” It took us a couple of days to recover from what we had seen and think about what to do next. Is this old house due for renovation? Or should I start building a new one from scratch?
We were faced with such a choice. Option one: frame house, completely empty, without furniture or plumbing, with a metal stove - this house would eat up all our funds. Option two: restoring a house with holes, which would have cost us less even with plumbing, furniture and interior decoration, and yet it is a brick house with thick walls and a Russian stove. In the second option, the result promised to be better, but it involved risk; we did not know what other shortcomings would appear next; the old house is full of surprises. We settled on the second one, took a risk and did not regret it.
Counting expenses
To ensure that the work does not end prematurely due to lack of material support, it is necessary to correctly calculate the upcoming expenses. Depending on what you are going to repair, the necessary measurements of the room are taken.
Knowing the dimensions of the room, you can make any calculation. Then specialized stores monitor the prices of building materials of interest. It is worth making a separate expense column for kitchen renovations if built-in appliances are installed.
Do-it-yourself restoration of the foundation and walls of a house
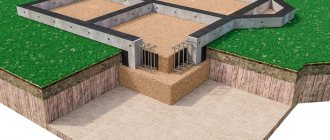
Restoring an old brick house inevitably involves heavy concrete work. It was decided to fill the mortar along the entire southern wall to the windows, in all four corners outside, as well as one corner inside the house, almost to the ceiling. This was necessary to fasten the wobbly bricks to each other and create support where there is none.
First day of working with concrete
Our list of foundation and wall repair tasks went something like this:
- Dig a trench in the pouring areas 40 cm deep and 30 cm wide
- Make a sand cushion, lay waterproofing (roofing felt), and add sand again
- Insert a plastic sewer pipe into the vent holes
- Set up the formwork and reinforce the place for pouring (a chain-link mesh was used, as well as all the scrap metal found on the site: frying pans, scissors, mattress springs, railroad spikes - if archaeologists study our house in a couple of hundred years, then based on what they found, a incredible story)
- Gradually pour 15-20 cm of concrete every 2-3 days, and build up the formwork for the next layer. In between pours, cover the concrete with roofing felt and regularly moisten it with water so that the concrete does not dry out too quickly and crack, which affects the strength of the concrete. Leave protruding reinforcement between pours to tie the layers together. Our solution: 1 part cement, 3 sand, 5 screenings. Red broken brick was also added to the solution
- At the last stage, the house was primed and painted with facade paint
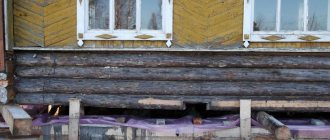
Reinforcement of the southern wall
The mortar was mixed by hand in a wooden box. The pouring took about two weeks of intensive work.
After concreting the global holes, we worked with small cracks: they cleaned them and filled them with cement mortar. 3-4 rows of bricks were laid on the northern and southern walls. Basically, the bricks had to be re-laid in places where the roof was leaking and the water was washing away the masonry.
The strengthening of the southern wall and corners of the house has been completed, small cracks have been cleaned and sealed, the upper rows of bricks have been rebuilt
Finishing work for floors
For a summer residence, protection from moisture and subzero temperatures is important. Therefore, the base coating here should still be a rigid concrete screed poured onto a porous base (expanded clay, and a reinforcement grid on top of it). Linoleum, laminate, and board fit perfectly on such a base.
A dacha made of timber - the floors are made of concrete screed for further finishing Source pol-exp.com
Finishing the floor with laminate is an excellent solution if the material is chosen with moisture-resistant properties. But if they live at the dacha permanently, which means they regularly maintain a normal level of humidity, then it is permissible to lay cheap laminate flooring. The material is presented on the market in a wide range (like linoleum or tile).
Finishing the bedroom floor in a country cottage with a light wood laminate Source: vash-artdom.ru
On a note! If the dacha is not heated during the cold season, then it is better not to lay carpet. Otherwise it will become damp and rot.
Laying the floor with parquet boards is expensive, but reliable. In addition, parquet is easier to restore than plank flooring. But you need to understand that parquet requires more careful care than other popular types of flooring. In addition, after laying the dies, the surface must be sanded many times and then polished. That's why such floors are not cheap.
Finishing the floor with parquet for a country living room Source rdstroy.by
Laying tiles may be a good solution. This is especially suitable for dachas with private use, where guests often come or a large family lives. Such a floor is easier to wash, and more than one hundred times. A warm floor is often built under the tiles.
Scandinavian-style shower floors are finished with small gray tiles Source coolhouses.ru
Restoration of vaulted windows in a private house
The window openings gave a special touch to our home. White plastered window sills, very wide - 60 centimeters, brick vaults - it was beautiful in its laconicism and simplicity, nothing superfluous. We really wanted to preserve this ascetic charm.
When they began to remove the old plaster, the window sills collapsed, one of the vaults miraculously did not collapse, some bricks in the masonry were loose, and huge cracks appeared.
Cleaning windows
After a moment of despair, a list of tasks for window restoration was compiled:
- Fill the window sills with concrete mortar (with the addition of bricks and metal reinforcement)
- Fill deep cracks in openings with a solution of sawdust concrete. Sawdust was added to make the mixture lighter and give less load on the support
- To strengthen the vaults, insert wooden boxes into the window openings. This way we gave support to the fragile vaults and created a level base for installing the frame with double-glazed windows
- Make window frames. To do this, we used timber for the door frame; the choice fell on it because the required groove for the double-glazed window was selected there, this simplified the task. Double-glazed windows were made to order, single-chamber, according to our non-standard sizes
Window boxes inserted
Window. Inside view
Ceiling
Ceiling repairs are done only after roofing work. Otherwise, your efforts will be in vain. You can trim it with clapboard. If you plan to whitewash, you first need to thoroughly clean the surface of old plaster and remove mold and mildew.
It is advisable to carry out home kitchen renovations in the warm season. This way there will be no problems with cooking in the summer kitchen or on the veranda.
Inexpensive roof repair of an old house
When choosing a house, we paid attention to the integrity of the roof. If the roof of an old house is leaking, then most likely precipitation has already washed away the stove, walls, floors, and foundation. Water quickly destroys buildings. This means that restoration will not help. The roof of our house was in good condition.
Repairing the roof around the chimney
To correct minor shortcomings, we made the following plan:
- Change the old skate. The previous skate was wooden, we decided to replace it. We bent a galvanized sheet ridge and installed it in place
- Cover the only hole in the slate with cement mortar and cover with mastic
- Seal the hole where the chimney comes out. I had to tinker with this, because... The pipe size is very non-standard. The stainless steel apron was not easy to cut.
After that, the house came to life, and we perked up.
We talk about what kind of restoration awaited the house next in the article “Restoration of a 100-year-old house. Interior decoration"
Daylight
According to standards, 10% of the total area of the house should be windows. In previous years, builders installed small structures to significantly reduce heat loss. Ordinary glass was inserted into them, but they let the cold through.
Today preference is given to plastic structures. They are high quality and comfortable.
Responses from the past
When we talk about the reconstruction and restoration of old brick houses, we most often mean buildings from the beginning - mid-last century. And there they used slightly different construction technologies and other building materials. Accordingly, you need to be prepared to learn about waterproofing the foundation with birch bark, bracing corners with metal pins, combining masonry mortar, etc. All this has served for decades with virtually no complaints, but in combination with modern materials and taking into account increased loads it can behave unpredictably.
Preparation
Before updating the outside of a brick house, you need to purchase tools and finishing materials, then prepare the wall surfaces. This process includes:
- cleaning walls from previously applied cladding, dirt, climbing plants,
- sealing cracks,
- drying the facade at high humidity,
- destruction of fungal plaque and treatment with an antiseptic,
- impregnation with a primer with increased moisture absorption,
- adjusting the thickness of heat-insulating raw materials,
- completion of plastering work,
- coating application.
Article on the topic: Why do you dream about a brick unfinished house?
Option 3. Dramatic change of image
Old brick house in the Ryazan region. Quiet place and 45 acres of land. It's hard to resist such a purchase. There was no goal to preserve the look of the old building, so after we assessed the cost of building a new house and reconstructing the old one, the choice was made in favor of the second one. Moreover, the box itself is in fairly good condition, did not have any significant defects and required minimal restoration.
Article on the topic: What is a brick house made of?
An old non-residential building had to be reconstructed. Photo from the PRO100LIZN channel
The task was not only to restore the old house, but also to add additional living space and a light second floor to it. To achieve this, a number of major works were carried out. First, the roof and rafter system were dismantled and the foundation was poured for the extension of the first floor. The existing foundation was left without reinforcement. In addition, existing cracks in the brickwork were widened and sealed. According to the builders, they were not critical. We installed lintels for window and door openings, as well as floor beams for the first and second floors.
It was decided to build the second floor from foam blocks. Photo from the PRO100LIZN channel
This house did not conceal any unpleasant surprises that required additional financial and time costs. As a result, after external and internal finishing, we got a modern, spacious cottage.
The result of the reconstruction. Photo from the PRO100LIZN channel
Much controversy arose due to the fact that the old part of the house was hidden behind modern decoration. But this is still the desire of the owner of the house, which clearly demonstrates that a modern and comfortable home can be made from an old, well-worn building.
Stage six. Wall decoration
Photo 7 - The sixth stage of renovation - finishing the walls in the apartment
Depending on your preferences and financial capabilities, you purchase material for wall decoration. You can hang wallpaper, the choice of which is extensive not only in color, but also in material, texture, and size. For example . Many options include painting, as well as decorative plaster. There are also more exotic types of finishes, it all depends on your desire and the overall style of the room.
Important!
Popular wisdom says: leftovers are sweet. This means that you can purchase leftover wallpaper at a lower price and create an original combination.
Option 1. Reconstruction while maintaining appearance
The house was in disrepair. Its wall began to lean and crack due to foundation settlement.
The walls of the house were seriously damaged. Photo from Denis Petrov channel
To level it, I had to pull out the wall with jacks and tie it with a monolithic belt. It took three weeks to solve this problem alone.
Article on the topic: Which brick is better for a bathhouse
Pulling out the wall. Photo from Denis Petrov channel
When the foundation was opened, it became clear that it sank due to improper laying. They dug it up on both sides and tied it with a monolithic clip. They made a blind area.
Blind area with insulation. Photo from Denis Petrov channel
Due to poorly executed roofing, the wall masonry was partially washed away. By the way, during the process of replacing the roof, it turned out that the difference in the width of the wall was about 15 cm, so at this stage we had to suffer.
As a result, the house was restored and suitable for living. The owner was pleased.
Restored house with preservation of appearance. Photo from Denis Petrov channel