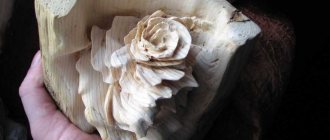
Workshop - Wood carving lesson. The carved element is a rosette.
Hello, dear guests! Today we will cut a carved wooden element - in our case: a rosette for a carved wooden chandelier with red deer antlers. Also, this decorative element can perfectly complement medallions for horns, panels, house carvings and other hand-made carved wooden things!
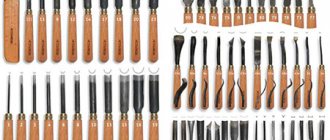
First, let's draw a sketch, prepare a wooden blank from which we will cut and tools that we have sharpened in advance (there is a lesson on sharpening cutters):
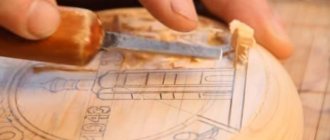
By cutting a corner, we separate the curly elements (lamb clouds) from each other.
We cut the dividing line in a circle with a corner, separating our “clouds” from the center.
We use a semicircular wide chisel to round off our “clouds” and use it to chamfer the central inner circle.
In fact, the very shape of the carved element “tells” which tool you can use, as well as at what depth you want to make the carving.
We clean the threads with a semicircular chisel and a jamb.
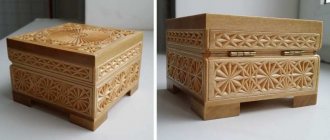
This is how we got a carved ceiling medallion (rosette) under a chandelier with red deer antlers. As always, my assistant Lynx is nearby!
Sanded and painted. Such a carved decorative element can also be used for the decoration of hunting trophies - a medallion under the horns.
PS Dear beginning cabinetmakers, if you want to master the technique of wood carving , don’t wait for help from outside, learn to “understand” the form, it will tell you which tool to choose for the desired operation.
The density of the wood will tell you what sharpening angle is required to work with it.
Pay special attention to safety precautions and perfect sharpening of the tool. And if you encounter any difficulties working with wood, don’t hesitate to ask! We give advice with pleasure! And your doubt about whether to ask or not can complicate your work and deprive us of pleasure!
By decorating our beloved home with our own hands, we make it wonderful. We wish you all success in your creativity. Amur jewelry
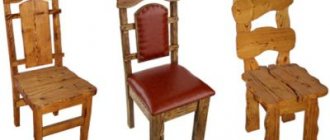
Carving wooden frames with your own hands
Carved platbands serve as an incredibly beautiful decoration for wooden residential buildings. The owner can make such elements with his own hands, which will add individuality to the residential building. The part has its own characteristics. One side of the casing is straight. The second is a figured carving.
DIY carved wooden frame
The framed windows on the façade evoke memories of grandma's house in the countryside. The structural element - the platband - serves as reliable protection from drafts, noise, rain, snow and dust. It completely covers the gap formed between the window frame and the opening. The carving gives the part an attractive appearance. The whimsical pattern can be modern or borrowed from ancestors.
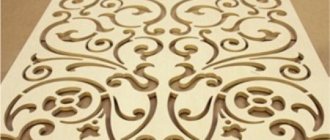
Templates for wood carving element rosette
Traditional wood carvings often use ancient symbols and motifs. Many patterns that include them have mystical and religious meaning.
These symbols include a socket.
Below are ways to divide circles into different numbers of equal parts. Having mastered them, you will be able to independently create dozens of your own sockets.
Several types of sockets can be cut from the same drawing.
A lot depends on whether you make this or that element convex or recessed. Sometimes the difference is amazing: it’s simply hard to believe that such different rosettes are based on the same pattern.
- Draw a vertical line.
- Place the compass needle at point 1 and draw a circle.
- Place the needle at point 2 and, without changing the compass solution, mark points B and C.
- Draw lines from point 1 to points A, B and C. These lines will divide the circle into three equal parts.
- If you connect lines Ac, B, B with B and B with A, you will get an equilateral triangle.
You can divide the circle into three equal parts using a protractor by making marks on it every 120 degrees.
Dividing a circle into four equal parts
- Draw a vertical line.
- Place the compass needle at point 1 and draw a circle.
- To find points A and B, arbitrarily increase the opening of the compass. Place the compass needle at points 2 and 3 in turn and draw short arcs intersecting outside the circle.
- Use a ruler to connect the points A and B.
You can divide the circle into four equal parts using a protractor, making marks on it every 90 degrees.
Dividing a circle into five equal parts
- Draw a vertical line.
- Place the compass needle at point 1 and draw a circle.
- To find points A&B, arbitrarily increase the opening of the compass. Place the compass needle in turn at points 2 and 3
and draw short arcs intersecting outside the circle.
- Use a ruler to connect points A and B. Make a mark on the circle at point B.
- Reduce the compass solution to the original and place its needle at point 2. Mark points D and E on the circle.
- Draw a line connecting points Gi D. At the point where it intersects with the vertical line, mark point E.
- Place the compass needle at point E and the stylus at point B. Draw an arc until it intersects with the vertical line. At the intersection, mark point G.
- Place the needle of the compass at point B, and the stylus at point G. Without changing the solution of the compass, divide the circle into five equal parts.
What is a stencil for?
First, let's try to figure out what stencils for woodworking are. These are special drawings and templates with which elements of patterns are applied to the surface of wood.
They make repeating identical symbols much easier and allow you to speed up your work. For example, the most popular stencils for carving wood are samples for platbands.
With their help, quite complex interior and facade design work is performed.
Stencils are divided according to their purpose for creating interior elements:
- ribbon carved ornament;
- carved platbands;
- pilasters;
- towels;
- brackets;
- carved balusters and more.
All varieties are considered professional templates. Using them, you can create several ornaments for wood carving of a three-dimensional nature and significantly facilitate the task assigned to the master. There is no need to create them yourself. On the Internet you can find and download the option you like.
Prices for wood carving kits
Carving with a jigsaw
The process of manufacturing carved elements is carried out in several stages:
Making a sketch
House carving with a jigsaw begins only when the master has prepared the templates. Prepared carving stencils will help you accurately create the desired carving pattern on wood. Take your time to get to work on wood as quickly as possible. Let you have not one sketch, but several. Sculpt the pattern to feel its volume. When choosing a design, you can start with simple elements of an openwork pattern, characteristic of slotted carvings in Russia.
Look for inspiration in the contemplation of immortal masterpieces of folk art. You can look at samples if you look at furniture in the Baroque or Rococo styles. Select a sketch of a baroque ornament used by Russian master carvers. The pattern depicts national characteristics. Rococo motifs include motifs of plant elements, small birds, curved shells, and fancy curls.
A sketch for carving in any of the above-mentioned styles involves preparing and executing complex compositions for window decoration. House painting contains all the richness of traditional patterns. Any woodwork is available to skilled craftsmen today.
Modern CNC machines do an excellent job of bringing a sketch to life. With the help of high-precision equipment, any design idea can be easily realized.
Multifaceted and sophisticated elements can cause admiration among others. House carving can be represented by a combination of different types. In order not to spoil the future product, be sure to use templates or stencils to make markings. House paintings from the past are a rich source of inspiration, in which you will find all kinds of Russian ornaments.
Creating a template is the best option
In the process of making a template, the following steps are distinguished:
- Measure the window dimensions correctly. Be sure to account for protruding edges that extend into the walls. The casing has a standard width of about 30 cm.
- Take cheap smooth wallpaper according to the sketch you choose to make the required life-size template from a roll.
- Make 3 patterns - for the side, top and bottom.
- Fold the strips in half. The center of the pattern should correspond to the fold.
How to choose a stencil
Wood carving patterns are so diverse that they can be used by both beginners and advanced professionals. With their help, both simple ornaments and high-level works of art are created.
The main thing is to make the right choice. To do this, you must adhere to certain rules:
- if you started using cutters quite recently, then you should not choose intricate ornaments , since it is quite difficult to work with them, and you can ruin the workpiece;
- for each type of wood carving they choose their own stencil;
- Before starting work, you must apply a stencil design to the workpiece; the lines must be neat and clear.
Finding stencils today is easy. This can be done using electronic libraries.
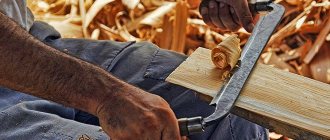
Tools and materials
Special chisels were previously used for wood carving. With the development of engineering and the invention of new tools, wood carving also changed. Firstly, with the increasing shortage of wood, and especially valuable varieties, plywood began to be produced. Secondly, with the advent of saws, a manual jigsaw was invented, and then electric models.
Types of plywood
Plywood is a wood-laminated building material that is obtained by gluing together specially prepared veneer. It is produced from various types of wood and is used for a wide range of tasks:
- construction;
- finishing;
- package;
- furniture manufacture;
- manufacturing of structures;
- application in industry.
There are two types of plywood, and every novice craftsman should know the difference between them. They produce sheets marked FK (moisture resistant) and FSF (increased moisture resistance). The former are suitable for any type of work, while the latter are best used for cladding buildings - the substances used in their manufacture can be dangerous to humans with prolonged contact.
Types of jigsaws
A hand jigsaw is the simplest and cheapest tool for sawing wood carving.
It has a U-shape, between the ends of which a file is fixed, and a handle. The tool is easy to use, but requires some skill. You should not expect that from the first minutes of communication with him you will get perfect arcs and lines. When working with a hand jigsaw, it is important to position the tool strictly perpendicular to the workpiece, and also to work correctly with your hand - the entire elbow should move, and not just the hand. It is best to work with material no thicker than 6 mm. Holding a jigsaw is much easier, and thanks to the electric traction, cutting is faster. However, even here you will need to get used to it. Without experience, it may seem that the tool is “jumping” on a sheet of plywood, and you need to be able to “walk” according to the drawing. This applies to portable jigsaws, but there are also stationary ones.
When working with machines, safety precautions should be observed, since during work you need to move the workpiece, and sometimes your hands are in close proximity to the sawing blade. Sheets of plywood and wood up to 140 mm thick can be used with power tools, depending on the power of the model.
Types of wood carving
Wood carving does not have a narrow direction; on the contrary, it has several varieties:
Slotted carving on plywood
The key to success when performing slotted carving is the correct choice of ornament. Thanks to it, plywood carving sets the overall concept and adds aesthetics to the product.
Drawings and ornaments on floral or animal themes are standard representatives of the classical style and are suitable for any interior design.
Carved inscriptions are very often used . In this case, ready-made stencils are difficult to find, since they are created individually for each case. This is due to the fact that it is necessary to maintain the size, style of the font, and the set of words is always different.
House wood carving
House wood carving is the main focus of the design of huts, which is very common in the Nizhny Novgorod region. It is she who can boast of various lace patterns . To perform it yourself, you should select the appropriate sketches.
The main condition for house carving is to avoid small parts. They will get lost on the facade of the house, and will not last long.
Options for house carvings can be selected on websites dedicated to wood carvings. But there are craftsmen who can make a template to order. In this case, you can realize exactly your idea and get an original pattern.
Through wood carving
The distinctive feature of through carving is the complete removal of wood from the interior of the design.
Through threads come in different styles:
- simple, in which elements are cut out along the contour of the design;
- openwork, when the pattern is created with a volumetric effect due to multi-level cutting.
Through carvings are used to make frames, various overlays, door panels, and decoration elements.
Through carving in oriental style is done using a jigsaw.
Sawing with a jigsaw
Sawing with a jigsaw is mainly carried out on plywood. To perform quality work, you must have at least the slightest experience working with the tool . Also an important factor is the presence of an original stencil depicting animals.
Commonly used stencils:
- a pair of swans;
- head of a deer, wolf;
- cockerels on a knitting needle;
- a horse standing on its hind legs;
- butterflies.
It all depends on the style of the interior, which needs to be supplemented with decorative elements. You can easily find examples of templates on the Internet.
The most suitable material for cutting is birch plywood 3–10 mm thick . In addition, for work you need to prepare:
- copy paper for interleaving the pattern;
- special paper for sanding parts;
- wood glue for joining parts;
- clear varnish to give a decent appearance.
Before starting work, the workpiece is carefully polished with glass paper, only then do they begin to transfer the design.
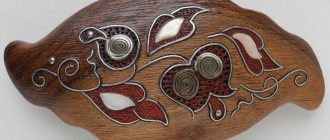
Floral ornament
Often, floral or foliage patterns are made in the form of stripes or borders consisting of repeating patterns. It can be made in an individual composition that contains images of trees, fruit-bearing plants, various floral elements , etc.
The work is done in various ways:
- display in a naturalistic form;
- simplified plant elements.
Floral patterns for carving wood are in second place in popularity after geometric patterns. Favorite thematic elements at all times are lilies, grape leaves and berries, oak, hops, ivy, etc.
Final processing of the carved product
After removing the background, the product is finished in order to obtain smooth and clean edges of the design. For stripping, use steep and sloping chisels of medium and small size. Places of the ornament that are difficult to reach with chisels are cleaned with a sharp knife. Using these tools, the edges of the image are rounded by cutting a thin chamfer or selecting narrow fillets.
It is recommended to place the chisel at a slight inclination in relation to the surface being processed, moving it down and slightly to the side. This technique facilitates the finishing process and allows you to achieve cleaner threads.
Processing of slotted openwork products is carried out on both sides. After trimming the contours with chisels, the cut out pattern is cleaned using needle files, sanding blocks and emery cloths.
The ornament is modeled in accordance with the carving used – relief or flat-relief.
The technique of flat-relief slotted carving is used, as a rule, to make decor for furniture, cornices, window frames, shutters, etc. Relief openwork carving allows you to get more elegant products, so it is used to create women's jewelry, screens, fillers for cabinet doors and etc. By the way, openwork furniture doors look even more impressive if you stretch bright fabric from the back, against which the ornamental composition will look clearer and brighter.
Sketches for patterns
Stencils for wood carving are quite diverse in their subject matter. Some of their variants are used in a narrow direction, and some can be found on any interior elements.
Here are several sketch options that can be used for a specific purpose:
- Wooden patterns are used to decorate the façade of houses . It looks perfect on both doors and walls.
- Art style cutting is used to decorate tableware and furniture.
- Products made using intricate openwork cutting are especially held in high esteem. Most often it is used for household items.
Where to buy wood for carving
There are many places where you can get material for work, the main thing is to find high-quality and dry wood. For example, good blanks for carving are sold in specialized stores for handmade fans and art salons. In addition, you can buy suitable boards at building materials stores or lumber yards. And small furniture manufacturing enterprises and carpentry workshops are a real treasure trove of dry wood scraps of various sizes. For carpenters, such waste is no longer valuable, so, as a rule, it is given away for free.
Another option is wooden packaging (boxes, pallets). From one such product you will get one and a half to two dozen blanks.