DIY dovetail joint
Of the different types of connections between two removable parts in the mechanics and wood industry, dovetail fastening is the strongest and most reliable. In woodworking, this type of joint, or lock, is used in all forms of production.
Methods of using dovetail fastening:
In large-scale production, the design of this lock is quickly and successfully completed by a dovetail cutter. At home, in the absence of milling equipment, it is easy to make a dovetail with your own hands. At the same time, the ability to produce this structure with high quality is considered high-class craftsmanship.
This article provides a detailed description of the manufacturing process, with a step-by-step listing of all the techniques, so that a craftsman of any level can understand how to make a dovetail.
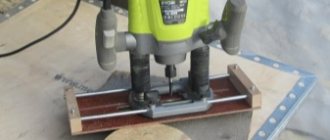
Manufacturing of equipment for box connection
This product allows you to mill box joint grooves one at a time on a milling table. In our case, it is simply an additional board, screwed onto an angle stop and having a key, with which we will determine the exact interval between the grooves.
simple device for making box joints
Install a straight cutter with the diameter of the required groove width; Place the router on the table. Set the routing depth equal to the thickness of the existing board and mill a groove into it. After this, unscrew the board from the miter gauge and move it so that the gap between the groove and the cutter is equal to the width of the cutter.
Mill a groove in the board again, this time the second one (on the right). Cut a key out of the wood so that it fits exactly into the first groove and place it on the glue, so that it will be approximately 25 mm from the groove on the additional board.
Milling grooves in the first workpiece
Place the workpiece with its front surface against the additional miter fence board, pressing one of its edges against the key. Turn on the router and, holding the workpiece firmly against the fence, move it onto the cutter, milling the first groove. U
place the first groove on the key and make a second pass. Continue routing in the same manner until you reach the opposite edge of the workpiece.
Milling slots in a mating workpiece
Install the last groove of the first blank onto the key. Press the edge of the mating second piece against the edge of the first and move the entire set to rout the first groove on the second board; Keep both workpieces pressed against the miter gauge. Mill the remaining workpieces using the same technology as when making the first one.
The tenoning device makes it easier to select grooves of any configuration, including dovetail - video
There are too many dovetail patterns to talk about each one in this article. Shall I just provide a link to the document? by downloading which you will find all sizes? and even drawings for making a dovetail template with your own hands.
Description of the manufacturing process
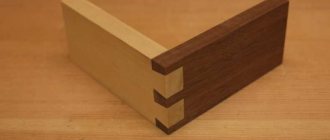
The design of this carpentry lock is a tight joining of two parts. At the end of one block a V-shaped protrusion is made, reminiscent of a dovetail (hence the name). A cut is made on the second block according to the shape of this protrusion. The thickness of this spike can be the entire width or half of the tree. The tenon and cut are made at an angle of 10-12 degrees.
This article describes the process of making this wood floor joinery. The type of product that should be produced in the end is shown in the figure.
The production of blanks is shown in the figure.
Next, using a carpenter's square, a ruler and a pencil, mark the dimensions of the joint tenon on the workpiece 1.
Advice! If you need to make several connections, it is recommended to make a dovetail template from a thin, dense material, which increases productivity. The example described shows a single production of this design.
After marking, to make the required V-shaped protrusion, the excess parts of workpiece 1 are cut off using a band saw.
When the tenon is cut, it is clamped in a carpenter's vice, trimmed with a chisel, and brought to perfect condition with a file and sandpaper.
When the protrusion is ready, a slot must be made under it on the second workpiece. To do this, markings are made on the second workpiece using the first one as a template. It is necessary to make the markings as accurately as possible, since any play between the parts is not allowed. The design will be unreliable. For this reason, the top lines are drawn with a cutting knife. The middle is marked with a pencil.
Clamping the workpiece in a vice, use a hand jigsaw to make cuts along the marked lines of the 2nd workpiece. The depth of the slots is the middle of the block, marked with a pencil.
Next, you have to select a slot for the tenon in the block, according to the marks made with a jigsaw. This can be done in two ways. In the first case, the slot is selected using a chisel, cutters, file and sandpaper. Here you need to be extremely careful, because... It is necessary to maintain a perfectly flat surface for joining and gluing parts.
If you have a hand router, it is much easier to make a dovetail with a router, since in this case it is much easier to get the perfect result than by hand.
Without removing the workpiece from the vice, using a hand router, carefully and carefully select a part of the wood in the space between the slots. A 10 mm finger cutter is used.
In order to complete the dovetail connection and ensure a tight and reliable connection of the parts, carefully trim the edges of the sides on workpiece 2 using a chisel, periodically trying on the tenon and trying to insert it into the slot. The tenon should be inserted tightly, but without excessive force.
Instructions for working with the ds5 (dw3) template
Instructions for making an open dovetail joint on a ds5 (dw3) template.
Let's consider manufacturing using the ds5 template. The production of this connection is quite labor-intensive, because When working, you need to use both sides of the template, and to do this you will have to remove and reinstall it.
First, let's look at the template itself and the information that is depicted on it:
- The tapered side of the template (bottom protrusions in the picture). On the conical side of the template you need to work with a straight (cylindrical) groove cutter f12mm and a copy sleeve f17mm. Inscriptions on the template (bottom of the picture, left):
L=30 – template step,
D=17 – diameter of the copy sleeve that must be used with this template,
f=12 – diameter of the groove cutter.
- The straight part of the template (the upper protrusions in the picture). On this side you need to work with a cone cutter with parameters similar to those of the cutter with article number 9317 from the ENCOR company. The parameters of cutters used with box templates are presented in the table:
Inscriptions on the template (top right):
L=30 – template step,
D=17 – diameter of the copy sleeve that must be used with this template,
f=9317 – article number of the cutter from the table.
Let's first consider working with a cone cutter art. 9317 on the straight side of the template. This is what you should get:
- We install the 17mm copy sleeve and the cutter into the base of the router:
In the example, we will use the maximum possible thickness of the workpiece – 22mm. This thickness is determined by the parameters of the cutter:
The height of the working part of the cutter art.9317 is 22mm, the thickness of the ds5 template (like any other) is 4mm, therefore, to obtain a tenon of the maximum size, it is necessary to set the cutter relative to the base of the router at 26mm.
We put the configured router aside.
2. Install the workpiece into the fixture.
The workpiece must be positioned above the plane of the fixture by at least 30mm, so as not to damage the cutter on the iron base of the fixture.
We clamp the workpiece and move the side support tightly. We also fix it.
3. Install the ds5 template. It is attached to the sides of the frame with M4x12(16) screws and nuts, which are included in the kit. The template must be shifted relative to the edge of the workpiece by an amount that is a multiple of half the step. Those. The template pitch is 30mm, the distance between the mark on the template and the edge of the workpiece should be a multiple of 15mm, in our case – 45mm.
We take the prepared router and make the first tenon:
Next, rolling the template with a sleeve, we make the remaining tenons:
Similarly we make the other side of the workpiece, we get:
Without changing the side settings, we make the required number of blanks.
We proceed to the tapered side of the template and the cylindrical cutter.
This is what you should get:
As you can see, the dimensions of the tenons/grooves of the drawer sidewall blanks and the front/back wall are slightly different. This is done to create a obviously tighter connection.
1. Set up the router and cutter. We set the cutter so that it protrudes beyond the plane of the router sole by 26mm. We do not change the bushing, it remains 17mm.
2. We fix the workpiece similarly to step 2 when working with the straight side of the template and a cone cutter.
We rotate the template in a horizontal plane by 180° and install it so that the line drawn across the tenons of the template coincides with the edge of the workpiece.
When this match has been achieved, it is necessary to move the template left/right, so that the distance between the line marked on the template along the tenons and the edge of the workpiece is a multiple of the template pitch, in our case 60mm.
We fix the template, you can start working
We make the following grooves and, turning the workpiece over, repeat the procedure on all walls of the future box. We get:
Assembling the box:
Example No. 2
We try a workpiece 12mm thick. Short review. Let's just focus on setting the cutter overhang. This is what happens if you leave the cutter overhang at 26mm.
The overhang of the cutter should be equal to the thickness of the workpiece + 4mm (thickness of the template). In our case 12+4=16mm
We work on the tapered side of the template with a groove cutter. We get:
We rearrange the template, work on the straight side of the template with a cone cutter.
We collect:
The dw3 template is completely identical to the ds5 template (only longer).
When working with the ds6 (dw4) template, it is worth considering that the copy sleeve must be used with diameter 19mm.
The connection tension is regulated by replaceable copy bushings, i.e. By installing a 17mm bushing instead of a 16.9mm bushing, we get a less tight connection, and by installing a 17.1mm bushing, a tighter connection.
When working with a router, do not forget about safety precautions.
Good luck with the templates. If you have questions, suggestions, ideas for modernizing templates or devices, write to e-mail: [email protected]
Dovetail is more than just aesthetics
It is a common belief that today, in an era of affordable quality glue and cheap fasteners, the use of dovetail is more of an aesthetic whim. This judgment is only partly true. Undoubtedly, all possible variations of this tenon joint are very expressive, testify to the carpenter’s skill and can decorate any project. But in addition to beauty, the dovetail also has important functional advantages.
The connection resists natural wood deformations well without losing structural integrity. Thanks to this quality, it is advisable to use it in large parts, especially in solid wood products in the manufacture of furniture and drawers.
Using a dovetail, you can choose the optimal strength of the connection: this is influenced by the total number of studs and the angle of inclination of the eye. Another feature that increases mechanical strength is a large gluing area.
Advantages and disadvantages of dovetail cutting
Fastening the dovetail beam has a number of advantages:
- No corner projections as with traditional “bowl” cutting. This allows you to cover logs and beams smoothly along the entire perimeter of the walls.
- Compared to the claw cut, the dovetail has a strong lock and the structure is stable and reliable.
- The tightness of the joint is ensured.
- The cutting is neat in appearance compared to other types of creating locks.
- Installation of logs and locks does not require special skills, algorithms or additional fasteners.
- The relative efficiency of work on creating excavations, which reduces construction costs.
What you should pay attention to when choosing a dovetail:
- The difficulty of creating a cutting for an inexperienced person. This is the type of connection that should be prepared by a professional.
- Inclined joints facilitate the passage of rainwater into the castle, which can cause putrefactive processes in the wood and the development of mold. To avoid this phenomenon, the corners are carefully waterproofed and sheathed on the outside.
- Corners are bridges of cold. To keep the room warm, they must be covered with thermal insulation materials.
The disadvantages of dovetail cutting can be easily eliminated at the stage of construction work, so you should not be afraid of them and refuse this type of log house.
What should you consider when designing a connection?
When designing a dovetail, there are a number of considerations that will affect both its strength and appearance.
Interval between spikes . The distance between the tenons and their size determine the strength of the connection.
At equal intervals (ratio 1:1), the mechanical strength is the highest. But this configuration is rarely used. Because due to the larger number of elements, manufacturing the part takes corresponding time. The likelihood of making mistakes that will cause a loose fit is also higher. Typically a ratio of 2:1 or 3:1 is used. In these cases, the strength of the connection remains just as high.
When joining wide parts, additional tenons are made at the edges at small intervals. This solution helps to effectively combat wood warping.
The dovetail angle is an important parameter that determines the mechanical characteristics of the joint. If the angle is too small, the lock will not lock and the fastening will turn into a regular tenon joint. If the angle is too large, the tapered part of the dovetail may split during assembly and the tenon will fall off.
For soft wood, the dovetail angle is made steeper, since it is more susceptible to crushing and deformation under loads. The optimal ratio is 1:6. For hardwood, the angle is made less steep - 1:8.
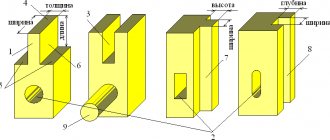
The design principle of the dovetail shape is shown in the drawing.
Connection application
This fastening method is used in various fields where it is necessary to securely fasten two parts or assemble an entire structure. For example, in mechanical engineering, dovetail joints are used to fasten blades to disks in various compressors, in individual units of metal-cutting machines, and in optical devices to ensure precise linear movement.
This type of fastening is most widespread in construction and furniture production.
In construction, when assembling wooden houses, dovetail elements (teeth and grooves) are made at the ends of the logs being fastened together. It is advisable to use it for connection beams that have a rectangular shape. The dimensions of the groove and tenon determine the reliability of the entire future structure.
In addition, in construction it is used in the production of various joinery products:
- window frames;
- windows, vents and transoms;
- doorways and the doors themselves;
- interior partitions, arches, various recesses.
In the manufacture of furniture, it is used to assemble the frame and individual elements (drawers, doors, collapsible lids). Mounting two parts in this way provides good resistance to external and internal influences. The design maintains structural integrity and prevents cracking. In order to improve fixation in furniture structures, it is glued. Thanks to the large contact area and complex configuration, the fastening is reliable.
Dovetail is used in the manufacture of containers of various sizes (boxes, boxes, containers).
Making a dovetail with your own hands
To make a dovetail by hand you will need the following set of tools:
TOOLS
Sawing the joint begins with preparing the part with spikes. This is important as it will be used to mark the dovetails. To avoid confusion in orientation, temporary markings are made on the parts, marking the front and back sides, top and bottom edges.
We mark the shoulder line on all four edges with a thicknesser. Having decided on the number of studs, using a special template we apply markings first on the end and then on the face of the part. For the convenience of subsequent work, we mark the areas that will be removed.
The same procedure can be performed using a crowbar and a carpenter's square.
Using a back saw, we make even cuts to the shoulder line marked with a surface planer. We hold the canvas strictly perpendicular to the end; we saw with uniform movements without jerking. To prevent the saw from being pulled to the side, you can use a small carpenter's square as an improvised guide.
The waste between the spines can be removed in two ways:
The first is with a jigsaw. In this case, the main part of the waste is removed, and small remnants are carefully trimmed and cleaned with a chisel.
Selecting waste is not much more difficult using one chisel. Having fixed the part on the workbench, we remove the wood layer by layer, as shown in the diagram.
We use the part with the spikes as a template for marking the dovetails. Aligning the end of the first part with the line of the shoulders, we apply the markings of the dovetails as shown in the photo. For convenience, we shade the waste sections.
We make cuts with a saw blade. We clamp the workpiece in a vice at an angle, so that the marking lines are not inclined, but vertical. This will increase ease of use and allow you to make cuts more accurately.
We make the cut not strictly along the marking line, but next to it, so as to create a small margin for subsequent trimming of the joint. We cut smoothly, without jerking, stopping at the shoulder line.
Having made all the cuts, use a chisel to remove the waste between the dovetails. This process is similar to stripping the tenons, except that the master is faced with the task of carefully and evenly trimming the left allowance.
We cut out the hangers. We saw off the waste with a small allowance, then trim it with a chisel to the marking line.
Before gluing, dry assembly is carried out to check the tightness of the fit. We insert the part with the spikes into the dovetails and carefully tap it with a mallet. To avoid breaking tenons and tails, cover the joint with a piece of wood that will distribute the impact.
The spikes and tails should fit snugly together. When the joint is properly assembled, a light tap with a mallet is all it takes to assemble. If the connection is too tight, the parts are disassembled, the problematic thickening is identified and very carefully trimmed with a chisel.
The glue is applied in a thin layer to all contact surfaces of both parts of the box joint. The assembled structure is tightened with clamps. To distribute pressure over the entire joint area, wooden blocks are placed under the jaws of the clamps.
You can learn more about the intricacies of this process from our materials on the choice of glue and the rules of carpentry gluing.
More complex shaped connections
A variety of shaped tenons can be made using a router and a special tenon-cutting device - a tenon cutter
But such connections can only be made with special templates
using a tenoning device - Leigh tenoner:
How to make a dovetail with a router
For mass production of parts with such a lock, it is advisable to use mechanized methods. The best option in this case is to use special templates, in which one side is intended for milling dovetails, the other for creating tenons.
Dovetail templates require the use of two different cutters. The first is a cone cutter for cutting trapezoidal dovetails. The second is a straight wood cutter for creating tenons.
We position the part with the “tails” so that its edge is located strictly in the center of the slot. We install the second part (with spikes) flush on the reverse side. To accurately fit two pieces, we use a carpenter's square.
Algorithm for making a connection
A dovetail is quite easy to create if you do all the necessary preparatory work in advance. Mechanical experience will also not be superfluous, because the product must be strong and beautiful.
Dovetail connection
When making interior items from wood, care must be taken to ensure that the wood does not deform.
Among other things, it is important to take measures to make the correct and safe connection of parts.
To ensure that the furniture does not become deformed during use.
One of the most effective types of joints is a joint called a dovetail.
“Dovetail” is a connection in which, even without the presence of glue, the wooden parts could not be separated.
With this type of connection, the spikes are clamped “like in a vice.” In addition to its strength, the dovetail connection is very beautiful from an aesthetic point of view.
To do this, connecting teeth must be made
This will require hard work.
To work you will need a chisel and a saw.
In order to make beautiful grooves and tenons,
Practice on simple, unnecessary boards first.
Get your hands on it, so to speak. Produce carefully right away
such a connection, without a certain skill, is unlikely to work. Pay attention to old furniture and its connections.
So many different and great types of connections
dovetail type, can be considered. Now let's take a closer look at how a dovetail joint is made.
We cut out the parts that we will need to connect together.
We apply markings on one side.
There will be tongues and grooves on this side.
On the same part, we continue to transfer the markings to the end part, and from there to the lower, back side.
We make grooves by sawing them with a saw. Then we cut out the grooves with a chisel. On the second board, using the grooves cut on the first board, we make markings.
After this we connect both parts.
If the grooves do not fit, we correct, file, and correct inaccuracies.
Apply glue to the joints and hold, pressing. Hold until the glue sets.
As soon as you slightly change the position of the wooden parts, it becomes impossible to separate the grooves.
In this case, glue is used more to fix the position of the boards than to fasten the parts together. In which part to make grooves or tenons is an important point.
when it comes to drawers.
when it is put forward.
where the load is heavy.
which are located horizontally.
We make a drawing for cutting out the connection.
If you have never cut out tenons to connect the tail of a swallow, then it is better to first make a drawing using a ruler, and then make a cut according to the markings.
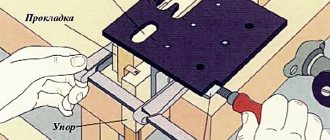
Universal device for tongue and groove connection
factory plate for making a tongue and groove connection
Used with a router to cut the corresponding grooves and tenons, it is installed in a vice and the part is pressed against the device with a clamp. Typically sold in stores.
connection appearance
Consider devices for milling grooves
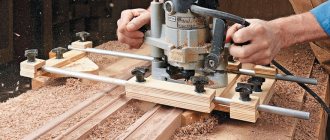
Cut out the top part - a tabletop from 18 mm plywood, 40 cm long and sufficiently wide to process the thickest workpiece that you plan to join with a tenon.
Cut two 5x10 cm bars, sawing them to the same length as the top. The bars will subsequently play the role of pressing the workpiece and centering it relative to the groove in the tabletop. To prepare the top, draw a line down the center of the top, then rout a mortise along the line at one end.
schematic representation of equipment
To use our equipment, draw a groove on the workpiece and mark the center line on it. Loosen the screws and place the workpieces between the bars so that the center line is connected to the top line of the jig, check that the edge of the workpiece is opposite the edge of the top.
Pinch the lambs. Align the router bit to one end of the mortise drawing, then mark guide lines on the top surface of the table along the edge of the router base.
How to work correctly with tongue and groove equipment
Repeat this again to mark the lines of the other end. Route the slot by starting the cut at the bottom by aligning the router base with the first construction line, and stop routing when the insert reaches the second construction line.
Let's make a device for making spikes with our own hands
Product for making spikes
The wood and plywood jig shown above allows you to cut rectangular tenons with two shoulders. The object being processed is located with its front surface underneath the jig, while the router moves along the stop from above, removing excess in two passes.
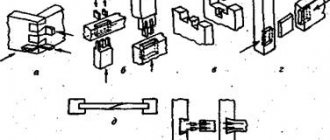
Connection types
Depending on the task at hand, dovetailing can be performed in various ways:
- Corner connections.
- Separating.
- Through.
- Decorative.
- Bevel connection.
- Through connection with rebate.
All types of connections have their strengths and weaknesses, but, one way or another, they form a reliable connection between two parts. To work you will need the following tools :
- Mallet (wooden hammer).
- Chisel, chisel.
- Reismus.
- Jigsaw or hand saw.
- Jigsaw.
- Pencil, tape measure, sandpaper.
- Square.
- Malka.
With these tools, you can easily make the connection. If it is possible to use a hand router, then the need for the listed tools disappears.
Through connection type
This type of connection is widely used in the manufacture of both cabinet and upholstered furniture.
It is also called “box”. To begin with, the workpiece must be processed with a plane and excess wood removed. The next step will be marking the nests. Everything here is individual and depends on the width of the board, as well as on the tasks assigned. It is necessary to draw lines across the workpiece at a distance of 6 mm from both edges. Then you need to divide the distance between them into an even amount, set aside 3 mm on each side and draw lines across the end.
Now you need to mark the slope of the spikes with a small marker. The excess that remains should be marked to avoid confusion in the future.
After marking, you can begin cutting out the tenons. This can be done using a jigsaw or a regular saw with a fine tooth. For convenience, the workpiece can be clamped in a vice. Using a saw, you need to cut out one edge on each side of the tenon. You should cut out carefully, otherwise there will be small gaps that will further spoil the appearance. The same must be done with the other side spikes.
The side waste should be cut off from the shoulder line, and excess wood between the tenons can be easily removed with an openwork saw. Residue on both sides can be removed with a chisel or beveled chisel.
The cutting of the tenons is completed, and you can begin marking and cutting out the nests. Using the same vice, clamp the workpiece. The part with spikes must be attached to the workpiece and carefully mark the shape of the spikes.
After marking, carefully cut out the nests along the previously drawn lines. The cut from the main part should be made in such a way that it does not reach the marking line slightly. Carefully cut off part of the waste with an openwork saw. In order for the two parts to fit tightly together, it is necessary to clean the corners with a cutter.
How to build a log house in a dovetail groove
A good source might be someone who has a small sawmill in your area. Contact the timber industry for a list of sawmill owners near you. If you have your own trees, you need someone to process them for you.
Step 1 Dovetail groove template
The easiest and fastest way to prepare logs according to a template.
I can recommend my own website on this topic if you want: https://logdovetailjig.com. By creating your own jig, you can have your own set of jigs that will work for your specific log size, and you will end up with a dovetailed log frame with the gap between the logs just the way you want it.
In our example, this log cabin ended up measuring 11'&8″ x 16″ using logs measuring 7″ thick x 9″ high. The gap will be 2.5 inches. Yours may be in different sizes. The plans are specially created to fit the dimensions shown.
After deciding on the dimensions of the log house, add 4 inches to each dimension and use these numbers to cut the logs to length. Thus, the logs for this example should be prepared at 12′ and 16'&4″.
The jigs are given for half of the dovetail grooves and will take about 2-3 hours to make.
Step 2 Install the first template
Lay the log on its side and mark a chalk line down the center of the log. The jig also has an axle with holes marked on it, which makes it easy to align the jig with the log.
The clamping device is attached to the inner surface of the log. (The face of the log that will be on the inside of the cabin. It's up in the photo).
Leave about 2 inches between the end of the log and the end of the jig. Attach it to the log with 3 drywall screws. Measure along the end of the log inside the jig, as shown in the photo.
Step 3
We said that we cut the logs for the walls with a log size of 11'&8″ inches. How to calculate the internal dimensions of a log house: This is the external dimension minus two times the thickness of the log. So for our cabin, the short measurement for the interior walls is 11'&8″ minus 6″, minus 6″. This equals 10'&8″. Align the other jig on the centerline of the log so that the perpendicular edge of the cut is 10'&8″ apart. Attach it with screws
Step 4 Block the chainsaw
The template plans have instructions for making and attaching saw clamps. These are necessary to allow the saw to run along the template without cutting it.
Step 5 Saw the grooves
Turn the log over and you will see the grooves that need to be cut along the jig using a chain saw. After making two cuts in one notch, remove the piece of wood and make a second pass. This will make the cut very smooth for a good fit, and the dovetail groove will ensure a tight joint. The process takes about 4 minutes to make cuts on one log. Watch the video on YouTube:
Step 6 Assembling the log house - laying the logs
Place the logs in the dovetail groove!
Step 7 Seal the gaps between the logs of the log house
Install foam sealing cord into the gaps of the frame.
Apply sealant. I used a special synthetic wood sealant.
Wet with a spray bottle and smooth with a small spatula or modified spatula.