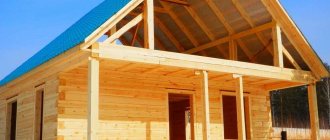
Logging in a paw is slightly inferior in popularity to the original Russian method of joining logs into a bowl, but still has many supporters in our country. And although log houses built in this way are considered less stable in comparison with the “bowl”, they benefit from a more aesthetic appearance.
Logging in the paw is less stable compared to other cutting options, but it looks much more aesthetically pleasing.
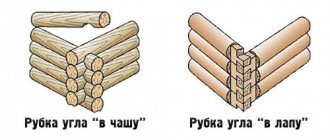
Methods of cutting in the paw
Logging into a paw is more difficult to perform, but it allows you to make the most efficient use of the entire useful length of logs or beams. There are three main ways to connect timber when making a log into a paw:
Scheme of preparation of logs for the assembly of a log house.
- direct connection;
- connection to the underside;
- dovetail.
Before chopping a log house into a paw, you need to make sure that you always have the necessary tools at hand during work:
- saw;
- axe;
- chisel;
- hammer.
It should also be taken into account that when the log house is forced into the paw, the corners turn out to be very cold, so they will need additional thermal insulation.
State standards
The main standard that establishes the rules for the manufacture of fastening elements for wooden parts is GOST 9330-2016. It specifies the sizes of teeth, grooves, dowels of various types of assembly. The standard provides diagrams with examples of such fastenings. The rounding rules and symbols used in the drawings are indicated.
The rules for gear connections are specified by GOST 19414-90. It shows the sizes of the teeth, the order of their arrangement and methods of connecting them.
When constructing wooden houses, GOST 30974-2002 is used. It defines the rules for preparing dovetail cuts for logs in low-rise construction. It details the types of structures, classification and dimensions of each element.
Preparatory work
Regardless of the chosen connection method, there are several general rules that should be strictly followed. When choosing a material for construction, you need to keep in mind that the thicker the timber, the warmer the building will end up, since it has fewer connecting grooves.
When installing the lower - frame - crown, the thickest beams are used for it. If, for the construction, a high-quality leveled beam of the same width was purchased, then for the installation of the casing crown it is better to additionally purchase 4 beams with a slightly larger cross-section.
Figure 1. Scheme of cutting into a paw with a tooth.
Before you begin installation, you first need to carry out preparatory work, especially if the material for construction is rounded timber or ordinary logs. In this case, you first need to use a plane or sanding machine to give a flat surface to the side that will be located indoors after assembly.
The side opposite to it is processed to a length of 2-2.5 times the diameter of the timber from the edge of the end. The sides need to be processed to a length of 1-1.5 diameters from the edge of the end. When performing processing, it should be taken into account that the butt of the log will always be thicker than the top.
The trim crown is arranged in the same way for all methods. The first two beams or logs are laid strictly parallel to each other. The next two crowns are placed perpendicularly on top of them. The square formed as a result of laying is leveled strictly according to the level. Further cutting of the log house depends on the chosen connection method, but in any case, the total depth of the groove for planting the upper crown should not be more than half the thickness of the log or timber.
How much does it cost to build a house from double timber?
A set of walls with an area not exceeding one hundred square meters costs from 350 to 700 thousand rubles. An identical “house”, but with a larger area (150-200 square meters) will cost the consumer up to a million Russian rubles. Buildings of two or three floors with an attic, a terrace, a winter garden, with an area of three hundred square meters, will cost from two million. The price largely depends on the preferences of the applicant for housing made from natural building materials. The higher the requests, the correspondingly more expensive the assembly will be.
Direct connection
This is the easiest way to connect into a paw. It has two varieties: one-sided and two-sided. With the one-sided method, a groove is made at both ends of the upper beam for half its thickness and the length of its diameter. With the double-sided method, the groove is cut to 1/4 of the thickness, and not only from the top, but also from the bottom of the beam or log, so that in the end the total depth of the groove is equal to half the thickness.
Figure 2. Connection diagram with subsection.
Then the crown is laid on top of the one lying with the selected grooves on two crowns laid perpendicular to it. Two perpendicular crowns are placed on it with grooves, then the upper crown is laid on top of them with grooves, and so, observing the order of tying the crowns, the frame is driven out (Fig. 1). You can also lay it in the reverse way, i.e. Place the upper crown on the selected grooves, but in this case, during precipitation, more water will get into the grooves.
To increase the stability of the building, the crowns in the corners are fastened together with wooden or metal spikes. To do this, when laying the upper crown, a hole with a diameter of 3-4 cm is made in it and the crown lying underneath it. A spike with a diameter slightly larger than the hole itself is driven into this hole so that it can enter it, but with a certain effort. With each crown placed on top, the procedure is repeated, but the hole must be drilled in a checkerboard pattern so as not to fall on an already driven tenon.
Material selection
For any log houses, it is recommended to use coniferous wood with natural moisture, felled in winter, preferably from the northern regions. Pine is the cheapest, larch and cedar are more expensive, but stronger and more durable. The trunks must be even along the entire length and of the same size.
We invite you to familiarize yourself with: Log houses and bathhouses
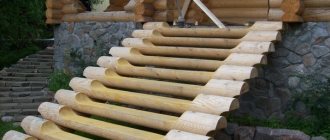
Removing bark from all sides of logs is done using a special tool called a scraper. You can also remove the bark with an ordinary shovel with a cut off spout and a sharpened bottom edge. It is unacceptable to remove the bark mechanically, using power tools, chainsaw attachments or grinders, since the upper layers of the main wood will be damaged along with the bark. After which the workpieces are stacked with spacers for ventilation and covered with roofing felt. Drying lasts ≥ 6 months.
The timber must be dry, free from visible cracks, mechanical damage, falling knots, rot and mold or mildew.
Connection with socket
This method of connecting into a paw is more reliable, but it is also much more difficult to implement, so without proper experience in making connecting grooves it is definitely not worth taking on. When marking and cutting the paw, a protrusion of 2-2.5 cm with an area of 1/4-1/5 of the total area of the paw is left on its inner surface (Fig. 2). Usually this tenon, or prism, as experts call it, is made on the paw so that when laying the crown it is located at the inner corner of the building under construction.
Figure 3. Dovetail connection diagram.
A hole for the tenon of the same area and depth is hollowed out from the bottom of the upper crown being laid. When using paws with a cut to fasten the crowns, the assembly of the log house turns out to be akin to assembling parts in a children's construction set.
Thanks to the undercut, the adhesion of the logs and the overall stability of the building are significantly increased. However, such forcing requires almost a jeweler's precision in fitting the tenon into the groove, so the time for making joints increases significantly, not only due to their more complex shape and the need to additionally make grooves, but also to a large extent for their adjustment.
If, when cutting a paw directly, a groove is taken out that is larger than required, and the logs do not fit tightly together, then you can hew out and drive a wooden wedge of the required width between them (although this should be the exception, but not the rule of assembly). When cutting a paw with a notch, if the hole is larger than the tenon, the crowns will move, and no amount of wedges can correct this.
Advantages and disadvantages of wooden buildings
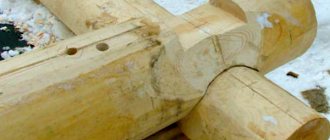
Swedish log house cutting.
Despite the fact that wooden houses have been built without the use of nails for centuries, technology has changed over time, and new methods of wood processing have appeared that require certain skills. Before starting construction, it is necessary to make calculations and become familiar with the approximate cost of the work. Don't forget to purchase the necessary materials and tools:
- logs;
- bars;
- axe;
- chisel;
- saw.
Cutting a log house is a fairly lengthy process, especially when using undried lumber (drying logs takes about a year). It is worth taking into account all the advantages and disadvantages of wooden houses. The advantages include environmental friendliness, attractive appearance, lack of high humidity in the premises (with proper waterproofing) and good thermal insulation of the house.
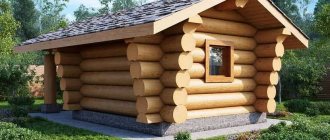
The technology of Norwegian manual cutting of log houses into a bowl.
Internal construction and finishing work is also easy: you can make any opening or hole in the wood for pipes and electrical wiring. The light weight of the tree, due to the reduction in loads on the foundation, allows the construction of cheaper foundation options, for example, columnar foundations. Small log houses can be built without a foundation.
The disadvantages include the high cost of logs and the short service life of the house (50-90 years depending on the method of wood processing).
In order to build a log house with your own hands, certain knowledge and skills are required. It is impossible to make an extension to such houses, and the house is practically not resistant to fire. Over time, logs can dry out, which worsens the overall condition of the building. Timely repairs help solve this problem. You won't be able to build a log house alone.
The first thing you need to do before starting construction work is to decide what type of foundation you will build: regular or pile. A more preferable option is a pile foundation - it can be built quickly, simply and inexpensively. There are several ways to cut a log house, which will be discussed below.
Floor installation
Correctly lay a double floor in a wooden house. The bottom layer is rough, it is made from edged boards. A clean, high-quality board is laid on the second layer, on which finishing material can be laid.
Important! The most reliable method of installing a subfloor is laying it on a skull block. It is attached to the joists on each side. And the subfloor is nailed onto the cranial block from the outside.
A cushion of insulation is laid on top of the subfloor. In order for the material to last a long time, it must be protected with a moisture-proofing film. It is laid on top of the subfloor, after which the insulation is attached. A vapor barrier is laid on it, in turn. To prevent wood rotting, a ventilation block is attached to the logs (a board 3-5 cm high and wide, matching the width of the logs). A finishing board is laid on top of this entire cushion.
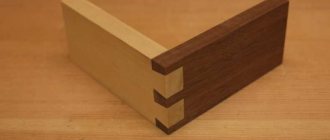
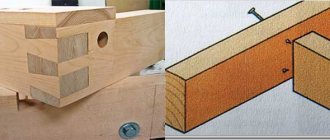
Features of the butt joint
This is the most basic fastening of timber to each other in a corner, lengthwise or T-shape. For such a connection, special metal plates with pins or brackets are used. Connections with staples are carried out for sections larger than 150 mm. The “butt” design is simple; the timber is placed tightly against each other and spliced together. But such a connection can only be used for outbuildings or country houses, since the airflow will be high. An example of such a connection can be seen in the figure above.
Materials used
Forming the corner of a house is an indispensable part of the wall laying work, and it is also the most difficult, since the shape of traditional lumber does not require special devices for this. This problem, of course, was also encountered during the construction of log structures and was solved through different assembly methods. So all the methods used today have stood the test of time.
Modern builders rarely deal with logs, but lumber for houses is used very widely.
- Planed - has 2 opposite or 4 planes, thanks to which the material can be laid quite tightly.
- Profiled - in addition to the fact that the 150*150 beam has a clear geometric shape and size, grooves and protrusions are formed in it, allowing for a much more dense and reliable joining of the material. This option itself provides better thermal insulation.
- Glued - made by gluing wooden lamellas under pressure. In terms of strength and density of masonry, it does not differ from profiled masonry. However, it has another valuable quality: it practically does not shrink. This means that over time the density of the masonry does not change and there is no need for additional thermal insulation.
Advantage of lumber: it is much easier to make additional grooves here.