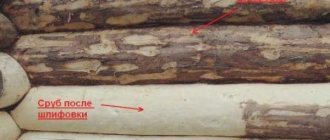
Wooden architecture has developed over the centuries in many countries. Today, for the construction of warm and durable houses, various types of logs and logs are used, which have successfully proven themselves in the northern regions of Russia, Canada and Norway.
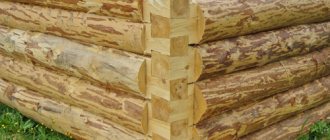
Timber and rounded logs are widely used as building materials - strict geometric dimensions simplify and speed up the assembly of the log house, since a template can be used to mark the connecting grooves. Construction from chopped debarked logs is noticeably more difficult, since each connection is adjusted individually.
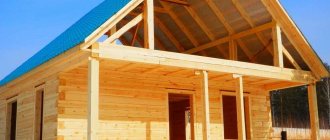
When it comes to houses made of wood for the private sector, we mainly mean either frame structures or ready-made turnkey log (timber) buildings. Is it possible to build log houses on your own, the way our ancestors did? The answer is unequivocal - yes, cutting a log house is within the capabilities of any skilled owner . You will learn about all its nuances from this article.
The construction of any building is a complex of various activities, including both preparation for construction and the phased implementation of individual technological operations. We will not consider them all, starting from the “zero” cycle, since the subject of conversation is precisely the felling of a log house. But one remark will not be superfluous. It concerns the most expensive part of the structure, the foundation, the costs of which can reach ⅓ of the estimate.
Which type should I choose? Considering the relative lightness of buildings made of wood, it is advisable to limit ourselves to a shallow-depth tape or a pile-grillage foundation. For any log house it is quite enough, if the presence of a technological (basement) floor is not an indispensable condition. Although in this case there is a good solution - to “raise” the house by installing a higher base.
The general order of work is unchanged: installation of the foundation - lower crown - laying wood samples in rows (from bottom to top) with simultaneous arrangement of openings for doors and windows. Next is the ceiling and rafter system. But what does “cutting a log house” mean? This is the connection of all blanks into a single structure with a preliminary selection of material at the designated “points”. The construction of the walls of a building is impossible without reliable fixation of all elements, therefore, when working with wood, cuts (cuts) are made in certain places of the log (timber).
But there is a difference in how the samples are fastened together. There are several ways to cut log houses. Each of the methods has both advantages and individual disadvantages, so we will give a general overview of the ones most used when doing DIY work, since there are quite a lot of them. And which one to choose is entirely at the discretion of the master.
Preparing regular logs for laying
Before cutting down a log house with your own hands, you need to perform two important operations: form a groove along the entire length and a corner connection without additional fasteners. Not only the strength characteristics depend on the quality of their execution, but also the most important property of the structure – the ability to retain heat inside for a long time.
The geometry of the longitudinal recess of the arc profile largely determines the thermal conductivity characteristics of the room. The width of the inter-crown groove has a double meaning. On the one hand, an unreasonable increase in the parameter reduces the useful height of the log, on the other hand, additional widening of the groove has a positive effect on maintaining the internal temperature.
Given this state of affairs, the logical resolution to the contradiction is the following: use a wider ditch when constructing structures in the northern regions.
The profile of the crown groove comes in several interpretations:
- lunar;
- tongue and groove;
- lunar with additional undercut.
Russian lunar profile is considered technologically advanced : the geometry of the excavation accurately repeats the ridge of the response log. This type of log cutting is described in detail in numerous videos due to its wide popularity.
To make a groove you need to have :
- line (a tool similar in functionality to a compass);
- pencil;
- axe;
- adze;
- chisel;
- hammer.
A medium power chainsaw with a good chain will intensify the initial stage of the ditch gouging process. The groove must be made in the lower part of the log to prevent the formation of additional pockets of moisture collection.
The technological process of forming a longitudinal recess includes the following operations:
- put the log of the future crown on top of the existing layer, center and fix it;
- mark a horizontal line on the top workpiece with a length equal to the width of the groove (at least 12 cm);
- adjust the line and draw a corresponding arc line on the surface of the lower one at the end of the upper log;
- draw a groove line along the entire length;
- use the nose of the chainsaw bar to make longitudinal cuts 1.5-2 cm less than the calculated depth of the excavation;
- make a longitudinal cut to the same depth;
- cut out one half of the groove, then the other.
It should be noted that in search of a solution to how to cut down a log house with your own hands faster and easier , experimenting with the shape of the longitudinal groove is not recommended.
The common belief that a triangular shape is no worse than a semicircular shape is erroneous. When connecting, the angular profile not only reduces the contact area, but also provokes the formation of cracks in the log.
Foundation for a log house
The main tasks of any house foundation are as follows:
- holding the base and structure of the house in one, solid plane and, as a result, maintaining the integrity of its walls
- preventing the house from sinking into the ground under its own weight
- preventing the house from freezing from below the ground during the cold season
In addition to the above-mentioned requirements for the foundation of any house, some more requirements should be added to the foundation of a log house:
- Height and moisture protection . The height of the foundation of the log house should be higher than for a stone house . The optimal foundation height for a wooden house above ground level is 50-60 cm or higher. Such a rise is necessary to maximally prevent contact of wooden walls with moisture emanating from the ground.
- Ventilated base. If you are planning a wooden base for a log house, then it should be well ventilated from below. This measure will increase the longevity of the floor. For this purpose, the optimal foundation for a log house will be one of the varieties of pile, columnar foundation, as well as a strip foundation with ventilation.
log house on a pile foundation
- No heavy foundation needed. The weight of wooden houses is much lighter than stone ones and therefore a log house does not require a deep, massive and heavy foundation. For a small log house up to 80 square meters, budget foundation options are well suited: pile and columnar.
Read more about the types and properties of pile foundations
Read more about the properties of a columnar foundation
log house on a columnar foundation
strip foundation
Stage 6
Types of cutting corners of a log house and informative videos on their implementation
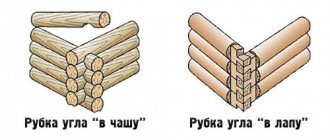
A characteristic feature of the construction of a wooden structure using the technology under consideration is the natural fastening of the logs to each other only through structural measures without the use of additional fasteners . ways to correctly implement a corner connection :
- "in the paw";
- “in a state of rage”;
- "into the bowl";
- "in a big way."
The first joining method is the basis of the so-called waste-free technology.
The next three provide additional projections beyond the plane of the walls. The often demonstrated corner cutting of a log house in the video is the last one on the list.
The advantages of joining logs “in a clap” are:
- lower location of the bowl, preventing the accumulation of moisture inside the ligament;
- a closed corner structure, which is formed by the ends of the logs protruding beyond the plane of the wall;
- high strength and reliability.
Before you cut down a corner frame with your own hands , you need to acquire a standard carpentry kit, which was also used when forming a longitudinal groove.
A chainsaw is also welcome here. The bowl is marked as follows:
- lay the log of the future crown and fix it with staples;
- the legs of the line are moved apart by half the diameter of the lower log;
- a line is placed on the cross-laid wooden blanks and the contour of the bowl is drawn, constantly maintaining the contact of the legs with the logs and their verticality;
- Transverse and longitudinal cuts are made according to the intended geometry, the bowl is chopped and its surfaces are cleaned.
Upon completion, the log is placed in the bowls and the gaps are checked. defective if the actual depth of the bowl is greater than the design one . The way out is to wedge or lay a thicker seal.
CORNER JOINTS
When classifying the types of log cutting, first of all, pay attention to the principle of fastening the crowns in the corners. There are two types of connections: with a remainder (with elements protruding at the corners and intersections of walls) and without a remainder.
Corners chopped with a remainder (with release) have a number of advantages:
- the level of heat loss in the premises is reduced, the corners do not freeze and are not blown through;
- The log house looks colorful and attractive.
The disadvantage is the loss of usable space, since the standard length of a log or timber is limited to six meters.
Corners chopped without residue allow you to make maximum use of the length of the log. Such connections are easier to make, but they have a significant drawback - they are blown through and freeze without additional insulation. To prevent the house from losing heat during the winter, and the corners from freezing and becoming damp, the outside is insulated and sheathed with boards or other finishing material.
LOBBY IN THE PAWS
This is one of the types of cutting corners without residue, which is used in the construction of houses from timber or logs. There are two main cutting methods - straight paw and dovetail (the second name is oblique paw).
STRAIGHT FOOT
The end of the log is trimmed to give it a smooth rectangular shape. If non-profiled timber is used for construction, no special manipulations are required; the crowns are simply laid on top of each other, alternating the arrangement of the ends.
When hewing chopped logs, first of all, a straight paw is formed at the thin end of the element. It is important that the surfaces of the connecting parts are smooth and ensure a tight fit, otherwise the corner will be blown out. When forming a paw on the thick end of a log, it is necessary to correctly determine the height of the element so that the crowns lie flat.
When assembling a log house, the crowns in the corners are strengthened with dowels, since a simple paw is a weak connection. When hewing a paw at the end of a log, a rectangular root tenon is formed on its upper plane, and a corresponding groove is formed on the lower plane.
OBLIQUE FOOT
At the end of a log or beam, a connecting element is hewn out in the form of a trapezoid, the planes of which are inclined. The dovetail configuration allows you to create a strong connection that is resistant to blowing. To increase the rigidity and reliability of the structure, the oblique paw is additionally equipped with a hewn tenon.
This is a complex and labor-intensive corner connection that requires the skill of the performer. To speed up the work, it is recommended to use a template taken from the first completed batten. The geometric shape and dimensions of the connecting element depend on the diameter of the logs and are regulated by GOST 30974-2002.
CANADIAN CUTTING
According to the principle of execution, a corner joint is similar to a fat tail cut; the main difference is the shape of the bowl. Canadian felling involves the formation of a trapezoidal bowl at the bottom of the log, in which a tenon is left. In the upper part of the log, cuts are made at an angle to fit the bowl and a groove is selected for the tenon of the transverse element of the crown.
The Canadian bowl is a sealed and reliable connection that does not blow out or freeze. The configuration of the lock has the following feature: it self-jams when the frame shrinks, which makes the connection even tighter over time, unlike a smooth bowl.
When building a house using this technology, it is enough to lay the thermal insulation material once and no longer worry about caulking the inter-crown joints, since as the logs dry out, no gaps appear between them.
With this technology, unlike others, the sapwood is preserved. This is a superficial, soft layer of wood in which, in addition to nutrients, various resins are concentrated. Their presence protects the log from rotting.
pros
— The heat loss of a log house is lower compared to other cutting methods. — In such a structure it is easier to maintain a constant microclimate. — Increased protection of the corner parts of the log house from freezing and moisture penetration. — The durability of wood with sapwood is much higher. — A log house built using the “Canadian” logging technology does not need caulking. Anyone who understands how troublesome this task is and how often it is carried out will appreciate this advantage.
NORWEGIAN CUTTING
The Norwegian chopped corner with the remainder is created according to the same principle as the joint commonly called Canadian felling - the bowl with the tenon has a trapezoidal shape, notches are made in the transverse log and a groove is formed for the tenon. But the fundamental difference is the shape of the log itself.
The material used for construction is a carriage - a log with side parts trimmed along its entire length. The cross section of such a log is an oval. Thanks to the use of a carriage, the walls in the house have a flat surface, and the usable space of the premises increases.
Log houses made from gun carriages look powerful and stylish; Norwegian log houses are suitable for building a heat-efficient house, since the corners are windproof and resistant to freezing. When shrinking, the structure self-compacts.
The peculiarity is in the form of “locks”. They are wedge-shaped, and during the drying process of the wood, the joint is compacted as much as possible.
pros
— The risk of wood twisting is minimal. — Significant savings on interventional insulation.
The technology is in many ways similar to the previous one. The difference is in the preparations. With this method of cutting, the logs are pre-processed so that the cross-section becomes an oval. The presence of openings and tenons in the grooves ensures spontaneous jamming of the “lock” during the shrinkage process.
SWEDISH CUT
And here the difference is in the shape of the log section.
The advantage is obvious - such a log house looks great. The downside is that this cutting takes a lot of time and is quite complex. You will have to trim each log with high precision, strictly maintaining the dimensions of the edges.
TO THE HOOK
There are two options for constructing log houses, which is called hook felling.
Option 1. The bowl is selected only half the diameter of the log relative to its axis. To the remaining part from above, select a through quarter. The ends of the logs receive a complex hook shape. The “hook” angle turns out to be windproof and durable, but in terms of execution it is a difficult option.
Option 2. The log from the inside along its entire length is trimmed to a quarter of its diameter. A tenon-presec is formed on the transverse log, the size of which must correspond to the size of the hem. The room has walls with a flat surface, which increases usable space.
This cutting method is considered one of the most difficult.
Only a master with sufficient practical experience can build a log house using this technology with his own hands. But as a result, you can get a very strong, reliable and warm corner connection. There are 2 varieties of this technique, differing in the way the bowl is arranged (up to half a log or through)
INTO THE BOWL
There is an intermediate option between felling in the chopping block and chopping in the chopping block. A moon groove is cut into the top log to prevent moisture from flowing between the crowns. At the same time, a lower bowl is made in the corners to simplify and speed up the assembly of the log house.
One of the simplest cutting methods, which has several options.
pros
— Ease of processing logs. — Time saving compared to other methods.
Minuses
— The need for regular caulking. — Risk of liquid getting into the bowl (precipitation, condensation). The result is constant dampness, rotting of wood and heat insulation. — The need for high-quality insulation of the log house. The absence of locking connections makes the structure ventilated even after caulking.
IN OHLOP
A log house, the corners of which are cut into clapboards, is more durable compared to the previous version. The “Siberian bowl” is an inverted version of the classic, lower bowl. Due to this, moisture from rain and snow does not get into the gap between the crowns and into the corner joints.
Installation of such a log house is more difficult and time-consuming, since each log is turned over many times during the cutting and fitting of the moon groove and the bowl itself. Disadvantages also include insufficient rigidity and ventilation of corners with smooth bowls.
The difference is clear from the figure. The same bowl, only upside down. This method of felling protects the log house from the accumulation of water in the lock joint. The difficulty is that the workpiece will have to be turned repeatedly, so this technology takes more time.
IN OBLO
An ancient technique of Russian architecture, thanks to which the construction of a log house is carried out at a rapid pace. A semicircular (lunar) groove is cut down in the upper part of the lower log. Indented from the edge, at the corner joint, a semicircular cutout is made - a bowl into which the transverse crown element is placed.
The advantages of the method include a minimum number of steps - the production of recesses is carried out on a log laid in the wall, it does not need to be removed and reinstalled. The main disadvantage is the penetration of moisture flowing down the walls into the cut out bowls and moon grooves during the operation of the log house, which reduces the durability of the building.
Corner joints assembled into a clapboard are blown out and frozen; they require caulking after the frame shrinks and regular replacement of the insulation as it deteriorates under the influence of moisture.
TO KURDIUK
This option is an improved bowl. When creating a bowl, a rectangular tenon is formed in it, and a groove of suitable dimensions is cut out in the lower part of the transverse log with an allowance for insulation. This corner connection is resistant to blowing and adds strength to the log house.
Corners cut into tails can be mounted up or down with the bowl. The connection is labor-intensive, but widespread due to its high performance characteristics.
The presence of a tenon increases the strength of all connections and eliminates blowing of the log house. Such felling is quite within the capabilities of any owner when building a log house with his own hands.
AT OKRYAP
Rectangular tenons and grooves for them are formed in the logs. But simple-shaped recesses do not allow for tightness and high strength of connections, so this option is used for the construction of auxiliary buildings for utility purposes.
Anyone can do cutting this way.
However, professionals do not recommend practicing it when constructing a residential building. A log house built using this technology can be ventilated even with insulation, so it is used mainly for utility buildings.
IN THE SADDLE
A simplified version of the Canadian felling . The bowl is made in a trapezoidal shape, there is no tenon and, accordingly, no groove is cut in the upper log. This technology for constructing a log house makes it possible to construct a durable structure, but the thermal insulation properties of its corners are noticeably lower.
Assembly
Watching the video of cutting down one crown of a log house “into a bowl” , you should note the sequence of processing the log: first you need to form the geometry of the “bowl”, and then start cutting out the longitudinal groove. Sometimes the issue is solved differently: simultaneously with marking the bowl, mark the location of the longitudinal groove from the end of the log to the corner joint and combine the operations.
When starting the practical implementation of the planned solutions, you need to clearly know the sequence of assembling the crowns together :
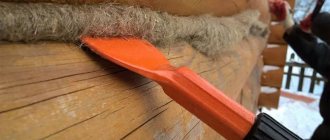
- an inter-crown sealant (tow, linen wool, moss, etc.) should be spread over the already formed layer;
- It is customary to connect several crowns together with dowels (wooden spikes) at intervals of 1.5 - 2 meters;
- the orientation of the wood fibers should be as follows: less dense (southern) fibers “look” inward, northern fibers “look” outward.
After cutting the log house yourself, experts recommend erecting a temporary roof and allowing time for the structure to shrink (1.5-2 years) . Afterwards, you can coat the ends of the logs with a protective compound.
Having developed the skills of cutting the geometry of a corner joint and a longitudinal groove, you can begin to construct a wooden structure. When developing a construction method, you should use the preferred options for the location of technological surfaces: it is advisable to base the bowl and longitudinal groove in the lower part of the wooden workpiece. When assembling, do not forget to place sealing material between the rims and fasten the layers together with dowels.
How to mark logs for cutting into a bowl?
To prepare for cutting out bowls, they use a special tool - a carpenter's line, which is similar to a compass, only of a rigid design.
The span between the extreme points of the line is set in accordance with the diameter of the logs used and is equal to half of the lower or upper log.
The marking process consists of marking the contours of future cutting. When marking, follow several rules:
- install the logs the way they will be laid when assembling the log house (cross to cross);
- place the pointed ends of the bar on the parts to be connected;
- draw lines for the wood notch on both logs at the same time.
Useful tips for building a log bathhouse with your own hands
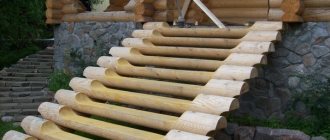
- It is difficult for one person to lift logs; you need at least two or three people; it is better to do this with the help of equipment. Organizations engaged in cutting log houses most often use manipulators, lifts, and hoists. Of course, it’s difficult to get equipment at home, but if you have the opportunity to use a wheeled tractor, such as MTZ, YuMZ or T-40, then you can make lifting logs easier. To do this, insert a thin log into the hitch so that its end is under the rear axle of the tractor, and the hitch rail is under it; With this lever you can lift a load up to 2-3 meters.
- The dowels should not fit tightly into the drilled holes; it is better to make them 1-2 mm thinner - in this case, the log house will not hang on the dowels during the shrinkage process.
- You can place the first and removable crowns on wide logs, after first removing the layer of grass under them. If there is rocky, dense soil, it is enough to simply level them.
- From time to time it is worth checking with a hydraulic level whether the log house has sagged on the stumps.
- A difference in height angles of 5-7 cm is allowed; there is no point in adjusting each crown to the same size.
- In the wall, the butt of the next log is placed on the top of the previous one.
- You need to remember the safety rules, use safety glasses and gloves, and work in special clothing.
Canadian bowl and others
The presence of kneading is a fundamental difference between the Canadian cup.
You can read more and learn about other cutting methods in a special article on this topic.
Additional Information:
- View information about our company
- View house projects
- Contact Information
You can ask all your questions by phone in St. Petersburg: +7(812)948-18-51,, +7(921)-652-56-78
Final Tips
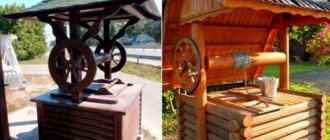
Having mastered the craft of a carpenter, you will save significantly on construction. Start learning the basics by making a log gazebo for the garden. Then, build a small bathhouse on your site. The experience gained will allow you to master the construction of a house. A technologically precisely manufactured log house will be warm and will give the building durability and reliability and provide exceptional environmental friendliness, especially if you use cedar lining for internal cladding.
On other pages of our website you can see a lot of interesting things about log houses and log baths.
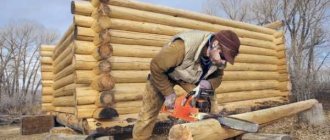
How to efficiently and quickly cut down?
The term “cutting” has been preserved historically, although modern craftsmen, when building houses from logs, more often use a chainsaw instead of an ax. Highly professional carpenters also perform the lines for the notches with a saw. After marking the cutting areas, cut down or saw out the bowl in such a way that when assembling the log house, the log will lie down, embedded exactly halfway into the adjacent bottom row.
To ensure a tight fit of the crowns to each other, lengthen the selected bowl by choosing a longitudinal oval with a groove. Select the size of the additional notch depending on the local weather. The colder the winter, the wider it should be. To ensure a tight fit, equalize the depth and volume of the wood cut for the oval.
Check the correctness and accuracy of the work performed by test laying the logs. The precisely processed surface of the upper log should fit tightly onto the lower log with its entire plane. The laid part should not have any gaps or cracks. If they form, mark again and adjust the cutting until the logs fit snugly.
Photo: a lot of interesting things on this topic can be gleaned from old books written with the participation of experienced carpentry masters.
To seal the connections, use an additional cutting element - a tenon. If you are cutting a warm building, take into account the location of the annual rings, since the looser southern parts of the rings should be inside the log house. To maintain the level of the rows in the horizontal direction, do not miss an important point. In log houses, the butt of the log is alternated with its narrower part. To align the crowns, cut down alternately - first in the wide part of the log, then in the narrow one.
Flaws
There cannot be ideal designs; the disadvantages of the design under consideration include the following points:
- sufficient complexity of execution without experience in carrying out similar work;
- difficulty in installing exterior decoration due to protruding corners;
- the presence of corner protrusions leads to a decrease in the useful length of the crowns and, accordingly, to an increase in the cost of the log house by up to 10%. This argument is cited as the main one in the debate on the topic of chopping into the paw or into the bowl, which is better. But a felled log house needs enhanced thermal insulation of the corners, which practically reduces real savings to zero. And insufficient rigidity leads to the fragility of the building due to the change in geometric dimensions with the appearance of cracks.
Bath size
The size of the bathhouse can be arbitrary - at your own request, depending on what is planned to be placed in it. A standard bathhouse includes a sink (washing room), a steam room and a dressing room (in the modern version, a relaxation room). For a steam room, three to four square meters are enough, for a sink a little more, about five to six. The dressing room, if without sophistication, can perform its functions with a size of 5-6 sq.m. In other words, the average size of a rather modest bathhouse will be 4x5 meters, or 3x6. With a standard log size of 6.1 m, the second option will be much more economical.
Connecting timber in a corner without leaving a trace
There are several types of connection. Traditionally, “half-tree” and “paw” are used for bathhouses and houses. They differ only in shape. Half a tree has smooth, parallel edges. It's easy to implement. When joining the timber “into the paw”, the shape of the tenons is made trapezoidal. It is a little more difficult to perform, but there is less chance of through holes occurring.
Joining the beam in the corner without leaving a trace: half a tree and a paw
There are several other types of butt joints for timber. They are not very reliable and do not provide proper tightness, although they are economical in terms of material consumption. They are rarely used for residential buildings, mainly for the construction of outbuildings.
A simple butt connection occurs with alternation. This makes the angle stronger. For reinforcement, you can use steel plates or knock down the beam with long nails at an angle.
Butt joint of timber
There are also methods for butt assembly with dowels of different shapes.
Another method of construction: using frame-timber technology. Then, in the corners and at the joints of the timber along the length, a vertical stand is placed with grooves formed in the required planes. At the ends of the beam, a spike is formed into the appropriate shape. When laying, you have to “put on” each element from above.
The advantage is that you can mold all the studs according to a single template, and then simply assemble everything like a construction set (not forgetting to lay inter-crown insulation). The connection turns out to be airtight and quite reliable, moreover, the joint itself is not visible and the appearance is very attractive.
Connecting timber using panel technology: quickly, warmly and reliably
With or without remainder?
Corners without any residue are obtained if the ends of the logs in the joint do not extend beyond the dimensions of the log house, but are flush with the wall. Cutting a log with a remainder, on the contrary, means that the ends of the logs protrude beyond the boundaries.
Corner cutting without residue, dovetail joint
Despite the fact that cutting with the remainder is a more expensive method in terms of log consumption (by about 0.3-0.5 m), this is compensated by the gain in heat capacity, protection from rain and wind, as well as a generally more stable structure of the log house. Therefore, we recommend our clients to chop with the remainder.
How to connect beads lengthwise
The easiest way is half a tree. Its configuration and shape are similar to those made when connecting a corner. But the disadvantage of this splicing method is that when longitudinal forces arise, which can occur during drying or movement of the soil, such a connection is easily broken. A continuous gap is formed.
Long beam connection
The oblique rim lock has the same disadvantage: it is easy to disengage. If you need reliable joining of timber, use a straight rim lock. As you can see, due to the protrusion, pressed by the crowns located on top and the weight of the roof, it will resist the forces of longitudinal tension (and compression too). It is more difficult to implement, but much more reliable.
Tags: dovetail, chop, log house, tail
« Previous entry