Wood, being an environmentally friendly material, not only effectively retains heat, but also gives the air in the room a special aroma.
DIY sauna log house
Log bathhouse 4x6 m
To build a wooden bathhouse, you must first prepare the timber.
Stage 1. Preparation of round timber
Preparation of round timber
Preparing the log
Attention! To determine the quality of logs (you can refuse low-grade sawlogs at any time), you need to know about the ideal harvesting conditions, which we will consider below.
Round timber must be harvested at sub-zero temperatures, that is, in winter. It is at this time that the amount of moisture in the wood is minimized, therefore, during drying the material will deform and crack less.
In order to ensure the durability of the log house, certain sections of logs (the so-called butt logs) are used during construction. These sections start from the rhizome and end at the crown. Such butt logs are denser (which compares favorably with the tops) and there are practically no knots in them. Selection criteria also include the round shape and degree of curvature of the trunk. In both cases, a defect is an error exceeding 1 cm per linear meter.
Preparation of logs for a log house Butt logs
Attention! If the length is, for example, 5 m, and the error exceeds 5 cm, then the log can be safely rejected.
The same applies to diameter. For example, the diameter of the base of the log is 35 cm, while the top is 25 cm or less. Such round timber is categorically not recommended for use in construction.
Logs for a log house
Finally, pay attention to the type of wood. Ideally, coniferous trees (spruce, larch, etc.) should be used for a bathhouse. Larch is characterized by resistance to moisture, although in extreme cases you can resort to the “pine-spruce” combination, in which the first few crowns are erected from pine. And if only spruce is used in construction, then the material must be treated several times with an antiseptic.
Perform further actions in accordance with the previously drawn up project. You can create such a project yourself, find it on the Internet, or order it from specialists. It is with the help of this document that you can calculate the required amount of consumables, determine the area and shape of the base.
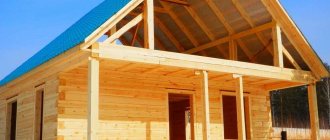
# How much does it cost to build a house made of logs with a metal roof
Here are the expenses we incurred during the construction of this house:
- Log house 4.3*6.5 height 2.3 - 75,000 rub. with delivery;
- Assembling a log house with a manipulator - 30,000 rubles;
- Board 50*200*6000 for the floor of the first floor - 19 pcs. (1.14 m³) 19,600 rub.;
- Board 50*200*6000 for the floor of the second floor - 24 pcs. (1.44 m³) RUB 21,600;
- Board 25*100*6000 for lathing - 35 pcs. (0.525 m³) 5,250 rub.;
- Board 50*150*6000 for rafters - 10 pcs. RUB 6,530;
- OSB sheets 1250*2500 thickness 9 mm - 5 pcs. 9,000 rub.;
- Tow 10 kg No. 4 - 6 bags 4,800 rub.;
- Ruberoid RKP-350 15 m in a roll "TechnoNIKOL" GOST - 1,090 rubles;
- Senezh OGNEBIO 10 kg - 4 cans 4,000 rub.;
- Corrugated sheeting + all additional elements - 60,000 rubles;
- Self-tapping screws, plates, angles, studs, other expenses + delivery of all materials - 10,000 rubles.
Stage 2. Timber processing
Processing logs for scraping
Processing a log for scraping
Step 1. After the consumables have been delivered to you (or you have cut and delivered them yourself), they need 25-30 days to rest.
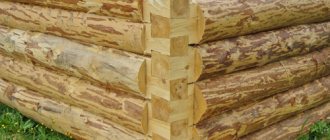
Step 2. Next, carefully examine and sort through the logs - keep only the highest quality ones, and discard defective or damaged ones.
Step 3. Then start processing. First, peel the bark from the logs (do this carefully so that they do not crack), leaving a little of it on the sides - about a 15-centimeter strip on each side.
Step 4. After processing, place the logs in storage approximately 25 cm from the surface of the ground. You can stack it however you like - in stacks, packs, etc., the main thing is that the distance between the logs is 7-10 cm.
Scheme for preparing logs for assembling a log house Log storage
Video - Preparing logs
Design and selection of materials
Assembling a log house with your own hands begins with designing a house, taking into account the characteristics of the land plot, future engineering systems and room design. The layout of a log house can be rectangular or square, as well as shaped in the form of a semicircle, hexagon, etc. Of course, the construction of the first option will be much easier.
After creating the project and calculating the estimate, lumber is carefully selected. Rounded logs are the best option for those who want to assemble a log house and build a house themselves.
Such logs are characterized by a smooth and even surface, identical sizes and diameters.
This will allow installation to be carried out quickly and easily. In addition, logs tightly adjacent to each other will provide good thermal insulation. Due to the aesthetics and naturalness of the materials, a house made of round wood will harmoniously fit into the environment. A wooden structure will look elegant and original.
Read more about the advantages of a log house here. To get a reliable and durable house, you need to use only high-quality logs. It is advisable that the lumber be from forested regions and undergo special processing. At the MariSrub company, timber harvesting takes place in the Kirov region, the Mari El and Komi republics. These regions are famous for their good, large and moisture-resistant wood. Raw materials and logs are carefully selected and processed in the company's own workshop.
The wood is impregnated and treated with protective agents against the negative effects of moisture and insects. Such materials will last longer and retain their original appearance and properties. Choose logs harvested from winter forests. Since such wood is stronger and more resistant to moisture.
The presence of knots of small diameter and small natural defects on lumber is allowed. The trunks of quality materials are characterized by yellow or dark yellow color. These must be unspun logs of the same diameter and the same wood species. There should be no mechanical damage, rot or wormholes on the surface.
Stage 3. Construction of the foundation
Let us immediately make a reservation that massive monolithic foundations can be abandoned due to the insignificant weight of the future structure. In order to save money, you can resort to one of two possible lightweight designs, namely:
- strip foundation;
- columnar.
Let's consider each of the options.
Strip foundation
Strip foundation
Marking
Marking
Digging a trench Formwork and reinforcement
Fill
Ready-made foundation for a bathhouse
To build such a foundation around the entire perimeter, as well as under future walls, dig a trench 40 cm wide and 50 cm deep, lay a “cushion” of sand and gravel on the bottom. Next, lay the reinforcement, build formwork 50 cm high and pour concrete mortar. As a result, the height of the foundation will be approximately 1 m.
Attention! A more specific height depends on the depth of soil freezing in a particular region.
Video - Pouring the foundation
Place strips of sand and crushed stone inside the perimeter. In the future, the strips can be filled with concrete or a wooden floor can be built on them. The choice of one option or another depends on personal preferences and financial capabilities.
Columnar foundation
Drilling
Fittings and pipe for foundation
The pipe and fittings are installed in the hole
Concrete poured into a pipe
Anchor for attaching the bottom trim
In the case of a columnar base, you will need to build supports. There are two possible options:
- brick;
- from asbestos pipes.
Place supports at the corners of the perimeter, as well as under all walls in 1.5 m increments. Pre-lay a concrete “cushion” under each support. Fix several reinforcement rods in each support so that the latter protrude above the surface by at least 30 cm.
Build formwork 40 cm high, lay reinforcement in it and tie it to rods protruding from the supports. Fill with concrete mortar. After four to five weeks, when the concrete is completely dry, you can begin further work.
Bathhouse foundation
Brick columnar foundation
Do you want everything ready?
Wanting to reduce the construction time of a house and bring the housewarming closer (and this can take place no earlier than one and a half to two years after the final assembly of the building), some are considering purchasing a ready-made log house. Is it worth doing?
First of all, it is unknown what quality of the project was used and whether it was used at all. In addition, many still want to “modernize” the log house for themselves, adding various extensions, balconies, etc. to it. In particular, this creates an increased load on the supporting structures; the junctions of new elements with log walls often become cold bridges, it is also possible emergence of other problems.
It is especially not recommended to purchase a log house that is offered to you as an already established one. Most likely, these are piles of logs that did not find their buyer in time, stacked in crowns on supports and stood there for a year or more without proper shelter. There is no need to explain what kind of house this material will make. Remember: the log house should only stand on its foundation and under a temporary roof.
Stage 4. Waterproofing the base
Waterproofing a strip foundation Waterproofing a strip foundation with roofing felt
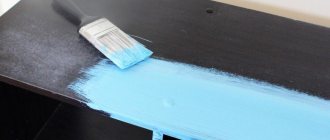
Treat the surface of the foundation with molten bitumen and lay a layer of roofing felt on top. After the bitumen has completely dried, repeat the procedure. As a result, you will have reliable two-layer waterproofing.
Waterproofing with mastic
Additional insulation with roofing felt
Stage 5. Preparing tools
To work you will need the following equipment:
- chisel;
Chisel - carpenter's axe; Carpenter's Ax
- medium power chainsaw;
- plumb line; Plumb
- level; Laser level
- electric drill;
Cordless drill/driver - mallet;
Wooden mallet - "trait".
Trait (tool)
We will pay special attention to the last tool - the “line”. For manufacturing you will need steel wire with sharpened ends. Bend the wire in half so that it takes the shape of a compass; you can additionally secure the handle. This tool will be needed when marking logs.
Stage 6. Construction of a log bathhouse
Comparison of Canadian and Russian cutting
There are several assembly technologies:
- Russian assembly;
- Canadian; Canadian cabin
- Norwegian Norwegian cutting Swedish cutting
The first option - Russian felling - is the easiest to perform; even an inexperienced carpenter can handle it. Therefore, we will consider this technology.
Sauna cutting
Step 1. The construction of the log house should be carried out in stages and begin with the frame crown (in other words, from the first). The logs that will serve as the frame crown should be edged to ensure a tight fit to the foundation.
To begin with, we lay the so-called “backing” linden board on the foundation. This can be a beam about 50 - 100 mm thick and at least 150 mm wide. Then we begin to assemble the log house
Mortgage crown
Laying the first crown on the foundation
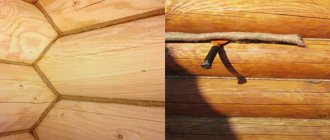
Step 2. Lay the first pair of logs on top of the waterproofing layer. Place the next pair at an angle of 90ᵒ relative to the first and connect everything into a “cup”.
Chopping into a bowl
Attention! “Cup” is the simplest connection option when constructing log buildings. It is done quite simply: the boundaries of the future “cup” are measured at the bottom of the log, then a recess is marked using a “line”. After checking the dimensions again, the recess is carefully cut out with an ax.
You can use a chainsaw - this will save a lot of time. Although the final finishing of the “cups” will still have to be done with an ax.
How to properly cut a corner in a log house
Log joining
Attention! In the starting crown, the “cups” will not be deep, as a result of which the logs will not come into contact with the base. Therefore, place a lining in the gap that appears - a small piece of board of the required thickness, treated with an antiseptic and covered with insulation.
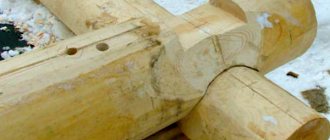
Step 3. Next, lay the second crown using the thickest logs possible. This is explained by the fact that in the future you will cut sex joists into them. To ensure a tight fit, make a longitudinal groove in the top log, which would be equal to a third of the diameter of the previous log. To draw the boundaries of the groove, place the upper log on the lower one and mark using the “line”.
Attention! The longitudinal groove can be semicircular or triangular. If you have a chainsaw available, you can cut a triangular groove in two to three minutes. But remember: logs with such a groove will not fit tightly together, which will negatively affect the thermal insulation properties of the walls.
Obviously, the best option is a semicircular groove. Do it with a chainsaw and use a chisel to remove any residue.
Walling
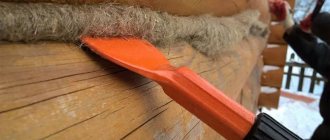
Step 4. Insulate the joints of the logs, preferably using flax-jute fabric. Place one piece of fabric on the lower crown, and seal the longitudinal groove with the second (especially if the latter has a triangular shape).
We fill the entire groove and recess of the bowl with caulking material
Step 5. Connect the crowns together. Here you can use:
- square dowels;
- round dowels made of wood.
The second method is preferable, because dowels can be purchased ready-made and holes can be made using an electric drill.
Make holes in increments of 1-1.5 m, parallel stitching the top pair of crowns completely and not completely the third one (from the bottom). To avoid distortion, after shrinkage is completed, recess the dowels into the upper crown by at least 6-7 cm.
Joining logs
Step 6. After raising the walls to the desired height, lay the ceiling beams and rafters on top of them. If damp wood was used, then lay slate sheets instead of rafters and wait until the structure shrinks. Usually, it is enough to overwinter once, but ideally, shrinkage should last a year and a half.
Flooring made of massive solid logs
In the spring, when the shrinkage is complete, start caulking.
Video - Roof made of aspen shingles
# Making a log house and storing it on the plot until spring
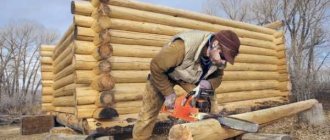
The log house was ordered at the end of December 2022. It took about a month to make it. Dimensions of the log house: width 4.3 m, length 6.5 m, height 2.3 m. This is a log house made from mountain Burzyan pine, winter-cut into a paw with a side extension. The price of the log house is 75,000 rubles (delivery costs included).
In the photo: a log house from Burzyan pine, winter cut into the paw after production. It is in storage until spring, standing in two feet. / January 2022
In the photo: a log house from Burzyan pine, winter cut into the paw after production. It is in storage until spring, standing in two feet. / January 2022
In the photo: a log house from Burzyan pine, winter cut into the paw after production. It is in storage until spring, standing in two feet. / January 2022
In the photo: a log house from Burzyan pine, winter cut into the paw after production. It is in storage until spring, standing in two feet. / January 2022 In the photo: a log house from Burzyan pine, winter cut into the paw after production. It is in storage until spring, standing in two feet. / January 2022
Stage 7. Doors and window openings
We specifically started talking about openings after construction was completed, since there are two options for their arrangement.
Installation of a casing for installing windows and doors in a log house
- In the first case, holes are created after the completion of construction work. At the same time, in the crowns located in the places of future openings, first leave small gaps (the dimensions of the latter depend on the size of the mounted products). Once you've finished laying the logs, simply cut the openings with a chainsaw.
- In the second case, leave openings during the construction process. This is very labor-intensive and expensive, since you will use bars with notches at the ends and special grooves.
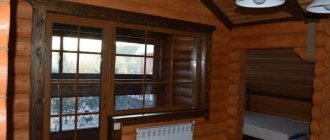
How to install a window in a log house
Window installation
Windows for a bathhouse Doors for a bathhouse made of logs
Therefore, we advise you to give preference to the first option.
# What does the first floor of a log house look like?
In the photo: the floor of the first floor in a log house. / July 2022
In the photo: the floor of the first floor in a log house. / July 2022
In the photo: this is what the walls of a log house look like (inside view). / July 2022
In the photo: the subfloor of the second floor in a log house (we used a 50*200*6000 board). View from the first floor. / July 2022
In the photo: the subfloor of the second floor in a log house (we used a 50*200*6000 board). View from the first floor. / July 2022
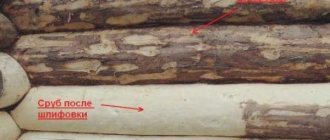
Stage 8. Caulking logs
Types of tools and caulking methods
After shrinkage is completed, the log house is caulked. To do this, prepare the following equipment:
- hammer;
- caulk (made of wood or metal).
Attention! If you sealed the inter-crown space with tow or moss, you can skip this step, since you most likely will not need caulking. But if you find even the slightest cracks, then it is still better to carry out the procedure.
Proceed to work only after the insulation has completely dried. First, twist the material (tow or moss) into a rope, then hammer it between the crowns with a hammer and caulk.
Caulk
You can use tape jute - in this case, the material is simply fixed with nails or a mounting stapler.
Primary and secondary caulking of a log house
Video – Caulk of a log house
Stage 9. Roof
Construction of a roof on males with layered rafters Rafter system
As soon as the tree shrinks, you can begin building the roof. If you do this earlier, the roof will simply collapse.
Step 1. Place wooden beams on the wall framing (we have already talked about this).
Step 2. Fix the beams and attach the rafter legs to them in 1 m increments. In the ridge part, cut the rafters at the appropriate angle for the connection.
Step 3. Nail a solid board deck to the rafters (if you plan to use rolled roofing material) or make a sheathing (if you use slate, tiles, etc.).
Step 4. Install the roofing according to the instructions for the specific material.
Step 5. Cover the ridge with galvanized sheet steel to protect it from aggressive environmental influences.
Step 6. Cover the roof gables with siding or clapboard.
How to sew up a pediment
After this, proceed to further planned work - pouring a concrete screed or building a wooden floor (in the second case, the logs are cut into the logs of the second crown and fixed), install insulation, carry out interior finishing and arrangement of the steam room according to your project.
Example of a log house with a shingle roof Example of a log house with a shingle roof
Cornice filing
Roof overhang trim
Eco-hut only 30 m²
mike099FORUMHOUSE user
The dream has long crept in about building a wooden house - environmentally friendly, practically without paints, mineral wool, polystyrene foam and other “benefits” of modern industry. The task is to build a solid, comfortable house with minimal effort, suitable for winter visits and year-round living, therefore shingles, boulders, mezzanines, Russian stoves and other delights of centuries past were not included in the project.
The craftsman immediately decided on the design:
- Pile foundation.
- Box made of hand-cut logs.
- Metal roofing.
- Sawdust with clay and sawdust with lime are used as insulation for floors.