If you want to somehow diversify your leisure time, then we advise you, dear friends, to take up carpentry. This exciting activity will captivate you so much that time will simply slip away unnoticed, and in this case you will learn how to make all sorts of decorations for your home, cottage, garden and, of course, the yard with your own hands. In addition to all this, you will not be tormented by the eternal question of what to give to relatives, friends and work colleagues on their name days and other holidays. Moreover, there are a dime a dozen available materials for creativity; all the old trees located on your plot are at your disposal. Even from ordinary-looking stumps and driftwood, if you use your imagination, you can create incredible masterpieces of art that will be admired by everyone without exception. So, we strongly recommend that you visit our article, which will provide you with 10 photos of ideas for beautiful and interesting DIY wood crafts for prepared beginners. They will serve as a shining example for you and an impetus for your own unusually cool works. Videos with step-by-step master classes will complement and consolidate your acquired knowledge in the field of carpentry.
Original log feeder
If your 11-12 year old child was given a homework assignment at school or kindergarten during a craft lesson, to make a bird feeder, then you should like this wooden craft. You won’t spend a lot of time making it, and the result will delight you and surprise those around you. Let's look at the step-by-step instructions and understand how to make an interesting log feeder with your own hands.
You will need:
- Log,
- Chainsaw,
- Jigsaw,
- Semicircular chisel,
- Hammer,
- Chain - 1 m,
- Carbine,
- Mounting loop - 2 pcs.,
- Self-tapping screws.
Progress:
- Even a novice carpenter, through our master class, will be able to build a simple and original log feeder with his own hands. From the log we saw off two circles on both sides, of small thickness with a chainsaw.
- We cut a wedge along the length of the log at approximately 45 degrees.
- We take the wedge out of the log.
- We make longitudinal and transverse cuts inside the log, not cutting about 5 centimeters to the outline.
- Using a chisel and hammer, we hollow out the middle of our log. We smooth out the chips, making the inside of the log smooth.
- From 2 sawn circles we cut out the side plugs. To do this, apply a circle to the log and mark the size of the plug along the inner contour, and cut it out with a jigsaw.
- We insert plugs along the edges of our feeder and secure them with self-tapping screws.
- Our craft in the form of a feeder is ready, now we’ll make fasteners for it.
- To do this, we screw mounting loops into the upper part on the sides. We put a chain on them.
- All that remains is to attach a carabiner to the chain and hang it on a tree.
Video: interesting DIY bird feeder
Frame made of tree branches
A photograph is a preserved piece of happiness captured at different periods of life. By making an unusual wooden photo frame with your own hands, you will add zest to the interior and surprise your guests. This frame will be especially relevant as a gift to loved ones. Even a novice carpenter can easily and quickly cope with such a simple task. The result will be an amazing craft for everyone to enjoy!
You will need:
- Branches of various thicknesses,
- Frame,
- glue gun,
- Jigsaw.
Progress:
- Cut the branches into wheels, about 5 mm thick. The more varied the thickness of the branches, the more interesting the finished frame will look.
- Now cover the frame with the resulting rings using glue, placing them in a chaotic order.
- The edges may be jagged, but this will add a special charm to your DIY wood craft.
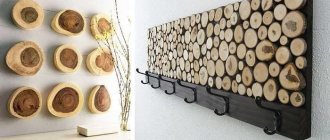
Panel
One of the most common crafts made from natural wood is a decorative panel. It has many varieties, can consist of any number of blanks, it all depends on the imagination of the person laying out the panel.
However, there are several characteristic features by which the panels can be divided:
- Made from dark wood
- Made from light wood
- Based
- Without reason
An easy option is a panel on a base onto which blanks are glued. As a rule, this is thin chipboard, on which blanks in the form of circles of wood are then placed.
To fill the space between cuts, branches, leaves, small stones, moss and natural materials are used.
It is more difficult to lay out panels without a base. In this case, you need to be careful, the panel should be smooth and firmly glued. It is recommended to use special wood glue when gluing joints between materials.
The result will be a kind of board of circles. Its advantage is that you can make a three-dimensional craft from it by adding details.
Very often a design is laid out from wood circles. Looks original. This is one of the simple and quick options to create a unique decorative element.
Swedish candle
This candle will be indispensable on any hike. You can cook food or heat water on it; it burns for a very long time. This useful craft, made with your own hands, will save you on any hike, travel, fishing, and even in the country. It's incredibly easy to make. Let's look at the step-by-step description and principle of its implementation.
You will need:
- A piece of log
- Chainsaw,
- Lighter fluid.
Progress:
- In order to make this interesting craft from wood with your own hands for beginners at home, you will need to use a chainsaw to make 4 cuts intersecting in the center along the log. We do not make the cuts all the way to the end so that the structure does not fall apart, but slightly more than half the length.
- Now pour lighter fluid into the middle.
- Once you're on your hike, simply light the log in the center. The flame will be strong.
- To ensure that oxygen reaches the fire site, take 2 branches, preferably raw ones, and place them parallel to each other. Now you can place dishes with food or water on them.
Video: master class on making a Swedish candle with your own hands
Owl made of wood
To decorate the garden or as an interesting craft for school, an owl made of wood will look good. It is quite simple to do with your own hands, so with your help, even a novice carpenter or schoolchild can easily cope with such an owl. Before we begin, let's see how to make an owl with your own hands in step-by-step instructions.
You will need:
- Round cuts from trees of different diameters (1 large, 2 small and 1 medium),
- Saw,
- Self-tapping screws,
- Cap from a plastic bottle - 2 pcs.,
- Felt pen,
- Sackcloth,
- Scissors,
- Glue.
Progress:
- A large saw cut will serve as the body of the owl.
- On the flat side on top we fasten two small saw cuts with self-tapping screws. These will be the eyes.
- We cut a medium-sized piece in half and attach it to the sides of the large cut. Sawed sides in different directions.
- Make your own beak from a small piece of log, cut it out. Place from below between the eyes, attaching with a self-tapping screw.
- We need to make ears from burlap, placing them above the eyes. Take a small piece and roll it into a tube, making one end sharp. Flatten it and use glue to glue it above one eye with the sharp part to the side. We make the second ear in the same way.
- We make eyes from lids. We attach the lids to the logs for the eyes with a self-tapping screw, and fill in the pupils with a black felt-tip pen.
- The owl is ready. It can be hung on the wall, since it has a flat side, or mounted on a tree branch in the garden, decorating it with another interesting DIY craft.
Watch
This craft is difficult, but with due diligence everything will work out. You need to take the mechanism from an old watch as a basis. We use a saw cut as a display with numbers.
Numbers can be burned onto the surface, pasted, or decorated with decorative elements. It all depends on your imagination.
You need to cut a small circle in the center to insert a clock mechanism with hands. The circle must fit perfectly.
If it is too large, you will have to use additional decor, such as artificial moss, leaves or flowers.
In the photo in the interior, such watches look original and are ideal for styles such as country, Provence and derivatives of them.
They can be used in minimalism, but provided that they match the color scheme, as well as at least one decorative wooden element in the room.
On the back of the clock it is necessary to provide the possibility of mounting it on the wall. To do this, a recess is knocked out in a certain place.
Interesting stool
This interesting wooden stool will be an excellent decoration for a summer cottage, bathhouse or garden. You won’t spend a lot of effort and energy making it yourself. This stool is distinguished by its originality in manufacturing, since, by and large, it turns out by itself. You will need several steps at the beginning and end of the job. For beginning craftsmen, this is just a great way to hone their skills.
You will need:
- Log,
- Ignition fluid,
- Saw,
- Round seat blank,
- Metal brush,
- Grinder,
- Nails,
- Hammer.
Progress:
- We take a log and make 2 cuts, perpendicular to each other, along the log.
- Pour lighter fluid into the middle and light it.
- We wait until the fire itself makes legs for the stool and extinguishes it.
- Using a metal brush, remove remaining coals and soot.
- Then sand the surface of the stool with your own hands.
- Nail the seat to the top of the stool.
- The stool is ready! An excellent and useful wood craft for the whole family.
Where can I buy
You can get acquainted with the range of products offered by companies for baths and sanitary linden in several sections of our website:
- Where to buy linden.
- Where to buy doors.
- Where to buy timber.
Linden, Shelves · 09/23/2019 · 0
DIY swing for a child
If you want to make your child happy with a swing, you don’t have to buy one. You can make a very beautiful and safe swing for small children from wooden planks with your own hands. They are safe because there is protection from falling out on all sides in the form of crossbars. So, let's start the process of making our homemade interesting craft at home.
You will need:
- Bar 3 × 4 × 37 cm - 11 pieces,
- Board 4.5 ×1.5 ×37 cm,
- Self-tapping screws,
- Rope,
- Hacksaw,
- Pencil,
- Ruler,
- Drill,
- Screwdriver.
Progress:
- To make our wonderful craft from wood, we place two bars parallel to each other. We lay 6 boards on top with the same distance between them and fasten them with self-tapping screws.
- We drill holes for attaching the rope on four sides in the corners.
- Next, take a hacksaw and cut two pieces of 15 centimeters each from the block.
- Then we drill holes in the center of the resulting blocks, so we will get the front pillars of our homemade craft.
- We cut the seven-centimeter piece in half and drill it vertically.
- We take a new block and place small blocks with holes along the edges. We drill holes in the block.
- We repeat the same action with two more bars and three planks.
- From the new block, we cut off two blocks, each 7.5 cm long, and drill vertical holes in them.
- We take the rope and begin to assemble our swing. We pass two different ends along the sides of the seat so that the middle of the rope is under it. We do this on both sides of the swing.
- We put 15 cm posts on the rope on the front part of the swing.
- We put 3.5 cm posts on the back ropes. Then we put a block with holes on the back posts, so we will make the back wall of our swing with our own hands.
- We put bars 7.5 cm long on the rear racks.
- We install armrests. We put planks on the side ropes.
- We put the two remaining drilled bars on the back ropes.
- We put a board on the front ropes, which will serve as a side for the child.
- Now you can hang the swing in any doorway or in the corridor.
Video: interesting DIY wood craft
Wood cutting board
Each of us uses cutting boards in the kitchen, so I want to talk about how to make a board with your own hands for novice craftsmen. This interesting craft can be used in your kitchen, given to friends and relatives, or used as a basis for wood burning or other works.
You will need:
- Board 20 × 70 × 40 mm,
- Glue,
- Clamp - 2 pcs.,
- Plane,
- Jigsaw,
- Drill with drill,
- Sandpaper,
- Creosote.
Progress:
- In order for the craft to turn out as required, the boards need to be glued together so that you get one wide board. To do this, we coat the sides of the boards with glue and, using two clamps, tightly tighten them together.
- After the glue has dried, remove the clamps and process the board with a plane so that it becomes smooth and even.
- Now draw the desired shape of the board and use a jigsaw to cut it out.
- Drill a hole in the top of the board so that our craft can be hung in the future.
- We sand all sides of our board so that it becomes perfectly smooth and without burrs.
- After sanding, treat your board with creosote. Wait for it to dry.
- The board, made from wood with your own hands in a short period of time, is ready for use!
Varieties - what kind of wood is used?
Of course, it is correct to understand the word “varieties” as grade. But in this regard, everything is quite simple: when the tree is cut and dried, this is followed by sorting, identifying fragments without defects and with defects. The latter are further divided. This is how we get the highest (or first) grade, first (=second) and second (=third) grade. Here you need to clarify which system is used to label this or that manufacturer.
In this sense, suitable varieties of linden for a bath are the highest and the first. The Supreme goes to the surfaces that are best visible and with which your body is in contact. Where it is not so noticeable, you can use the first one.
Now let’s try to understand the word “varieties” differently. After all, this can be said about linden species - botanical and geographical varieties, as well as about linden that has undergone special processing.
Heart-shaped, large-leaved, European
The woodworking industry has long decided which types of trees are most suitable for its purposes. cordate and were distinguished , the trunks of which produce less waste when cut. A very long ago bred or self-formed hybrid of these two was the European linden.
However, even between these types there is a difference. Linden wood is on average soft and ductile, but that of the European linden is a little harder and denser than that of those that gave it its origin.
In addition to this, there are other types that are also sometimes used for making lumber.
Caucasian
Unfortunately, manufacturers who create a legend from the “Caucasian linden” do not bother to clarify whether it is one of the three species mentioned above, simply grown in the Caucasus, or whether it is a species called Caucasian linden.
We do not have comparative information on how much wood from the Caucasus differs from wood grown in other areas. But sellers claim that Caucasian linden is the best tree for a bathhouse, because it resists rotting more successfully than its European relatives. You can take this at its word, or you can consider it a simple PR stunt.
Thermo-linden
Finally, let's talk about the moisture content of wood and its role in construction.
The wetter the wood used on a construction site, the more problems the owner will have when it dries naturally. Free-drying wood tends to bend and twist, breaking fasteners, and it also dries out, forming cracks.
Therefore, it is extremely important that the wood is dried at the time of purchase. According to the rules - up to 12%. Such a tree can already be used without fear. But in reality, they will most likely sell you wood with higher moisture content.
On the other hand, there are technologies that make it possible to expel almost all bound water from a tree, after which its properties change radically: that wood, which until recently was not resistant to rotting, acquires increased resistance, not to mention the fact that it is no longer swells from moisture and does not dry out when dried. It becomes light, hard, durable... almost perfect.
Polok Lipa Thermo "Extra". Photo: Pech-grad.ru
But its price also increases. But thermal wood is much better than even wood that has been well dried to the above-mentioned 12% of ordinary wood. Its humidity of 8% is an excellent indicator.
ADVICE! In general, if you want to extend the life of the steam room decoration or shelves, use thermo-linden for the bath.
Tic-tac-toe game made of wood
You can make not only decorative and useful crafts from wood, but you can also make a tic-tac-toe game with your own hands. This interesting work will delight both adults and children with its unusual design. This game can occupy time at home and in the country.
You will need:
- Sawed circle, diameter 20 - 25 cm,
- Branch, 3 cm in diameter,
- Cautery on wood,
- Hacksaw,
- Sandpaper.
Progress:
- In order to make an interesting wooden craft with your own hands for beginners without any problems, you first need to cut the branch into circles up to 1 cm thick. We need 12 of these blanks.
- Using sandpaper, sand all sides of the circles, as well as our playing field.
- Now burn out a playing field of 3 × 3 cells on a large circle.
- We need to burn 6 zeros and 6 crosses on small circles.
- The craft is ready for play!
Snowman made of wood
Such an interesting and cute children's craft will become a real decoration for your room interior for the New Year 2022 or a gift for friends - schoolchildren. Children can easily make such a creation with their own hands, they just need to devote a little time and effort to creativity, and also prepare several cuts of wood. Parental help and support, of course, will also not be superfluous for beginners. So let's get to work.
To create you will need:
- a piece of wood, size 5 X 10 cm;
- sandpaper;
- white acrylic paint;
- materials for decorating the Snowman: buttons, fabric and other things you like;
- drill;
- black marker;
- pink paints;
- paper;
- compass;
- orange polymer clay;
- brush and sponge for applying paint.
Work process:
- To make this craft, you will need to separate the work for children and adults. To begin with, a child of 11-12 years old will be able to freely draw a Snowman template on a piece of paper, and then cut it out in front of an adult.
- Dad or grandfather, in turn, transfers these sketches onto the tree, tracing the lines with a black marker.
- Using a carpenter's tool you will need to cut out the fairy-tale character, and then sand all the unevenness and roughness.
- After this, it is necessary to bring the Snowman closer to its natural color. To do this you will need snow-white acrylic paint. We cover the entire product with it and set aside time for drying.
- We create the cheeks using pink paint. With a simple touch of a finger we apply blush to our craft.
- We draw the eyes and mouth with a black marker.
- We make our own carrot nose from polymer clay. Entrust this part of the work to your child. After drying, attach it to the product with universal glue. In the same way, attach the buttons to the Snowman’s body.
- We make handles from tree branches, a hat from gray or brown colored cardboard, and a scarf from any piece of fabric. So our fun New Year's craft is ready, created with your own hands quickly and easily. For schoolchildren, you can come up with many similar products that they can create on their own at home. Perhaps this creativity will develop into your child’s real hobby, and subsequently into something more serious.
What are wooden spoons made of?
What kind of wood is best to carve wooden utensils from? This important question worries all novice carvers. For carving spoons, the best pieces are made from hard, but not splintered, hardwood - aspen, ash, maple, birch, elm, walnut, cherry or maple.
Beginner carvers are better off using linden wood. This wood is softer and lighter, has a uniform density and is well planed in all directions. For gaining experience and practicing basic carving skills, this is the most suitable material. Among other things, linden products are not prone to warping and do not emit tannins.
Coniferous trees are not suitable for making spoons due to their high resin content and characteristic odor. Also avoid exotic tropical woods such as teak, which can be toxic.
You can use planks as a blank, or split the whole ridge deck into small logs. The first option is more practical, the second is more traditional. The orientation of the wood fibers in the workpiece determines the symmetry of the pattern of the spoon bowl as shown in the photo.
Linden lumber
1. PROPERTIES OF EUROBOARD AND LINDEN SHELVES It has healing powers: substances released from wood when heated have: Anti-inflammatory effect, treatment and prevention of tuberculosis. Being in a “linden” room will get rid of cellulite and heal the liver; inhalation properties; Linden bath procedures are recommended for colds, articular rheumatism and many others; 2.
Linden eurolining has the ability to charge with new forces (energy donor); 3. Does not overheat, which prevents thermal burns; 4. Does not have tar compounds harmful to the body; Despite the high content of essential oils, linden does not cause allergies even in the most sensitive people5. When heated, it releases a honey aroma (a type of aromatic wood)6.
Has very high thermal insulation and sound insulation properties; 7. Has low hygroscopicity, that is, the ability of the material to absorb liquids; That is why it is used for finishing baths, saunas, making shelves and cooperage products8. Not affected by precipitation9. It has air ducts for air circulation, which avoids condensation on the material10.
2. HEALING PROPERTIES OF LINDEN Linden is one of the most famous healing plants. Moreover, not only its fragrant flowers and the honey obtained from them have beneficial properties. The same qualities are characteristic of linden wood. Linden is a truly unique tree. First of all, all its parts - inflorescences, buds, bark and the wood itself - have pronounced healing properties.
In particular, linden wood is capable of releasing special substances that, indoors, have a healing effect on humans. And in the hot and humid air of the steam room, these properties are further enhanced, and contribute not only to relaxation, but also to rid the body of toxins and waste.
When heated, the linden board releases a pleasant smell and many essential oils, which have bactericidal and anti-inflammatory properties, helping to avoid colds or relieve cold syndromes. High humidity helps preserve and enhance the beneficial properties of linden wood, which makes it an ideal material for baths and saunas.
The use of linden in the decoration of saunas and baths is also explained by a whole range of useful properties inherent in this type of wood: it has a relaxing and restorative effect, and creates positive energy in the room. In addition, linden has a diaphoretic effect, which is important when using a steam room.
Linden is a highly revered and beloved domestic tree variety, which has long been actively used in the national economy. Our ancestors also figured out that this is a real “storehouse” of useful things, therefore:
- Healing teas and decoctions were prepared from its inflorescences;
- linden bast was used to weave shoes;
- toys, kitchen and household utensils were carved from tree trunks;
- linden fibers were used to weave washcloths, ropes, harnesses and even clothes.
The peasants piled linden logs prepared in the summer under the roof canopy and dried them until winter. Closer to the cold weather, the blanks were covered with a black crust, but as soon as they fell into the hands of the master, they were transformed and pleased the eye with a delicate white color with a slight pink tint.
It was precisely this comprehensive use of linden by medieval peasants that forced our contemporaries to primarily use it as a raw material for the production of modern lumber. Folk wisdom accumulated over centuries did not disappoint. Nowadays, linden tongue and groove boards are one of the most popular products on the domestic wooden market.
A set of basic tools
To make a wooden spoon with your own hands you will need a minimum set of simple tools:
- Knife . For wood carving, it is better to use a Bogorodsk knife. Its double-sided sharpening makes it equally convenient to work both “pull” and “pull”, and the narrow nose makes it possible to cut wood along internal lines.
- Spoon cutter (scraper) . This is a chisel with a sharp bend, designed for scraping wood in recesses and working on the internal walls when carving dishes. An alternative to a spoon cutter can be a wide cranberry or a regular semicircular chisel.
- Straight chisel – used for even cutting of solid wood from a workpiece.
- Clamp – necessary for conveniently fixing a piece of wood.
- Roughing file
- Stikhel is a thin steel cutter for creating decorative carvings on the handle.
general characteristics
Linden is the common name of trees belonging to the genus Linden (lat.Tilia), growing in the European and Asian territories of Russia. The tree prefers fertile, well-draining soil. Grows equally well in sun and partial shade. Sufficiently resistant to low winter temperatures and summer droughts.
People grow linden for its wood, which can be easily carved by hand, for making sculptural crafts, all kinds of toys and souvenirs. Leaves, flowers, bark and wood are widely used for medicinal purposes. More than 30 species of linden are known. Growing conditions and species are not significant, but they change the physical and mechanical properties of wood.
Linden can easily reach impressive sizes from 20 to 40 meters in height. Depending on the type, it has a pyramidal or rounded crown with obliquely heart-shaped leaves from 6 to 20 cm at the crossbar. Young trees have almost smooth gray bark, which over the years develops into brown, furrowed bark.
Linden trees usually live for several hundred years. Wild trees are found to be 800 years old or more.
Blooms in late spring. The flowers are yellow, fragrant and arranged in drooping clusters. Flowers contain both types of reproductive organs (stigma and stamens); they are not capable of self-pollination. The strong aroma of the flowers attracts bees, the main pollinators of the linden tree.
Bees use nectar from linden flowers to produce delicious honey. Flowers are a rich source of volatile oils, which are responsible for the pleasant aroma of this plant. Aromatic flowers are popular and often consumed in the form of teas and herbal infusions, in natural and dried forms.
How to Carve a Spoon from Wood: Step-by-Step Guide
- Using a template, transfer the top and side views onto a piece of wood. Please note that the orientation of the wood fibers is longitudinal, in this case the spoon will have maximum strength.
- Having fixed the workpiece with a clamp, proceed to roughly forming the bowl. For these purposes, a spoon cutter is used, but you can limit yourself to an ordinary semicircular chisel or a wide cranberry. Wood is sampled in the direction of the grain. When deepening the bowl, do not forget that you need to leave a small allowance in thickness for finishing trimming and sanding.
Hollowing out a bowl on a rectangular piece is much more convenient, since the piece of wood is rigidly fixed and maintains a stable position.
- When the recess is formed, you can begin cutting off the excess mass in the horizontal and vertical planes, following the top and side contours. To do this, it is most convenient to use a jigsaw or band saw, but if you wish, you can perform all the manipulations with a straight chisel or hacksaw.
- Using a Bogorodsk knife, cut off the convex part of the spoon. Using a wide chisel, we give the bowl a perfectly even, rounded shape. Using a knife and chisel we work out the shape of the handle.
- Using a spoon cutter, trim the bowl cleanly and carefully align its edges as shown in the picture.
- Grinding is carried out in two or three passes, each time reducing the grain size of the abrasive.
When in contact with water, even a perfectly sanded surface can begin to fluff. The raised lint does not spoil the appearance of the spoon, but it does feel unpleasant in the mouth. Therefore, if you plan to use the utensils you made yourself for their intended purpose, you can solve this problem using the old proven method. After grinding, the spoon is wetted and thoroughly dried, passing again with a fine-grained abrasive. This procedure is repeated two to three times.
Our version of making a spoon is a more adapted technique. It is designed to use a modern tool, which, although it simplifies the work process, at the same time distances it from the age-old traditions of carving art.
The secrets of primordially Russian carving of a wooden spoon - watch in the presented video:
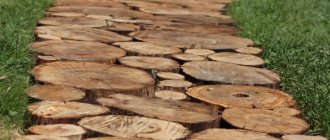
Wall parquet
We can say that wall parquet is a type of lining for walls. To lay linden parquet, a lathing is used, to which parts of the wall parquet must be attached. Most often, bathhouses are arranged this way.
However, wall parquet has also found application in everyday life. To style houses as antique, as well as to create environmentally friendly apartments, parquet is used to cover the walls of literally any room, including corridors, kitchens and balconies.
The installation method resembles brickwork. The length of one element, most often, with a stable width and thickness, ranges from 15-20 centimeters to a meter. Using linden wall parquet, you can hide significant wall imperfections (unevenness, fungal damage), while creating a cozy and environmentally friendly room. Installation is quick and simple, the appearance is stylish, and the price is usually reasonable. Rating 5.
How to cover a wooden spoon for eating?
The final touch to creating a wooden spoon is its treatment with a finishing compound. And here, as a rule, many questions arise. If you are carving a decorative spoon, then everything is simple: you can paint it, apply any varnish coating or treat it with wax. With products that are planned to be used for their intended purpose, everything is more complicated. When choosing a composition for impregnation, it is important that it is practical and safe.
In the Russian tradition, linseed oil was and continues to be used for processing wooden spoons. This impregnation is environmentally friendly, has antibacterial properties, emphasizes the texture of wood, and is easy to apply. But it will have to be updated periodically. At the same time, using raw linseed oil as a finish, over time it can begin to transmit an unpleasant rancid odor to the food.
A more practical solution is to use special mineral oils for finishing wooden utensils. This impregnation gives the surface water-repellent properties, but does not form a film - the pores remain open and the wood continues to breathe. Mineral oils do not affect the taste of food and are more durable.
We spoke in detail about the practicality and food safety of finishing compositions in our previous material.
- Author: Maria Sukhorukikh
Rate this article:
- 5
- 4
- 3
- 2
- 1
(0 votes, average: 0 out of 5)
Share with your friends!
Linden sauna
Linden is one of the most famous healing plants. Moreover, not only its fragrant flowers and the honey obtained from them have beneficial properties. The same qualities are characteristic of linden wood. When heated, linden boards release a pleasant smell and many essential oils, which have bactericidal and anti-inflammatory properties, help to avoid colds or relieve cold syndromes. High humidity helps preserve and enhance the beneficial properties of linden wood, which makes it an ideal material for baths and saunas.
The use of linden in the decoration of saunas and baths is also explained by a whole range of useful properties inherent in this type of wood: it has a relaxing and restorative effect, and creates positive energy in the room. In addition, linden has a diaphoretic effect, which is important when using a steam room.
Despite the high content of essential oils, linden does not cause allergies even in the most sensitive people. This quality distinguishes it from many other types of aromatic wood. Thanks to the combination of the natural properties of linden wood and the conditions created in the bathhouse and sauna, staying in a steam room decorated with linden is considered especially beneficial.
When building a sauna, other properties of linden wood are revealed. It is easy to process and polish, is lightweight and practically impervious to water. Baths and saunas, the decoration of which uses light golden linden wood, are durable and beautiful..