The interior of a house or apartment directly reflects the character and tastes of its owner. For this reason, those who like to go beyond the standards find truly original and unusual interior items. Each of them approaches the selection of decorative elements and furniture with particular scrupulousness and responsibility. An excellent solution in this situation would be tables made of epoxy resin and wood, which look truly masterpiece.
- Advantages of epoxy resin for pouring tables
- Disadvantages of the material
- Tables made of epoxy resin and wood: options
- Decorative tables with filling
- Wood slab tables with epoxy resin
- Original countertops in the form of ponds
- Other types
- How to make a table from epoxy: instructions with video review
- Choosing epoxy resin for countertops: tips
- Material calculation
- Preparation for production
- Tools and materials
- Work room
- Step-by-step filling of countertops with epoxy
- Recommendations for proper operation
- Epoxy countertop care
For example, epoxy countertops are a bright, unusual highlight in the kitchen of any housewife. To make them, you will need to determine which epoxy resin to choose for pouring the countertop.
This article is devoted to the methods and types of manufacturing wooden tables with pouring. The publication covers:
- criteria for choosing popular brands of epoxy compounds;
- several original design solutions;
- calculation and instructions for filling the countertop with epoxy resin with a step-by-step work algorithm.
Advantages and disadvantages of slab tables
Slab furniture in combination with epoxy resin has many advantages, including:
- Wear resistance and durability;
- External attractiveness;
- Resistance to mechanical damage;
- Moisture resistance;
- Good strength properties;
- Uniqueness;
- Interesting color scheme;
- Possibility of decoration with various decorative elements.
Thanks to their reliability and high quality, tables made from such raw materials are in demand among designers all over the world. But it’s worth remembering that, like any thing, such an interior accessory has its drawbacks:
- High cost of original works;
- Complexity and labor-intensiveness of self-production;
- Release of toxic substances upon contact with fire.
Interior styles:
A slab table would be appropriate in the following interiors:
- Loft
- Eco style
- Modern
- Chalet
- Ethnic styles
- Grunge
- Rustic
- eclecticism
And also all styles with natural motifs or interiors emphasizing natural lines, roughness and brutality.
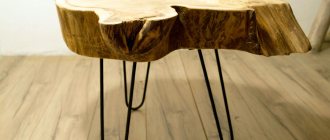
What is a slab
A slab is a wide longitudinal cut of elm, oak or poplar used in furniture production. A cross-section along the trunk reveals the texture of the tree.
In addition to beautiful shade transitions, defects of natural origin (wormholes, various knots, etc.) are also valuable. As a rule, there is no processing of the side surfaces of such slabs.
Other features of slabs:
- Irregular geometric shape;
- Impossibility of self-production (requires special tools).
Types of Epoxy Resin Tables
According to their design solutions, tables with resin are divided into:
- Combined. A special feature is the alternation of epoxy elements with wooden parts.
- Options with support. Synthetic material is used exclusively to create a coating. The design is complemented by a variety of decor
- Structures without support. Created from resin without the use of wood or metal. They are distinguished by compact dimensions. Not intended for heavy loads.
The first two options may have different designs and purposes. Dining structures with a rectangular-shaped tabletop look incredibly attractive. They will decorate any kitchen and fit into most interior styles.
In addition, round models are of interest to users. Most often they are placed in the dining room and living room. Products with futuristic configurations are no less in demand. However, it should be remembered that they are not suitable for every style direction.
Plain or transparent tabletop
Making a table with a single-color tabletop begins with cleaning and degreasing the workpiece. If a material that absorbs liquids (for example, wood) is used as a base, then it must first be primed with resin. This will prevent bubbles from appearing during operation. The next step is to make an epoxy mixture and pour it into the mold.
If the table is to be made in color, then the appropriate coloring pigment must be added to the resin, and it is desirable that the dye be from the same manufacturer as the epoxy. If you want the color of the tabletop to be combined, then during the pouring process you need to use resin with dyes of several shades.
After pouring, you need to leave the countertop for 10-15 minutes, and then remove any bubbles if they appear. After two days, you can grind and polish the product. After a week, the table is completely ready for use.
Popular techniques
Not everyone can make furniture from synthetic resin at home. The master must have a developed imagination. He will also need to familiarize himself with the most relevant techniques in our time.
Continuous coating
The main advantage of this technique is creativity. This manufacturing method involves three stages:
- Creating the foundation;
- Decoration;
- Filling the product with epoxy resin.
All work must be done extremely carefully. The coating is usually made transparent so that the base pattern is visible.
Countertops created using a similar technology are used for dressing tables and coffee tables, since they are not able to withstand any more significant load.
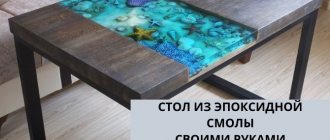
River
This modification is now in trend. It involves gluing two pieces of wood with an epoxy insert stylized as a river between them.
- These countertops can be of any configuration. The most popular options are circle, oval, rectangle.
- These structures can be placed not only in the living room, but also in the kitchen.
- The most popular styles for a table with a river are country and Provence.
From cuts
Furniture with wood cuts looks luxurious and unusual. Resin helps highlight the natural beauty of the saw cuts and allows you to create real works of mosaic art. The work is labor-intensive and requires good imagination.
This technology is used, as a rule, to create small round tabletops. However, no one forbids making products of a different configuration and size.
Design possibilities
Thanks to resin coloring, you can get hundreds of color nuances from transparent to deep and rich tones, as you wish, as well as achieve the effect of various landscapes, from mountain to sea, which is very popular now.
Under the filling, you can place any components of your choice: pebbles, shells, interesting twigs and leaves, various types of sand, marble chips, dried flowers, as well as memorable little things and souvenirs.
The special beauty of the furniture is given by dilapidated pieces of wood, withered, eaten away by bark beetles, larvae and voids formed over time. By filling such natural flaws with epoxy, you can achieve unrealistic special effects.
And by adding additional decor in the form of coarse sand into the gaps, alternating layers of resin with chips and sawdust, we will create the impression of frozen time.
It is also easy to create modern motifs using polymer resin by placing metal objects, semi-precious stones, glitter, and foil into the tabletop. In addition, when painting exposed parts of wood with metallic paints, we will get fantastic effects and shimmers.
Manufacturing algorithm
To make a table from slab and epoxy resin with your own hands, you need to follow a certain sequence of actions. First you need to choose the right material. You can buy slab at any sawmill. The wood must be thoroughly dried and thick. Rocks with colorful textures are most preferred.
The second step is to process the wood slab. Here you will need special equipment. The cut surface must be leveled and sanded, knots and bark must be removed. Metal can be used to stabilize the countertop.
The third stage is assembling the form. Here are the instructions:
- Place a plastic sheet on the work surface.
- Align the plywood walls, focusing on the dimensions of the tabletop, and fix them.
- Seal the area where the epoxy will be located, as well as all seams, with sealing tape.
- Move the prepared countertop into the resulting mold. Carefully secure and press down using weights.
Epoxy resin should be poured in layers 2 cm thick. Each subsequent layer must be applied after the previous one has dried. It is necessary to ensure that the composition is distributed evenly and covers the entire required area.
If air bubbles are observed, they must be removed using a gas burner. It is recommended to make three layers in total. Next, the product should be left to dry for two days.
The finishing works are as follows:
- After the epoxy has dried, dismantle the walls and the filling mold.
- Using a grinder, get rid of resin drips and sand all surfaces.
- Use a plunge-cut saw to straighten the edges of the product.
- Make a chamfer around the perimeter of the tabletop.
- Pour the top layer of resin. After two days, sand with abrasive up to P1200.
- Install the finished tabletop onto the prepared frame.
A strong, reliable table made of epoxy resin and slab will decorate any interior. You can purchase a suitable model online or make it yourself.
Self-made table technology
The work of manufacturing parts and assembling the table begins with the selection of suitable materials. Using the example of the following master class, you can see how easy it is to make a small coffee table with your own hands. By spending a minimum of available materials and time, you can get real designer furniture.
Fabrication of the supporting structure
One of the important stages in the work process. In order for the future table to be strong and stable, you will need to prepare two wooden circles of different diameters - one for support, the second for the tabletop. Their thickness should be at least 1 cm. The connecting element will be a plastic pipe. You will also need epoxy-based glue to attach the stand, the resin itself for pouring, and a furniture border. You can use any material you wish as a decorative filler. Metal beer caps will look original and stylish under a layer of filling.
Now the structure needs to be assembled. Place the smaller circle on the floor, mark the center and glue the pipe. We also determine the center on the underside of the lid, lubricate the attachment point with glue and place the tabletop on the upper end of the stand. Degrease and prime the surface of the table.
Preparation of formwork and filling
First, we do the first fitting - we lay out several covers along the edge of the tabletop. This is necessary to accurately determine the thickness of the furniture tape. Decorative elements should be buried in epoxy resin by at least half their size. Having chosen the appropriate filling height, glue the tape and lay out the lids with the pattern facing up. This is a final layout, so you need to think carefully about the drawing.
We coat the back side of each part with glue and lean it against the surface. You must work very carefully, since even the slightest leak of the adhesive mixture will be visible through the transparent layer of fill.
Rules for pouring resin
The final and most important stage of making a coffee table is pouring epoxy resin. We begin to pour in the prepared composition from the middle. It will spread over the surface on its own, leveling out under its own weight. If the countertop area is large, you can retreat slightly from the center to the edges.
When the epoxy resin reaches the edges of the furniture tape, it must be carefully leveled with a spatula. Add a little mixture to the places where there are voids and irregularities. Puncture the resulting bubbles with a toothpick or remove them with a hairdryer. Having refined the solution to the desired consistency, you can create various decorative elements. More viscous epoxy is used to make drops, lenses, and sculpt complementary elements. Then the surface is covered with polyethylene and left to dry completely for several hours. This will prevent the formation of defects and dust.