Before attaching the logs to the strapping beam, you need to choose a fixation method. The decision depends on the design features of the structure, the availability of fittings and other factors. This stage requires a responsible approach, since the logs are constantly under stress from furniture, equipment and residents.
The choice of method for fixing lags depends on many factors.
Methods for securing lags to timber frames
Before attaching the logs to the strapping beam, you need to choose a fixation method.
The decision depends on the design features of the structure, the availability of fittings and other factors. This stage requires a responsible approach, since the logs are constantly under stress from furniture, equipment and residents. The choice of method for fixing lags depends on many factors.
Recommendations for choosing timber for the frame
Lumber with a cross section of 150x150, 150x200 or 200x200 mm is used. If the trim in the house is made from a board, the thickness of the latter is 50 mm.
Coniferous wood is preferred:
If a frame house is being built in a lowland area with high humidity, larch is preferable.
Requirements for lumber:
Logs are made from boards with an aspect ratio of 1:2 or 2:3, for example, 50x100 or 100x150 mm. The choice depends on the pitch between them and the thickness of the insulation.
Piece and roll insulation
This type of insulation includes mineral wool and polystyrene foam. They have the advantage of minimal volumetric weight. These materials need to be used in small quantities to make the house warm (the middle layer is 10-15 cm thick).
Therefore, such insulation does not create a serious load on the floor frame. To install it, it is enough to additionally use only thin boards or even particle boards, which are installed on thin skull blocks measuring 30x30 mm.
Polyurethane foam insulation can also be applied to the resulting floor covering. Although this option has many disadvantages (the need to involve strangers and equipment, the high cost of materials), this insulation is considered the best option for insulating a subfloor on a basement floor.
As soon as the foam finishes forming, a continuous volumetric coating is obtained, which has sufficient rigidity and the ability to protect the structural element from high humidity and other negative phenomena.
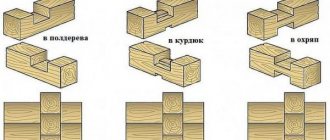
Types of fastening lags to beams
The logs are the load-bearing base for the floor. They experience heavy loads, so their attachment to the beams must be strong and reliable. Several options are used.
The attachment of the joists to the beams must be strong.
With support on a block
A block that serves as a support for the joist is screwed to the side of the frame from below with self-tapping screws or nailed with long nails. After installation in place, it is additionally fixed with corners to prevent lateral displacement.
Using metal structures
In this option, there is no support; the joist is held in place only by fasteners.
The most commonly used parts are:
With harness support
In this option, the logs are simply placed on the timber. To prevent lateral movement, grooves can be cut to a shallow depth. Additionally, the beam is fixed with screws or nails.
Horizontal ties are laid on top of the joists so that the racks can be installed.
Use of bulk aggregates
Bulk insulation of frame houses is very popular, because with the help of various substances (slag, sawdust, perlite, expanded clay) you can fill the entire space between the beams. Such flooring can withstand even increased loads.
Loose aggregates are typically used to fill the basement of a frame house when the subfloor is installed on joists. It is enough to install cranial bars 50x50 mm, as well as OSB 15-20 mm thick, and this design will be enough to withstand large expanded clay or other thermal insulation materials.
What should be the distance between the logs for the convenience of further insulation?
From below, the logs are lined with subfloor boards, on which insulation is placed. To avoid gaps, the material must fit tightly between the beams.
The step of their installation depends on the type of heat insulator:
It must be remembered that the step primarily depends on the permissible load on the joist, which, in turn, is determined by its cross-section. If, according to calculations, the gap between the beams turns out to be narrow compared to the width of the insulation, and it is not possible to use larger lumber, under no circumstances should you increase the distance. In such a situation, the heat insulator is cut.
If the strength calculation, on the contrary, allows you to install beams with a pitch exceeding the width of the mineral wool slabs, you should not reduce the distance - this will lead to unjustified consumption of lumber. It is better to blow out the gap between the slab and the joist with construction foam or fill it with strips of insulation.
Design advantages
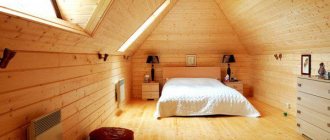
An example of installing an insulated interfloor floor in a wooden house.
Why is installing a subfloor with beams so popular? Despite the fact that the process of attaching wooden battens to the base is very difficult, it is still in demand. Why? The beam base provides the floor with the following technical advantages:
- Improves heat and sound insulation performance;
- Provides a more uniform distribution of the load on the floor, which ensures a long service life of the subfloor;
- The timber does not contain synthetic substances and therefore can be used for flooring in residential premises;
- When arranging a non-ground floor of a high-rise building, it is more advisable to use wooden elements to finish the floor base, which do not create a large static load on the interfloor floors;
- An air gap can be formed between the trim and the beams, which will create optimal conditions for underground ventilation;
- Using a wooden beam, you can not only install a warm floor, but also level it if necessary.
Instructions for attaching the log to the strapping beam
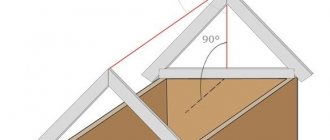
When installing the floor, the boards and laminate are laid perpendicular to the wall with the window, i.e. parallel to the light flux. With this orientation, the long joints between the lamellas are less visible. Accordingly, the logs are directed along the window.
Before their installation, façade or end boards are installed. They are designed to mark the position of the bars and fix them vertically.
The boards are placed according to the floor plan. They are placed on edge and aligned along the outer edge of the strapping beam. Then they are fixed with corners or nails 100-120 mm long, driven in at an angle.
Installation of logs is carried out in the following sequence:
Transverse elements perform several functions:
It is allowed to install jumpers in a checkerboard pattern (except for the last case).
Support on timber
This method of attaching lags involves the following sequence of actions:
Using self-tapping screws and metal structures
As an example, we consider the method of fastening lags with U-shaped holders:
Next, in the same order, install the outer beam on the opposite side of the floor. After this, a cord is pulled between the fixed lags and, using it as a guide, intermediate ones are installed.
Support on the harness
To fix the logs in a vertical position, it is recommended to cut grooves on the support beam.
As in the previous version, it is recommended to first install the outer beams, then install the intermediate beams along the cord stretched between them.
how to choose a countertop and apron to match the kitchen facades by color
Source
The process of manufacturing the bottom trim of a strip foundation
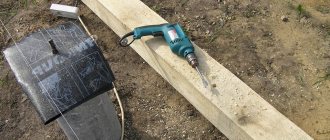
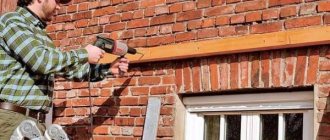
Arrangement of strapping on a reinforced concrete strip is a simple task that can be done independently without the help of professionals. Before starting, you need to check with a level to ensure that the foundation is level. If the differences are more than 1 cm, they can be covered with concrete mortar, which is then left to dry for a day. When using boards in this case, it is better to install two layers instead of one. Slight irregularities are removed with a grinding device equipped with a disc designed for concrete surfaces.
Step-by-step sequence of work:
- Anchors or wooden plugs are installed in the areas where the foundation joins the piping. If 2 rows of boards are laid, the fasteners must be larger.
- 2 layers of roofing material or other waterproofing material produced in rolls are laid and secured on the base.
- They fit the boards to the foundation and drill holes in them for fasteners. Then they begin to secure the strapping elements to the base.
- The strength of the corner areas is enhanced by additional fasteners.
- The evenness of the horizontal layout is checked. If there are differences, they are straightened with wedges and pads.
When using two layers of boards, first connect the top one to the underlying one using nails, and then, if necessary, level it with larch wedges. To prevent the destruction of the latter, large cracks are sealed with a solution of cement and sand. The distance between the holes of the boards should not exceed 1.8 m. Each of the elements is secured with at least a pair of anchors.
Choosing timber for logs
As already mentioned, it is the floor joists that perform one of the most important functions. Therefore, in order for flooring to last for a long time, it is necessary to choose the right building material. It will be necessary to pay attention to many factors, otherwise the bars may deform under load and cause damage to the finish coating.
Advice! You need to select lumber very carefully. It is best to select the samples you like from the warehouse yourself. This way you can get rid of the possibility that they will give you warped ones, which will be difficult to level, and you will have to do a lot of planing with a plane.
Choosing the right building material is only half the battle. It is worth dwelling on how logs are attached to wooden beams in a wooden house, to concrete floors and to the strapping system.
Joists on supports in a wooden house
For logs, bars with a cross section of 50x100 mm are usually used. From this it is clear that they are not the only strengthening system. That’s why they use beams in wooden houses on the floors, and on the ground floor they use support pillars.
Supporting wooden support beams on poles
Installation of support pillars
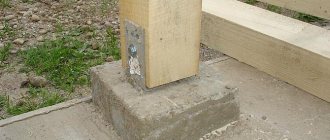
The support pillars are made of brick with a wooden overlay, which should not allow moisture coming from the pillar to rot the wood of the beam.
The installation site for the pillars is dug to a depth of 50–60 cm, and a sand cushion is made. A layer of waterproofing from roofing felt sheets is applied, and formwork is performed with a height above the ground level of 30–40 cm.
After the concrete has been poured and dried, bricks are laid on it one level at a time, which will also have a concrete structure inside. To do this, during the process of pouring the concrete base, reinforcing wire is left under the pillars to the height that will be necessary for the height of one pillar. Excess sections of reinforcement are subsequently trimmed with a grinder.
Adjustable support for wooden floor beams
The step between the pillars for one beam is within the range of 60–100 cm, and between adjacent beams – 150–200 cm.
Attention! Plank flooring is usually oriented in the direction of the sunlight falling through the window. Therefore, it will be necessary to take this fact into account and orient the beams in the same direction as the finishing floor.
Beams
A layer of roofing felt is laid on the prepared pillars. In addition, during the manufacturing process of the pillars, a wooden strip is installed on them as an overlay.
The beams will rest mainly on the strip foundation, and the pillars should serve only as reinforcing elements and in no case take the main burden. Therefore, their level should not exceed the level of the foundation tape.
Attaching to wooden beams
Attaching joists to wooden beams will be a piece of cake. It is recommended to use angles as fasteners. It is not necessary to attach the logs on both sides. To save on fasteners for large squares, you can attach the corners in a checkerboard pattern.
Joists on beams
When using mounts on beams, it is better to refrain from rigidly fastening the support slats to the wall. It is worth using an angle fastening with the possibility of shrinkage of the supports and movement of the screw. In this case, it is necessary to leave a technological gap between the wall and the logs.
Installation Features:
- The fastening for floors in a timber house must be so strong that in the event of shrinkage and loading, the logs do not become displaced. Typically, dovetail cutting is chosen for stability.
- Floor joists in a log house must be placed in such a way that they receive sufficient ventilation. The fastening pitch should be at least 60-70 cm. In general, it depends on the parameters of the wood used - the thinner it is, the more often the ceilings are placed.
- Provided that the load-bearing wood is laid on a concrete base, that is, the foundation, a set of works is carried out to waterproof the platform. This is done in the case of a slab type foundation. There is a risk that settling condensation will appear due to temperature changes, and then no antiseptic treatment of the ceiling will save you - the moisture will wash away everything that is there.
- If the foundation is different from a slab, then there is a way to install joists on support pillars. Which, in turn, must also be protected and waterproofed. For large spans, more than 4 m, this option is the most acceptable.
Attaching the joist to the timber frame
When making a log system, they usually use a frame made of timber, which performs a strengthening function and allows the logs to be installed at the same level. In order to secure the logs to the frame, a simple method is used - the corners and brackets are installed on self-tapping screws. At the same time, the latter are advised to be installed slightly at an angle so that the logs cannot become loose during operation.
How to attach joists to a frame without using nails
The use of a strapping system is typical for frame houses and other types that do not have a rigid base, where an accurate and even connection is possible. When connecting bars with fasteners to a concrete base, squeaks may subsequently occur, but fastening only to the strapping will not cause this.
There are many different fastening methods, which need to be used depending on the situation.
In the video you can see how best to attach wooden logs in a loggia in an adjustable manner:
Source
Preparatory stage
The preliminary stage before laying the first crown of timber on the foundation is to prepare the material and tools.
Everything you need for the job is presented in the table below.
It is recommended to give preference to lumber with a large number of annual rings.
For a log house, the height of the strip base above the ground surface should be at least half a meter. Additional construction is often done with bricks.
The material for row 1 can be treated with waste oil, and the rest with antiseptic compounds.
Before starting construction, it is recommended to check all lumber for minor defects by marking these sides. They will place the timber up or down. The sides with bulges should be lateral.
The beams should be processed carefully so as not to miss any area. Otherwise, it will serve as a source of spread of the putrefactive process. The quality of the selected material is of paramount importance in ensuring the durability of the building.
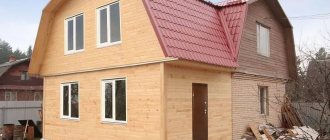
Frame and floor joists in a frame house
Strapping and floor joists in a frame house
The construction of a frame house is a responsible process, each stage of which is of great importance for obtaining a positive result as a whole. Failure to comply with certain building rules, non-compliance with technology and consistency during installation can lead to big problems and significant financial costs in the subsequent operation of the entire structure.
The correct sequence of installation of the piping largely depends on the type of foundation. Let's consider the process of performing the lower piping using the example of a pile (metal, reinforced concrete piles) foundation. Due to the speed of construction, long service life and affordable price, this type of foundation has become widespread.
Types of strapping, materials and design solutions
The bottom trim can be structurally made of timber, solid boards or logs. Since the wood from which the bottom frame is made will be subject to significant loads during operation, it is worth selecting high-quality material for its creation.
It is better to give preference to softwood lumber (pine, spruce, fir, larch), since the presence of natural resinous substances in the wood creates an additional barrier to the processes of decay, the formation of mold, mildew and reduces its hygroscopicity. Also, the availability and relatively low price of these wood species are an additional criterion for purchase.
how to use liquid glass for waterproofing walls
Fig.1 Coniferous trees
Let's take a closer look at the types of strapping:
Correct installation - reliable design
The bottom trim is a necessary element to create a reliable connection between the foundation, walls and floor joists. It is also necessary for the construction of a level platform, acceptance and uniform distribution of the entire load from the house structures.
During installation, certain rules should be followed:
Step-by-step arrangement of timber strapping (150x150mm).
1) The strapping beam is cut to size in accordance with the foundation strapping plan. Then each beam ends up in its own knot.
Fig.2 Connection nodes of the strapping beam
2) Next, the beam is laid out on the foundation and the diagonal dimensions are checked.
3) All units are fastened together (nails 150-200mm).
4) And finally, the strapping is fastened to the foundation (to the pile head). Anchor bolts or threaded rods are used as fasteners.
Fig.3 Timber strapping on a pile foundation
Step-by-step arrangement of strapping made of cohesive boards (50x150mm).
1) Assembling the bottom frame from boards begins with the perimeter (outer boards). The boards are sawed down in accordance with the strapping plan, the ends are connected to each other with nails.
2) After laying the outer boards on the foundation, the diagonal dimensions are checked.
3) Next, the remaining boards are assembled. Each board is sawn to size and ends up in its own knot. All boards are connected to each other with nails.
4) For greater strength, the boards are tied together with pins.
Fig. 4 The main connection points of the plank strapping
5) The strapping is fastened to the foundation (to the pile head). Anchor bolts or threaded rods are used as fasteners.
Fig.5 Plank strapping on a pile foundation
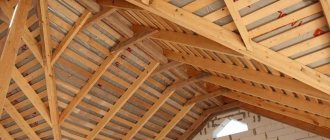
Floor joists: materials, features of work
Floor joists are used to organize and install the subfloor, finishing coating and insulation. They are longitudinal beams of a certain size, made of various materials. The most applicable are wood logs. For wooden logs when building a frame house, you can use coniferous wood (pine, spruce, fir, larch). The log wood should not have visible defects, delaminations, transverse cracks or a large number of knots.
The dimensions of the timber (50x150mm, 100x150mm, 50x200mm, etc.) and the pitch between them depend on the span of the bottom trim, the load and the size of the insulation.
If you are planning to build a house on your own, then beam calculators will help you, where you can choose the optimal dimensions, pitch and material of the beams.
A prerequisite for installing the log system is their location in the same plane, which is checked with a control rail. It is also desirable to treat with an antiseptic to prevent the material from rotting.
There are several options for attaching the log to the bottom trim:
1) Supported by a block. A block located in the lower part is attached to the harness, on which the end of the log rests. With this method, additional fastening of the log to the frame is necessary, since the block is only a support and does not create a connection with the beam.
2) Using metal plates and corners. In this case, there is a reliable connection between the end of the log and the strapping beam, but there is no support from below, the log “hangs” on the metal part.
3) Installation on top of the harness with direct support on it. This method allows you to reliably connect the log with the harness, creating high-quality support and connection. In this case, the installation of wall frame racks will require an additional tie on top of the joists.
In practice, the third method is most often used, or the first two are combined - using a support bar and metal connecting elements at the same time. This maximizes the connection between the joists and the frame, allows you to more accurately maintain the plane of the subfloor and simplifies the process of installing the joists.
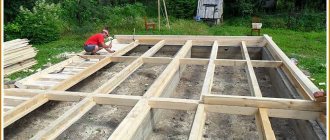
Step-by-step installation of floor joists (50x200mm).
1) Based on the floor plan, installation of facade or end boards is carried out (serve for fixing the logs in a vertical position and marking the position of the logs). The boards are installed on edge and aligned along the outer edge of the trim.
2) The boards are fastened at an angle with nails (100-120mm) or using corners and self-tapping screws.
Fig.6 Installation of façade boards on the frame
3) After marking is completed, the logs themselves are installed, the pitch of which is calculated depending on the load and the size of the spans.
Fig.7 Installation of floor joists on the harness
Fig.8 Distance between joists for convenient installation of insulation
4) The lags are fastened using nails.
5) After installing the logs, spacers (lintels) or transverse stiffeners are installed. They are installed in order to fix the vertical position of the joist and distribute the point load on the floor joist between two adjacent ones.
Fig.9 Arrangement of jumpers (stiffeners)
6) It is possible to arrange the jumpers in a checkerboard pattern for ease of installation. The main thing is that they are tightly packed.
Fig. 10 More convenient location of jumpers
7) Also, lintels are installed that support the outer wall (the wall that stands parallel to the next joist) and lintels that support non-load-bearing partitions (later the partitions will be installed on them).
8) Fastening of jumpers is also done using nails.
Compliance with these simple rules guarantees the correct assembly of the basement floor, which will serve as a reliable connection for the floor, walls and foundation and ensure the long service of all elements of the frame house.
Fig. 11 Finished basement floor
Source
How to make a floor with your own hands: step-by-step instructions
Even if you are not going to do the construction yourself, study the algorithm to properly control the performers.
Preparing to create a floor in a frame house
First, check whether the foundation is level. To do this, measure the height of different sections and check the diagonals. If there are inaccuracies, they are eliminated. Next, holes are made in the foundation along the perimeter of the building and anchor bolts are installed there to secure the beds.
Then the foundation is waterproofed by coating it with an appropriate solution or installing a waterproofing film.
Laying the beds
Floors are boards or beams that are secured with anchor bolts along the entire perimeter of the building. They must be level and fastened securely and accurately. The requirements for the beds are that they have a thickness of at least 50 mm and a width of at least 150 mm.
Next, install the beds:
- Lay the boards directly on the concrete slabs and mark where to cut off the excess.
- Calculate the best places to drill bolts
- Preparing holes in concrete.
- Lay waterproofing
- Install the boards and secure them with anchor bolts. After installation, check that the horizontal plane is maintained. If it is not there, the work is adjusted.
Floor supports and beams
Beams are the main supporting elements that support the entire floor structure of a frame house. They must be treated with protective agents.
Installation is performed as follows:
- Mark on the house plan exactly where the supports will be located and what their height will be. Then they install the supports and pull the string to make sure that everyone is the same height.
- According to the measurements specified in the first paragraph, cut a beam with a cross-section of 100x100 mm and place it in the areas indicated in the plan. A waterproofing layer is laid under the timber. Secure the supports with nails.
- They begin to place the beams with their ends in the pocket. To install them in height, special inserts are used. It happens that workpieces turn out longer than expected. Then the excess is cut off. And if the length is insufficient, the beams are joined on the support.
- The beams are secured to the beams using corrugated nails. If their height exceeds 1 m, it is necessary to use wooden slopes.
Strapping and logs
To perform the strapping, boards with a thickness of 50 mm are used. The width is determined depending on the thickness of the insulation and the expected load. The installation is done like this:
- Lay the trim along the sides of the house, installing the boards parallel to the floor beams. Place the material on the end, aligning it with the outer edge of the bed, and then hammer it in with nails in increments of 20 cm.
- Mark where the logs will be located. To do this, measure 40 cm from the strapping board near the corner. The boards for the joists are immediately placed on the beams and placed on their sides, aligned according to the markings.
- If the board is long enough, similar markings are made on the opposite side. The logs are trimmed and secured to the beams and strapping, as well as to the beams if they intersect them.
- If the length is insufficient, overlap the joint. The joint must be on the floor beam.
Floor insulation
It is best to insulate the floor in a frame using mineral wool. It has only one drawback - loss of thermal insulation properties when wet. Therefore, it is important to make high-quality hydro, wind and vapor protection.
If the density of the insulation is small, a liner treated with bioprotective agents is installed under the joists.
- They begin to sew a vapor barrier film across the joists, allowing for slight sagging. This is necessary so that insulation can fit into the openings between the joists. All joints are sealed with tape, and the film itself is attached to the wood with a stapler.
- Insulation is placed between the joists so that there are no gaps. With a double layer of insulation, it is necessary that it overlaps.
- A layer of waterproofing is laid on top of the insulation and also secured to a stapler. It is needed to prevent the insulation from getting wet due to moisture that may come from the house.
Tying screw piles with wooden beams: important points
The reliability of a pile-screw foundation, as well as any other building foundation, depends on compliance with technological recommendations, as well as on the correctness of its geometric parameters. Today we will look at the main points regarding the arrangement of wooden lining for a pile-screw foundation. We learn about possible errors, as well as rules that must be followed, from the experience of FORUMHOUSE users.
In this article we will consider the following questions:
Let's assume that the pile part of the foundation is already ready: the piles are screwed into the ground, the heads are welded, and the deviation of the horizontal level of the screw piles corresponds to the permissible errors. We will not take responsibility by discussing what distance should be between the piles or how deep they should be screwed into the ground. Also, we will not give advice regarding the appropriate diameter of the piles. Only professional designers can reasonably answer these questions, and you should contact them for appropriate calculations. To begin with, we want to warn you against a serious mistake, which many unprofessional developers are tempted to make.
facade corrector hidden mortise adjustable from above l 2190 2610 mm
Is it worth putting roofing felt under the beams?
Roofing felt is laid on pile heads (before installing the timber) in 90% of cases. There is no particular need to use such linings, so decide for yourself whether it is worth doing such waterproofing, or whether its arrangement is a completely useless excess.
Leo060147 FORUMHOUSE user
Do I need to put anything between the heads and the timber while building the frame? There is no point in such waterproofing. Unlike concrete or other porous materials, metal does not have capillaries. Therefore, capillary moisture from its surface cannot get onto the timber or any other material.
For those who want to learn about the technology of tying screw piles from experienced people, we recommend visiting the corresponding topic, open for discussion on our portal. An article about how you can screw piles without the use of special equipment will help you save a lot on labor-intensive construction activities. And a video about how important functions a pile frame is designed to perform will be interesting for anyone who plans to start building a wooden house in the near future.
Removal of load-bearing walls beyond the pile foundation
Sometimes private developers try to find solutions that allow them to save on the purchase of building materials and the work of screwing in additional piles. At the same time, they forget about the strength of the building structure, which can be broken very recklessly.
Here is an example of a gross violation of construction technology; the photo shows the removal of the outer wall beyond the boundaries of the pile row.
What can you recommend to people who prioritize questionable savings? The most important thing is to avoid self-indulgence, and then everything will work out for you. If building regulations provide for the installation of piles under each corner or wall of the future room, then so be it. There is no need to make any overhangs or indentations that are not supported in the form of a pile firmly screwed into the ground. This will not lead to a reduction in the cost of construction, but it will provide additional problems for the developer.
If you make an overhang or indentation, then this structure will hang on the logs. In this case, you will have to make a double strapping from the inside and connect it somehow with the external overhang (so that the structure does not completely fall apart). It won’t be cheaper (due to savings on piles), since you will have to spend money on strengthening the lower floor, but this will add problems.
In general, according to the technology of constructing a pile-screw foundation, piles must be placed under all cuts, corners and load-bearing walls. This is the most important rule.
A LITTLE HISTORY
In ancient times, our Slavic ancestors used a foundation made of timber. To us, modern people, this probably seems wild, but it is not at all true. The thrifty owner in those days simply laid a clay-sand cushion on the ground and placed the first crown of the log house on it.
It was customary to make this crown of oak and generously lubricate it with tar and sometimes resin. In fact, this first crown was both the frame and the foundation of the entire structure. The sand protected the crown from rain, and the clay from groundwater.
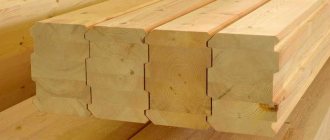
Timber or board - which is better?
Let's talk about what material is best to use to create a wooden frame. Construction regulations allow the use of solid wooden beams (150x150, 150x200, 200x200) or timber sewn from several boards (50x200). Laminated timber qualitatively replaces solid timber and even surpasses it in some characteristics. Three boards sewn together replace a beam with a section of 150x200, while four boards are similar to a beam of 200x200.
Both options (both with timber and with boards) are popular and both are correct. At the same time, having studied the advantages and disadvantages of each material, many developers make their choice in favor of stitched boards.
Why do you need to use 150*200 timber? Knock down 3 50*200 boards instead and don’t bother with this log. This topic constantly comes up on the forum.
The word “log” was not mentioned by the user by chance. Solid timber is a relatively heavy building material and, with a limited number of workers, moving it from place to place (even on a small construction site) will be very difficult. In addition, solid timber does not resist bending well (worse, in any case, than boards placed on edge), which makes its use less practical.
Boards, unlike timber, must be firmly connected to each other before installation on piles. And these are additional costs, and this, perhaps, is their main drawback.
The boards are nailed together with nails in two rows with a pitch of 20 cm. At each head they are fastened not with one wood grouse, but with four.
As for the length of the nails: for a composite beam of three boards (50x200), nails with a length of 90 - 120 mm are sufficient. They are made on both sides in a checkerboard pattern, as user builder indicated. The distance between the nails is 20...45 cm. If the beam is made up of four boards, first 3 boards are knocked together, then the fourth is attached to them (with the same nails).
Now let's talk about the "grouse" mentioned in the quote. “Capercaillie” is a fastening element - a self-tapping screw, the head of which is made in the form of a hexagon (for a wrench or impact driver).
With the help of a capercaillie, the beam is attached to the head of the pile (the capercaillie is screwed in from below).
The diameter of the capercaillie for attaching the strapping beam is 8...10 mm, its length is 100...150 mm.
To prevent the beams or composite beams from splitting while screwing the wood grouse, a hole must be pre-drilled in the wood.
A small table will help you determine the diameter of the drill.
| Thread diameter, mm | 6 | 8 | 10 |
| Drill diameter, mm | 4,5 | 6,5 | 8 |
Construction Materials
The wood must be resistant to moisture and decay.
To organize the strapping, coniferous wood (pine, cedar, etc.) is used in the form of fastened boards, beams or solid logs. In most regions of Russia, these species are more accessible than deciduous ones. The choice of material should be based on the following criteria:
- low permeability to moisture;
- straightforwardness;
- possibility of long-term operation under high load conditions;
- as little susceptibility to rotting as possible.
In addition to the wooden lumber itself, you will also need a layer for waterproofing. A simple roofing material is suitable for this purpose. Mineral wool is used as a heat insulator. You will need fastening parts - regular and self-tapping nails with different sizes of the driving part (in the first case - 5.10 and 15 cm, in the second - 5 and 10).