Beton-House.com
Website about concrete: construction, characteristics, design. We combine the experience of professionals and private craftsmen in one place
We are building a house
Fastening timber to concrete is a fairly common question that arises in the process of building a country house with your own hands.
The sequence of performing such work is not particularly difficult, but choosing the technologically correct fasteners for timber to concrete is a task that requires detailed consideration.
General principles
In general, they are not very difficult:
- When installing any wooden structures on a foundation, reliable waterproofing is required at the interface of two dissimilar materials. If the waterproofing of the foundation is damaged, concrete can provide capillary suction of groundwater; meanwhile, moisture is detrimental to wood;
Please note: different types of wood tolerate prolonged contact with moisture differently. That is why they try to make the lower trim of frame walls or the lower crowns of a log house from oak or larch - extremely resistant to rot and characterized by the highest mechanical strength.
- Where contact with water or moist air is expected, the wood is, if possible, protected from dampness by impregnation with drying oil or oil compounds;
- Antiseptic impregnation is mandatory for all wooden building structures. It will not only protect the wood from fungus, but will also repel woodworms and reduce the flammability of the timber.
Fastening methods
Bottom trim to strip foundation
It is attached as follows:
- The concrete surface is waterproofed. The minimum program is laying a couple of layers of roofing material; ideally, it is not simply laid under the framing beam, but glued to bitumen mastic;
- In the strapping beam, grooves are selected to connect half the tree. All connections must be made at the points of attachment to the foundation;
- The timber is impregnated with an antiseptic and (ideally) a protective waterproofing impregnation. Usually this role is played by ordinary drying oil;
- Then the lower trim is drilled for anchor bolts - at the connection points of the beam sections and in straight sections with a pitch of no more than 1.5 meters. The holes are countersunk for the washers and nuts of the anchors;
- Holes for anchors are marked and drilled in concrete;
- The last stage is the actual fastening. The anchors are driven into the concrete monolith through holes in the beam, after which the nuts are tightened with a socket wrench.
The anchor attracts the beam to the concrete base.
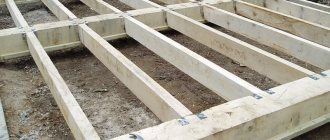
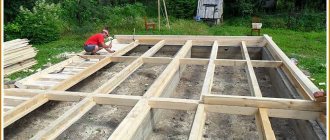
Wooden grillage for a columnar foundation
Here the fastening algorithm is very similar to that described above; however, instead of anchor bolts, pieces of smooth or corrugated reinforcement with a diameter of 14 mm, laid in their masonry during the construction of pillars, are usually used.
- The surface of the pillars is waterproofed. The methods are similar to those above;
- Holes for anchors are selected in the timber;
Please note: in this case, the pillars with anchors must be located at all beam connections.
- The grillage is impregnated with antiseptic primer and, if possible, a water-repellent composition;
- Then the grillage is laid on the pillars, after which the part of the anchors protruding above the surface of the beam is cut off. As a rule, additional fixation of the grillage to the pillars is not used: after the walls are erected, it will be securely pressed by their mass.
Anchors embedded in the masonry prevent horizontal displacement of the grillage.
Mauerlat to armored belt
In this case, fastening the wooden beam to the concrete wall is necessary in order to subsequently tie the rafter system to it. It's probably better to be a little more specific about the design description.
As a rule, the walls of residential low-rise buildings are built from lightweight materials with low thermal conductivity. Here are some examples:
| Construction material | Density, t/m3 | Thermal conductivity, W/(m*S) |
| Expanded clay concrete | 1,8 | 0,66 |
| Ceramic hollow brick | 1,6 | 0,41 |
| Foam concrete | 1 | 0,29 |
| Limestone | 1,4 | 0,5 |
| Shell rock | 1 | 0,27 |
All these materials have one thing in common - low mechanical strength. They are able to provide sufficient load-bearing capacity due to the solid thickness of the walls; but it is impossible to reliably attach a rafter system or mauerlat to them: any anchors will be torn out by the first strong gust of wind.
The problem is solved by pouring a reinforced concrete armored belt along the top of the wall, which, in fact, becomes the basis for attaching the Mauerlat.
Pouring armored belt on aerated concrete walls.
Please note: the reinforced belt additionally increases the seismic resistance of the structure by connecting adjacent walls. In areas with high seismicity, the reinforced belt is replaced by a load-bearing reinforced frame; lightweight materials are used only as wall filling.
The instructions for installing the Mauerlat to the armored belt are almost identical to the description of installing the lower trim on a strip foundation:
- The surface of reinforced concrete is waterproofed with bitumen mastic and/or roofing felt;
- A timber impregnated with antiseptic and drying oil is laid on them, connected at the corners and splice points by cutting into half a tree;
- The timber is drilled into the corners and splice points;
- The holes are countersunk for washers and anchor nuts;
- Holes are drilled into the concrete for the anchors;
- The anchors are driven in, after which their nuts are pulled through with a socket wrench.
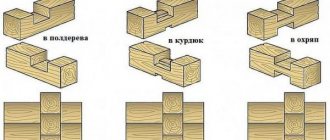
Joining timber at corners
Since assembling a log cottage resembles assembling a construction set, it is important to prepare all the grooves in the corners. Most often, if laminated veneer lumber or kiln-drying profiled timber is used in construction, all elements are already sawn through in production. All that remains is to assemble the structure on the site. But if planed timber with natural moisture is used, then in this case you will have to work with the wood. The beams are fastened together using the “bowl” or “paw” methods.
- The first method provides the house with a warm corner, although it requires more material consumption. That is, at the ends of the beam there is a margin of 10-15 cm, and before reaching it, cuts are made from the lower part (for one beam) and from the upper part (for perpendicular). Thus, two perpendicular beams are tightly joined at the corners, additionally laid with insulation.
- The second “paw-on” method allows you to save lumber. But at the same time, cold bridges may arise even with high-quality insulation. The cuts of the grooves are made in the same order, but without the extra timber at the edges.
Important: any type of connection can be additionally fixed with wooden dowels. Fixation is performed every three to four crowns.
In addition, when assembling walls, it is necessary to additionally fix the crowns around the perimeter. To do this, holes are made in the crown with a drill in increments of 1-1.5 meters. They drill through the rows of crowns laid below. Wooden dowels are driven into the resulting holes, driving them into the beam with a mallet. The next holes for the dowels are made through the next three rows of crowns and placed in a checkerboard pattern (offset) relative to the lower dowels.
Related article: Is it possible to prime walls with wallpaper glue?
How and what to fasten
The beams are laid under a flooring made of plywood and treated boards. In order for the base to be firmly fixed, there are no cracks or movements, it is necessary to make a strong fastening to the concrete wall. If the house is an apartment building and there are neighbors below, it is recommended to consider fixation methods without fasteners so as not to disturb the sound insulation.
Rubber gaskets are used that absorb the resulting vibration. The layers help to align the position of the lags and level them.
There is no need to be afraid that the floor will turn out to be unreliable: when clamped with rubber, a tight fit is obtained, providing a sufficient level of fixation. Sheathing with flooring helps to tighten the structure; the ceiling is pressed against furniture and appliances.
It is necessary to use only dry timber in the work; it is better if the wood is dried using the chamber method. If it is wet, it will become deformed as it dries, may become covered with severe cracks, and the floor will be unsafe.
You can reduce the risk of destruction of the base if you use a composite beam made from two to three boards. To connect the elements, nails and self-tapping screws are used, which are arranged in a checkerboard pattern.
Fastening to a concrete floor is carried out in rooms with a poured concrete screed. More often, in private homes, where there will be no complaints about sound insulation. Any type of fastening can be used.
For work you will need power tools: jigsaw, hammer drill, drill. You need to immediately prepare anchor bolts, other hardware, screws, and a building level (you can use a laser and bubble level at the same time).
From consumables, it is necessary to prepare waterproofing, components for mixing concrete mortar, primer, and rubber gaskets.
Any tools and materials are chosen based on their technical parameters, the homeowner’s budget, and the recommendations of the master. The main thing is to buy products in certified stores and not save much: cheap raw materials will not last long.
How to secure a beam between the floor and ceiling?
There is a need to install some kind of wooden beam structure in the room. This design has racks that should be located “in space” between the floor and ceiling, away from the wall. Did I make it clear?
Surely there are some ways to attach the bar so that it is not visible from the outside. I would not like to fence off some corners. Please tell me so I don't reinvent the wheel
Elementary, Watson (c). You yourself want to go to hell
Drill a hole with a diameter of 12-16mm in the end of the beam. Then insert an M12-16 bolt inside with a screwed nut and washer, install the beam vertically. By unscrewing the nut from the bolt, you create the necessary expansion. Did you explain clearly?
After thinking a little, I decided that it would be possible to make a recess in the ceiling for the bolt head. Then even a structure that is not fully expanded will not have the opportunity to move sideways. Yes? Although, no! How then can you turn the nut without allowing the bolt to turn?
In general, I want more options
evg87 wrote: In general, I want more options
We will do this: At the end of the baluster and in the floor there are 4 holes with a diameter of 10 mm, dowels of 10x100 mm for any good glue. And at the top:
Luddit wrote: only there is a groove in the timber on that side
where it is more invisible.
Source
Fasteners
The beam can be secured with dowels, regular pins, or dowels. On strong, dense concrete, fastening is done with studs, dowels, and for a less reliable solution, dowels are used.
The pins are distinguished by a hexagonal head, which is tightened tightly with a tool; it is impossible to manually ensure the required tightening density.
The type of fastener depends on the size of the timber and the concrete base. An option is to deepen the fastener the same distance as the nail goes into the beam, the same distance should go into the concrete. The best outcome would be to drive it into concrete to a depth twice the width of the block. For example, with a timber thickness of 15 cm, fasteners of 15, 20, 25, 30 cm are driven into the concrete. Recommendation - the reason for refusing fasteners in an apartment is that the other end of the hardware product may protrude through the neighbors' ceilings.
Types of hardware
When choosing dowels and studs, pay attention to the neck - the area under the head without threads. Threading begins with an indentation from the top edge; it is possible to achieve better attraction of the joists to the base.
The diameter of the connecting element must be large.
It is necessary to check the fasteners for chips, the amount of impurities, and a high percentage of soft metal content. The thread must be clear, the material must be durable and sufficiently hardened.
There is another fastening option - a quick-fix steel nail anchor, which is inserted into pre-drilled holes without a plug. The latter is not required; the nail has a metal sheath located around the rod. As the anchor is driven in, the shell expands, facilitating reliable fastening.
Selecting mounting and fastening methods
The need to join the timber to the wall arises when installing ceiling slabs and beams, interior partitions and suspended ceilings, door and window frames. Wall-mounted furniture, bookshelves, cladding and design elements are attached to the bars. For large design loads, it is recommended to use a hard fastening method; to attach light structures, use a soft method.
The fastening method is chosen taking into account the load and material of the walls; the following types of timber fastening are distinguished:
- Sealing into grooves;
- Laying under support;
- Installation on brickwork;
- Dowel fastening;
- Use of metal supports.
Construction adhesive and polyurethane foam have become new fastening materials that have received high praise from professional builders.
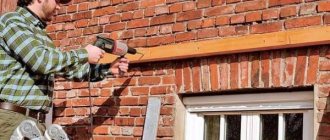
Fastening a wooden beam to a brick wall
You can firmly fix the timber to the brickwork in the following ways:
- Seal in the groove. This method is used to install load-bearing interfloor and ceiling joists. The ends of the beam are installed in special grooves up to 150 mm deep. Brick is a fragile material; it can crack when gouging out recesses; it is better to make the landing groove in advance when laying the walls. U-shaped frame anchors can be used to secure the joists. When installed on external walls, the ends of the beams are treated with sealant, and the free space is filled with insulation. The edges of the beams in the wall space are wrapped with roofing felt.
- Installation of supports. In this case, the timber serves as a support for laying the boards. The support is attached to screw anchors; the number of anchors depends on the diameter and design load. For example, for a beam with a cross-section of up to 50 mm, the distance between the anchors should be no more than 30-40 mm. The technology is used for laying floors and installing wooden ceilings in brick houses. The junction of the support with the external wall is laid with roofing felt.
- Installation on brickwork. In this way, the rafter mauerlat is fastened and the first - the tying crown of a two-story house, where the first floor is made of brick, and the second is planned to be made of timber. To securely install the mauerlat and the tying crown on the brickwork, embedded anchors are used.
Fastening timber to a concrete base
Concrete walls compare favorably with brickwork in their strength and resistance to cracking. To attach the timber to a concrete wall, use bracket supports, anchors or plastic dowel plugs. L-, Z- or U-shaped support brackets are easy to install and ensure reliable connection of the bars to the walls.
The basic rules for attaching timber to a wall with a dowel include:
- The anchoring depth should be 1.5 times greater than the part of the fastener that “sits” in the wood;
- A hole in concrete is made according to the diameter of a plastic dowel, a hole in solid wood is smaller than the diameter of a screw;
- The upper part of the screw should be without thread; such a “neck” allows you to pull the block to the base;
- The choice of fastener size depends on the design load, for example, an 8x150 dowel can withstand a shear load of up to 150 kg. If the design load is greater, install several dowels, dividing the design load by 150 kg to obtain the number of dowels.
Fastening to concrete
To attach joists to concrete, you will need to follow several mandatory steps. First, you need to mark and drill the fixation points; the diameter of the drill must exceed the size of the hardware head. During drilling, they are buried 5-10 cm, or reached to the middle of the beam. The nozzle is replaced with a drill, which is 1-2 mm smaller in size than the screw, and the joists are drilled through.
The next step is to place the tree in the right place, check the level, and correct it with a rubber layer. When using stacks of gaskets, the elements are fastened with glue and fasteners, placed again in the right place, and checked for level.
Alignment with pads
Now, you need to secure one side of the log and apply markings to the concrete through the drilled points. You can immediately insert the bolts into the holes, but do not tighten them yet.
The beam is moved aside and the concrete surface is drilled to the required depth. Drills are selected according to the type of fastening: for a dowel with a plug the diameter must be completely suitable, for studs and anchors - a couple of millimeters less.
All that remains is to put the block back in place and tighten it to the concrete using fasteners.
Sometimes, to create a level floor, it is necessary to lift the beams onto thick pads or sections of board. The first element is screwed with a dowel in the middle, several screws around the perimeter, the next layers are fixed on the previous ones.
Approximate depth of fasteners
They place a block and nail it. The position of the posts can be properly secured by installing metal plates that are screwed onto the sides of the elevations.
A clear example of how to attach a joist to a concrete wall can be seen in the following video:
Wall lathing device
Special metal profiles are provided for lathing installation of ventilated facades or lining internal walls with plasterboard or plastic panels.
But in some cases, if the temperature conditions of the region and the permissible humidity of the premises in use allow, wooden blocks can be used as guides.
Therefore, we will consider below how to attach a block to a concrete wall.
Depending on the weight of the cladding and the coverage area, timber with dimensions of 20x40 mm, 40x40 mm, 50x50 mm is used under the sheathing.
Related article: Is it possible to lay tiles on a putty wall?
To fasten such a beam, metal anchors or a dowel-nail with plastic plugs are used (see photo).
It is better to install the sheathing with a partner. Depending on the material, beams on walls can be mounted either horizontally (plastic panel) or vertically (plasterboard boards).
The installation principle is the same as when laying joists:
- We attach the rail to the wall.
- We drill a hole with a hammer drill.
- Insert an anchor or dowel-nail.
- Using a rack level and fiberboard spacers, we adjust the correct installation.
- Tighten the anchor or hammer in a dowel-nail until the block stops at the base.
- We install the panels.
This article discussed in detail the topic of how to attach timber to concrete. We hope that this publication was useful for you, watch the video and leave comments.
Installation without fasteners, drilling
Fixation with nails is not always a reliable solution.
The principle of installing bars without fasteners or drilling is close to the rules for placing beacons before leveling the surface.
To work, you will need to mix a high-quality cement-sand mortar, preferably with the addition of gypsum or alabaster, so that the mixture dries faster.
Dry ingredients are poured into the container, mixed thoroughly, and clean water at room temperature is gradually added. To mix a homogeneous mass, it is recommended to use a small concrete mixer, a construction mixer, or an electric drill with a mixer attachment.
Cement is used as a base, grades no lower than M400, so that the output is concrete, grades no less than M250.
It is necessary to mark the lines of the beams; it is better to draw wide stripes for greater clarity.
Installation of beams without fasteners
Then, the finished solution is thrown in approximately equal piles along the drawn markings. A beam is placed on top, pressed lightly, a level is applied, and adjusted. If the block is very long, an assistant is involved so that the element simultaneously creates uniform pressure on the building mixture.
The frequency of pouring the mortar is related to the physical parameters of the timber: the thicker the wood blank, the more often the concrete should be laid.
Hanging on corners
The most correct, reliable, working method is to install wood on metal corners. The height of the building under construction is preserved; other methods of fixation often conceal the space.
Thick-walled mounting angles with perforations for different diameters of hardware are recommended for use. The holes are located on the top parts of the product in an unstructured pattern.
The corners are mounted on both sides of the beams, arranged in a checkerboard pattern, often placing one element opposite the other.
A significant drawback is the complication of the process of leveling wood with a building level. First, the fixing products are attached according to pre-applied markings to the base under the bars. Then, the logs are placed along the edges and the horizontal is immediately adjusted.
Steel corners for beams
Then, they move to the middle, which is somewhat more difficult to set strictly horizontally. It will probably be necessary to raise and lower the wood. It is necessary to set the central log, the rest will already be installed according to the same principle, a single level.
Ease of work is observed if the wooden elements have smooth edges and are not twisted.
Place the corners on one side, then move to the other. It will not require a large investment of time; all that remains is to provide a sufficient level of stability. The horizontal position has already been leveled; the level is rarely checked, but it’s better to be safe.
Materials and tools
The material for laying the subfloor is coniferous and deciduous wood. The most popular varieties are spruce and pine.
For the manufacture of logs, grade 2 wood is used, having a thickness of 50-60 mm and a residual moisture content of 12-18%. The moisture level of lumber is checked using a special device - a moisture meter. The construction timber must not contain falling knots, chips, holes or surfaces damaged by mold.
Fiberboard sheets or cork pads are used as underlying material.
You may also need:
Fasteners
To attach the beams to the base, use:
Tools for attaching joists.
The choice of fasteners depends on the following factors:
Tips for choosing lags
When choosing wood for the floor, the following material characteristics must be taken into account:
For timber, you need to use unplaned boards of the second or third grade from deciduous and coniferous wood, except poplar and linden.
Defects in lumber that preclude their use in the construction of a wooden floor base:
The choice of joist width depends on the area of the room, the type of finishing coating and the expected load on the base. The larger the volume of the room, the wider the profile is needed.
The thickness of the logs, resting their entire plane on the floor slabs, should be 40 mm, width - 75-100 mm. The width of the timber laid on separate supports is 100-120 mm, thickness 40-50 mm.
The height of the logs is selected based on the size of the room and the presence in the project of recommendations for the installation of natural floor ventilation.
You can increase the load-bearing capacity of elements by increasing the number of support posts, which is much cheaper than buying a profile with a larger cross-section. When calculating the amount of lumber, you must also take into account that the installation of logs on a concrete base should be carried out at a distance of 20-30 cm from the enclosing structures.
Tools
To install a wooden floor on joists, a set of specialized equipment and tools is required:
Fastening joists to a concrete wall
The support of the beams does not always go to the floor: the base can be a protrusion of the foundation, or prepared supports pre-attached to the walls. To create support points, metal supports in the shape of the letter “P” are used.
U-shaped products are fixed on the walls of the house, the foundation with anchors and dowels.
To make it smooth, prepare. Measure the required height for placing the bars and immediately draw a single line along the level. Then, they hang the supports and put wood logs inside.
The principle of mounting the mount does not change. Markings are applied in advance, holes are drilled, and plates are mounted. When attaching to foundation walls, you will need to lay a piece of waterproofing between the support and the concrete, for example, a piece of roofing felt folded in half.
What does the wall mount look like?
The difference between the fastening method is that the logs do not need to be fastened: the supporting element is firmly fixed, the timber is inserted exactly to size. The product has nowhere to go: on the sides and below, the displacement is stopped by protruding sections of metal.
The only drawback of the method is that intermediate supports are not laid; it is necessary to use beams of a larger cross-section, which are more expensive than narrower analogues. To prevent the beam from sagging, intermediate support posts are installed that will absorb most of the load.
An example of the practical application of steel supports for beams:
Wooden beams are a popular, reliable material for the construction of various types of buildings. You need to select the elements and attach them correctly. Without high-quality installation, the positive aspects of any type of raw material will be reduced to zero. In order to maintain the integrity of the floors, it is necessary to carry out the work strictly according to the approved technology, without haste, or much savings on materials.
Installation of slats to the wall of a wooden house
Quite often, when constructing walls, glued or profiled timber is also used. How is it necessary to attach the timber to the wall of a timber house? Most often, perforated fasteners are used to connect wooden surfaces. They can be secured to the surface of the block and the wall using nails, self-tapping screws or self-tapping screws. Perforated fasteners are available in various types. To secure elements located in the same plane, plates are used; if fastening needs to be done in different planes, angles are used.
If there will not be much pressure on the structure, you can use mounting tape. When using nails to fasten wooden elements, you should follow a few simple rules. If you have to drive nails in hard-to-reach places, you should use a bolt with a nut at the end. It is also necessary to choose the correct length of nails.
To make the structure more stable, the nails are driven at a distance at a certain angle to one another. If the slats are made of high-density wood, hold the middle of the nail with pliers while driving. Pre-drilling the holes will make it easier to drive large nails.
General questions about timber fastening
When building a wooden house in the form of a log house or a frame dwelling, the question often arises of how to reliably fasten the timber to a concrete foundation, how to fasten the lower crowns to the concrete surface as reliably as possible, so that you don’t have to worry about the safety of the structure. The wooden beam is attached to the grillage using two methods that have been known for quite some time: rigid fixation and overhead installation.
Fastening the frame to the concrete foundation.
- As the name suggests, the essence of the first method is to securely fix a wooden beam to a concrete base using several special foundation bolts or steel clamps. If you decide to use bolts, then this method of fastening will be permanent and non-dismountable, and fastening with clamps implies the ability to disassemble the entire structure if necessary.
- The overhead fastening consists of simply installing the timber on top of the grillage without any fixation. On the one hand, the beam is loose and movable, but due to its weight it is securely installed without additional fastening.
It is clear that the first option is much more reliable and provides more guarantees of the reliability of fastening the beam to the concrete foundation. But the second option is more common. This is due to lower installation complexity and, accordingly, lower cost. And the rather significant mass of the entire structure gives sufficient reliability of fastening to the base and immobility of the lower crown of the frame.
You will have to independently choose the option that is suitable for your case. If there are no strong winds in your area, the total weight of the house will be quite significant, and the builders are confident in the reliability of the overhead option, then it may be worth choosing a cheaper option.
Wall lathing device
Special metal profiles are provided for lathing installation of ventilated facades or lining internal walls with plasterboard or plastic panels.
But in some cases, if the temperature conditions of the region and the permissible humidity of the premises in use allow, wooden blocks can be used as guides.
Therefore, we will consider below how to attach a block to a concrete wall.
Depending on the weight of the cladding and the coverage area, timber with dimensions of 20x40 mm, 40x40 mm, 50x50 mm is used under the sheathing.
To fasten such a beam, metal anchors or a dowel-nail with plastic plugs are used (see photo).
It is better to install the sheathing with a partner. Depending on the material, beams on walls can be mounted either horizontally (plastic panel) or vertically (plasterboard boards).
The installation principle is the same as when laying joists:
- We attach the rail to the wall.
- We drill a hole with a hammer drill.
- Insert an anchor or dowel-nail.
- Using a rack level and fiberboard spacers, we adjust the correct installation.
- Tighten the anchor or hammer in a dowel-nail until the block stops at the base.
- We install the panels.
This article discussed in detail the topic of how to attach timber to concrete. We hope that this publication was useful for you, watch the video and leave comments.
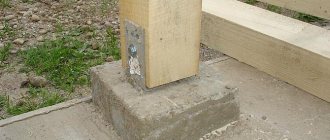
Rigid fastening of timber to the foundation
The first beam is attached to the foundation using anchor bolts and only after the foundation has completely hardened.
To carry out rigid fastening of timber to such common types of foundations as slab or strip, it is necessary to carry out a number of preparatory measures. They can be carried out at the stage of foundation construction or immediately after completion of pouring or installation. First of all, they consist in the fact that even at the stage of pouring concrete into the foundation grillage (concrete strip or slab), special foundation bolts are introduced with the studs facing up. It is to these studs that the beam of the future structure will be attached. The fastening process itself will consist of inserting a timber with a pre-prepared hole onto a stud and screwing it using a locknut. A tightly twisted pin-locknut pair reliably attaches the beam to the surface of the grillage.
Let's consider the process using the example of a slab foundation in more detail and in stages:
Types of beam connections.
- So, after finishing pouring the foundation, those same foundation bolts are immersed in the wet mass of concrete with the studs up and the bases down (they can be conical or simply curved). The distance between the bolts must be at least half a meter, and each individual wooden element must be fastened with at least two fixation points.
- The next step is to prepare the timber. Preparation involves drilling holes for the foundation bolts. Here you need to be careful when measuring.
- If you have not yet checked the evenness of the grillage, now is the time to do so. It is necessary to check the horizontal position and eliminate all possible defects - fill the recesses with solution, trim off the bulges. The timber can only be attached to a flat concrete surface.
- At the fourth stage, it is necessary to lay waterproofing, in most cases it is simple roofing felt. It is impossible to lay timber directly on concrete.
- Then the prepared wooden structures are laid on the roofing felt. The beams should lie so that all the studs from the bolts fit into the drilled holes.
- How to connect the corners is up to you. Can be connected into a paw or into a bowl. If you want to make the connection more reliable, then use metal corners to fasten the beams, which are attached to them using self-tapping screws.
- At the last stage, we begin to twist the structure using locknuts, having previously placed washers under them. In order to avoid distortion of the structure, the nuts are tightened little by little and in parallel. That is, we make several turns of one nut, then move on to the second and make the same number of turns there.
This process is described for a slab base. To attach the beam to a strip foundation, you need to do all the same operations, except for installing the foundation bolts.
Video description
Installation of timber to piles in this video:
See also: Catalog of companies that specialize in foundations and decorative forms.
Screw
Installing timber on a screw foundation is considered the fastest and not very difficult. Before installing the first crown, some preparatory work is required:
- You need to measure the width of the entire foundation and check it for unevenness using a building level.
- Before installation, it is recommended to treat wooden surfaces with an antiseptic and let it dry.
- Next you need to drill holes in the beam and foundation. Logs should be drilled with a drill whose diameter is 2 mm larger than that of the fastener. This is done so that the timber does not burst after drying.
After all the work, you need to lay the frame on the base and secure it with bolts or other fasteners. Before installing the first crown, it is recommended to let the wood dry thoroughly to avoid damage during further use.
Installing timber on a screw foundation Source stroykarecept.ru
Pile foundation and timber fastening to it
Scheme of attaching timber to a pile foundation.
In some areas, the use of a slab or strip foundation is difficult; there, only pile or screw options for foundation of the future house are suitable. Therefore, the issue of attaching timber to them is relevant for many homeowners. Here the fastening follows a slightly different pattern. After installing the piles, special U-shaped steel caps are attached to their upper part. A beam of timber is laid between the steel plates of this head, and then the beam is fastened through the holes in these plates using screws or studs. If you want to use studs, you will also have to drill through the timber. This will not provide better fastening compared to self-tapping screws, but it will cause much more trouble. So it is recommended to choose the latter mounting option. Let's analyze this type of fastening step by step:
Layout of studs for fastening the strapping beam.
- It is first necessary to prepare the beams by cutting them according to the existing parameters. The beams must be used with a square cross-section.
- The second stage is the installation of the heads. To do this, prepared sections of timber are laid on the piles, and steel angle brackets are inserted under them. Having measured the width of the beam in this way, the heads are fastened to the piles by welding. After this, the welded corners are used as beacons for attaching the remaining heads. The beam can already be removed at this time.
- In this type of fastening, it is also necessary to lay waterproofing between the steel of the ends and the wood of the beam. The most common type of insulation is ordinary roofing felt. Contact of wood with concrete and steel is unacceptable.
- All that remains is to lay the prepared beams, fastening them together in the corners by placing them in a paw, in a bowl, or placing them on spikes.
- All preparation is completed, you can fasten the lower log of a log house or the timber of a light frame house with the steel caps. As already mentioned, you can fasten them with studs (then you will have to drill holes in the wood) or self-tapping screws. It is recommended to choose the latter option, since the first does not provide any advantages and will add more hassle.
Installation of timber without rigid fixation proceeds according to the following scheme. To do this, not a U-shaped, but a T-shaped steel top is attached to the pile.
Selection of material for the lower crown
In order to assemble a strong timber frame, you first need to take care of the quality of the wood used. After all, if substandard raw materials are selected, the lower part of the house will become unusable in the next ten years. When choosing timber for the lower crown, you should be guided by the following principles:
- The timber must have an even shade along its entire length and cross-section. Wood with a tint of blue, with resin pockets, cracks and chips should not be taken for the lower crown.
- It is important to pay attention to the annual rings on the ends of the lumber. Ideally, the rings have a small cross-section, equal to or smaller than the cross-section of the timber. This means that the wood is cut from the very heart of the log, which means it has a higher density, which is good for installing the lower crown.
- It is also good if the ring density is high. This also indicates the strength and density of the wood.
- The selected material must be treated twice with antiseptics and fire retardants on all sides. At the same time, the ends of the tree are not coated with an antiseptic so as not to interfere with its breathing.
- If the selected material fully meets all the requirements, but one of the edges is uneven, then this side of the lumber is turned outward. This will be the outer wall of the house.
Important: if the timber is fastened to concrete using special concreted studs, then holes will need to be drilled in the lumber with a pitch identical to the pitch of the fasteners in the concrete.
Attaching joists to a concrete floor
Scheme for attaching joists to a concrete floor.
The second common case in construction of attaching a wooden beam to a concrete surface is installing joists on the concrete floor. Modern floor equipment techniques are very diverse: various insulating materials, heated floors, various solutions for leveling and improving the floor surface, etc. are used.
But even today, the option of installing ordinary wooden logs is quite relevant for both houses and apartments. This method of laying floors is used, as a rule, in houses where there are no problems with ceiling heights, but where one would like to save on expensive insulating materials.
“And I’m crazy, and I’m crazy!” (C)
alex-bs published a topic in Our work, August 17, topic
Hello, brothers in repair! I haven’t written anything here for a long time, and in general I rarely come in, it’s all a bit of a lack of time: first a drinking session, sometimes a party, and now a new “attack” has attacked me. But knowing that, despite everything, you stubbornly do not forget me, I decided not to be a pig and tell you about my new hobby. I’ll start from afar: I have worked almost my entire adult life as an electronics engineer, moreover, as an engineer developing electronic and electrical devices of the widest class and purpose, and at the same time purely in the defense industry. It is clear that the scope of my amateur radio interests was limited only by my laziness, there were simply no restrictions on radio components for me, I had EVERYTHING! Well, following the trends of the amateur radio fashion of that time, my main focus was on radio receivers and amplifiers, of course, on transistors and microcircuits. I haven’t worked in this field for a long time, and I threw everything into the landfill a long time ago, but all this time I had a dream in my soul - to make a tube power amplifier, and not a simple one, but one that would make everyone gasp. But I must say that at work I spent most of my time dealing with electric vacuum devices, radio tubes, to put it simply, so this topic was very familiar to me. And then there’s this fashion for “warm tube sound”, which people are literally going crazy about. In short, a year ago I decided to make my dream come true. I immediately decided: the mainstream, ordinary tube amplifiers with an output transformer, are not interesting to me, this is not a royal matter! Shouldn't I invent a TRANSFORMER-LESS tube amplifier? Well, I well imagined the difficulties along this path, and I had some of my own thoughts on this matter, but still I decided to consult with the radio amateurs. I found a suitable group on Facebook, started publishing in it myself, and once asked a question on the topic: could anyone tell me the circuit of such an amplifier. And they immediately give me a link: https://hifisound.com.ua. a-6s33s-otl/ (I hope I didn’t violate any Forum rules by providing a direct link here, especially since it’s from a completely different area?). I won’t talk about this scheme, if anyone is interested, I can later explain what’s what, I’ll just say that this scheme immediately interested me, both for its unusualness and for the potential opportunities that I saw in it. I decided to start. And where to start: there are 0 parts, there is a soldering iron, also a Soviet one, and a tester from Ketai. But, bad luck - the beginning: I got comfortable on Avito, on Ali Express, went to the Mitinsky radio market a couple of times, and began to acquire amateur radio junk.
Now I’ll go and take Tinka for a walk, and I’ll continue, if you’re interested, with photos. )))