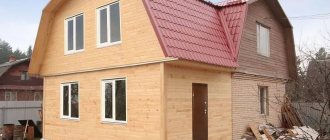
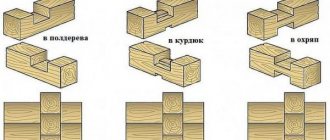
Houses made of wood will never lose their relevance. After all, wood is a unique building material. In addition to the fact that it can store the energy and warmth of nature, it is also beautiful. There is one more feature: it does not lose its attractiveness for a long time. Absorbing time, it ages gracefully.
In addition, wooden walls are warm, quiet, and cozy. Therefore, the idea of covering rounded logs or profiled timber with another type of finishing is somewhat barbaric. But in a private house there are several wooden walls that sometimes still have to be leveled: the bathroom and the kitchen. In the bathroom you need to get a flat surface for tiles, in the kitchen - for wall cabinets and an apron. Another thing is old houses, with untreated, cracked logs. Here, the alignment of wooden walls for a different type of finish is dictated by necessity.
Leveling walls in a wooden house with your own hands
Candidate of Sciences, permanent expert of the site, a real, and not abstract (unlike other resources) person.
Houses made of wood will never lose their relevance. After all, wood is a unique building material. In addition to the fact that it can store the energy and warmth of nature, it is also beautiful. There is one more feature: it does not lose its attractiveness for a long time. Absorbing time, it ages gracefully.
In addition, wooden walls are warm, quiet, and cozy. Therefore, the idea of covering rounded logs or profiled timber with another type of finishing is somewhat barbaric. But in a private house there are several wooden walls that sometimes still have to be leveled: the bathroom and the kitchen. In the bathroom you need to get a flat surface for tiles, in the kitchen - for wall cabinets and an apron. Another thing is old houses, with untreated, cracked logs. Here, the alignment of wooden walls for a different type of finish is dictated by necessity.
Additional wall fixation
Installed screeds can be beautifully disguised, further protecting the walls from deformation. The inside of the structure is sheathed with metal or wooden slats that tighten the wall. If necessary, insulation and a film are placed on top of it to protect the material from moisture. If the house is located in a cold region, it is worth installing shielding foil, which will provide additional heat protection. The presence of a film near the wall is mandatory: most modern materials for insulating rooms do not tolerate moisture, steam, and with prolonged exposure lose their qualities. The next stage is cladding with plasterboard, wood, clapboard or block house.
If the wall is bent from the outside and it has been leveled, the metal parts used are insulated and then torn with finishing materials. If the situation is not neglected, the wall is plastered. To avoid further possible deformations, the outside walls are sheathed with siding. Quite often, if wooden structures are leveled, but they continue to deform in new areas, they are covered with bricks as a saving measure. It is important not to forget about the vapor barrier necessary in this case.
Wood for housing construction always has a special appeal. It is always a pleasure to be in such a house; its atmosphere is extremely friendly. Therefore, you should not abandon this building material just because of the risks associated with possible deformation of the walls. There are plenty of opportunities to renovate on your own, improving the design and increasing the value of your home.
Source
Pros and cons of methods
Each technology has its own advantages and disadvantages. It is up to the owners to decide which method to choose.
Plaster
“Wet” plaster is one of the most common methods of leveling any surface. Many years of practice have revealed all the strengths and weaknesses of the method.
Pros:
Minuses:
Panels
The panels have their own advantages :
Several disadvantages greatly limit the scope of application:
Sheet material
The advantages and disadvantages of sheet material largely overlap with the strengths of panels. Let us briefly recall:
The disadvantages include :
Lining
The list of advantages of leveling walls with clapboard:
In addition to the listed strengths, there are several specific advantages :
Disadvantages of the material:
You can also level the walls with fiberboard. The technology has many advantages :
There are three drawbacks , but one significant one: after a few years of use, waves will appear on the wall - there is not enough rigidity, no matter how often you hit nails or screw in self-tapping screws. Besides:
Some tips
Before leveling the walls you need to prepare. Clean the surfaces and free them from foreign objects, nails and other things. Free door or window openings from plaster or putty so that nothing interferes with the fixation of fasteners.
Additional treatment of wood with an antiseptic will never be superfluous.
The stiffness nodes remaining in the wall after pulling can be masked with decorative finishing, sheathed with plasterboard, decorated with decorative techniques from the inside and covered with siding and panels on the outside.
Before starting restoration work, you need to find the cause of the defect, assess the severity of the damage, as well as the condition of the timber. You can fix anything, even crooked walls. Good luck!
Source
Required materials and tools
Each technology requires its own materials and tools.
Plaster
To level walls with “wet plaster” you need to buy:
The following tools and devices should be on hand:
More information can be found here.
Panels
To install the panels you will need:
Drywall
To install gypsum boards, you will need the same materials and tools as for the panels. Exception: liquid nails are not required. Additionally you need to buy:
You also need a narrow and wide spatula. The need for materials and tools is described in more detail in the work “How to level walls with plasterboard with your own hands?”
Lining
To install clapboard cladding you will need:
You need to collect the least amount of tools and buy materials when leveling walls with fiberboards. You will need:
Work procedure
Leveling walls in a wooden house with your own hands is done using different technologies - each has its own instructions. It all depends on the type of leveling material.
Plaster
When plastering a wooden house, the following rules must be observed:
The technology itself does not cause difficulties:
Details on the rules for filling shingles, installing beacons and the recipes for various plaster solutions can be found here.
Panels
You can also level the wall with panels. You need to start with the installation of wooden sheathing. Experts recommend putting wooden slats under the panels and lining - it’s easier and faster than assembling a metal structure.
The lathing technology is standard:
Important: for tying, take a 50x100 mm beam, for a transverse or longitudinal beam - 50x50 mm.
The process of installing the sheathing is completed by tying the window and door openings. With relatively flat walls, you can do without a frame. In this case, the supporting slats are placed directly on the wall, without strapping.
Panels are mounted on the frame. This is done in the following sequence:
Attention: for better sealing, experts recommend lubricating the spikes with silicone.
Instead of nails and screws, you can use glue. Details of the technology are here.
Drywall
Leveling the walls in a wooden house with plasterboard is carried out using the same technology as on brick or concrete walls. Therefore, we will not increase the volume of the article and will send those who wish to study the corresponding instructions for the material “How to level walls with plasterboard with your own hands?”
For general information, let us briefly recall what we are talking about:
Lining
The lining is mounted on a wooden sheathing. Connected to each other by a tongue-and-groove system. Attached to the sheathing or with special fastening devices designed for hidden fastening or with finishing nails.
About 40-50 years ago, owners of wooden houses, without further ado, tried to straighten the walls of wooden houses for wallpaper using fiberboard. They nailed the sheets to the full height and glued their trellises. But after a couple of years, waves appeared on the walls - this is how the finishing material reacted to the breathing walls. They stayed for many years - there were simply enough other jobs in the village.
The idea of using fiberboard to level walls was just an idea for a long time, until modern materials appeared that completely changed the technology. The work is performed in the following sequence:
Important: with wood-fiber boards you can level walls with a small difference in height - up to 2 cm. And it’s even better when you simply remove the grooves between the crowns.
Step by step - simple, affordable - inexpensive.
Leveling work
At the initial stage of work, it is necessary to identify problem areas and stock up on everything necessary to level the surfaces of enclosing structures.
Preparation of material and tools
Before leveling the walls in a timber house, you need to prepare the following tools and materials:
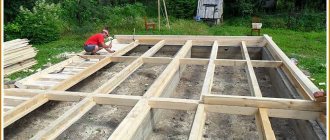
When performing work, they start from the basic design of the building. The document indicates the layout of load-bearing walls and partitions. Based on the project, you can decide on the installation of additional elements and frames. Leveling a timber wall inside a house occurs in different ways.
New building
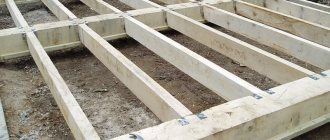
Not all manufacturers pay attention to the quality of the lumber they produce; they are more interested in sales volumes. If wooden elements become crooked during drying, it is necessary to carry out work to eliminate surface defects. To level the wall, select the most convex part and secure it to the cross beam. The element is firmly fixed to the lower crown.
To create a strong fastening, you need to drill one through hole, insert a pin and tighten the threaded connection with a nut. After some time, the latch is tightened again and this is done several times until the beam reaches its initial position.
Note! It will not be possible to quickly straighten timber walls; this can lead to destruction of the wood. The process can continue for a month. Rainy, humid weather speeds up leveling.
You can correct the position of the lower beams using wooden wedges. The wooden element is driven into the ground and its position is secured. A wedge is carefully hammered into the upper part with a heavy hammer. After some time, this part is tamped down again and operations are carried out until the wall is completely leveled. On the inside, the enclosing structures are covered with sheets of plasterboard or wooden clapboard.
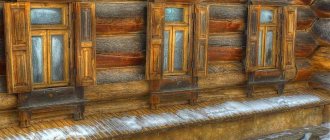
an old house
Wooden residential buildings that have been in use for at least 5 years are considered old. During this period, complete shrinkage of the residential building occurs. In old buildings, it is necessary to first strengthen window and door openings. The lack of casing is considered the main reason for wall deformation.
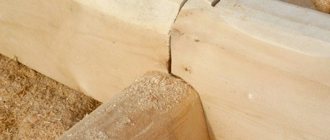
To align the enclosing structures in places adjacent to the openings, a metal corner with a shelf width of at least 6 cm is used. The element must correspond to the length of the opening. They cut off the timber that will be used as a stand, prop it up with a jack and place a corner under the opening. In the last element it is necessary to drill three holes with a diameter of 8 mm.
The corner is attached to the beam using thickened screws. To prevent wood from cracking, fasteners are lubricated with used machine oil. The screws are tightened evenly, one at a time. After this, the metal corner is covered with a layer of paint, which will prevent corrosion of the material.
Thick metal bars are used to straighten the walls from the inside. The elements are placed on concave surfaces along the height of the walls. They are fixed using threaded connections in three places - at the top, bottom and in the central part of the structure. To level the walls with your own hands, you need to gradually tighten the nuts. After straightening the tire surfaces, they remain in the same place. They can be hidden under the finishing (sheets of drywall).
How to level walls in a wooden house: nuances of process technology
Nowadays the trend of building private country houses from natural materials continues. To build load-bearing walls, many people choose wooden beams instead of brick or gas block. The products are inferior in thermal conductivity to foam concrete, but with their help you can create a favorable indoor climate.
Wood breathes, allowing air to circulate, but the structures also have disadvantages. One of them is the shrinkage of a wooden building during operation. A year after building the house, you will have to caulk the walls and lay additional thermal insulation. Shrinkage can lead to deformation of the enclosing structures, so you need to know how to level a wall made of timber.
Reasons for wall deformation
Before leveling the walls, you need to familiarize yourself with the reasons that may cause defects. At the time of installation of a house, a person stocks up building materials for future use. It is not possible to check all received timber for defects. Lumber must be made so that the core of the log is strictly in the center of the product. If this rule is not followed, drying will occur unevenly and deformation of the timber during construction or shrinkage of the building is inevitable.
Important! The best solution is to alternate multidirectional elements so that the elements compensate for each other's curvature.
Another reason for deformation of enclosing structures is considered to be incorrect calculation of loads. When compressed, any element of the building structure will bend. It is necessary to seek help from specialists who will help make important calculations and identify excess pressure in the structure. To redistribute the forces on the wall, you will need several additional racks.
The last reason for the deformation of enclosing structures is considered to be improper installation of inter-crown insulation, which can squeeze out the timber. There is no need to dismantle the wall; you need to remove the thermal insulation material and caulk the resulting gaps.
How to level the walls in a log house with your own hands: step-by-step instructions
The problem of crooked walls is one of the most common not only in apartments, but also in private houses. Straightening and straightening log surfaces is undoubtedly difficult, unlike timber or brick ones, but it is possible.
It should also be noted that the house is subject to subsequent cladding, since after the procedures, the area remains unpresentable, the log house loses its former beauty.
How to level the walls in a log house - simple instructions for amateurs below.
Causes of curvature of walls
If we talk about log cabins, then the cylinder can also be subject to bending, like a wild whip with bark, although to a lesser extent. This is due to violations of technology, the degree of dryness of raw materials and its processing from the penetration of moisture and the effects of sunlight. More details:
The spacing of the dowels is from 50 to 60 cm. If you do more, the log will twist and defects cannot be avoided. A frequent arrangement of holes can split the log and longitudinal cracks on the whip will appear too quickly.
A raw log can take a thousand years to shrink and at the same time change its shape right in the log house. And this is also not conducive to straight walls.
This effect can be prevented if you pay attention to the wood in terms of insulating it from moisture. To do this, after construction, the walls are treated with protective compounds that prevent natural precipitation from the outside and steam from the inside from penetrating into the depths of the logs.
Alignment methods
There are only two of them - mechanical and decorative. Both should be used for best results. So, how to straighten the walls of a log house using available methods:
Mechanical method of leveling log walls using metal corners
The method is good for single defects.
That is, if a single log stands out from the overall picture. For large violations, you must first use jacks, otherwise leveling the walls of a log house will not have the desired effect.
A decorative way to correct wall unevenness
It is used primarily indoors using drywall. Why is it recommended to do it mechanically first?
This is obvious - under the decorative cladding, the process of subsidence of the walls will continue, and the day when the whips will begin to break the drywall is not far off. So, if all manipulations with jacks and corners are completed, but the house has lost its attractiveness, proceed as follows:
You should not join drywall - a gap of 3 mm will become a necessary technological action due to constant shrinkage. It is better to fill the seams with elastic putty, then the sheets will move without fractures or other defects.
In this way, the walls in the log house are aligned. The essence of such repairs is simple and accessible to craftsmen of any level.
To ensure that the walls do not warp at any stage of operation, attention should be paid in advance to the material during the construction period. The correct selection of materials and strict adherence to the technology of fastening logs is the key to the strength of the position of the crowns in the log house.
Total score: 7 Lost: 2
We recommend! — Encyclopedia Wooden Houses — NEW
You can find out detailed and expanded information on the topic of the article from the book “Wooden Houses,” which reflects all stages of building a house, from laying the foundation to installing the roof. Book price = 77 rubles.
You may also be interested in other BOOKS on building houses from wood with your own hands.
Mechanical method of leveling log walls using metal corners
- For work, special steel plates with identical holes on each pair of elements and threaded rods are purchased. The cross-section of the studs must be at least 1 - 1.5 cm. The location of the structures must be not only in places of curvature, but also at the opposite end of the wall to bring them into the same condition.
- Using a drill, mark the location of the holes for fasteners and make through holes with a diameter smaller than the cross-section of the pins. Then hammer in the studs with a sledgehammer and put on the corners.
- The logs are pulled together using threaded nuts, alternately guided by the crowns, which do not cause any criticism. The protruding ends of the rods are cut off with a circular saw with a diamond wheel.
The method is good for single defects. That is, if a single log stands out from the overall picture. For large violations, you must first use jacks, otherwise leveling the walls of a log house will not have the desired effect.
How to level clay walls
How to level the walls in a wooden house efficiently and inexpensively? This question is most often asked by those who have purchased or inherited an old log house.
In the event that the owner is the owner of a new log house, it is advisable to wait with the interior decoration for 2 - 3 years, due to shrinkage of the material.
If the structure has been in use for several decades, it is first necessary to assess the current condition and quality of the wood.
How to level wooden walls?
Wood is a natural product and a high-quality building material. It creates excellent ecological housing construction projects.
But there are situations when the walls of wooden houses can have significant unevenness. In this case, you need to move away from originality a little and level the walls.
The principles of such work can cover several ways . In modern conditions, there is a capacious material base to choose the appropriate material.
How to level log walls?
Wooden houses are built using a variety of materials . With their help, the walls are prepared for finishing. Thanks to the use of various materials, the walls of a wooden house acquire an aesthetic appearance and create a comfortable atmosphere.
Immediately before leveling the log walls, the most problematic areas and irregularities are determined , as well as the curvature of the corners and uneven joining of adjacent logs.
If there is already old finishing on the walls, it must be removed and the surface must be cleaned of nails or old screws that may interfere with the alignment with new materials.
To re-level the walls, you need to:
How to level walls with plywood?
Leveling walls with plywood is done without the use of building mixtures . The maximum that can be done is to cover the surface of the plywood with paints and varnishes to give it shine and an aesthetic appearance.
The advantage of plywood over plasterboard is strength and resistance to mechanical stress , but working with plasterboard is much simpler and easier.
Plywood is used as a finishing material inside country houses, in garages, outbuildings, and storerooms. To attach the plywood, you need to mount a frame.
You need to use plywood with a thickness of at least 6 mm , maximum 9 mm. Using thinner sheets may cause them to warp. Thicker sheets must be mounted on a reinforced frame, which is expensive.
In rooms with high moisture, you should use plywood treated with an antiseptic. Using ordinary plywood in such places can soon lead to curvature of the surface.
To process plywood sheets, you need a special tool - a jigsaw , with which the plywood is trimmed. It is attached to the frame with wood screws (if the frame is wooden) and metal (if the frame is metal).
How to level the walls of a timber house?
A log house consists of a set and joining of wooden blanks of the same thickness and parameters. But there are cases when logs, under the influence of internal and external microclimates, can shrink , losing the evenness of their laying.
Another reason for uneven walls in a log house may be foundation shrinkage . This can be avoided by using screw piles to strengthen the foundation.
Reasons for wall deformation
A disease can be treated effectively only by knowing its cause. Even with the most competent and careful installation of timber, deformation of the walls is possible.
Important! Curvature of the wall is a serious problem, indicating the emergency condition of the house, requiring immediate action.
To build a house, we buy materials in large quantities; you can’t check each unit to see whether there is a defect or not. A quality beam should be produced by trimming the rounded edges so that the remaining middle is located strictly in the center. Around the core, the annual rings should diverge evenly to the sides. If the core is displaced, shrinkage will occur unevenly, and deformation is inevitable. During the construction process, such an element must either be set aside for some other measures or alternated in the masonry so that differently directed beams compensate each other.
Another reason for the wall to warp may be an incorrectly calculated load. As a result of compression from different sides, any part bends. In this case, you will need the help of specialists who will calculate the load-bearing capabilities and identify where the pressure is excessive. You will need additional racks to redistribute the load, at least two.
The reason for the curvature of the walls may be incorrectly placed inter-crown insulation, which squeezes out the timber. But you won’t have to disassemble the wall; you will need to remove the insulation separately, and then caulk the resulting cracks.
How to level walls in a wooden house: nuances of process technology
A wooden house is an excellent solution for housing. Environmental friendliness, natural beauty, lightness of construction are some of the most positive features of wooden houses. But still, curvature between logs and in corners can be considered some disadvantages.
Therefore, the answer to the question of how to level wooden walls in a house is very important for the final aesthetic completion of the home.
And in a wooden house, the process of leveling walls is quite different from the same work, for example, in a brick or panel building.
Previously, when no modern technologies were available, walls in wooden houses were leveled using cardboard and newspapers glued to them. This method was no different in practicality, nor in the stability of the finish. It has been replaced by modern techniques, which are now successfully used and make it possible to prevent curvature at the stage of pouring the foundation.
An important point is that if the walls are made of timber, then they can only be leveled using plasterboard, but if they are made of another type of wooden material, then you can also use building mixtures - putty and cement.
Why is it worth leveling with drywall?
If you are thinking about how to level a wooden wall inside a house, you should give preference to plasterboard sheets. This material allows for additional insulation of the house. Also, after installation, you get a perfectly flat surface, ready for finishing. And you can do the installation of sheets yourself. With proper installation, you can avoid cracks that can occur due to shrinkage of the house. That is why cement mixtures and plaster are increasingly being abandoned in favor of drywall. It's simple, cheap and practical.
Finish options
There are several options for leveling the walls of a wooden house. You can use cement or special putty mixtures. But you need to resort to such an operation only if the house is not made of wild timber. Cement also has its limitations. So, it can only be used if there is a sheathing. The technology involves installing thin strips. Only then will the cement adhere normally to the vertical surface of the wall.
If the house is made of logs, you can resort to using a modern and practical method. This is leveling walls with plasterboard. This is a very simple and yet reliable building material. Thanks to plasterboard sheets, you can quickly carry out finishing work in any room. This creates a movable frame that can respond to the shrinkage of the building (which can occur over several years). This is a guarantee of no cracks.
Preparatory activities
Preparation for leveling walls is an important stage at which it is necessary to correctly assess the condition of the surface, select technology and materials that can be used to ensure optimal finishing. Work begins with thorough cleaning of the surface from old coatings and dirt.
Leveling techniques can be divided into 2 main categories - dry and wet technology. The first option is based on fastening sheet materials (plasterboard, chipboard, fiberboard, plywood, etc.), which does not require the use of aqueous solutions. Wet technology, which includes plaster and putty, involves leveling with mixtures in a liquefied state.
The choice of method depends on the degree of unevenness of the wall. The following criteria are recognized:
- the height of unevenness is no more than 10 mm - putty can be used;
- unevenness within 10-50 mm - leveling is ensured by plaster;
- differences in the height of unevenness exceed 50 mm - it is necessary to use the dry method.
Taking into account the criteria for choosing a leveling technology, at the preparatory stage it is important to correctly assess the degree of unevenness of the wall. It is necessary to determine the presence of surface irregularities (depressions and convexities), deviation from verticality and violation of parallelism of the walls (deviation in the horizontal direction), curvature and squareness of the corner zone. To do this, the necessary measurements are taken.
Surface irregularities can be identified using a rule or a straight wooden batten about 2 m long. The device is simply applied to the wall and all irregularities under the batten become noticeable. Their size can be measured with a ruler.
The verticality of the wall is assessed using a plumb line on a long cord, which descends from the ceiling to the floor. To determine the parallelism of the walls, a tape measure is used, and horizontal flaws are determined using a building level. The quality of the corners is assessed using a square.
When violations are detected in construction, the “work front” is marked. Nails are driven into the wall near the ceiling and floor with a projection of 2-3 cm from the surface. Focusing on the plumb line, a cord is pulled between the nails, indicating a strictly vertical direction.
The cords are installed at several points, which allows you to form the future vertical surface of the leveled wall. Markings are made in the same way to correct deviations in the horizontal direction.
How and how to level walls in a wooden house
How to level the walls in a wooden house efficiently and inexpensively? This question is most often asked by those who have purchased or inherited an old log house.
In the event that the owner is the owner of a new log house, it is advisable to wait with the interior decoration for 2 - 3 years, due to shrinkage of the material.
If the structure has been in use for several decades, it is first necessary to assess the current condition and quality of the wood.
To do this, you need to remove all the old finish and identify possible flaws in the structure of the wood. This is not difficult to do: you need to take some kind of cutting tool (screwdriver or knife) and pick at all suspicious places. If the wood structure is dense, you can begin finishing.
It is necessary to start immediately with impregnation of the walls in order to reliably protect the logs and not return to repair work for a long time.
If the use of cutting elements causes the wood to crumble, you cannot do without the help of specialists. You need to find out exactly the root cause of the changes in order to know what actions to take in the future.
If necessary, damaged areas must be replaced; great importance is attached to the chemical treatment of adjacent logs with an antiseptic.
Sheathing nuances
Next, we cover the walls with plasterboard in a wooden house. This can be done using self-tapping screws. You need to start from the bottom. If the length of the plasterboard sheet is not sufficient to cover the height of the wall, no problem. In such a situation, we cut off part of the piece from the new sheet and install it in place. Please note that the fastening of adjacent plasterboard sheets must be done in a staggered manner, offset.
The sheet is attached to self-tapping screws, but the latter are screwed in no closer than 10 centimeters from the edge. The step for fastening is 30 centimeters. It is important to carefully screw the screws into the plasterboard sheet. You need to stop screwing when the head of the screw has been recessed one millimeter into the sheet. This will be enough to securely fix the structure to the wall. Please note that if you tighten the screw too tightly, it can damage the plasterboard itself. In this case, the fixation will be unreliable. How to level walls in a wooden house? Then you can start decorating.
But first, experts advise to putty all the screw caps and all visible joints. Wallpaper can serve as a decorative finish. But usually in such houses the walls are simply prepared for painting.
When to start
On a “fresh” log house, you can begin finishing work no earlier than the main shrinkage has passed. If the log house is made of laminated timber, it should take 3-4 weeks. For all other types of wooden houses, the period is calculated in months, and sometimes years. The exact shrinkage time depends on the initial moisture content of the raw materials, climate zone and construction time. That's how difficult it is. In any case, it’s not worth starting finishing sooner than a year later, or at least 10 months later. During this period of time, active shrinkage of the wood occurs, logs and beams decrease in size, and the insulation laid between the crowns is crushed. If you attach the trim before the main processes have completed, it will fall off or become warped. Everything will have to be removed and redone. So there's no need to rush. Moreover, there will be enough work: you need to achieve tightness of the joints, and this is not easy. Careful competent caulking is needed.
Before starting finishing work, it is tedious to caulk a log or timber frame
Typically, the main caulking of a log house takes place in two stages. Primary - a few weeks after installing the log house, and secondary - after about six to eight months. Each time the cracks are clogged with insulation - jute, tow, sometimes moss. It is done immediately both outside and inside, otherwise the house will warp. Therefore, they walk around the perimeter of the building, caulking alternately, each crown, now from the outside, now from the inside. Work begins from below, from the lowest row of logs or beams.
With each caulking, the frame rises by 5-7 cm. Then, under the force of gravity, it gradually settles. The compacted inter-crown insulation reliably covers the cracks. The quality of this work is very important: it not least determines how warm the house will be.
Finishing work begins inside the wooden house after the frame has settled after the second caulking. To determine whether the process is completed or not, the height of the walls is periodically measured. If there are no significant changes within two to three months, we can assume that the main processes have passed. It's time to start decorating the inside and outside of the house.
How to attach drywall to a wall without profiles: 17 tips for a beginner
In this case, work begins with preparing the wall. It must be cleaned of dirt, dust free and primed with penetrating acrylic primer twice. Drywall (even moisture resistant) has a certain hygroscopicity and slightly changes its linear dimensions with fluctuations in humidity.
The same thing happens with temperature changes: thermal expansion has not been canceled. Periodic changes in the size of adjacent sheets sooner or later lead to the appearance of cracks along the seams separating them. First of all: not only specialized glue (Perlfix, Volma Montazh, etc.) is suitable for this purpose, but also any gypsum putty or plaster.
Their price is approximately equal to the cost of glue, and the adhesive qualities are also practically the same.
- In addition, attaching drywall to the wall without profiles will significantly increase the free space of the room. Let's do another simple calculation: find out how much space the frame will take up with an average distance from the wall to the gypsum board sheet of 5 centimeters and a room size of 4x5 meters.
This is not required, but recommended. The putty creates a separating layer on the surface, allowing you to peel off the wallpaper if necessary without tearing off the top layer of kraft paper. In addition, puttying the surface will reliably disguise visible seams.
Leveling walls in wooden houses
Today, despite the rapid development of construction technologies, owners of wooden country houses and country houses very often encounter such a problem as leveling walls. In a wooden house, leveling the walls is complicated by the specific nature of the wood.
Almost all wooden buildings experience significant shrinkage, which leads to skewed angles and deformation of the walls. This phenomenon is often observed in log houses. The article describes the most common methods of leveling walls in wooden houses . The main materials that are used to level walls are considered.
Preparation
Before leveling the walls in a wooden house, you need to create a plan and calculate the required amount of materials. Places for mounting lamps and installing wiring are also outlined. All tools are prepared in advance:
- Drill.
- Level.
- Saw.
- Screwdriver.
- Roulette.
On paper you should make a sketch or drawing of the room and mark the places where the frame profiles pass. The number of screws and dowels is immediately determined. But it’s better to take them with a reserve. They are cheap, and no one ruled out the possibility of buying a defective one. It is also recommended to take extra sheets.
How to level the walls in a wooden house yourself
In many regions of the Russian Federation, housing construction is intensively developing, including individual houses and cottages.
A wooden house made of timber or logs has a number of features, one of which is gradual shrinkage, which occurs within 1-3 years after completion of construction.
After this period, the owner is faced with the question of how to level the walls in a wooden house quickly and efficiently and carry out general repairs while spending a moderate amount of money?
Types of repairs
Self-leveling walls
The most affordable way to carry out repairs is to level the walls using plasterboard slabs.
For installation of drywall, a special technology is used, which allows the work to be carried out quickly and efficiently.
When using the frame method of installing sheets, a number of preparatory operations are first performed:
Particular attention should be paid to work in the kitchen, bathroom and toilet. By covering the walls with plasterboard, it becomes possible to hide water pipes, heating communication systems and external electrical wiring.
It is necessary to take into account the air humidity in the premises, since plasterboard slabs are susceptible to high humidity. At temperatures below +10*C, working with drywall is prohibited.
When installing GKP, a metal profile is most often used. During installation, 2 options are mainly used:
To ensure proper installation of the profile, careful measurements are taken and the working surfaces are marked. The guide profiles are fastened at a distance of 500 mm from each other.
Correcting a crooked wall
To fasten the profile to the wall, hangers are used (at the rate of 3 pieces per 1 m of profile).
The racks are mounted with a pitch of 600 mm, but in case of complications, the pitch can be reduced to 400 mm.
To strengthen the frame, horizontal jumpers are used.
After completing the installation of the frame, the plasterboard sheets are fastened using self-tapping screws with a set spacing for fastening of 250 mm.
After completing all the work on fastening the sheets, all seams are taped with a special tape and covered with putty. For work in the bathroom, special moisture-resistant sheets are used.
But to maintain the required level of humidity in the bathroom, you need to install a special electric fan.
When installing plasterboard sheets, thermal insulation is installed at the same time. Foam boards, mineral wool and sheet cork can be used as insulators.
Doing the work yourself
All work on leveling the walls can be done with your own hands, using materials produced by Russian enterprises. When asked how to level the walls in a wooden house with your own hands, you can accurately thaw it using finishing panels.
The material for finishing walls can be finishing panels, which are divided into:
Moisture-resistant finishing panels include:
Non-moisture resistant materials include:
Let's start installing the frame
We continue to study the question: “How to level the walls in a wooden house?” So, everything is ready. All that remains is to make the frame and sheathe it. The plasterboard sheets are fastened directly to the frame using self-tapping screws. But to secure the frame to the beam, special fasteners will be required. Since wooden structures can not only shrink, but also swell, absorbing moisture, the eraser will definitely move. Therefore, the height of the drywall sheets should be 10 centimeters less than the height of the room. This gap is subsequently closed using skirting boards.
To make the frame, we need:
- Metallic profile.
- "Crab" (first level connector).
- Closed sliding rafter support.
So, first you need to cut the eye in the sliding support. We don't need it anymore. Next, holes are made in the “crab”. Through them the support will then be fastened to the surface. Only the horizontal strip is fixed directly to the wall, and then the “crab” to it (and nothing else). This system allows you to avoid future deformations.
We attach the steel profile to the “crab”. If the work was carried out according to the instructions, then the profile should easily move vertically due to the sliding support. What's next? After this, jumpers are installed.