Before you start making plywood figures for the garden with your own hands, you first need to decide on the type of plywood. The durability and attractiveness of a garden figurine depends on the choice of one or another type of plywood sheet.
Which plywood to choose?
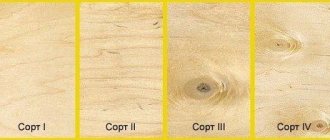
Today, the construction market offers a huge number of different types of plywood. For garden figures, BS, FB and FSF are best suited. Such brands have increased moisture resistance and frost resistance.
A cheaper option for FC. The moisture resistance of this brand is lower than that of the above types, so before painting it (FC sheet) should be treated with moisture-repellent compounds.
It is better not to use the FBA brand for garden crafts, since this type does not withstand atmospheric conditions well. Outdoor figurine will last a maximum of one season. But if you are going to update the figurine once a year, then FBA plywood, pre-impregnated with drying oil, will do.
As for the number of layers, both single-layer and multi-layer plywood sheets are suitable for the garden.
Important point!
If you are going to make an outbuilding, then a thin sheet will do. For ground figures it is better to use plywood, about thirty millimeters thick.
Blueprints
The selected figure can be printed on a printer or a template can be created. As a rule, beginners choose the second option, since using a template it will be easier to reproduce the figure on a sheet of plywood.
A grid of the same scale/size is drawn on the drawing and on the plywood. Then all the contours are transferred from the paper to the plywood sheet.
What will you need for work?
To work you will need:
- stencil, pencil;
- plywood sheet;
- jigsaw;
- screwdriver and screws;
- sandpaper, acrylic paint and brushes.
Important point!
If you are going to install a figurine that will not lean on anything, then in this case you will need to install pegs on which the figurine will “sit” in the future.
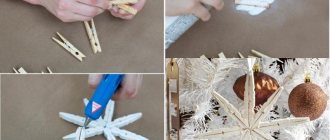
DIY garden snail made of plywood
The snail will be a wonderful decoration for any garden plot.
Manufacturing process:
- A snail is drawn on paper. Then transfer it using carbon paper to plywood.
- Using an electric jigsaw, cut out the components of the craft.
- Using acrylic paints, decorate the figurine. You can use burning to highlight all the contours.
Stork making their own plywood
The stork will not only decorate the garden plot, but will also bring happiness and joy to the house. You can install it, for example, near a pond, fountain or in the center of the site.
Manufacturing process:
- For work you will need a plywood sheet with a thickness of six millimeters. A figurine of a stork is cut out of it, measuring 0.85x.58 m.
- For the stand (the stork's leg) plywood about twelve millimeters thick is used.
- All cut out elements are cleaned with sandpaper.
- A hole is made at the end of the “leg”. You will need to insert the body of the stork into it. The depth of the hole should be about five centimeters.
- Self-tapping screws are used to attach the legs to the body. In order for the product to last a long time, you must first make holes for the screws.
- The product is primed.
- Paint the figurine.
If they are attached to the pediment, then thin plywood will do for the “leg”. If you wish, you can create not one, but two storks and a nest. After painting, the products are attached to the facade using self-tapping screws.
DIY bird feeder made of plywood
Manufacturing process:
- For the base you will need four slats (two long and two slightly shorter). A rectangle is created from them.
- Cut out the bottom and roof for the feeder from the sheet (must fit the size of the slats).
- Stands are made in the corners.
- The resulting product is painted with acrylic paints. You can also use burning to make an interesting pattern on the roof of the feeder.
DIY plywood hedgehog
Manufacturing process:
- Make drawings of the figure on paper. Then cut out a hedgehog from paper.
- Attach the template to the plywood sheet and trace the contours of the figure with a pencil.
- Then use a jigsaw to cut out a hedgehog from plywood.
- All edges of the craft are sanded with fine-grained sandpaper.
- Coloring the product.
DIY plywood butterfly
Their plywood can be used to make not only large figures, but also small ones, for example, various insects, butterflies and various bugs. Such figures can be attached, for example, to a garden house, birdhouse or gate.
Manufacturing process:
- The butterfly can be drawn directly on plywood. If you do not have the ability to draw, then you should create a template. Place the stencil on the plywood and trace it with a pencil.
- Using a simple jigsaw, carefully cut out the product.
- In order to cut patterns inside the wing, you should drill holes within its area.
- Then the fabric should be inserted into the holes made and secured.
- Cut the product along the contour.
In addition to the garden figurines described above, you can also install a unique green frog, cat, fox, bear and many other fairy-tale characters on your site.
Many of us spend a lot of time in our garden. At the same time, we want to be surrounded by comfort, convenience and beauty. DIY plywood crafts are a wonderful way to self-realize and decorate your garden.
It's nice to play the guitar after eating a piece of sausage. If mice are not caught, it will be bad.
Working with plywood is easy and pleasant. The material is affordable. In the simplest version, the craft will additionally require paints and some screws. You will need a few tools, see the maximum list below.
You can make decorative crafts from plywood for garden beds and fences, fairy tale and cartoon characters for the playground, birdhouses, bird feeders, flower pots, and so on. Having asked the question what can be made from plywood with your own hands, we divided all the figures into two groups: simple ones, which are made from one piece of plywood, and more complex ones, which are assembled from several parts.
"Cartoons" for children and adults
Flat plywood figures
Almost all of the examples presented above were cut from one piece of plywood.
To make crafts with your own hands, it is better to use a sheet with a thickness of at least 10mm. In this case, the image will not warp and will last longer. At the same time, it is preferable to use moisture-resistant plywood in the garden.
There is no arguing about tastes - the choice of your favorite option is yours
The procedure for making a figurine from plywood is as follows:
- The contours of the design are drawn on a sheet of plywood with a pencil.
- The craft is cut around the perimeter with a jigsaw.
- The contours and flat surface of the workpiece are processed with emery cloth.
- Painting boundaries in different colors are applied to the part with a pencil.
- The craft is sequentially painted with all colors. Adjacent layers of paint must be completely dry before applying the next color.
Guys from our yard
It is convenient to secure the finished product with self-tapping screws to a fence or wall. Look at the photo: you can “screw” hair, buttons, shoes, a wire tail, and so on onto the craft.
It is important that these elements hold securely, serve for a long time in the sun and rain, and do not pose a danger to people.
Animals, as always, are useful: a deer holds a flower pot
You can make a variety of decorations for your garden with your own hands from one piece of plywood. We have selected several interesting options for you.
Why does a dog need a hare if it has a bone?
These birds are clearly not friends
Storks, swans, chickens: no one will fly away from you!
A grandmother solves an important problem: what should she cook for her grandfather and granddaughter?
Grandfather understands well that without firewood there will be no lunch
The granddaughter wastes no time and decides to milk the goat
Carved box
This casket is ideal for storing various trinkets: hairpins, keys, rings. It amazingly combines functionality and aesthetic appeal. You can choose the ornament yourself, so you won’t have any problems fitting the finished product into the interior.
Such boxes look good in rooms decorated in rustic, ethnic, and environmental styles. They will also find a place in rooms arranged according to the rules of classical and modern design.
Volumetric crafts for the garden
It is wrong to say that volumetric plywood crafts for the garden are noticeably more complicated. Of course, you will have to cut out a few parts yourself. But some of them should be painted in one color, which simplifies the work.
It’s hard for a donkey to understand how you can sleep for so long, he’s a donkey!
All parts are prepared according to the scheme described above, and then fastened with self-tapping screws. Of course, a three-dimensional figure looks more interesting. The photo clearly shows that it is necessary to use material with a thickness of 15-20mm. Each detail has its own shape and size. They can be placed optimally on a sheet of material and plywood can be used sparingly.
The dog protects, the cat helps: in general, everything is in order
It’s especially nice when a homemade craft not only decorates the yard, but also performs a useful function. In the photo you see only some examples.
The observer is looking out for birds - or a hedgehog?
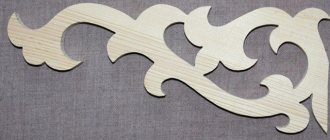
Templates for cutting out figures for the garden
Templates for cutting plywood figures for the garden, continuing the theme “Decorating the garden with homemade figures”
Picture templates are suitable not only for cutting, they can be used as regular stencils.
Crafts made from plywood can perfectly decorate a country house interior. They can be made either multi-layered or flat, which can be nailed to a fence or the facade of a country house.
Moisture-resistant plywood, the price of which is not much different from the usual one, is better suited.
Pets
Poultry yard
20.22. .
Some pictures can be used as a template, you just need to enlarge them and print them first.
14.
1
Sep 17, 2015Galinka
6cotok.boltai.com
Templates and diagrams are not problems
It is better to make templates yourself. Firstly, it’s not difficult, and secondly, you can make templates for your own and a new drawing when you get tired of repeating other people’s ideas. Note that there are a huge number of children's applications for crafts made from colored paper, which are quite easy to cut out of plywood.
The easiest option is to apply the design directly to the plywood. Moreover, if you had an A in drawing at school, it is not at all necessary to copy what has already been done.
Otherwise, you should apply a grid on the drawing you like with a pencil. Then the same grid is drawn on a sheet of material with a pencil. All elements of the design are transferred to plywood “in squares”. Conveniently, the squares in the drawing and the workpiece can have different sizes, that is, the drawing can be transferred to any scale.
The most convenient and modern way to do the work is to use a computer, which is what we did. Almost everyone has a Microsoft Power Point program, where you should copy the picture you like. The program presets the sheet size for printing on a printer to 29.7x21cm.
We have a piece of plywood measuring 57x77 cm, and we set the size of the pattern based on the availability of material. You must understand that the program takes into account the size of the entire image.
Then you need to print fragments of the drawing on the printer, sequentially moving it relative to the sheet to be printed. For ease of printing, a grid of sheets for printing should be applied to the drawing and grouped with the image.
Now the sheets should be glued into a single image and cut along the contour after the glue has dried. The paper template is placed on a sheet of plywood and outlined with a pencil. Subsequently, individual parts of the drawing are sequentially cut off from the template and also transferred with a pencil to the workpiece. You can cut it out!
Origami cat craft
We fold paper triangles of the same size and build a circle. Next, we make a circle one smaller triangle and attach it to the previous one.
What types of arcade games are there?About educational toys for babies
- T-shirts with Native American prints
Thus, having created a pyramid, we get the body of the future cat. We make the head using the same principle, but smaller in scale, and attach it to the body.
We construct ears from the same triangles on top and glue the muzzle cut out on paper. The craft can also be painted in any color, giving it uniqueness, and a tail can be drawn.
How to save your work longer
It will be very disappointing if the handicraft you made yourself peels off and warps from the first rain. So it is better to take a number of measures to save your own work.
Firstly, it is better to use moisture-resistant material. Secondly, it is necessary to impregnate it from moisture, for example, with Pinotex. Acrylic and oil paints can be used. It is important that they are for external use. If you want to leave the natural color of the wood, the craft should be coated with transparent yacht varnish.
Prepare for the fact that the figurine will have to be repainted every two to three years. If the plywood begins to delaminate, it must be puttied before painting, for example, with Silacryl sealant. It is very effective to hide the craft from bad weather during the winter.
Let the video help you in your work. All that remains is to wish you good luck!
- Creating figures
- Plywood selection
- Image
- Cutting out figures
- Stork on the roof
- Plywood butterflies
Perhaps everyone knows the figures of traffic police officers with patrol cars, installed on the roadsides and designed to discipline road users. Even if they stop frightening drivers over time, they still enliven the boring roadside landscape. Despite the rather realistic appearance of these crafts, they are made using very simple technology. If you have an artistic brush, you can easily create the same silent guards for your site; fortunately, cutting them out of plywood is not difficult. Nevertheless, at the dacha or in the garden it is better to install figures of animals, which will create a more relaxed atmosphere than models of law enforcement officers.
Plywood figures will help diversify the boring natural landscape of the site.
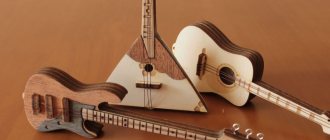
3D figures
The potential of plywood in decorating rooms is incredibly large. Proof of this is the mass of all kinds of sculptural compositions created using this material. 3D models are made up of many small elements.
Using this technology, you can make anything - a car, a ship, an airplane, and even furniture. Modern stores offer a wide range of kits with ready-made parts. Moreover, some sets are intended for children's use, others for adults.
Creating figures
To make animal figures from plywood, you don’t need to have professional artist skills
. Of course, they will help create complex compositions “in the style of realism,” but simpler installations can also please the eye. It’s very good if a child’s hand is involved in coloring them.
You can install the figures in any place you like, but it is still advisable that they do not look ridiculous there. The figure of a fox is hardly appropriate, for example, in the water of a pond, and a frog should not be placed in a vineyard. Otherwise everything is quite simple.
Return to contents
Plywood selection
Today, the industry produces many types of plywood, and some of them have such high moisture resistance characteristics that steel sheets can envy them. For installation in the garden, plywood of the FSF, FB and BS brands is best suited. Cheaper material is FK plywood. Although it is relatively moisture resistant, it must be treated with moisture-repellent compounds before painting.
The FBA brand withstands the effects of atmospheric factors the worst, however, it can also withstand 1 season in an open area. If you are going to update the figures at least once a year, then FBA plywood well impregnated with drying oil will suit you.
When decorating your site, you can use plywood with almost any number of layers. The combination of elements of different thicknesses will give the figures volume. True, it can also be played up by coloring. The weather vane is made from thinner plywood, and the ground figures are cut from thick plywood. Sometimes it is appropriate to use a sheet of 20 or 30 mm thickness.
Return to contents
Image
To translate an animal figurine into plywood, search for its image on the Internet. Print the drawing you like on a regular A4 sheet. If you are not sure that you can accurately reproduce all the contours of the drawing, create a template according to which you will transfer the figure onto a plywood blank.
Draw or print out a grid of small square cells. Apply the same grid, scaling the size of the squares taking into account the size of the future figure, onto a sheet of plywood. Now it’s quite easy to transfer all the contours from a sheet of paper onto the workpiece. First draw the outline of the selected figure using the cells, and then you can draw the contours of the remaining details of the drawing.
The most inexperienced can only give advice on using images with simplified contours and a minimum of details.
Return to contents
Hand tool
To cut a figurine of a person or animal from plywood, you need to have a special tool. Work at home is done either with a manual jigsaw or an electric analogue.
A hand jigsaw is an arched metal frame with file clips at the ends. The saw blade has a thin size, thanks to which you can cut out figures by changing the sawing direction. The frame is large in size so that the saw can be used inside a sheet of plywood.
If the work begins not from the very edge, but from the inner point, then you must first make a hole in the middle of the drawn figure with a drill, and then insert a saw into it, unscrewing one of the jigsaw clamps. After stretching the blade, secure the saw back with a clamp and continue cutting along the contours.
Since saws for a hand jigsaw are incredibly thin, and plywood sheets are dense, they often break, so purchase several blades for work at once so as not to look for them in the process, if you don’t have enough recommendations for working with the tool, we recommend that you read this article: https ://fb.ru/article/371354/vyipilivanie-iz-faneryi-lobzikom-po-chertejam—podrobnaya-instruktsiya.
Cutting out figures
Now all that remains is to cut out the figure with a manual or electric jigsaw and paint it with acrylic paints of different colors. Sculptures can be mounted on trees or poles. The figures can be moved to a new location each time. They can, like tin soldiers, rest on flat stands that are screwed to the figures with self-tapping screws. The figures can be attached to wooden, plastic or steel pins stuck into the ground. Stationary sculptures require a more reliable base so that they do not fall over from the slightest wind. The support itself should serve for many years, so it is better to use a pipe or thick reinforcement treated with bitumen mastic and plugged on both sides. A plate with holes for installing fasteners can be welded to its upper end. If the plywood is thick enough, the pin can be inserted into a hole specially drilled for it on its bottom edge. The supports are dug in to a depth of at least ½ meter.
Return to contents
Stork on the roof
Perhaps, creating a “zoo” on the site should begin with making a stork, because it brings happiness to the house. A figurine of a stork can stand in the middle of the plot or decorate the pediment. To paint a bird, you need paint of only 3 colors, and the appearance of a stork is so familiar to everyone that even the most inept draftsman can reproduce it, especially since a template will come to his aid.
- The bird figurine is cut out of 6mm plywood. The size of the workpiece is 85 x 58 cm.
- The stand leg is cut out from a separate piece of plywood 10-12 mm thick.
- All edges are cleaned with sandpaper.
- A slot is made at the end of the stand to insert the body. Its depth is 3-5 cm.
- The leg is attached to the figure with 2 self-tapping screws. Before screwing them in, holes are drilled in the plywood.
- Primer is applied.
- The bird is painted white.
- Black paint is applied to the wings and the eyes are drawn.
- The beak and leg are painted.
The stork is ready to be installed in the garden.
There is no need to use thicker plywood on the legs to attach the figurine to the pediment. If the size of the leaf allows, then you can cut out 2 storks and a nest. After painting, the figure is attached to the facade with self-tapping screws, and the nest can be made more realistic by decorating it with tufts of straw.
You can make a weather vane from a plywood stork. The bird itself is made according to the dimensions described above. The stork will be mounted on a bicycle wheel rotating on a horizontal axis on well-lubricated bearings. To securely fasten the bird, you need to weld corner brackets to the spokes, and the stork will need two stand legs with an extension at the bottom to increase the plane of contact with the brackets. The legs are attached to the wheel with bolts and nuts. The knitting needles and rim are braided with willow twigs and straw to disguise the fastening. By securing pieces of thick wire to the rim and braiding them with branches, you can make the walls of the “nest” higher. Install the weather vane on a roof, pole or tree, but please follow safety precautions.
Crafts made from plywood for the garden are the simplest decorations, but thanks to their imagery, brightness, and the ability to move them around the site with ease, they are especially loved.
Such garden crafts are cheap, since the material itself is inexpensive, and making them with your own hands is not particularly difficult work. Plywood crafts are installed in place using a long pin that can be easily stuck into the ground. Although you can attach such crafts to any building on the site.
How to cut crafts from plywood
The ideal tool for cutting out plywood is a jigsaw. Of course, you need to take a file with fine teeth - this way the edges of the cut out figure will be more neat, without chipping the plywood layers. After the craft is cut out, sand its edges.
If you don’t have a jigsaw, you’ll have to use a regular hand saw.
Of course, it will take longer to cut than with an electric jigsaw, but if you don’t cut jerkily, the edges of the garden craft will also be clean
How and how to paint plywood crafts
When the craft is cut out, you can begin the most interesting part - coloring it. But first the foundation needs to be prepared.
Using sandpaper, carefully sand both surfaces. Use coarse sandpaper first and fine sand for final sanding. You need to sand with coarse sandpaper across the grain, and with fine sandpaper both across and along. Wipe off any dust thoroughly after sanding.
If you want everything to be according to the rules, treat the base of the garden craft with a protective impregnation for wood - this will extend its difficult life (under the winds, rains, sun), and will also make it “unpalatable” to various bugs.
Prime the garden craft blank. Primer is necessary for several reasons. Firstly, it will fill the pores in the plywood, as well as small cracks. Secondly, it will prevent cracking of the material. Thirdly, it will serve for better adhesion of paint to the base.
Choose a primer depending on the type of paint (cans always have instructions for use). By the way, there are very high-quality porosity-filling primers, which can be considered ideal for pre-treatment of plywood. But they are not necessary for creating garden crafts; more often they are bought for wood processing for interior work.
You can paint plywood crafts with all types of paints and enamels intended for painting wood. It is very useful to carefully read the instructions: the paint should be for street work. Most often, plywood crafts are painted with oil paints or wood enamels.
To make plywood garden crafts shine, as well as to protect the design, we take the final step - coat them with varnish. When painting with glossy paints, which already give shine, you can do without varnishing the crafts.
To make your dream come true - to make your personal garden unusual and unique, you can use plywood figurines for your garden with your own hands. To implement this idea, large financial expenditures are not required.
Plywood figures can be in the form of funny characters, which will add a touch of fun to the design of the site.
In the last few years, plywood jewelry has become quite popular due to the fact that it is very simple to make and takes very little time. And if there are children in the family, they will be happy to help paint the blanks. These crafts will fit perfectly into the design of any garden or cottage. To create a unique relaxation corner, you don’t need to have any special talent, it’s enough to have a wild imagination.
Plywood figures can decorate any area, even the simplest one.
These homemade decorations are used to highlight special places in the country house or garden. They make this corner of the site unique and attractive. Due to the fact that the figures are made from high-quality material, they look great and harmonize with the surrounding landscape.
Crafts for the garden can be represented by the following types:
- unusual mailboxes;
- all kinds of figures, for example, heroes from your favorite fairy tales;
- painted feeders for birds living in the garden;
- decorated fences around the garden or cottage.
Each decoration made from plywood has its own uniqueness, expressiveness and beauty.
Varieties
Wood of different densities can be used to make plywood. Each type has its own purpose and service life. Also, plywood may differ:
- the type of wood used;
- number of layers;
- by water resistance;
- by processing method (can be conventional or laminated);
- by quality;
- by price.
Some characteristics
The best, convenient and easy-to-process material for creating masterpieces is plywood.
Using it to create figures, you will spend very little time, and the process will be interesting and exciting.
Plywood is produced in the form of veneer sheets, bonded together with a special synthetic glue in several layers. The more layers, the stronger and thicker the material will be. There is plywood with a thickness of 3 to 30 mm.
The structure and color of the craft for the cottage or garden will depend on the texture of the plywood. For example, if the base is made of coniferous wood, then it is more convenient to paint it, and if it is made of birch, then the figures will look beautiful and aesthetically pleasing even without the use of paint.
Why is it still better to use plywood:
- it is environmentally friendly;
- durable and will serve for many years;
- has good flexibility;
- does not allow water to pass through;
- very easy to process.
Due to the fact that plywood is made from wood, it has some of its properties, namely the ability to change its structure under the influence of natural conditions. Therefore, when choosing the source material for a figurine, you should adhere to the following rules:
- Plywood marked FSF or FKM has greater moisture resistance. Phenolic and melamine resins are used for connection in these materials. This connecting material does not absorb water at all.
- On sale you can find plywood sanded on both sides, on one side, or unsanded. This must be taken into account when choosing material for the base, especially if you do not have time for additional processing of the resulting figure.
In order for dacha crafts to look bright and colorful, you need to use acrylic or oil paints when painting them. The use of this type of art supplies is convenient, since they lie well and softly on the tree, and are also resistant to sunlight, that is, you will not have to repaint the figures over several summer seasons.
Translation of the drawing
For me, drawing translation has always been the main process in my work. I will tell you a couple of rules, as well as tips for high-quality translation of a drawing. Many people transfer the drawing onto plywood not only using a pencil and copying, but also using “Black Tape”, glue the drawing to the plywood, then wash off the drawing with water and the markings of the drawing remain on the plywood. In general, there are many ways, but I will tell you about the most common method. To transfer the drawing onto prepared plywood, you must use a copy, a ruler, a sharp pencil and a non-writing pen. Fasten the drawing in plywood using buttons or simply hold it with your left hand. Check if the drawing fits the dimensions. Arrange the clock drawing so that you can use a sheet of plywood as economically as possible. Translate the drawing using a non-writing pen and ruler. There is no need to rush, because your future craft depends on the drawing.
What you need to create a masterpiece
To make figures from plywood you need a stencil.
The dacha is decorated in most cases with flat-shaped figures, for the manufacture of which sheets of plywood are used. In addition to the main material you will need:
- stencil of the future product;
- pen or pencil;
- screws and jigsaw;
- screwdriver or screwdriver;
- fine grain sandpaper;
- brushes, special acrylic paints;
- furniture varnish.
If you do not plan to place the figure on a support, then you need to make special pegs. They should be dug into the ground to a depth of 50 cm.
You can buy a stencil for a craft in a store or make it yourself by drawing an outline on cardboard and cutting it out.
Structure of making crafts
Theoretically, manufacturing is divided into several stages.
- choice and design;
- determination of dimensions, design features;
- preparation of material, development and assembly of the device;
- decoration and protection.