Safety precautions while working on the box
Safety precautions when working with sharp cutting tools must be followed very clearly and without fail. You should not think that injuries such as cuts are an accident: they are inevitable whenever safety rules are violated.
Cuts are an unpleasant thing, and if they are strong enough, then the person cannot work for several days and after recovery he is afraid to cut, and does not adapt for a long time. Of course, there is nothing to even think about free and beautiful carving, plastic movements and creativity! Our rules, when followed, exclude injuries.
You should not work when you are very nervous or tired, when your attention is dulled and it is difficult to concentrate.
The workplace must always be kept in order. There should be no unnecessary objects on the surface of the table; it should be promptly cleaned of chips, which are recommended to be swept away only with a brush. An unused tool should not interfere with work. It must always be placed in a specific place. If you move or push awkwardly, the tool should not fall, but it is also dangerous to keep it tightly secured when force is required to release it.
The tool should always be kept in good working order. When burning, charring produces acrid smoke, so do not lean too far over the work. If possible, sit up straight.
The room in which burning occurs must be ventilated more often. Flat burning is characterized by the fact that the image and background are on the same level, and the expressiveness of the drawing is achieved by a variety of contour lines and shading in the form of strokes, dots, etc. The techniques for performing this type of burning are reminiscent of contour carving, where the purity and conciseness of the line determine success affairs.
By moving the pin slower or faster, lines of different width and depth are obtained. By changing the adjustment of the pin heat and giving the pin a different inclination, you can achieve deeply saturated lines and barely noticeable strokes. In this case, the color strength of the line changes from dark brown to light yellowish-brown tones.
You cannot push the pin with special effort or hesitantly slow down its movement along the pattern. If the edges of the burnt grooves are charred, then apparently the movement of the pin was too slow or the pin was overheated. In this case, it is necessary to reduce the voltage or reduce the air supply. You can also cool the tip of the pin by touching it to the surface of the marble tile or by holding it in an upright position for a while.
In general, the pins should not be heated, as the tip may become wrinkled. It must be remembered that it is impossible to correct or remove a damaged line or an erroneously applied stroke, therefore, while showing courage in work, one must not forget about caution. It’s better to underburn the line a little than to burn it out.
Unfinished lines, as well as finishing touches, should not be left until the end of the work, as they can become veiled and go unnoticed. In addition, the carbon deposits of early firing harden and make finishing difficult.
You should always have a bandage, iodine, ammonia, hydrogen peroxide and a bactericidal adhesive plaster on hand.
Technological map of product manufacturing
| № p/p | Type of work | Image | Tools, devices |
| 1 | Choice of material. | Internet, literature. | |
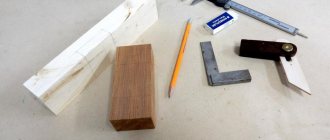
| 2 | Marking of parts. | Corner, ruler, pencil. | |
| 3 | Sawing blanks. | Hacksaw for metal. | |
| 4 | Fitting of blanks. | File. | |
| 5 | Sanding workpieces. | Sandpaper. | |
| 6 | Selecting a picture. | Internet, literature. | |
| 7 | Marking the drawing | Ruler, pencil, carbon paper. | |
| 8 | Burning out a drawing. | Burner. | |
| 9 | Gluing the box. | PVA glue, brush. | |
| 10 | Sanding the product. | Sandpaper. | |
| 11 | Varnishing. | Varnish NTs-228, brush. | |
| 12 | Decoration of the box inside | PVA glue, velvet paper. |
We chose pine to make the box. Having chosen the material, we began marking out the parts of the box. Dimensions of the box: length – 210 mm, width – 160 mm, height – 90 mm, wall thickness – 15 mm.
Having secured the workpiece in a vice, begin cutting out the product blanks using a hacksaw. In compliance with all safety regulations.
Using a square, adjust all corners of the workpieces. Cut the edges of the product on one side at an angle of 45 degrees. for further assembly of the product.
Grind all surfaces of the product blanks using sandpaper.
Using a ruler and square, finally check the dimensions of the product being manufactured.
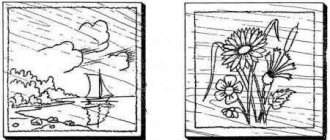
Select a design to burn.
Using a ruler, square, pencil, compass, mark the drawing.
Following safety rules, burn the applied design onto the product blank using a burner.
Glue the box with PVA glue. Secure the parts with a clamp and leave until the glue dries completely.
Clean the edges of the product and all surfaces of the box.
Coat the outer surfaces of the box with NTs-228 varnish in a well-ventilated area, observing safety rules when working with varnish, and leave until completely dry.
Finish the interior of the box using velvet paper and PVA glue.
Economic justification for a wooden box
| Name | Quantity | Price(rubles) |
| 1. Pine board | 150x80x15 mm | 90 |
| 2. PVA glue | 100 gr. | 20 |
| 3. Varnish NTs-228 | 200 ml | 15 |
| 4. Sandpaper | 150x200 mm | 15 |
| 5.Velvet paper | 3 sheets | 30 |
| 6.Hinges for the lid of the box | 4 things. | 24 |
| 7.Decorative handles | 2 pcs. | 30 |
| TOTAL | 224 |
Conclusion
While making the box, we learned a lot about wood and methods of processing it. We gained new knowledge about the tools and devices used when working with wood, the technique of wood burning, and much more. Learned how to use a burner correctly.
And most importantly, we realized that no matter how strictly we adhere to the diagrams and descriptions, the product always turns out a little different. This is because it is made by ourselves. And there is no limit to creative imagination.
Product advertising
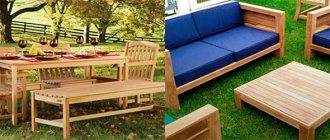
This is a very wonderful product. You can store a lot of little things in the box; it is also a very good gift that will fit into any interior and will appeal to every person. The best gift for friends and family is a gift made with your own hands.
Conclusion
During the work, I learned how to make a box and burn patterns on wood, and now I can put this into practice. I made a box to store small items and gave it to my mom for Mother's Day.
Economic justification for making a wooden box
| Name | Quantity | Price(rubles) |
| 1. Pine board | 150x80x15 mm | 90 |
| 2. PVA glue | 100 gr. | 20 |
| 3. Varnish NTs-228 | 200 ml | 15 |
| 4. Sandpaper | 150x200 mm | 15 |
| 5.Velvet paper | 3 sheets | 30 |
| 6.Hinges for the lid of the box | 4 things. | 24 |
| 7.Decorative handles | 2 pcs. | 30 |
| TOTAL | 224 |
Self-esteem
While making the box, we learned a lot about wood and methods of processing it. We gained new knowledge about the tools and devices used when working with wood, the technique of wood burning, and much more.
Learned how to use a burner correctly. And most importantly, we realized that no matter how strictly we adhere to the diagrams and descriptions, the product always turns out a little different. This is because it is made by ourselves. And there is no limit to creative imagination.
Product advertising
This is a very wonderful product. You can store a lot of little things in the box; it is also a very good gift that will fit into any interior and will appeal to every person. The best gift for friends and family is a gift made with your own hands.
Conclusion
While working as part of a creative project using the “Box” technology, I learned how to make a box and burn patterns on wood, and now I can put this into practice. I made a box to store small items and gave it to my mom for Mother's Day.
If you need a drawer
In general, a wooden box with a drawer is made in the same way as the classic version, but there are a number of features.
A simple rectangular shape of the lid and bottom will spoil the appearance of the product. It is better to make the long sides of these elements wavy using an electric router. In addition, by choosing this option, the lid and bottom are not placed inside the body, but left outside.
The walls are made of different heights. In particular, the back part and ends are made of the same height and glued together. For the front wall, cut out a die half as wide as the back part. This element is not recessed between the ends, but is installed overlapping and fixed with glue.
The box consists of two parts: the box, which fits freely between the walls, and the front part, which is similar in size to the top die. The elements are also mounted on wood glue.
A partition is installed between the upper and lower parts, which will serve as the bottom of the upper compartment of the box. Inside the retractable and stationary drawers, you can make partitions from thin plywood, delimiting the internal space into several compartments. The lid is installed on decorative hinges, the wood is covered with several layers of furniture varnish.
How to make an unusual miniature box with your own hands from a reel of tape
If you want to please your loved ones with a small box to store jewelry or small items for handicrafts, you won’t find a better material than a spool of tape. You can make an absolutely stunning product out of it. No one will guess what served as the basis for creativity.
What you need to prepare for work
For our amazing box you will need completely accessible materials:
- a spool of tape 4 cm high;
- corrugated thin cardboard from biscuit;
- thin cardboard for the bottom;
- screw cap from a jar of suitable diameter;
- glue “Moment” and PVA;
- white acrylic paint;
- 2 single-layer decorative napkins;
- decorative paper, you can take it from a candy box;
- colorless varnish.
Master class on making a box from a tape reel
- Coat the edges of the reel with white acrylic paint. Cut cardboard from under the roll 4 cm wide and cover the inside of the reel with it. Press well so that the strips do not fall behind on the sides
- Cut the bottom out of thin cardboard according to the diameter of the reel, and you can also use the cardboard that is inside any screw-on lid
- Glue decorative paper on one side of the bottom with PVA glue
- Glue the bottom to the bobbin with Moment glue with the decorative side inward
- Glue white decorative paper to the outside of the reel and to the top of the lid
- Cut out decorative elements from a single-layer napkin
- Glue the elements with PVA glue to the inside and outside of the lid, as well as on the sides.
- Decorate the bottom and sides of the bobbin in the same way.
- After the adhesive composition has completely dried, coat the workpieces 2 times with colorless varnish
- These boxes are made from an ordinary reel of tape
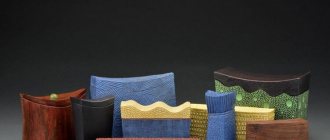
Decorating a wooden box – what is worth knowing?
Despite the attractive design and shape, the box will look truly original only after decoration. The technique of relief carving provides in this case almost limitless scope for creativity.
You can decorate the box in different ways
Using key carving techniques, you can create original textures on the box. We can talk about both simple textures and complex ornaments or geometric shapes.
Chisels for applying relief
- A semicircular chisel used to texture the product with small dimples.
- Forming grooves with an angled chisel on the surface of the box lid.
On a note! In the photo below you can find more complex examples of decoration that use complex textures and geometric patterns.
Options for decorating boxes
A few more decoration options
Add legs, hinges and start finishing
To make the legs match the box and lid, we joined the short sections on a miter, hiding the end surfaces. You will need a 5mm radius fillet bit or a 10mm round cutter to form the profile. We then attached the lid using a narrow piano hinge.
Cut a 13x25x460 mm strip from wood of a contrasting color and mill a fillet with a radius of 5 mm along one edge. Make a bevel on one end of the piece using a bench saw, and then, using a miter saw and a miter box (or bench), saw off one half of the leg. Bevel the piece again and repeat to get eight halves. Apply glue to adjacent bevels, then, placing the halves on wax paper, rub them together, aligning them at the same time, until the glue begins to set.
To make a loop recess on the top edge, insert a 19mm straight bit into the collet and adjust its offset to match the thickness of the folded loop. Adjust the position of the stop to select a fold, the width of which is equal to the width of the folded loop. Secure stoppers that limit the length of the passage. Press the corner of the box against the right stopper, turn it towards the cutter and move it along the stop until it touches the left stopper. Then carefully trim the rounded corners with a chisel.
Press a piece of board against the back wall of the box with a clamp and insert the loop into the recess close to the cut. Drill pilot holes and temporarily secure the hinge with two brass screws into the outer holes (you will need to remove the hinge before applying the finish).
Insert thin spacers between the hinge halves to align the top of the hinge with the edge of the box. Apply strips of double-sided tape to the top of the hinge, press the lid down, and carefully open it. Then drill all the pilot holes and secure the cover with only two screws.
Finally, apply glue to the bottom edges of the box and glue the legs in place. Make sure they are all neatly aligned. Once the glue is dry, sand any areas that need it further, remove the hinge, and apply a finish coat. After thorough drying, finally secure the hinge with brass screws.
Double profile for symmetry
To make such a box, simply rout identical profiles along both edges of the wall blanks, leaving a flat strip in the middle. One advantage of this method is that you can make the box and lid at the same time with the same router table settings. We used a cutter with a wavy profile (the so-called “heel”), formed by two radii of 38 mm each. You will also need a 19mm straight bit.
On three pieces measuring 19x89x610 mm, mill the profile along both edges in several shallow passes. Using double-sided tape, attach a 15° beveled rail to the router table to support the workpieces so that they do not wobble. Before each pass, move the staff closer to the stop.
Saw a tongue at the bottom edge of the two pieces on the inside to insert the bottom. Then, tilting the saw blade 45°, place a stopper with a bevel on the other end of the cross-cut (angle) stop and saw off two pairs of walls. Cut out the bottom to the required dimensions, sand all internal surfaces and glue the box.
From the third blank, cut out the flat middle part to get two profile blanks for the lid frame. On each of them, make a tongue and groove 6 mm deep along the wide edge with a 3 mm indentation at the top. Saw off the frame pieces with bevels at the ends to match the length and width of the box. Cut out the panel to the required size. (We used embossed plywood.) Sand all the pieces and glue the paneled lid together.
After thoroughly drying the lid, sand off any irregularities at the joints of the parts. Then, with a straight bit installed, rout the folds on the underside, gradually increasing their width so that the lip of the lid fits into the box.
Cut out a handle of any shape, sand it smooth and glue it to the lid panel. Then glue on simple square legs from 6mm scraps (in this box we didn't hide the end surfaces with a bevel). Give the box and lid a final sanding before finishing.
Master's advice. Look for ways to make your work unique
When making small boxes like this with a flat bottom and lid, it is convenient to use 6mm or thinner sheet materials.
Walk through the sheet materials and panels section at a hardware store. For one of these boxes, we made the lid panel from ordinary plywood with decorative embossing, the reverse side of which was lined with bird's eye maple veneer. Great find for a meager price!
Buy 3mm hardboard and glue the veneer yourself. In this way, you can give your products any look at minimal cost, guided by your own taste. To avoid warping, glue veneer on both sides of the base.
Kaplunov Viktor, student of class 9 B, MBOU Secondary School No. 6, Amursk
The project consists of a presentation-speech and a design folder.
How to decorate?
For a homemade box, it is important to think about beautiful decor so that it looks more interesting, brighter and richer. There are many ways to decorate this accessory. The most popular solution is to decorate the product with carvings. Carved caskets look very beautiful and solid.
It is not recommended for a novice craftsman to immediately begin applying intricate and complex carved patterns to structures. You should start with simple shapes or large lines. A master with minimal experience can handle such work, but you need to be very careful and patient to avoid mistakes.
To add carvings to a product, you should apply a certain design/pattern to its surface with a pencil. Each line must be drawn as accurately and noticeably as possible. Next, you need to take a special knife or chisel.
These tools carefully cut out lines and patterns in accordance with the applied design. Small imperfections and defects can be removed with a file or sandpaper.
If you don’t want to waste time carving the product, you can turn to a simpler solution - paint the casket or coat it with a special varnish. The color of the accessory can be absolutely any - it all depends on the ideas of the home craftsman. Caskets decorated using the decoupage technique look interesting and stylish.
The final design of the box can be anything:
- products are often complemented with precious/semi-precious stones and beads;
- the design can be effectively painted;
- attach a flower arrangement to the lid;
- create an aging effect using the craquelure technique;
- attach pearls (natural or imitation) to the lid.
Option number 4. Product with concave lid
Drawing of a box with a concave lid
Casket with concave lid
Making a simple box
Sawing a curved lid
Finishing the lid
How to decorate with carvings
Carved boxes look much more original and interesting, but such work requires certain skills and knowledge. For beginners who decide to try their hand at wood carving, experienced craftsmen recommend starting with simple geometric shapes and large patterns. With a certain amount of patience, even a novice master will be able to cope with such a task.
The drawing is applied to the surface with a pencil, each line is well drawn. After this, the pattern is carefully cut out with an oblique knife or chisel in strict accordance with the applied markings. Small flaws and irregularities can be corrected with a file or fine sandpaper.