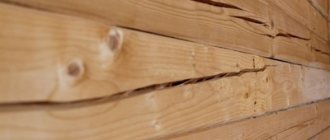
Cracking of log logs should not frighten developers, since this is an absolutely natural process.
The higher the percentage of wood moisture, the more liquid fills the internal volume of the logs. The process of moisture absorption will continue until the humidity reaches equilibrium with the external environment.
When the humidity in the atmosphere drops, moisture from the wood will evaporate outward - this is the process of shrinking the log. In this case, the outer dry pores will shrink, but the inner ones are still filled with excess moisture.
As a result, tension is created between them and, as a result, a rupture and the appearance of a crack in the body of the log.
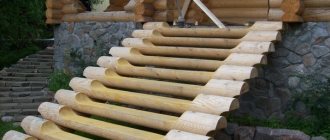
Longitudinal slot - replacing logs
Cracks in profiled timber are a common occurrence. There are many reasons for its occurrence. The main ones include the impact of adverse weather. For example: rain, snow, sun rays. Temperature changes also negatively affect the condition of wood. Over time, this all leads to cracks appearing on the beams. There is no need to despair, this problem can be solved. The main thing is to seal them correctly.
But before you begin this important process, it is worth determining the type of crack. It differs in size, depth and other parameters
The most common are deep longitudinal splits. Their length is equal to the entire log. They appear when there is heavy load or damage to the logs.
As for carrying out repair work in such a situation, they are impractical, since it is impossible to repair such a crack. The only correct solution is to replace the damaged timber with a new one. Otherwise, the entire structure is at risk.
Approximate costs
Prices for material and work to seal cracks in log walls depend on the volume of restoration, the depth of damage to the wood, the choice of restoration material and the degree of contamination of the walls.
Average prices for work and materials:
- Preparing a crack for laying sealant – 50 rubles. /p.m.
- Impregnation of logs - 50 rub./m2.
- Sealing cracks - 230 rub./m.p.
- Wall sanding - 250 rub./m2.
- Sealing cracks with putty - 120 rub./m.p.
- Caulk of cracks - 100 rub./m.p.
- Finnish putty “Tikkurila”, 500 rub. per package 0.5 l.
- Russian putty “Extra”, 60 rub. per package 0.45 kg.
- Russian putty “Eurotex”, 80 rub. for 0.225 kg of putty.
- Russian-Swedish putty “Parade”, 80 rub. per package 0.4 kg.
- Russian putty “Rainbow”, 119 RUR. per package 0.9 kg.
- Russian sealant "Neomid", 350 rubles. per package 0.6 kg.
- Russian acrylic sealant “Eurotex”, 1000 rub. per package 3 kg.
- German sealant "Remmers", 400 rubles. per cylinder 0.6 l.
- Polish sealant “Ceresit”, 160 rubles. per bottle 310 ml.
- American sealant “Check Mate”, RUB 1,300. per bottle 650 ml.
A mixture of glue and wood shavings
In those places where the putty composition will sooner or later begin to crack due to various factors such as seasonal fluctuations, a self-made glue filler will be able to withstand the test of time. It is recommended for use for sealing cracks along carpentry joints, repairing cracks in wood doors and other places where the seam is subject to stress.
Ideally, the adhesive should be mixed with fine wood dust that is generated during sanding. When drying, this composition will shrink significantly. Therefore, when filling cracks, it should be applied in large quantities, so that it protrudes above the surface. After everything is dry, you can carefully remove the excess using a sharp chisel, and the area that has been repaired should be sanded with fine-grained sandpaper.
A mixture of glue and wood shavings
In those places where the putty composition will sooner or later begin to crack due to various factors such as seasonal fluctuations, a self-made glue filler will be able to withstand the test of time. It is recommended for use for sealing cracks along carpentry joints, repairing cracks in wood doors and other places where the seam is subject to stress.
We suggest you familiarize yourself with How to cover up cracks in a stove with fireclay clay. How to cover the stove to prevent it from cracking - folk and modern methods
Ideally, the adhesive should be mixed with fine wood dust that is generated during sanding. When drying, this composition will shrink significantly. Therefore, when filling cracks, it should be applied in large quantities, so that it protrudes above the surface. After everything is dry, you can carefully remove the excess using a sharp chisel, and the area that has been repaired should be sanded with fine-grained sandpaper.
How and with what can you seal cracks in timber?
Another good product to use for deep and wide cracks is a planed solid piece of wood.
It is important to take into account the dimensions of the gap and prepare the block according to them. It should fit tightly into the opening
To make this seal durable, you will need to use glue.
Small cracks also need to be repaired. To do this, you can use acrylic putty, which is designed for working with wood. It is well suited for splits whose depth does not exceed three millimeters. Otherwise, this product is not suitable for use, since if a large amount is applied after drying, the mass may crack and fall out of the split.
Applying this putty is quite simple. It is enough to use a rubber spatula. At the same time, it is easy to match it to any color and type of timber. As a result, the defect will be practically invisible. And if you follow all the rules of this process, the mass will withstand frost and other bad weather. Under their influence it will retain its properties.
If we are talking about medium-sized cracks, then acrylic sealant is perfect for sealing them. It is presented in the form of a syringe. Therefore, it is easy to use, allows you to reach the deepest places of the split, and control the dosage. At the same time, it dries quickly.
Sealing of joints is carried out on almost all wooden buildings. Logs are different, no two are alike. Therefore, when laying them, joints are formed that will need to be sealed. Tow and sealant are well suited for this. This will improve the airtightness and thermal insulation of the house.
Process and leave as is
The construction of wooden houses has a thousand-year history. Over this long period, humanity has learned to eliminate the consequences of wood shrinkage and building shrinkage. New technologies have significantly expanded the range of materials used for sealing facades and options for their use.
To seal cracks, you can use a mixture of sawdust and PVA glue.
- Using a plug. The plug is an ordinary wood chip made to fit the hole. Hammer it in with a hammer. It is not recommended to use excessive force when driving the wedge - this may split the wood. Since it will continue to dry out, you need to apply PVA glue to the wedge. The repair area is sealed with putty or a mortar made from sawdust and glue.
- Sealing with homemade putty. The ingredients used are fine sawdust and PVA glue. The consistency of the solution should correspond to ordinary wall putty. The cavities are filled with material using a rubber spatula. After it dries, the next layer is applied. After this, the surface is leveled and polished. To improve the appearance, the repair area can be tinted.
- Use of façade sealant. This is a new unique product of the chemical industry. The sealant has high adhesion and is environmentally friendly. It can be deformed, changing in size up to 25% of the volume, without loss of technical characteristics. In this case, the temperature range at which the sealant can be used is from - 50º C to 50º C. The material is placed in the cavity using a glue gun. After this, the surface is leveled.
- Using putty on wood. This material can be used to seal both end and longitudinal cracks. It should be taken into account that holes no larger than 3 mm in size can be treated with this composition. Otherwise, the material will quickly fall out. It should only be applied to a dry surface. The putty is sold in ready-to-use form in the color of natural wood. No additional finishing is required after application. The material is resistant to water, frost and ultraviolet radiation.
- Carrying out caulking. This is an ancient method of repairing wooden log houses, tried and tested over the centuries. To fill cavities, ordinary moss is used, of which there is a lot in the forest. The good thing about using moss is that this material has a very low degree of thermal conductivity. Sealing with moss provides additional thermal insulation. Caulking is carried out with well-soaked and wrung-out material. It is compacted tightly into the holes using a wooden spatula. As the moss dries, it expands in volume and fills the smallest cracks. The protruding excess is carefully cut off. This method is environmentally friendly and does not require capital investments.
Which material is most optimal?
Currently, the building materials market provides a wide variety of materials for sealing cracks on log walls. The most modern and popular are putties and sealants.
When choosing the right sealant, you will need to carefully study its instructions so that the product is suitable for specific operating conditions.
According to user reviews, the following putties are the most popular:
- Finnish “Tikkurila” has good adaptation to the color of wood, is suitable for a wide variety of wooden products, and has high resistance to low air temperatures and moisture. Disadvantage: high price: 500 rubles. per package 0.5 l.
Russian “Extra” is an excellent budget material with high protective characteristics for water and temperature.
Universal, can be used for interior and exterior work, characterized by low specific material consumption per 1 m.p. repair. Price: 60 rub. per package 0.45 kg.- Russian "Eurotex" in convenient packaging has a good plastic structure, and therefore is easily applied to the surface of the crack, sanded and sanded. Budget price: 80 rub. for 0.225 kg of putty. The disadvantages include the poor color range of the material and increased shrinkage.
- Russian-Swedish “Parade” is a putty with increased water-resistant characteristics. Dries quickly and sands quickly. Price: 300 rub. per package 0.4 kg. Disadvantages include difficult application to the surface due to the liquid composition of the paste.
- Russian "Rainbow" has restrictions on the temperature of application to the surface, not lower than 15 C. Otherwise, it has a number of advantages, including low specific consumption for wood repair, high adhesion speed and low shrinkage, price: 119 rubles. per package 0.9 kg.
Among sealants, Russian consumers prefer the following brands:
- Russian "Neomid" is a highly effective sealant that can eliminate cracks with high deformation from 15 to 30% of the cross-section. It features high protection against moisture and temperature changes. At the same time, it is very elastic and flexible, capable of working in both external and internal environments. Price: 1000 rub. per package 0.6 kg.
- Russian acrylic sealant "Eurotex" for external work, has protection against moisture, insects and biodamage. It showed itself well in repairing side and end cracks in wall structures of a house. Very durable and at the same time elastic material. Price: 1000 rub. per package 3 kg.
- German “Remmers” for interior and exterior work, resists moisture and temperature changes well. It has a wide range of colors from colorless to dark brown, and is also well compatible with both varnish and paint. Price: 400 rub. per cylinder 0.6 l.
- Polish "Ceresit" is produced on both acrylic and silicone bases and has a low shrinkage rate. Resistant to low temperatures, ultraviolet radiation and high humidity. It performed well when restoring the external walls of a log house. Price: 160 rub. per bottle 310 ml.
- American “Check Mate” acrylic sealant of an elite modification, very elastic, creates lasting protection of walls from moisture, temperature fluctuations and biodamage, and has minimal shrinkage. The price is high from 1300 rubles. per bottle 650 ml.
Alternative options
It includes:
- Sealing with wood glue and sawdust. A paste is prepared from the ingredients. After processing and drying the log, it is placed in portions into the cracks and sanded. This method can give natural material its former beauty even without painting with pigment compounds.
Insert of extruded polyethylene strands. The material tends to expand inside the crack, closing the entrance to moisture. After processing the log in this way, a sealant for cracks in the log is applied to the surface and leveled with a spatula, then sanded. Closing with wooden wedges. This work is performed when other methods are no longer effective. A wedge the size of the crack is cut out of wood chips and carefully driven into it using a rubber hammer.
Having achieved a certain result, the remains should be cut off with an electric jigsaw and the entire surface should be sanded with a special machine. It, unlike the manual process, acts with pressure and will press the wedge inward even more.
Before repairing cracks in logs, you should carefully inspect the damaged areas. Perhaps the condition represents a precursor to destruction rather than simply cracked wood. If anything raises concerns, you should consult with specialists; a major overhaul of the log house or replacement of logs may be necessary.
Egor Kondratyuk
Author of publications on 1Drevo.ru with the topics: Houses made of rounded logs | House made of rounded timber | Gas boiler for home | Rounded garage | Choosing an electric boiler | Polycarbonate canopy | Clapboard finishing | Base finishing | Log house for shrinkage | External insulation | Cedar house | Profiled timber | Wooden fence | Finnish house made of timber | Roof installation | Shallow foundation, etc.
Video description
A little about cuts and protective measures is described in the video:
See also: Catalog of projects of houses made of timber with two entrances for a family.
Why do you need to seal cracks?
Any split is a place for water to penetrate into the flesh of the log. The core cannot quickly release moisture, which increases the likelihood of rotting. This is where bacteria grow, fungus and mold appear. Bark beetles also like to live in cracks and destroy any tree. Among other things, heat escapes through these places. All this can be prevented only by sealing the damaged areas.
Consequences of the bark beetle's activity Source pbs.twimg.com
Background
Rustic log cabins with thick wooden walls usually last for many decades. Throughout its life, weather and other unforeseen circumstances can cause the log to crack or split.
It is important to fill these cracks as quickly as possible to prevent further deterioration of the wood. Sometimes an inspection of the log of a wooden house will allow you to identify these cracks. Home caulking is the process of creating your own airtight solutions for filling cracks in the log of a log house.
Previously, holes and cracks were sealed with improvised materials: they were stuffed with stones, straw, rags, wood chips, and then covered with clay or cement. Later they began to use epoxy resin to fill felt, jute or flax fiber, and then paint or plaster.
And now there are many ways to make a mixture “out of something” and caulk problem logs. How long? You should always compare what is more effective for you - the guaranteed quality of professional construction sealants or the economic benefits of a homemade substance.
WARM HOUSE Wood Professional sealant was developed specifically for sealing cracks in the logs of a wooden house. Neomid already has extensive experience using construction sealants and sealants from other manufacturers and their practical skills have been applied in the development of new, high-quality products.
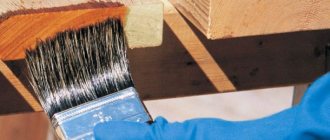
Sealant
It is necessary to carry out work with sealant in dry weather so that the sun's rays do not fall on the composition. The optimal temperature for closing cracks will be +10 degrees.
At the first stage, the wooden product is cleaned of dust, rot and dried. Then masking tape is applied on both sides to reduce the consumption of sealant and prevent it from getting onto adjacent beams.
For convenience, they work with a spatula, and if the damage is larger, then a special gun is used. The maximum thickness of the extruded composition should not be more than 5-6 mm. The seam is spread with a spatula to create a more even surface.
Slots at the junction of calibrated timber
Here it is reasonable to mention the main advantage of calibrated timber over logs. The presence of a tongue-and-groove system on the longitudinal edges of the timber reduces to zero the possibility of air passing through. However, opening the joint even to a small depth allows cold air to pass inside the wall in winter, which contributes to the formation of condensation (cold bridge). In spring and autumn, humidified air penetrates there. The tree takes in moisture, and oxidation and rotting processes can begin.
The modern method for blocking the joints of timber frames looks the same as for cracks. In this case, the same materials are used - sealant and Energoflex cord. Sealing materials for log houses from different companies are usually labeled with the name “Warm seam”.
A conversation about how to correct defects in wood cannot be considered complete without talking about how to repair a crack in a log house. For this reason, below are briefly answered the most popular questions related to this topic.
Is this required?
Repairing a crack in a log log is not just a matter of aesthetics. Together with inter-crown insulation, sealing of logs is an extremely important technological stage for wooden construction. Repaired cracks help reduce the level of heat loss of the building, and will also prevent the accumulation of moisture and the growth of biological activity inside the material, which significantly helps to extend the service life.
How to repair cracks on the outside of the house?
The technology for sealing cracks is similar to how to seal roof gaps. A special cord made of polyethylene foam should be placed inside the cracks using a spatula. Depending on the size of the split, you should select the required diameter of the cord for insulation. in order to perform reliable fixation in the crack cavity, it should be compressed by approximately ¼ of the initial diameter.
Next, the crack should be covered on both sides using masking tape. Using a special gun that has a narrow nose, the crack cavity should be evenly filled with sealant. The seam must be as tight as possible - the formation of voids and bubbles is not allowed! The filled seam should be smoothed with force using a spatula dipped in water, and excess sealant should be removed. When the work is completed, care should be taken during the day to ensure that the seams are protected from moisture.
Why is a cord required and is it possible not to use it?
A sealing gasket in the form of a cord will not only prevent adhesive contacts, but also reduce heat losses due to the fact that an air cushion is formed in the cavity of the beam/log. Other elements can be used as a sealing material, namely natural wool, tow and others, but as practice has shown, cord is the most practical solution. Do all cracks need to be sealed? No. Narrow cracks, no more than 0.5 cm wide, do not require sealing.
When is the best time to seal cracks?
Repairing cracks that have formed on the outside of a wooden house can be done no earlier than 1-2 years after the building is erected and after at least one heating season. Waiting this amount of time is only required for the building to shrink and the cracks to open completely. By the time stabilization occurs, the size may increase 2-3 times.
Tags: log, timber, defect, wood, sealing, prevention, method, log house, crack
« Previous entry
Epoxy resin
After hardening, the epoxy resin will begin to gain strength, which exceeds the strength of wood, and due to its fluidity and excellent adhesion, it will penetrate into all cavities and thus restore the original integral structure of the wooden product, and will also prevent the further spread of cracks. This method is often used when working with solid wood, when the problem of cracks worsens due to high internal stress.
After the epoxy resin has completely hardened, it will turn into an inert and completely safe plastic that will have increased strength. The resin can be used to repair defects in products that come into contact with food, such as repairing kitchen countertops or repairing cracks in a cutting board or dining table. Epoxy resin makes it possible not only to fill a crack in a beam/log/wood product and thereby hide cosmetic defects, but also to completely stabilize the condition of the wood. Often this is only the only opportunity to bring back to life a timber that seems to be completely and completely damaged by through cracks, as shown in the photo below.
Butterfly dowels for crack stabilization
Large cracks can become not just a headache, but even a natural decoration of the overall design of the project. To a greater extent, this will apply to products made from slabs - these are massive cuts of wood, which are subsequently used to make table covers, seats for benches and other elements. In such furniture, wide cracks can preserve the philosophy of the Live ege style, which is characterized by interference with the natural forms of wood. But in order for a crack not to be a defect and become a real decoration, it first needs to be stabilized. If this is not done, it will continue to expand and after some time will split the wood part into two halves.
Wax correctors
Special sticks made from hard wax are a simple and extremely convenient solution for cosmetic repairs of small cracks, dents, chips, deep scratches and other defects. Wax correctors have become very popular as a means of redecorating furniture and other wooden products that are used indoors and are not subject to much wear and tear. Wax concealers are usually offered in colors that imitate different types of wood. The colors can be easily mixed to obtain the desired shade.
Before starting work, the area to be repaired should be prepared - clean it of dust and various contaminants, remove chipped nicks. Wax correctors should be used at a temperature that is not lower than +10 degrees. First, polish the restoration site gently with a lint-free cloth. Next, you should apply the wax with force to the damaged areas so that it is thoroughly packed into all cavities.
How and with what to seal cracks in log logs of various widths
To eliminate these defects, a lot of various materials are produced. Let's look at which of them really do the job well, and which damages require repair.
1. How and with what to seal cracks in log logs 1-2 mm wide.
Experts recommend getting rid of such defects by grinding (the softer the material, the smaller the grain size of the sandpaper). After removing the damaged layer, the material must be re-treated with an antiseptic and varnished. In fact, these defects do not in any way affect the quality, strength and endurance of the elements. They practically do not spoil the appearance, as they are hardly noticeable.
2. How and with what to seal cracks in log logs 5-10 mm wide.
The same experts recommend sealing damage of this size with acrylic sealant. Its stated characteristics indicate that it has high ductility and adhesion. Before applying it, the split is cleaned, after which it is tightly clogged with material. But such repairs will last for two or three years at best. Due to the fact that this material does not allow moisture to pass through, it begins to accumulate in the split, which leads to rotting of the wood. After the wood surrounding the patch turns to dust, the adhesion between the walls of the split and the sealant will disappear, and the latter will simply fall off as a result.
3. An effective way to repair damage more than 10 mm wide.
All the same professionals who are knowledgeable about the issue recommend repairing such large damages using a mixture of wood glue and sawdust (for one part of the first component there are five parts of the second). But it has a significant drawback - excessive fluidity (suitable only for processing horizontal planes). But such a mixture is not at all plastic, so over time it will simply crumble inside the split and move away from its walls. Damage of both medium and large size can be successfully caulked with moss. The dry material is poured with water for a couple of minutes, taken out, wrung out and compacted tightly into the cavity with a wooden spatula. Excess dried material is cleaned off with a drill with a grinding attachment.
Splits up to 1.5 cm wide do not cause significant heat loss, do not provoke rotting of elements, and are not an attractive place for pests or mold. Their sealing is an improvement in the decorative appearance of the elements. Damage of a larger width indicates serious violations of the material procurement technology; such elements may subsequently fail completely.
Cracks in logs: WHAT to do
Let's talk about one of the most common problems of log houses - the appearance of cracks in logs. Let's study methods to prevent this problem and ways to deal with cracks that have already appeared. Let’s see if cracked logs are really that bad for the entire log house, and whether it’s worth abandoning construction because of this.
Let us immediately note that the appearance of cracks in drying logs is inevitable. Any wood decreases in size as it gradually dries out. For example, when pine is completely dry, it will shrink along the grain by 0.1–0.3%, and across the grain by 3–5%. And everything would be fine, because fighting the shrinkage of log houses is not so difficult.
However, the dimensions of the internal and external layers of the log change unevenly! For example, let's take the same pine - the outer fibers dry out by more than 8%, and the inner ones - by only 2-3%. This is understandable, because the density of external and internal wood fibers is different. External ones release moisture faster.
As a result, the outside of the log turns out to be almost dry, but moisture remains inside. This difference in humidity and density leads to ruptures in the upper layers and cracks appear.
If the process of cracks appearing in logs is natural and inevitable, is it worth building log houses at all? Yes, because small cracks are just a grid on a log, not a problem for the structure. But expansion of cracks up to 3–5 mm can already lead to serious consequences:
- moisture gets into the cracks, and this can cause the wood to rot;
- cracks can become an excellent access point for bark beetles and other wood pests;
- the structure of the wood and the sealant of the log house are damaged, and deformations are possible.
Despite the inevitability of cracks appearing on logs during drying, there are methods for preventing this phenomenon to avoid large ruptures:
Natural shrinkage extended over time. If the log dries out gradually, in the shade, long before construction begins, the cracks will be much smaller. For example, if the logs dry for only a year, the width of the cracks can reach 6-10 mm, if two - only 1-2 mm; End sealing
It is important to remember that the end of the log itself dries much faster than the rest. It is exposed to active external influences, so shrinkage is intense and cracks appear much earlier than on the log itself
But if you close the moisture exit through the ends, cracks can be minimized. Special sealants, drying oils, wood varnishes, and oil paints are used; Compensation cut. It is made specifically to reduce tension in the fibers of the log. Specialists themselves decide what type of compensation cut is needed; it is made along the axis of the beam, along the upper or lower surface. Some craftsmen do not complete the deformation cut to the end, while others decide to make it over the entire surface. The cut will be hidden by the lower or upper log, that is, it does not affect the characteristics and type of the log house, while compensating for the difference in stress, humidity and density. The cut is usually made with a thickness of 7–10 mm and a depth of 1/6 or 1/5 of the diameter of the log.
Important! Some wood experts are wary of compensation cuts. They believe that it is better to dry the wood for two to three years in a stack to minimize the formation of cracks than to make an extra cut and disrupt the structure of the wood
Prevention methods help to avoid large cracks, and small ones, as many experts believe, do not need to be sealed; there will be no harm to the log house. However, if the crack is larger than 3 mm, you are afraid of the consequences, you can start sealing it. For this purpose, numerous sealants are used today: silicone, acrylic, boutique rubber.
Alternatively, you can use a mixture of sawdust and PVA glue, this is a proven home method. Chips are driven into especially deep cracks, and then these places are covered on top to seal. There are also special putties for wood, but they are used on small cracks - up to 3 mm, otherwise the composition itself may begin to crack.
Another old-fashioned method is caulking cracks with moss, previously moistened so that it swells and clogs all the cracks.
We state: proper, long-term drying of logs minimizes the appearance of cracks; this is the most reliable way to prevent problems.
Therefore, choose logs for your log house wisely and thoughtfully, giving preference to those that have been in the stack for at least two years. In this case, you will not have to deal with cracks; they will not become a problem. published by econet.ru If you have any questions on this topic, ask them to the specialists and readers of our project here.
Why do cracks appear?
Those logs that are most susceptible to cracking are those that were used in construction without undergoing long-term natural drying. In the first year after completion of construction, the entire structure shrinks. As a result, the logs experience double stress: on the one hand, uneven shrinkage occurs, on the other, compression occurs under the influence of the weight of the structure. End of a log with cracks
Since the inside of the log dries last, a difference in stress is created between the dry surface and the wet core. In this case, the surface layers are stretched, and the inner layers are compressed. The resulting dissonance leads to ruptures in the wood fiber.
Important! The more intensively the log dries out, the greater the number and depth of ruptures. For this reason, the drying process must occur naturally (this may take up to 2 years)
Consequences of wood delamination
Small cracks are not capable of causing serious damage to the finished building. But deep defects and damage can cause uneven shrinkage of wood and deformation of the entire structure of the log house.
When eliminating defects, you should not ignore the smallest grooves and cracks, which, under the influence of high humidity, can become a breeding ground for mold, fungal formations and rot.
All this can lead to the destruction of the log house itself and a decrease in its performance characteristics.
Methods for sealing cracks in log logs
Preventive measures help reduce the number of cracks that occur. It is impossible to completely get rid of their appearance. But hiding their presence, as well as preventing putrefactive processes in their thickness, is quite possible. To do this, cracks are sealed using various materials - dry mixtures, hardening putties, sealants. Let's consider the most successful sealing options.
Option 1. Sawdust and PVA putty
Cracks can be filled with homemade putty made from a mixture of PVA and sawdust (or tyras). The components are mixed to putty condition and the resulting mixture is used to fill the gap. You can use a spatula to push the putty deep into the crack.
After hardening, the putty may “fall” slightly. The resulting free groove is sealed again using the same adhesive mixture or wood putty.
Option #2. Driving wood chips
A deep and wide crack can be blocked with a wood chip sharpened with a wedge. The length of the sliver is equal to the length of the crack.
The sliver is hammered into the crack with force; it is advisable to apply a layer of PVA to the wedge of the sliver to secure it. Putty or a mixture of PVA and sawdust is applied on top of the chips.
Option #3. Sealing with wood putty
Only small cracks with a width and depth of no more than 3 mm are sealed with acrylic putty. If the crack is larger, the acrylic putty in it will begin to crack after hardening. And after a short time it will fall out.
Wood putties are sold in the form of ready-made plastic compounds, initially painted to match the color of a certain type of wood. They dry quickly, are water- and frost-resistant, and durable. When sealing such putty, it is convenient to use a rubber spatula.
Option #4. Sealing with acrylic sealant
Acrylic syringe sealants also work well for joining the sides of a wood gap. But you can’t completely fill a deep crack with it. The maximum layer of sealant is 5 mm.
If the depth of the crack exceeds 5 mm, do the following: lay a polyethylene rope (for example, Izonel) deep inside, and apply a sealant on top of it. Polyethylene does not adhere to the sealant, allowing it to work well in tension and create an elastic fastening tape.
Option #5. Plastering with arbogypsum
A durable and reliable crack filler can be made from arbogypsum. Arbogypsum is an aqueous solution of gypsum (alabaster) with sawdust, tyrsa, crushed bark, and straw. Most often, sawdust is used as a filler.
Mix arbogypsum as follows: add sawdust to dry gypsum and mix the mixture with water. For a more flexible composition, add a few drops of shampoo to the water. The ratio of gypsum to sawdust is 1:3. The ratio of gypsum to the amount of water is 2:1.
After kneading, you should get a dense, plastic mass.
It is important to mix it well to avoid lumps. The mixture hardens very quickly, so it must be used immediately after mixing.
Place arbogypsum into the cracks with a spatula and leave it until completely dry. The “seal” made from arbogypsum is very strong and durable. It adheres securely to wood and does not fall out during use.
Option #6. Caulking with moss
In villages, they prefer to seal large cracks with moss. Such caulking does not spoil the appearance of the log house and eliminates cold bridges that can form in the log house at the site of a deep crack. If dry moss is used for caulking, it must first be soaked in water. To do this, place the moss in a bucket, basin or other container and fill it with water for 30 minutes. After which the water is drained and the moss is squeezed out.
The finished softened moss is rolled into rolls and pushed into the cracks with a wooden “caulk” spatula. Compact the moss layer by tapping the blade with a mallet or hammer. The moss is compacted until the layer begins to spring back.
The moss dries completely in 2-3 days. During this time, it “unfolds”, increases in volume up to 20% and reliably plugs all the cracks. After drying, the excess moss protruding from the cracks is trimmed with a petal circle.
All considered options for sealing cracks are suitable for both external and internal walls of a log house. They are harmless to wood, restore the strength characteristics of the log house, and eliminate cold bridges.