Often, already in the first year of their operation, owners of log houses are faced with the fact that the logs are twisted, the walls are warped, and there is blowing, as they say, from everywhere. And the reason for all these problems is essentially the same - non-compliance with the technology for assembling the log house
The conclusion is obvious - build according to the rules, and if we are talking about a finished house - conduct a thorough diagnosis (if necessary, with the involvement of construction experts) and eliminate the identified violations before they lead to more serious consequences.
15 mistakes in assembling log cabins.
At the beginning began
Experts never tire of repeating: any construction must begin with a project. And in the case of a log house, this should not be a three-page sketch, limited only to breaking up the wall elements, but a full-fledged detailed document with calculations of expected loads, indicating the size of the crown joints and gaps in the cups, etc. It follows from this that the preparation of the project should be entrusted to an architect , specializing specifically in log buildings and well acquainted with the requirements of the relevant SNiPs.
Moreover, this also explains another important point. “Flying squads” of “broad-profile” craftsmen usually work on the basis of just sketchy “projects”, sometimes drawn by the customer himself and little reminiscent of professional construction documentation, so it is strongly recommended to order the construction of a log house only from specialized companies that have solid experience in field of wooden house construction.
Of course, it will cost more, but in this way you will save yourself from very likely and very serious problems that cannot be solved without spending a lot of money, time and nerves. Or maybe they will turn out to be unsolvable in principle. (For example, with the foundation laid as for a high-rise building, you can’t do anything and you won’t get back the money spent on it. Or if you have to put support pillars under the ceiling so that it doesn’t collapse, then goodbye to the transparent, open interior - after all, the reliability of the structures and safety is incomparably more important.)
However, the “order and forget” principle does not work even if you contact a specialized company. The responsible customer will have to master a lot of specific information and terminology (just look at the methods of cutting corners - “in the paw”, “in the head”, “in the hook”, etc.) in order to communicate with the performers knowledgeably, competently control the process and do not allow yourself to be forced into wrong decisions and unnecessary expenses.
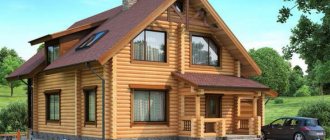
Houses made by hand, which does not disturb the structure of the tree, will last longer and will be warmer than those made on machines. In central Russia, houses for year-round use are built from logs Ø 22–24 cm
Caulk of a log house
Caulking a house is a separate important stage in its construction. Upon completion of the construction of the walls and roof, it is necessary to caulk all the insulation that was initially laid between the logs inside. To do this, using a special caulking tool, wrap the hanging 5 cm of the gasket downwards, and then push it inside between the cracks of the logs.
Having completed the caulking and roofing, the house is left to settle for a year. After a year, the caulking of the walls must be repeated. Some experts recommend repeating the “procedure” after a year of using the house with the heating on.
The insulation placed between the beams must be hidden Source vi.decorexpro.com
After caulking, the insulation is almost invisible, and there is no draft in the house Source uteplovdome.ru
Installation of doors, windows, installation of ceilings and floors
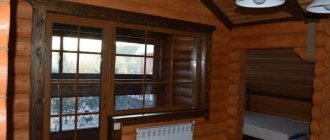
Important points when installing doors and windows is that they are installed only after the house has completely settled and only in special casing boxes that are installed in openings in the walls.
Installation of doors and windows is carried out after complete shrinkage of the log house, with the exception of houses made of kiln-dried logs - in this case they can be installed immediately Source perekrasimdom.by
Such precautions are due to the fact that wood is a “living” building material and will completely shrink in size in another 5-7 years.
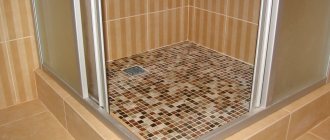
The floor is installed on logs that cut into the first, or better yet, the second crown. The mortgage crown must be well ventilated in order to be subject to rotting processes as little as possible.
After installing the entrance doors, windows and laying the floor, you can install a heating system, conduct communications, connect the electrics, as well as install interior doors, slopes, baseboards and install plumbing.
There is no need to finish the walls. After all, the beauty of a log house is not only outside, but also inside. The bas-relief of slightly yellowish walls will fit into almost any interior. The main thing is to correctly emphasize the texture of the wood and complement the design with the necessary accessories. And your dream home is ready!
A log house in the forest over the water is a great place to relax from the hustle and bustle of the countryside Source houzz.com
The inside of the house does not require additional finishing, and natural wood can complement the stone Source houzz.com
One-story house made of hand-cut logs combined with stone trim Source pinterest.ca
The first floor is built of stone, the second - of logs: this combination also looks great Source houzz.es
Do you want everything ready?
Wanting to reduce the construction time of a house and bring the housewarming closer (and this can take place no earlier than one and a half to two years after the final assembly of the building), some are considering purchasing a ready-made log house. Is it worth doing?
First of all, it is unknown what quality of the project was used and whether it was used at all. In addition, many still want to “modernize” the log house for themselves, adding various extensions, balconies, etc. to it. In particular, this creates an increased load on the supporting structures; the junctions of new elements with log walls often become cold bridges, it is also possible emergence of other problems.
It is especially not recommended to purchase a log house that is offered to you as an already established one. Most likely, these are piles of logs that did not find their buyer in time, stacked in crowns on supports and stood there for a year or more without proper shelter. There is no need to explain what kind of house this material will make. Remember: the log house should only stand on its foundation and under a temporary roof.
Foundation
Preference was given to screw piles due to the desire to try an “ultra-modern solution” and save money, as well as due to the speed and relative ease of installation. A total of nine piles were screwed in - three support points for each load-bearing beam, pile diameter 108 mm, thickness - 4 mm. Despite some problems when installing the piles and the flimsiness of the coating, which is positioned as a durable protective layer, but in fact can be easily removed with a fingernail, the craftsman is satisfied with the choice. Moreover, perhaps the bathhouse will also be placed on stilts, although he admits that a tape or slab “will be more reliable.”
From trunk to log
Of the three varieties of wood - construction, lumber and timber - the first, growing on sandy soils and reaching a height of more than 24 m, belongs to the “extra” class materials and is optimal for the construction of houses. Sawlog, due to its knotty and conical nature (significant difference in the diameters of the butt and top), is considered not the best option for house building. The same is true for the podtovarnik, which grows up to 15–18 m and has a small taper, but due to its small diameter (11–20 cm) is not able to provide the walls with sufficient thermal protection.
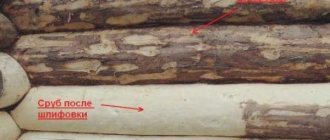
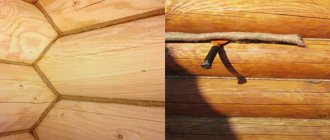
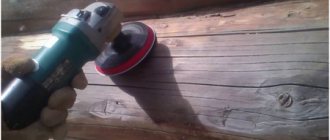
After cutting, the tree is debarked - the bark is removed from it. Since this is usually done without the use of mechanized tools, the wood fibers are ultimately preserved intact, but in some places traces of the subbark (or bast)—the lower layer of bark adjacent to the trunk—remain on the log. As it dries, it darkens, giving the surface a natural “spotty” appearance. True, this decorative effect has a downside - the bast can become a source of rotting. That is why it is advisable not only to debark the log, but also to plan it with an electric planer, completely removing the underbark.
According to their shape, logs for log houses are divided into round timber, carriage (hewn on both sides - into two edges) and semi-carriage (hewn only on the inside - into one edge).
The latter are preferable when finishing interior walls with clapboard or panels, since this consumes less usable space. Please note: cutting a log by one edge increases the cost of a log house by 35–50%.
Making openings in a freshly built log house inevitably leads to skewing of the walls, so cutting them and installing window and door structures should only be done after the initial settlement of the log house
Roof
The craftsman refused the now popular soft tiles for several reasons.
mike099
I rejected the soft roof immediately, due to its less environmental friendliness and higher price. The binders, the basis of soft tiles, are far from natural materials. Its installation is more expensive, and you need a smooth flooring made of OSB or plywood.
Therefore, I preferred metal tiles that imitate the ceramic source. A wide, semicircular ridge, instead of sub-rafter elements there is a central supporting ridge beam. Waterproofing, counter-lattice along the rafters (50×50 mm), lathing with pitch to match the covering profile (35 cm). As planned, the eaves overhangs are 70 cm long; in the future there will be a metal drainage system.
After assembling the frame “under the roof”, I protected the ventilation windows with awnings, and also installed temporary flashings made of waterproofing along the ends, cracks of the flashings and at the junction of the frame and trim. No matter how much I wanted to avoid the use of chemicals, I had to treat the imitation timber gables with protective impregnation.
Assembling a log house
The log house is assembled twice. The workers carry out the initial assembly (without insulation) on their own territory, and it is very difficult for the customer to monitor this process. To transfer it to the immediate construction site for ease of control means that you will encounter many difficulties (accommodating people for at least 3-4 weeks, cleaning and removing large volumes of wood waste, etc.). The best way out of the situation is to stipulate in the contract with the performing company that it is obliged to inform the client about the completion of the next stage of work (for example, about the readiness of each stack of logs, consisting of five crowns), so that he can visit the place and evaluate the quality making a log house.
Diagram of the main elements of the log house
After assembly, all logs are numbered, the log house is disassembled and transported to the construction site, where it is reassembled on the foundation and with insulation laid. For primary caulking, different materials are used: moss (good because it not only does not rot, but also acts as an antibacterial protection for wood), tow and flax fiber (can have a fire-retardant impregnation; the disadvantages are hygroscopicity and damage by moths), jute tape, etc.
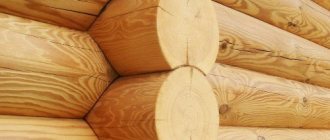
The process of assembling a log house begins with the strapping - laying the lower crown, for which the thickest logs are used, because it bears the greatest load. To install the next crowns from the bottom of the logs, use an ax to select a groove whose shape corresponds to the bend of the log of the previous row. The most important assembly unit is the locking connections at the corners of the frame. Not only the “warmth of the house” depends on the quality of their execution (log buildings freeze in the corners), but also the strength of the box itself.
Video description
Without knowing the technology of building a house, it is easy to make many mistakes. About them in the video:
Foundation
The main and most important element of any building is the foundation. Its depth and character depend on the soil on which the house will stand, on the nature of the wall material and on the number of storeys.
A log house is relatively light in weight. This design quality allows the foundation to be shallow. Almost all options for existing types of foundations are suitable for constructing a log house. Often they make a tape version. For difficult soils, a deep strip foundation or a pile foundation is used. You can also make a slab version.
It is worth noting that any version of the foundation should go 300-400 mm into the ground. After pouring it and completely drying, it is necessary to carry out waterproofing (roofing felt with mastic). This is a very important process despite the fact that the house is made of logs.
If a strip foundation is used, it begins with the arrangement of formwork Source bel-dom-stroy.ru
When the foundation is ready, they begin laying the walls Source fabrikadomov.by
Walling
Upon completion of the foundation laying stage, they move on to the main thing - the construction of walls. It is important to know that the first crown (the first row of logs) is never placed directly on the foundation. First, a “backing” board is laid. It is made from linden timber 50-100 mm thick and at least 150 mm wide. Then they move on to assembling the walls from the rounded log house.
Mortgage crown on a shallow monolithic foundation Source domsireni.ru
The first mortgage crown must be cut from below. Its end should match the width of the backing board. This is necessary so that the house rests firmly on the foundation.
Logs for walls are laid in circles (crowns). First, logs are laid that are parallel to each other. Then the other two sides, and insulation is laid on top. It is attached to the log using a construction stapler and should hang down at the edges by 5 cm.
Then the transverse sides of the house are laid, which will rest on the mortgage crown. And we repeat the “procedure” of assembling the house like a construction set.
The assembly of the house is carried out like a “constructor”: each log has its own place Source tula.stroimdom.com
Each of the logs has its own number, which makes it easy to determine where the timber should be located Source saw-wood.ru
The walls of the house smoothly merge into the end of the roof Source domsireni.ru
Methods for cutting corners
Cutting into the corner.
This is a method of cutting a corner with a remainder, in which the ends of the logs protrude beyond the perimeter of the walls. The material consumption in this case increases noticeably, but the corners are additionally protected from atmospheric influences, which means the house will be warmer. In addition, it is believed that such designs are characterized by increased reliability.
Cutting “into the corner” has three varieties – “into the cup”, “into the edge” and “into the hook”.
A simple cup
a semicircular recess is made in the lower log so that a transverse log rests on top of it.
First, a rough sample is made, and then it is precisely adjusted to the shape. Since such a connection does not provide a high level of thermal insulation, it is mainly used in the construction of commercial buildings, and for the construction of residential buildings they use a “warmer” cup with a pre-seal.
Cutting "in the oblo"
(this should also be done with a stop) is essentially an overturned cup, and from the point of view of protection from moisture, this is a more reliable option.
Hook cutting method
(an overturned cup with a spike) is not very common due to the complexity of its execution; moreover, to implement it, the surfaces of the walls on the side of the premises must certainly be smooth.
Please note: “cup” or “bowl” connections, on the contrary, do not imply hewn internal walls.
Cutting "in the paw"
- a method of making a corner without a residue, in which the ends of the logs do not extend beyond the walls. Unlike log houses connected “in a corner,” the facades of the house in this case can be sheathed or tiled. It is important to take into account that the geometry and tightness of the corners in the log house depend on the quality and accuracy of the manufacturing of the paw (the end of the log cut in a special way).
There are two options for such cutting: “in an oblique paw” (the well-known “dovetail”) and “in a straight paw with a tooth.”
In the first case, a trapezoidal foot is used, with which it is impossible to achieve the thermal protection indicators required for residential buildings. But despite the fact that dovetail is only suitable for non-residential buildings, it is extremely common in our country. If there is still a need to cut “into the paw”, GOST 300974-2002 (“Corner connections of wooden block and log low-rise buildings”) recommends using a straight claw in the shape of a parallelepiped with a tooth that performs the function of a stop when cutting the corner “into the cup”.
Vertical column supports
Installation of vertical elements (pillars, columns, racks) in a wooden house is carried out using special devices (shrinkage compensators) - screw jacks.
- the log is cut to length minus 80-100 mm. By this amount, a house made of rounded logs will shrink, and the jack can be lowered;
- a bowl is cut out at the bottom of the support;
- a jack is installed on top, which will compensate for the shrinkage of the house;
- Vertical installation is checked;
- the remaining vertical elements are installed along the same line;
- The jack is height adjustable.
The price of a wooden cottage and what does it depend on?
The cost of construction will depend on the following factors :
- quality and diameter of the material;
- the presence or absence of access roads to the site;
- soil condition;
- number of floors;
- complexity of the design.
Before construction, a preliminary estimate is drawn up . This document must contain all parameters. For example, here they describe the quantity and cost of material, finishing, consumables, and also indicate all the services of workers, up to indicating the cost of work for one hour.
Estimates for a log house can be found here.
How much do workers' services cost?
Construction prices will vary. For example, if you order the construction of a house from a contractor with dimensions of 6x7 meters with a veranda, then construction will cost 887,200 rubles , provided the area is 92 square meters.
The cost of a building built independently will be 20-30% cheaper.
What buildings cannot be raised
If you have one of the problems listed above, and you want to solve it by raising the bathhouse, then first you need to find out how possible and safe this is to maintain the integrity of the structure. In some cases, it may be easier to disassemble it and reassemble it in a new location or a repaired foundation.
Some categories of buildings are strictly not subject to lifting. This:
- baths made of aerated concrete and foam concrete;
- from monolithic concrete, brick or blocks in the presence of large and deep cracks in the walls;
- frame baths, the vertical load-bearing elements of which are built into a concrete foundation;
Frame post poured into concrete Source habitatgtr.com
- log houses with destroyed or rotten corner locks without ceiling beams.
It is also unsafe to raise two-story buildings, especially if the upper floor is not a continuation of the log house, but is made of other materials.
Results
A wooden log house is one of the most environmentally friendly buildings. Such a house will literally “breathe”, since there is constant air exchange through natural wood. Due to the optimal humidity levels, it is even healthy to live in a wooden log house!
The service life of such houses is much longer than even the most solid buildings. Frame structures, in which the beams are impregnated with an anti-corrosion and fire-resistant composition, can become excellent housing for several generations of a family. Interestingly, the thermal conductivity of a log house is 2.5 times less than that of a house built of brick, and this ensures warmth inside the house in winter and pleasant coolness in summer. The external walls of the log house do not require insulation.
Stage 7. Doors and window openings
We specifically started talking about openings after construction was completed, since there are two options for their arrangement.
Installation of a casing for installing windows and doors in a log house
- In the first case, holes are created after the completion of construction work. At the same time, in the crowns located in the places of future openings, first leave small gaps (the dimensions of the latter depend on the size of the mounted products). Once you've finished laying the logs, simply cut the openings with a chainsaw.
- In the second case, leave openings during the construction process. This is very labor-intensive and expensive, since you will use bars with notches at the ends and special grooves.
How to install a window in a log house
Window installation
Bath windows
Doors for a bathhouse made of logs
Therefore, we advise you to give preference to the first option.
Carrying out repair work
Having completed the ascent, they immediately begin work on the reconstruction of the bathhouse. They are complicated by the fact that they have to be produced under an overhanging log house. To ensure your own safety, you need to make sure that the supports are reliable and strong, and if necessary, install additional ones to reduce the load on each point. Jacks must also be used until the work is completed.
Replacing the lower crowns
To change the crown, one wall is freed from supports, “hanging” it on a longitudinal beam laid on external support posts. The supports are left under the remaining walls, forming a U-shaped line from them and the jacks.
The rotten crown is dismantled, the one lying above is cleaned and treated with an antiseptic. After this, a new crown is installed through a felt pad or tow, pressed against the top one with jacks and secured with metal ties.
Briefly about the main thing
Knowing how to raise a bathhouse with your own hands, you can carry out a major overhaul of it, replacing the crowns and foundation without dismantling work. To implement this idea, you will need powerful jacks installed on a stable and solid foundation. The lifting is carried out gradually, in small steps, moving the mechanisms one by one to different support points and trying to prevent the box from skewing. For it to be successful, the building must first be freed from removable structures and strengthened with spacers and diagonal linings.