Shrinkage of a wooden house
Most house customers are afraid of the shrinkage process of a wooden house and therefore opt for a brick or block house.
But, believe me, nothing can replace the luxury of living in a wooden house! Wooden houses have a special atmosphere, smell, air... No stone can bring such pleasure. Shrinkage of a wooden house is a natural reduction in the volume of wood; the process is associated with a decrease in humidity. In a living tree, the trunk is saturated with a certain amount of moisture, and after cutting down the process of drying the material begins. This process lasts on average from several months to one year. This fact is taken into account during the construction of a wooden house, and it also affects the completion time of construction.
Problems associated with shrinkage are completely solvable. The main thing is control, patience and thoroughness. You need to be especially careful when choosing specialists. Only professionals can help you choose the right material and determine the optimal balance between the quality of the structure and the timing of putting the house into operation. For example, if you buy laminated veneer lumber from the manufacturer, the price per cube will be completely justified.
You just need to be patient, and within a year and a half you will be moving into a house that breathes peace and harmony, in a house made of rounded logs.
What affects the shrinkage itself?
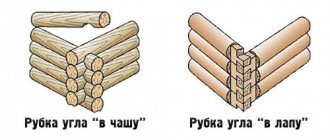
The first is the material you chose for construction: - Chopped logs
shrinks approximately 7-10%, it will take about a year to settle, sometimes more.
This depends on the quality of cutting and the time of material procurement. - Timber with natural humidity
- shrinkage 3-5%, time to settle - from six months to a year.
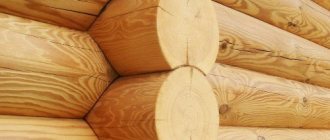
— A rounded log
shrinks 5-6%, and interior work can begin in 4-6 months.
Wood is characterized by the ability to change its moisture content depending on changes in environmental humidity and temperature, this is called hygroscopicity. This feature lays the foundation for the unique qualities of a material such as wood, and also determines the features of working with this material. Everyone has heard the phrase more than once that a wooden house breathes. How is it? Wooden walls cannot simply let air through, because then the entire function of the walls is lost. Of course this is not true! The peculiarity is that wood regulates the microclimate of the room due to its special ability to absorb and release moisture. Naturally, wood takes care of providing the most comfortable conditions for humans; in this, no other material can compete with wood. Scientists have proven that humidity fluctuations occur only in the first 5 centimeters of the top layer on both sides of the log. Once the crown wood reaches equilibrium with the environment, the moisture content of the inner layers no longer changes. The dimensions of the tree change due to changes in humidity, and processes of shrinkage or swelling may occur. The amount of shrinkage depends on the direction of the fibers; this feature is associated with the anisotropic layered fibrous structure of wood. During the construction process and in the future during the further operation of the house, the amount of shrinkage is taken into account in the event of a change from the natural state (humidity about 40%) to absolutely dry. In the radial direction this figure is 4%, in the tangential direction - 8%, along the fibers this percentage is so insignificant that it is usually not taken into account.
A new house or bathhouse made of rounded logs or timber seems ideal. But the builders only have time to put the last crown on, when the finished house begins to be affected by its own weight and shrinkage, which leads to compaction of the grooves. This is called shrinkage - a change in the linear dimensions of building elements under the influence of the above factors. Per meter of height, shrinkage can be 10 - 40 mm, this depends on the initial and final moisture content of the crowns.
How to determine the degree of shrinkage
As the building material dries, the owner of the new building can independently determine the degree of shrinkage. This can be done in 2 ways:
- Regularly check moisture content using a wood moisture meter. It is recommended to check the top and bottom beams, as well as internal partitions;
- Displaying beacons made of tissue paper and arranging an operational load in one of the premises for a period of up to 3 days with mandatory recording of deformations.
When the moisture content of the timber is 18–20%, it is recommended to close the circuit and perform insulation work. If minor deformations are detected as a result of moderate loads, the circuit must also be closed.
Uneven shrinkage
The side walls settle more slowly than the ridge and gable walls, since they are lower than the others. The walls from the inside will shrink faster if the contour of the house is closed, that is, there are windows and doors, and when the heating is on. The process is accelerated due to the difference in humidity and air temperature outside and inside the building. In view of this, after building a house from rounded logs, it is strictly not recommended to install windows and doors in the first 4-6 months (close the thermal circuit of the house), as well as heat the house. During this period, maximum ventilation and unhindered air circulation in all rooms should be ensured, this will contribute to the natural drying of the log and natural and uniform shrinkage. Natural and mechanical shrinkage occurs in the first year. Natural shrinkage is affected by the drying of the log and a decrease in its diameter as a result; shrinkage will be 5-10 mm depending on the initial combination. Mechanical shrinkage is ensured by the load of the roof and upper crowns; naturally, the logs are compressed and fit more tightly to each other. In addition, cracking along the moon groove or expansion joint affects a slight change in the cross-sectional geometry of the log, and therefore also affects the percentage of shrinkage upward.
Shrinkage directions and comparison table for different types of wood
If we consider a log, then the process of shrinkage (shrinkage) in it occurs in three directions - radial, tangential and along the fibers .
Shrinkage along the fibers is usually not taken into account due to its small value. The greatest practical importance is the magnitude of the change across the fibers (radial). Radial shrinkage must be taken into account, providing, for example, allowances for shrinkage when sawing logs into boards. Since logs are usually sawn in a wet state, if allowance for drying is not allowed, the resulting lumber after drying will not have the required cross-sectional dimensions. Comparison of shrinkage (shrinkage) of different types of wood:
| Breed | Volumetric shrinkage, % | Radial shrinkage, % | Tangential shrinkage, % | The ratio of tangential to radial, taken as 1 |
| red alder | 12,6 | 4,4 | 7,3 | 1,61 |
| Black Ash | 18,2 | 5,0 | 7,8 | 1,56 |
| White ash | 14,0 | 5,3 | 8,7 | 1,64 |
| Aspen | 11,1 | 3,8 | 6,9 | 2,09 |
| Linden | 16,2 | 4,8 | 10,6 | 2,21 |
| Beech | 16,2 | 4,8 | 10,6 | 2,21 |
| Paper birch | 16,8 | 6,6 | 8,8 | 1,33 |
| Sweet birch | 15,0 | 6,3 | 7,6 | 1,21 |
| Yellow birch | 16,8 | 7,4 | 9,0 | 1,22 |
| North American horse chestnut | 12,0 | 3,5 | 7,8 | 2,23 |
| Cherry black | 11,5 | 3,7 | 7,1 | 1,92 |
| Chestnut | 11,6 | 3,4 | 6,7 | 1,97 |
| Canadian poplar | 14,1 | 3,9 | 9,2 | 2,36 |
| Blooming dogwood | 19,9 | 7,1 | 11,8 | 1,59 |
| Hard elm | 14,1 | 4,8 | 8,1 | 1,69 |
| Elm soft | 13,8 | 14,9 | 8,9 | 1,82 |
| White elm | 14,4 | 4,2 | 9,5 | 2,26 |
| Eucalyptus black | 13,9 | 4,4 | 7,7 | 1,75 |
| Eucalyptus red | 15,0 | 5,2 | 9,9 | 1,90 |
| Thickbark hickory | 19,2 | 7,6 | 12,6 | 1,66 |
| American hickory | 13,6 | 4,9 | 8,9 | 1,82 |
| North American hickory | 17,9 | 7,2 | 11,5 | 1,60 |
| White hickory | 16,7 | 7,0 | 10,5 | 1,50 |
| Holly (honey locust) | 16,2 | 4,5 | 9,5 | 2,11 |
| Hornbeam | 18,6 | 8,2 | 9,6 | 1,17 |
| Black acacia | 9,8 | 4,4 | 6,9 | 1,57 |
| Sweet carob | 10,8 | 4,2 | 6,6 | 1,57 |
| Magnolia evergreen | 12,3 | 5,4 | 6,6 | 1,22 |
| Red tree | 7,8 | 3,4 | 4,9 | 1,44 |
| Oregon maple | 11,6 | 3,7 | 7,1 | 1,92 |
| Red maple | 12,5 | 3,8 | 8,1 | 2,13 |
| Silver maple | 12,0 | 3,0 | 7,2 | 2,40 |
| Sugar maple | 14,5 | 4,8 | 9,2 | 1,92 |
| Oak | 12,7 | 4,4 | 8,8 | 2,00 |
| Black oak | 12,1 | 3,6 | 6,6 | 1,83 |
| Chestnut | 16,7 | 5,5 | 9,7 | 1,76 |
| bay tree | 19,0 | 3,9 | 9,5 | 2,44 |
| Spanish mountain oak | 16,3 | 4,5 | 8,7 | 1,93 |
| Spanish plain oak | 16,4 | 5,2 | 10,8 | 2,08 |
| Swamp oak | 16,4 | 4,2 | 9,3 | 2,21 |
| White oak | 15,8 | 5,3 | 9,0 | 1,70 |
| Willow | 18,9 | 5,0 | 9,6 | 1,92 |
| Yellow willow | 14,2 | 4,5 | 9,7 | 2,16 |
| Perommony | 18,3 | 7,5 | 10,8 | 1,44 |
| Yellow poplar | 11,4 | 4,1 | 6,9 | 1,68 |
| Sassafras | 10,3 | 4,0 | 6,2 | 1,55 |
| Fig tree | 14,2 | 5,1 | 7,6 | 1,40 |
| Black walnut | 11,3 | 5,2 | 7,1 | 1,37 |
| Black willow | 13,8 | 2,6 | 7,8 | 3,00 |
| Fragrant cedar | 7,6 | 3,3 | 5,7 | 1,73 |
| Northern white cedar | 7,0 | 2,1 | 4,9 | 2,33 |
| Western red cedar | 8,1 | 2,5 | 5,1 | 2,04 |
| Cypress virginiana | 10,7 | 3,8 | 6,0 | 1,58 |
| Douglas fir (Rocky Mountain) | 10,6 | 3,6 | 6,2 | 1,72 |
| Douglas fir (from the Pacific coast) | 12,6 | 5,0 | 7,9 | 1,58 |
| Fir | 14,1 | 4,5 | 10,0 | 2,22 |
| Balsam fir | 10,8 | 2,8 | 6,6 | 2,36 |
| tall fir | 10,6 | 3,2 | 7,2 | 2,25 |
| Noble fir | 13,6 | 4,9 | 9,1 | 1,86 |
| White fir | 10,2 | 3,4 | 7,0 | 2,06 |
| Hemlock east | 10,4 | 3,0 | 6,4 | 2,13 |
| Hemlock western | 11,6 | 4,5 | 7,9 | 1,76 |
| Western larch | 13,2 | 4,2 | 8,1 | 1,93 |
| Pine | 10,4 | 3,4 | 6,5 | 1,91 |
| Pine | 12,6 | 5,5 | 7,5 | 1,36 |
| Pine | 11,5 | 4,5 | 6,7 | 1,49 |
| White pine of the Americas | 12,3 | 5,3 | 7,5 | 1,42 |
| Norway pine | 11,5 | 4,6 | 7,2 | 1,57 |
| Short-coniferous pine | 12,6 | 5,1 | 8,2 | 1,61 |
| Sugar pine | 8,4 | 2,9 | 5,6 | 1,93 |
| Eastern Weymouth pine | 7,8 | 2,2 | 5,8 | 2,68 |
| Weymouth white pine | 11,5 | 4,1 | 7,4 | 1,80 |
| Western yellow pine Weymouth | 10,0 | 3,9 | 6,4 | 1,64 |
| Feriambuk | 6,3 | 2,7 | 4,2 | 1,55 |
| Spruce Engelmanovskaya | 10,4 | 3,4 | 6,6 | 1,94 |
| Red spruce | 11,8 | 3,8 | 7,8 | 2,05 |
| Spruce (Sitka) | 11,2 | 4,5 | 7,4 | 1,64 |
| White spruce | 14,8 | 3,7 | 7,3 | 1,97 |
| American black larch | 13,6 | 3,7 | 7,4 | 2,00 |
| Western yew | 9,7 | 4,0 | 5,4 | 1,35 |
Mechanical load on walls
It is for this reason that we recommend that all our clients complete the installation of a finished roof at the same time as assembling the house, because... this allows you to accelerate shrinkage through additional mechanical load on the walls, evenly distributing additional (weight of the roofing, snow, wind) loads, which have a beneficial effect on the shrinkage process, sealing the groove joints, eliminating the hanging of log logs and reducing, and in most cases eliminating, possibility of cracks forming. With this approach, labor costs and material consumption for caulking a log house are reduced, and as a result, the overall costs of its construction are reduced. Mechanical shrinkage is especially effective when choosing a tile roofing covering for the roofing of a wooden house made of rounded logs. In more detail, we present this information on the page how to cover a wooden house.
But this approach is applicable if the wooden house has a simple gable roof, and the mandatory installation of the roof using hinged joints, sliding rafter supports and compliance with all roofing technologies on a wooden house that do not interfere with shrinkage processes and compensate for them, preserving the integrity of the structural elements and roof planes. Otherwise, a temporary roof is installed, made of roofing felt or waterproofing film, while the house shrinks, after which they begin to install it in its final form. Therefore, we recommend that you take this feature into account when choosing your future home and strive to simplify the configuration of the roof of a wooden house, which will also have a positive effect on increasing its reliability for the entire service life, due to the absence of obviously weak points of the roof - valleys, joints, kinks and adjacencies.
Chain link
To prevent the gables from hanging, a dormer window (15 x 15 or 20 x 20 cm) is made in their upper part, stretching a galvanized chain through it and the lintel of the window (or door) opening. The ends of the chain outside the house are connected with a special screw tie, which is tightened from time to time, creating a load on the pediment. When tightening the chain, it is important to take into account the uneven settlement of the log house and avoid bending. Instead of a dormer window, you can drill a small hole in the pediment, closing it with a wooden insert.
Use shrinkage compensators
Shrinkage is especially pronounced in the first year after the completion of construction of a log house. Taking this feature into account, modern technologies make it possible to eliminate negative consequences by using new technical solutions for competent work. When talking about this, we mean shrinkage compensators (screw adjustable supports); they are used to adjust the height of supporting wooden posts. For more than 50 years, shrinkage compensators have been successfully used in the construction of wooden houses, log baths and in the construction of wooden roof structures.
The shrinkage compensator is installed between a rounded log and a supporting wooden beam, which is located under the roof of a wooden house. Adjustable screw supports are indispensable at any stage of construction and shrinkage of a wooden house. Compensators allow you to achieve uniform shrinkage of the log structure. In production, they are galvanized and are available in diameters of 20-26 mm.
Such adjustable screw expansion joints are required to be installed when a log post supports wooden walls. Shrinkage compensators are always installed under the pillars that support an open veranda, or the pillars that support the open porch of a wooden house. Screw shrinkage compensators operate according to the following principle: at the maximum unscrewed size, the compensator is installed under a support beam or under a support wooden post. The compensator support platforms are attached to the post or beam using self-tapping screws. The compensator screw is set to the highest possible position.
During the entire period of shrinkage of a wooden house made of rounded logs, it is recommended to tighten the compensator nut in the direction of twisting once every 1.5-2 months, so that the pillar or support beam is lowered by 0.5 - 1.5 cm. In some cases, you can determine “by eye” the distance to lower the shrinkage compensator nut, if you are guided by the deflection arrow of the rafter beam or the floor of the house.
House maintenance work during shrinkage
Considering the duration of shrinkage and its possible consequences, it is necessary to regularly monitor this physical process and, if necessary, intervene in it:
- At least once every 30 days, it is necessary to inspect the entire building for changes in the geometric dimensions of the structure. Also, during the walk, control measurements of humidity and shrinkage are made at certain fixation points. Particular attention is paid to the fastenings of the sliding supports of the rafter system.
- Once every 60 days, compensatory adjustment of the vertical support elements is carried out.
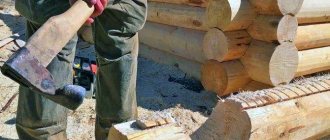
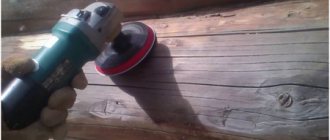
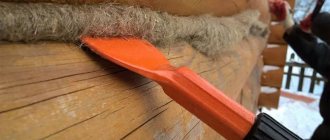
- The intercrown seal, made from natural materials, must be caulked, since birds often pull it out to build nests.
- Once a month, inspect the verticality of the walls and the horizontal position of the logs. They also pay attention to the integrity of the temporary roof.
- At least once every 60 days, it is necessary to inspect the log house for biocorrosion and, if necessary, additionally carry out antiseptic treatment.
- Upon successful completion of the shrinkage period, the leading specialist must give his opinion, with a detailed analysis of the shrinkage process. After this, you can proceed to the final stage of construction - installation of windows, doors, and finishing work.
The undeniable advantages of a natural wooden house are:
- environmental friendliness of materials;
- low cost;
- good thermal insulation;
- strength and high wear resistance.
In order for a wooden house to delight the soul for a long time and be a place of comfort and happiness, during its construction it is necessary to take a responsible approach to all stages of installation.
Eliminate twisting, skewing and sagging of logs
The walls of a wooden house made of logs, during the shrinkage process, in addition to drying out, also tend to change their shape. The log twists and bends. This occurs along the axis of the load-bearing walls, and not only in the vertical and horizontal planes.
To compensate for the above-mentioned processes and to prevent the structures from shifting from the design level, a log house is assembled on wooden dowels. Without it, during drying due to internal forces, deformation of the log will be inevitable.
A dowel is a dowel made of wood, which during shrinkage prevents the logs from twisting along its axis.
Complete absence, incorrect installation or insufficient number of dowels will ultimately lead to distortions and logs falling out of the walls.
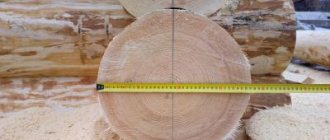
The dowels are installed, taking into account the length of the log and the location of the doors and windows, in a checkerboard pattern relative to each other. Holes for dowels are made strictly vertically and in the center of the log every one and a half to two meters.
The diameter of the hole is made slightly larger than the diameter of the dowel itself. Its depth should also be greater than the length of the dowel by about 3-4 cm, this provides space for its advancement for shrinkage of the log house. Otherwise, the top log will hang on the dowel when it shrinks, resulting in a gap forming between the logs. The best material for dowels is birch.
What problems will have to be solved after shrinkage?
Due to the fact that each log in a log house changes (deforms) according to its nature, the overall structural strength of the structure becomes weaker. This can lead to its complete destruction, especially if the log house was delivered with technological violations or the technical calculation of the structure was made incorrectly, and an error in the design can lead to destruction.
Lesser problems would be walls collapsing, corners sagging, a breach of integrity (crack) in the foundation, twisting of individual crowns, beams falling out, floor bending, etc. Which will also require considerable effort to correct.
If you have poorly covered the log house with a temporary roof, then the moisture accumulated inside can lead to rotting of the logs.
Well, if you did everything correctly during construction and design, then the least you can get away with is cracks and crevices that require sealing, caulking and sealing. As well as deformation of window-door openings.
Pay attention to openings
To protect and secure the openings during the shrinkage period, it is recommended to leave a bandage using log beams in the center of the openings; they are cut out before the jamb and direct installation of window and door products. This remedy is simple, but quite effective, it allows you to strengthen walls weakened by cutting openings and protect door and window blocks from the effects of shrinkage, which will help avoid the appearance of cracks along the edges of the openings, and also strengthen the ends of the logs from twisting.
Here are some tips to follow when building a wooden house from rounded logs: * use sliding supports and hinged joints; * do not attach the rafters to the log too tightly; * leave a bandage on the walls in window and door openings; * do not place pillars in spacers without screw compensators; * make the depth of the hole for the dowel 3-4 cm greater than the length of the dowel; * leave a compensating gap in the openings between the top log and the post; * leave door and window openings open during the shrinkage period; • - finishing work should begin no earlier than six months later.
It must be remembered that if the shrinkage process is not taken into account and compensatory measures are not taken into account in time, shrinkage can lead to a critical moment when it will simply be impossible to restore or repair a wooden house.
Our designers and builders are very familiar with all the nuances and technologies for constructing a durable wooden house. The key to obtaining a high-quality and stable result is to study the construction experience of our ancestors in combination with the latest technologies and work experience. By contacting us, you can be sure that after several decades your home will delight you with its beauty, warmth and comfort!
Constructive measures for the house to shrink
A negative factor when building a house from timber is the uneven change in the size of the product during the drying process. The longer the shrinkage period, the higher the quality of the resulting structure. To avoid cracking and warping of wood, you must:
- take a technological pause between finishing and construction of the log house for at least 6 months;
- during the period of shrinkage, cover the log house with a temporary roof;
- when installing log gables, attach them to the roof elements only using the sliding method;
- when connecting crowns vertically, use only wooden dowels;
- install shrinkage compensators on vertical structural elements;
- treat a fresh log house with a water-based antiseptic, which does not cover the wood with a film and allows it to evenly lose moisture;
- the ends of the log house are treated with special protective agents that prevent moisture evaporation and cracking;
- after shrinkage of the log house, caulk it a second time;
- when installing windows and doors, leave a gap for shrinkage at the top of at least 1/20 of the opening height;
- walls should be sheathed only using sliding fasteners;
- When installing a chimney, use fastenings and passages through the roof to prevent deformation and leakage during shrinkage.
In order to reduce the settlement of a wooden wall, during the installation of logs or beams, it is necessary to choose the right quality sealant. Each new crown is pressed using a rubber or wooden mallet. During the period of shrinkage of the log house, it is necessary to cover it with a temporary roof, but at the same time take care of uniform ventilation inside the structure for more uniform drying. When the shrinkage process is completed, the temporary roof must be replaced with a permanent one.
To compensate for shrinkage, special methods are used for rafter systems. To do this, sliding connections are installed in the supporting places, thanks to which the connected elements can move relative to each other, but do not involve the truss structure.
To avoid deformation of the ridge connection, it is made of a hinged type, connected using metal plates, screws and bolts. Metal components must be coated with zinc.
If the linear dimensions of the log house are deformed, the structure is subject to additional stress and also makes it difficult to install windows and doors. To avoid such troubles, it is necessary to install special beams, which are cut down after final shrinkage. When designing a casing for windows and doors, the possibility of deformation distortion is eliminated by using a casing or frame. To do this, a special ridge is cut out in the vertical surface of the openings, which, like a puzzle, should fit into the corresponding groove of the door frame. There should be a gap between the wall and the frame equal to 1/20 of the entire opening. This space is filled with an inter-crown seal and covered from the outside with a platband. The window installation algorithm looks something like this:
- The window sill board is mounted on insulation.
- One of the sides of the box is attached.
- The top beam is installed.
- The final stage of the pigtail is attaching the side of the box.
An equally effective installation method is another option for forming a casing. Grooves are installed in the vertical surfaces of the wall opening, where an embedded block is used as a tenon, which has a gap for possible shrinkage. The casing box is attached to the tenon using self-tapping screws, but without connecting to the wall. The inter-crown seal is located at the top and bottom of the casing box, directly between the wall and the box. The undeniable advantage of this installation method is the lower cost of work, as well as the possibility of carrying out installation work outside the opening.
To prevent internal stress in the wood during shrinkage of the log house, rounded logs are used, in which the manufacturers provide unloading grooves, the width of which is 0.7-1.0 cm. The number of such grooves varies from 1 to 3 on one log. Most often these are 3 grooves, one is in the upper part, and the rest are on the sides of the log.
A preventive measure against warping during the construction of a log house is to connect the crowns using dry wooden dowels. It is most effective to use birch dowels. Using this technique, you can secure the initial position of the beam in the crown.
Reasons for shrinkage of houses made of timber and logs
The porosity and anisotropy of the properties of wood is the reason that the logs and beams that make up the house constantly absorb moisture from the air when humidity rises and release this moisture when atmospheric humidity decreases. The radial increase in size is much greater than the linear one, and this unevenness leads to the appearance of gaps between the crowns of log houses, shear and torsion deformations, leading to cracking in the logs.