A modern approach to wooden construction is the use of rounded logs. The material has precise dimensions and a cleanly rounded shape, which allows the construction of a log house without a large amount of waste that appears in the process of fitting logs to each other. But regardless of this, it is necessary to carry out a number of works related to the protection of wood, where grinding of rounded logs occupies a special place.
Sanding a log house
Some general information
An angle grinder or angle grinder, better known as an angle grinder, is a universal tool for various tasks:
- rough and fine sanding of wood;
- polishing, cleaning surfaces;
- removing bark, cutting branches from trees;
- sawing boards, chipboard, fiberboard, logs.
Such a wealth of tasks that can be solved makes the grinder the most versatile of all grinding machines. It is called angular due to the fact that the axes of the engine and the working circle are located at right angles to each other, in contrast to machines with a direct arrangement.
At the same time, an angle grinder is a tool specifically for periodic work around the house, minor repairs, and replacement of floor coverings. Attachment disks allow you to cut, sharpen, and polish workpieces. For regular work with wood, stream production for the purpose of earning money, you need a professional category tool.
Structure of an angle grinder
Video description
About correcting wall defects before sanding in the following video:
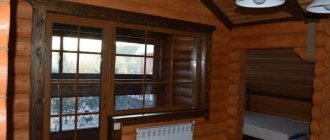
- Condition of the walls . If walls made of profiled timber are covered with paints and varnishes, you will have to pay additionally for cleaning the old coating. It will also be more expensive to process walls with a large number of defects (jags, irregularities and resin).
- Expected Result . It depends on the customer how many passes will be made before covering the walls with wax, varnish or oil.
- House height . If the work requires the use of scaffolding, the cost of working at height will be higher.
- Comprehensive services . If you order sanding of corrugated timber walls together with painting, the work will cost less than separately.
The cost of sanding internal walls made of planed timber (profiled or glued) is:
- Sanding walls . Standard processing includes two passes (first with coarse, then with fine sandpaper) and costs from 200 to 350 rubles/m2.
- Polishing the walls . From 170 to 250 rubles/m2. The surface is treated once.
- Finishing . It is carried out after applying wax or varnish. From 320 rub./m2.
The customer determines the degree of treatment of the internal walls Source roomester.ru
Types of cutting attachments for grinding wood angle grinders
Sanding boards with a grinder is one of the main tasks for which this tool is used. Special care is required from the craftsman, since wood is a fibrous material. To avoid the appearance of burrs, chips, and large scattering of chips, you need not only reliable fixation of the workpiece, but also special attachments: standard diamond cutters will not work. The work is performed with special grinding attachments.
For rough processing
Primary processing of wooden products is carried out using grinding discs of the following types:
- Roughing. This type of nozzle is used to remove old, hard-to-clean coating from the workpiece: varnish, dried paint. There are steel wire bristles across the entire area of the disc.
- Cord brushes. After the initial rough processing, the wooden surface is smoothed and leveled with cord brushes made of wire or rigid wire bundles of a horizontal or perpendicular arrangement.
- End Designed for cleaning the ends and edges of wooden boards, aligning miter cuts.
For grinding and polishing
Following rough initial processing, the wood is sanded and polished. The following types of disks are used for this:
- Petalaceae. The most famous and widespread type of attachments for angle grinders. The disc looks like a flower with long thin petals, the role of which is played by an abrasive material. The petal attachments wear out slowly. As you sand, it is recommended to gradually replace coarse-grained nozzles with fine-grained ones.
- Adhesive abrasive wheels. They are glued with Velcro onto the round metal attachment of the grinder. The kit comes standard with several circles – usually five. A worn disc can be easily removed from the attachment and replaced with a new one. The abrasive wheel contains sandpaper, felt, sponge, and high-density fabrics.
Cutting discs
To cut wood with a grinder, cutting circles are used. They are made of tungsten carbide, a high-strength powder material, since cutting work requires increased durability. Do not use a cutting wheel for stone, metal or ceramics on wood. The consequences can be disastrous: the wooden workpiece will be damaged, the disk will break, the grinder itself will burn out.
In addition to the diameter and cutting depth, the key classification parameter for cutting wheels is the shape of the teeth:
- straight – for soft wood;
- variable beveled - for all types of wood;
- trapezoidal - for fiberboard, medium-density chipboard, laminate.
If you look at a cutting disc, the notches along the circumference or slot immediately catch your eye.
Cut-off with different teeth and slots
This is a special design solution that prevents overheating of the material. For example, when working with stone or metal, the water cooling method is used, but this is not applicable for wood. Therefore, the manufacturers did everything in advance to minimize the risk of the wheel overheating.
Important! On all modern angle grinders the standard shaft diameter is 22.2 mm; on older models this size may be smaller or larger. A cutting wheel can be placed on a shaft of a smaller diameter using an adapter attachment, but it will not be possible to install a disk of this type on a large shaft.
Peculiarities
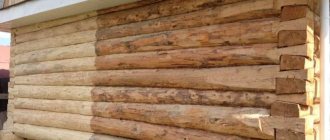
Despite the high-quality professional assembly of a wooden building, individual rows of beams in the structure can protrude by 1-2 mm, making the walls uneven. To achieve ideal smoothness of the walls inside the house, it is necessary to grind the timber, although such work also has other purposes.
This process solves several problems:
- removal of mold and mildew stains;
- elimination of minor damage to timber received during installation;
- lightening the wood surface;
- removing lint after using antiseptic impregnations;
- giving freshness to the pattern and texture of wood.
Polishing also involves the removal of a layer damaged as a result of external influences, renewal after several years of operation of the room. In addition, this removes old varnish and antiseptic impregnation from the surface, which are no longer relevant. Sanding helps restore the timber to the look and color of fresh wood.
Technique for sanding wood with an angle grinder
When starting to process wood with an angle grinder, you need to keep two main points in mind:
- You should not process the surface of the workpiece with the entire area of the grinding disc, as marks from the wheel may remain. Only the upper part of the nozzle is used.
- During sanding, the grinder is guided along the grain of the wood: this way there will be no marks left. At the same time, it is important to find a support point so that your hands do not get tired.
The general process of sanding wooden surfaces with a grinder is divided into several separate stages:
- Preliminary preparation of the coating. All remnants of the previous paint and varnish are removed with rough grinding wheels. It is also worth making sure that there are no nails or screws sticking out from the floor or wall, if they are the ones being sanded. Protruding fasteners must be removed, and if this is not possible, immersed as deeply as possible into the surface so that they do not in any way affect the operation of the angle grinder.
Pre-processing of the part
When sanding floors, there are two more mandatory rules. Even if only a small area of the floor is being processed with a grinder, it is recommended to remove all furniture from the room and cover doorways and windows with thick film or oilcloth to protect from dust. Any cracks or gaps in the working surface are unacceptable. Only after filling the holes with a special wood putty and drying can you start sanding.
- Primary grinding. It is carried out with coarse-grained discs in the range P20-P40. If you don’t have such a circle at hand, you can cut out and glue a piece of sandpaper to the angle grinder attachment. Perform 2-3 passes with a grinder over the entire working area. At this stage, it is especially important to control the force of pressing on the nozzle: weakly - the processing will not be good enough, too much - a large load on the angle grinder motor.
Primary grinding
- Fine stripping. Replaceable petal attachments of varying degrees of granularity are used - from P60 to P80. The master makes 1-2 full passes over the wooden workpiece being processed.
Fine grinding is done using a flap attachment.
- Putty gaps. After sanding, all gaps must be eliminated. First, they are passed over with a nozzle with a minimum grain size, and then the treated areas are puttied. Two points are worth highlighting here. In places that are difficult to access, you will have to process them manually. Plus, during grinding a lot of dust is generated, and we must not forget to remove it in a timely manner.
Wood putty
Final grinding steps
Final polishing of the wooden surface is carried out using sanding discs made of felt and soft cloth marked P100 or P120. A wax-based polishing paste is first applied to the wood, and then 1-2 passes are made along the surface area to be treated. After polishing, all that remains is to prime the surface. By priming, not only the remaining small roughnesses are smoothed out, but the service life of the wood is also extended. Oil paints or alkyd enamels are best suited as a primer for wood.
The procedure is done manually with brushes in the following sequence:
- Dip the brush well in the primer, apply to the workpiece, spread over the entire area.
- Wait until the paint is completely absorbed and the wood dries - at least 2 days.
- Apply 2 more layers of primer, and the second can be coated only after the first has dried.
- After this, the priming will be completed. You can apply a top coat of varnish to the wood.
Priming wood
Profiled and laminated timber: differences in the process
Sanding allows you to improve the appearance of walls and prepare them for high-quality painting, waxing or varnishing. For profiled and glued material, the process is different:
- Profiled timber . Usually processed in two steps. The first time is sanded with a coarse abrasive (a wheel with a grit size of No. 40), even at the construction stage. The second treatment (final polishing) of the walls is carried out after completion of the shrinkage process.
- Glued laminated timber . This building material is carefully processed at the production stage, does not shrink strongly and therefore does not require preliminary deep grinding like its profiled counterpart. To process walls made of laminated veneer lumber, use nozzles with a wheel starting from No. 80. Sanding should be carried out with caution - excessive force can damage the outer lamella.
The nuances of choosing a disc for an angle grinder for sanding wood
Any circle for an angle grinder is marked, which contains all the necessary information:
- diameter;
- thickness;
- seat size;
- permissible speed;
- recommended material for processing;
- best before date.
Marking of grinding wheels
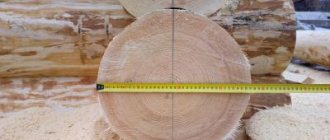
The minimum standard disc diameter is 11.5 cm, but for sanding wooden boards with a grinder it is recommended to install attachments at 12.5 cm. Large diameters - over 15 cm - are not very suitable for processing wood, and create an increased risk of injury.
It is a bad idea to polish a wooden piece with a wheel of a larger diameter than intended by the angle grinder manufacturer. This option will not provide a single advantage, but there are plenty of potential problems:
- Causing injury;
- disk failure;
- lack of standard power of the grinder for working with a circle of the wrong size;
- the need to remove the protective cover under the nozzle.
The abrasiveness of the wheel depends on the type of work planned. For rough, rough processing, discs with coarse grains are used, but the finer the grinding should be achieved, the smaller the grain size of the abrasive selected.
Advice! An interesting option is a circle with replaceable adhesive attachments of different abrasiveness. True, the quality of the products is not the highest, which is why they wear out quickly.
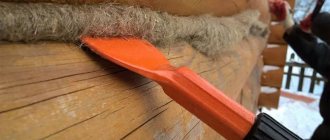
Sealing cracks in a log
If the logs are cracked, then first you need to seal the cracks, and only then paint or impregnate them. Today, there is a very huge selection of wood putties and sealants on sale. In most cases, they can be divided into groups:
- Acrylic based sealants
- Polyurethane sealant
- Silicone sealant
Acrylic-based sealants can be used for various cracks, where the depth and width can reach up to 2 or even 3 cm. They are not afraid of deformation and are durable. It is mainly used for interior work, but there are also options for exterior work. It paints well with various paints, there are moisture-resistant and non-moisture resistant options. It is not very elastic, so if the log house shrinks, it is better not to use it.
Although there are special modifications that allow this sealant to withstand deformation. On sale you will find acrylic sealants of various colors, you can even choose according to the type of wood. If selected correctly, the sealant will be almost invisible against the background of the wood.
For example, acrylic sealant “Accent”-136 can be used both inside and outside the building. There are various colors on sale: white, gray, larch, pine, oak, walnut, rosewood. The deformation process after hardening can reach 25%, and this will not entail a deterioration in the quality of the repaired cracks. Therefore, if your log house still shrinks, you can use this sealant without fear.
Work with it can be carried out at temperatures down to -10 degrees, the main thing is that snow or rain does not fall on the working surface. The start time for hardening is two hours, complete drying can take up to three weeks.
Polyurethane sealant not only seals cracks but also glues them together. It is not afraid of vibrations and moisture, moreover, moisture makes it stronger. It is similar to polyurethane foam, so it hardens very quickly and you need to work with it carefully, avoiding contact with exposed skin. Main advantages: withstands large deformations - since it is the most elastic sealant, it can be painted, even with water-based dyes. It emits a pungent odor during hardening, so it is mainly used for outdoor work or in rooms with good ventilation. Available in color schemes: white, black, gray. Very suitable for sealing cracks in log houses.
For example, Sikaflex-221, a one-component polyurethane sealant, is not afraid of ultraviolet radiation. Can be used at temperatures from -40 to +90. Country of origin: Germany. Before application, the surface must be clean and dry. Work must be carried out at temperatures from +10 to +35.
Silicone sealant is probably a universal option. After all, it tolerates moisture and deformation well. Can be used for both internal and external work. Available in a wide range of colors. Very durable, can last more than 50 years. Not afraid of temperature changes, can be used from -50 to +80. The only drawback is the inability to paint it, but the wide range of colors that this material is available for sale can compensate for this.
Tips and tricks for sanding wood using an angle grinder
Some useful tips about sanding wood with a grinder:
- It is important to choose the right angle grinder for this job. It is recommended to use a tool with a speed of up to 6 thousand per minute or a speed controller. At high speeds, grinding discs are more susceptible to clogging and, accordingly, wear out more quickly.
- To avoid the wire getting in the way while working, it is better to use a cordless angle grinder.
- Sanding wood involves a lot of dust and shavings, so angle grinder models with motor protection are preferable. Another option is to attach a dust collector to the grinder.
- Eye and respiratory protection is necessary when operating an angle grinder. There should be mittens on your hands.
- The protective cover of the grinding disc must not be removed during operation. It also has a protective function: if the circle breaks into small fragments, the casing will protect the master from falling fragments.
- If a cutting wheel is installed on the angle grinder, the wooden surface must be polished strictly at a right angle. Otherwise, the grinding will turn out uneven, and the angle grinder itself may jam in the workpiece.
- It is better to never use grinding discs that do not fit the grinder in at least one of the dimensional parameters.
- It is not allowed to use a wheel with even minor defects.
- Circles for circular saws and other third-party attachments should not be installed on an angle grinder - there is no need to reinvent the wheel, standard grinding and cutting discs are sufficient. In addition, this is impractical: circular saw discs are designed for a much lower speed, which means that the grinding will be of poor quality, and the disc itself may break.
Cleaning wood with a grinder is a simple procedure, but the result will meet expectations only if all stages are performed correctly: surface preparation, primary and fine sanding, filling gaps, polishing, priming. You should only use abrasive wheels of the appropriate size and grit.
When should you sand timber inside your home?
Nowadays, there are different opinions about when to sand wood. Some believe that this should be done after the house has settled, others - immediately after installing the roof. There is still a consensus on wood moisture content, which should be no more than 20%. In all other cases, there will be no benefit from grinding the surface.
The first option is considered correct here, but supporters of the second argue its advantage as follows:
- during the shrinkage process, the wooden beam may become infected with fungus;
- By waiting for the frame to shrink, the shade of the wood may change significantly during this time.
The latter will, of course, happen, but the material will quickly recover after sanding.
Shrinkage of the frame of a wooden house occurs for one reason - due to loss of moisture from the wood mass. If the estimated rate of shrinkage of a structure is in the double digits and measured in centimeters, then the moisture level of the wood was at least 20%.
Stages of technology, possible errors
The procedure for grinding a log frame is carried out in the following stages:
- Rough processing. Coarse-grained abrasive materials and tools are used. At this stage, the bark, knots, protrusions, defects, or old coating are removed (if a log house built a long time ago is being updated).
- Basic sanding. Medium-grained abrasives are used. During processing, the surface is given maximum evenness. The lint is also removed.
- Finishing processing. Fine-grained materials are used. The surface is given perfect smoothness.
When sanding a house, a bathhouse made of logs or timber, inexperienced craftsmen often make the same mistakes. They are associated primarily with the wrong choice of tools, abrasive materials and operating modes of devices. For example, setting the speed too high or applying excessive pressure can easily lead to the formation of grooves and gouges in the material.
What does the tool kit consist of?
In fact, there are not so many of them, since convenient tools have been created and they are constantly used. Let's look at the most popular:
The easiest way to work is with a specialized angle grinder or the capabilities of a modern angle grinder, which has a set of suitable versions of attachments such as grinding rounds of various sizes.
The fine grinding process is carried out with a variety of attachments with a small grain type. The angled version of the sanding machine shows the best performance during the process of processing the interior of walls based on planed logs.
It is convenient to work with profiled timber based on the capabilities of the belt model of the sanding machine. To do this, it has a rotating belt-type version of the abrasive surface. With its help, the process of getting rid of the old varnish coating is simplified.
An increased level of functionality is provided by the length of the blade. It is recommended to use a belt with a length of 610 mm, as it is considered the optimal version of the tool for sanding the largest surface areas of timber.
Almost all models are offered with a container for collecting and disposing of chips, dust and other residues, which helps save valuable minutes during the cleaning process.
The inside of timber premises can be sanded using a vibratory grinding machine model, which has a rectangular version of the working sole.
We are talking about fine and polishing processing. Based on a triangular shape, such a product helps to polish hard-to-reach places such as corners or grooves of a log house.
- Soil resistance - a practical guide on how to determine the main parameter (75 photos)
- Insulation of facades - selection of materials and instructions for creating ventilated facades (85 photos)
- Self-priming pump - 120 photos of the best models and their main characteristics
Briefly about the main thing
A wooden frame is made from interconnected rows of logs or beams. It is characterized by harmlessness, a healthy microclimate, good gas exchange, sufficient sound and heat insulation, and resistance to stress. Disadvantages manifest themselves in the form of natural aging, destruction under the influence of biological and climatic factors, as well as susceptibility to fire.
The grinding procedure brings him the following benefits:
- Improves aesthetic qualities.
- Strengthens adhesion.
- Stops aging.
- Reduces the consumption of finishing impregnations.
- Protects against destructive factors.
You can begin the procedure of sanding logs only after the wood has naturally dried and shrinked. The processing tool is selected depending on the type of log house. It is made from chopped or rounded logs, as well as profiled or laminated timber. Grinding is carried out in 3 stages - coarse, medium and fine grinding. Upon completion of the procedure, the surface is treated with an antiseptic, bleach and fire retardant.