A variety of crafts for home and garden can not only decorate the interior profitably, but will also become reliable helpers in everyday life with the right approach to work. Using your own imagination and experience, you can prepare many useful household items, souvenirs and decorations for your home.
Solid wood is popular among craftsmen. The reason for this is a number of obvious advantages. Wood is easy to work with. With proper preparation of raw materials, the finished product will delight its new owners for a long time.
The basis for making crafts is an environmentally friendly material, which makes it possible to use wood for assembling children's furniture and other household items.
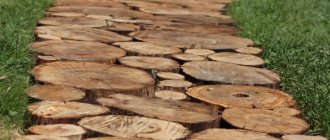
Difficulties in laying out a modular floor
This type is quite complex, so it is better to be patient and get to work. Choose thick trunks to avoid the formation of large voids when laying out circles. Hardwood logs are selected to make the floor, because the floor is exposed to impact every day.
There are two reasons that will make you sweat:
- Solution. If you put all the parts on glue, then the floor will not last long, even if you cover it all with varnish. Modules will begin to fall off due to constant pressure. You will have to use a solution, possibly cement-based.
- Leveling the surface. If the thickness of each element does not play a big role in the design of the vertical plane, then for the floor this is the main condition. It is necessary to adjust all the modules to the overall thickness, and start grinding after installation. The procedure will take quite a long time, because achieving a smooth surface is not easy.
70 New Year's decor ideas: decorating your apartment and house
Next, start covering the finished surface with varnish. It will protect it from pests and external influences. The floor is easier to clean, and it will last longer in a “protected” state. An unprotected surface can be attacked by pests or it will simply begin to rot due to excessive moisture.
Chemical method
To remove a stump using this method, it is necessary to deliberately destroy the wood fibers. Deep enough holes are made in the stump with a drill and filled with herbicides, kerosene, diesel fuel, battery acid or saltpeter. The stump is covered with a film to prevent evaporation and complete impregnation of the roots with chemicals, then tightly wrapped for several days. After 10-12 days, the stump can be easily broken into pieces and disposed of. The remains of a stump in the ground can be burned, following safety regulations. In the absence of chemicals, you can use salt, but its effect is designed to last for a year. If you plan to set up beds or a greenhouse in this place, remember that chemicals and salt contaminate the soil for a long period. Therefore, let's consider another, environmentally friendly method of tree removal.
Preparation of cuts
Having prepared the tools and materials, you can start working with wood. The choice of wood for the path depends on the operating conditions and purpose of the path. For example, those who want to make a path from wood cuts with their own hands in a kindergarten do not necessarily need to take the same hard wood as for the path between the utility rooms of a summer cottage. However, for greater reliability, it is recommended to use harder types of wood in any case.
As a rule, one of three types of wood is chosen for cuts: pine (lasts up to 7 years); oak (lasts up to 10 years) or larch (lasts up to 25 years). If the issue with service life is not fundamental, then you can use any other breeds that are at hand. They will deteriorate faster, but restoring the track will not be difficult at all.
Whole logs must be cut into identical fragments about 20 centimeters long. The length of the cut may depend on its diameter. The minimum length is 10 cm - if you make cuts shorter, they will fall out of the track due to uneven mechanical impact on the surface.
The next step is to clean the logs and bark. Despite the fact that the bark makes the tree look even more attractive, it is worth getting rid of. The fact is that it quickly breaks and rots. In parallel with removing the bark from the logs, it is worth checking them for cracks. Even if there is a small defect on the log, it will be the weak link of the path. It is worth noting that cracks in a tree look very attractive, so many sacrifice the durability of the stump for the unusual appearance of a path created with their own hands. Photos of paths made from wood cuts using cracked stumps look really interesting. In this case, you should definitely prepare spare cuts, thanks to which it will be possible to repair the path when the cracked stump completely collapses.
When the saw cuts are prepared and sorted, they must be protected from the external environment, pests, rotting processes and other troubles that may arise during the operation of the track. The simplest, but at the same time very effective way to protect wood is to treat it with drying oil. Before you start covering the stumps with drying oil, it should be heated to boiling temperature. When the drying oil dries, it is recommended to treat the tree with antiseptics, which will ensure its bioprotection. In addition, it is recommended to additionally treat the lower part of the cuts with bitumen in order to finally protect the tree from damage. If you want a path made from sawn wood or lumber to look aged, you can coat it with copper sulfate.
Table
To make such a craft, you need to have skills in working with wood. An easy way would be to purchase a large-diameter cut from a very old tree. However, such cuts are rare.
You can also create a tabletop from small blanks. Each of them must be carefully sanded so that they are of the same thickness. After this, you need to lay out a large circle from them. The diameter of the circle depends on the size of the tabletop.
Once the circle is laid out, you need to secure the cuts together. There are several different mounting methods you can use at this stage. Only those that are not at the edges of the tabletop are nailed.
Therefore, the edges must be carefully glued. The tabletop should be dense, with a minimum number of gaps. To do this, you need to carefully select the dimensions of the workpieces to each other.
When the table surface is ready, you need to sand it on all sides. Determine the bottom side, mark the places where the legs are attached. It is advisable to install metal legs using self-tapping screws.
The front side of the table is varnished to give the product a more aesthetic appearance.
If desired, you can place tempered glass on top. To do this, you must first take the glass to a workshop so that holes for fastenings can be drilled there. In this case, you do not need to coat the surface of the cuts with varnish.
The resulting table will serve for many years with proper care without losing its appearance.
Wood cuts as finishing material for house walls
Wall surfaces are the most convenient and extensive area for decorating a room. Here you can realize the most daring and creative ideas in room decoration. This time we will use wooden slices as a decorative element. They are smooth transverse layers of a tree trunk. Each layer has its own original and unique pattern, which is obtained from the growth rings of wood. Well, are you ready to get to work? First, let's find out how to make wood cuts for the interior. The process is extremely simple and even a beginner can handle it. Often, a transverse cut (also called an end cut) of a log takes part in the design.
- We cut tree trunks into plates of the thickness we need. Their diameter can be different - this way the decorated surface will look even more beautiful.
- We clean the cut from sawdust and shavings, you can also remove the bark.
- We treat the layers with stain or special paint.
- We apply an adhesive solution to each cut and place it on the wall.
- You can lay out the wall plane partially or completely with cuts.
- We wait for the glue to set and finally cover the surface of the glued sections with varnish.
Where to get wooden cuts?
There are 2 ways to purchase saw cuts for crafts.
The easiest way to purchase them is at a hardware store. They have already been processed and are intended for decorative finishing of the room. Another option is to prepare the material yourself.
This requires appropriate skills and tools for cutting and processing.
In addition, fresh wood is not suitable for harvesting logs. It is cut into pieces no more than 50 cm long, after which they are laid out in sawdust.
This removes excess moisture from the wood. After the workpieces have dried, they can be sawed into circles. The thickness of the wood cuts is approximately 4-5 cm.
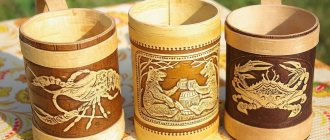
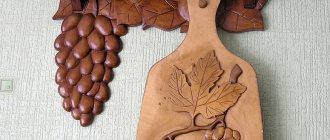
Gouache for painting as an alternative
A cutting board for the kitchen is one of the practical items of regular use. To make this accessory pleasing to the eye every day, it is recommended to paint it; this can be done with gouache paints on wood. This coloring material is similar to acrylic, but is slightly inferior in saturation.
Painting on wood with gouache consists of the following stages:
- Sanding the board. If the surface of the product was not smooth enough, it must be polished with sandpaper.
- Structure protection. If the board does not have a varnish coating, it must be treated with stain.
- Priming. For this, acrylic of any suitable color is used. The wooden board should be carefully coated with paint without gaps. This will make coloring easy and quick.
- Drawing. After translating the image or drawing it yourself, you need to start painting on the board. For beginners, it is better to choose simple patterns or floral motifs. Before painting the tree with gouache, you can add a little PVA glue to the jar for better adhesion.
- Varnishing. After finishing the process, it is recommended to open the product with varnish. You can use any composition that you have at home, but odorless acrylic varnish is considered the most suitable.
The master class presented in the photo below is designed for people who do not have the skills to paint kitchen boards. Painting on wood brings pleasure, and the resulting result delights everyone around you.
Required materials and tools
To carry out any plumbing work, the master needs a comfortable workplace, where there will be a workbench, clamps or a vice for fixing parts, high-quality ventilation and lighting. For independent work you will also need the following set:
- Plane.
- Electric jigsaw.
- Marker for marking boundaries and attachment points.
- Pins, screws or glue are used as fasteners.
- Be sure to prepare compositions for impregnating surfaces.
- Sandpaper will allow for better sanding of the finished product.
- To obtain a niche, you need to prepare a hammer and chisel.
Some craftsmen use various techniques for decorating wooden crafts, for example, pouring with epoxy resin, opening with stain and acrylic varnish, burning and wood carving. Each technology has its own specific set of tools.
Recommendations for decorating with wood cuts
- The main condition for quality work is a well-prepared and cleaned surface. The wall plane must be leveled and treated with a primer.
- Decide in advance exactly how you will decorate the surface. A wall with a partially covered saw cut will look good. It is not recommended to lay all the walls of the room with wooden plates, since the room will seem too small and overly cluttered.
- Partial installation looks natural in bedrooms at the head of the bed, in living rooms near fireplaces or modern electric fireplaces, as well as in the kitchen or hallway.
- Decorating surfaces with wood cuts is excellent for country and country houses.
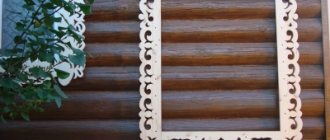
Wood cut frame
Felling with pruning: how to cut down a tree correctly
Anyone who thinks about how to cut down a tall tree on their own property has the question of what is needed: immediate felling or preliminary pruning. Some trees do not require pruning, others cannot be felled otherwise. If there are power lines or gas pipes nearby, pruning is required. This will allow you to balance the tree. The branches on the side of the expected blockage can be left.
Before removing a tree from your site, measure its height. The barrel may need to be shortened first for safety reasons. First, remove the lower vegetation, if possible, remove branches from the side of the rubble (the crown may become tangled when a tree falls). Neighboring trees, if they interfere with work, are removed only in case of dead wood. In other situations, they plan the trajectory of the fall and simply remove unnecessary branches. How to cut down a tree in a country house by felling and how safe it is:
- bring down the trunk only if you are sure that it will fall the way you want;
- the height of the tree before cutting should be up to 50% less than the length of the prepared area;
- Attach guy wires to adjacent objects.
Wall made of wood cuts
Wooden saw cuts in the interior of a country house look very stylish and give the room a certain naturalness and primitiveness. Most often used to decorate walls. Such a cut is made very simply - the branch or trunk must be cut into thin “pancakes”, which will become a finishing element. Each "plate" will be unique, even if they are all made from one single piece of wood. For wall finishing, the thickness of the layer does not matter much.
The creator himself decides whether to remove the bark or leave it, although if it is too thick, then most likely there is no place for it on the wall. Although such finishing is intended to introduce a certain element of wildness into the design, it is advisable to sand the surface so that a careless guest or the owner himself does not get hurt by accidentally touching the rough product. It should be remembered that natural wood is an attractive environment for numerous insects, so it must be impregnated with special protective compounds. For a greater aesthetic effect, it can also be coated with stain, varnish or paint.
How to place the saw cuts on the wall surface is up to the owner to decide. Such finishing can cover both the entire wall and part of it, as if zoning the space. The option of a separate framed panel is also possible. In any case, the decoration of the wall with saw cuts is made using special glue.
Important! In order for the glue to firmly hold the wood cut, the wall surface must first be cleaned and leveled
Dacha.news
Usually the question is not only how to cut down a tree , but also how to accurately place it in the right direction so that it does not cause any damage when it falls. We will also talk about in what cases this can be done, and when it is worth looking for other solutions.
Basic tree felling technique
The basic technique for felling trees is simple and consists of making an angular or straight cut with a depth of 1/4 or 1/5 of the trunk diameter on the side where the tree will be felled, after which the main cut is made on the opposite side.
If the tree is upright, and the thickness of the trunk at the base is no more than 15-20 cm, then there are no special tricks here. But if the tree stands at a slight slope, or the trunk diameter exceeds 20 cm, the process must be approached as responsibly and competently as possible. Otherwise, the tree may fall in an unpredictable direction, even if the cut is made correctly.
What, how and why
The guide chip is the undercut between the main cut and the undercut. It is this that allows you to direct the tree with high precision in the desired direction.
Remember, the guide chips are never cut all the way down! Otherwise, the direction of the tree's fall will become unpredictable. Always leave 10 to 5 cm (or approximately 10% of the thickness), after which the trunk is pushed in the desired direction.
If the saw blade is shorter than the diameter of the trunk, then the main cut can be made in several passes.
push and guide the trunk using a pole, a pre-installed winch, or cables longer than the height of the tree. And also using a special lever, wedges or even a jack.
How to cut down a leaning tree
Important point! If the inclination of the tree does NOT exceed 5-7° from the vertical, i.e., for example, the projection of the top point of a 10-meter tree is located at a distance of no more than one meter from the center of the future stump, then such a tree can be conditionally considered upright. It is sawed according to the scheme described above, but if the felling needs to be done in the opposite direction from the slope, two things should be taken into account:
- Remember that after finishing the main cut, you will definitely have to first align the tree in the desired direction, and you will also have to overcome the resistance of the guide chips. It is set as described above, using cables and other means. A guide chip can also help with this if one edge is made wider.
- The force on the ropes at some point may be too high, so it is necessary to use a pulley or winch to prevent reverse movement.
If the slope of the tree exceeds 5-7°, then it is better not to try to fell it in a direction other than its slope, but to resort to other methods (cutting in parts or simply spending time clearing this direction, if possible).
A few words about safety
When felling rotten or rotten trees, the guide chips should be left thicker than usual. Otherwise, it may burst at the most unexpected moment, and the tree will fall along an unpredictable trajectory.
The safe zone and the operator's escape zone are located on either side of the felling direction, and not in the opposite direction. If there is an error in calculating the thickness of the chips during a fall, the trunk may sharply move back.
Source: dacha.news
Wood detail as an accent in the interior
Small inclusions of “forest” in your usual surroundings will mentally bring you closer to nature. Saw cuts in the interior are used as decoration and perform certain functions.
DIY decorative fence +50 photos
We create fancy accents with our own hands:
Watch. The unusual use of sawn wood in any interior looks nice. Especially if it is an uneven circle with bark on the surface. The bark is fixed, because it can deteriorate over time. The more careless the wooden “pancake” looks, the more interesting the watch will be.
Flower vases. Give free rein to your imagination and use different types of branches. An ornament made with your own hands from small branches looks expensive, and no one will guess that the vase cost you pennies. It will harmonize with the design and will resonate with items with similar decor.
Mirror frames
When creating a product, it is important to adhere to rhythm or metricity, but chaos will be inappropriate. Alternate large cuts of wood with small ones, or make the entire frame from circles of approximate size
Any of the options will be correct.
Making a floor from saw cuts yourself is quite possible. Not to mention small interior items that can be made in a minute using wood, glue and your imagination. Surprise your friends with a tastefully decorated home and make your life more comfortable. This is an environmentally friendly product that will benefit your health. If the product is made of pine needles, then the light pine aroma can even help you treat a cold.
If you can handle the floor, then decorating an entire wall with wood will seem like a matter of five minutes. You will need to use your own taste and knowledge of composition, although most people trust their instincts.
Everything will work out, just “assemble” these products and secure them with glue, or simply cut out a solid object. Create an image in your head and try to bring it to life. You do not need special knowledge or skills; adhere to the basic rules for choosing materials and processing tools. After all, why spend a lot of money on a designer’s work if you can handle this task yourself without spending a penny.
Next, let's look at a couple of useful aspects of the work.
Processing frozen wood
Frozen trees, no matter what the species, are much more difficult to saw than dry trees, and therefore this type of sawing is a separate category. Due to the fact that trees are often cut in the cold season, selecting the optimal method for processing raw materials will be a very pressing problem. This will require tools with a strong construction - frozen wood will become stronger due to the fact that the moisture inside is frozen.
Sawing soft wood
If we talk about sawing soft wood, then things are somewhat different. Most of the methods that are used for sawing hardwood will work for softwood too. But there are other differences. Naturally, safety considerations must take precedence over the desire to produce as much product as possible in a limited time period.
It is natural to position the log in such a way that during sawing small defects appear inside the lumber, if everything is not so serious as to affect the final strength of the finished product. If possible, you should cut in such a way that all defects and knots are located on one side of the lumber, while at the same time the other side is clean.
True, in this case with building materials, a clean surface will not affect the final cost of the product, but large branches or even defects can greatly affect the structural strength. Select the worst side of the log and start sawing from there, making short lengths of lumber. The first lumber will be the worst, so it must be short to sell.
After the log has been sawn from the bad edge and along the entire length of the log, it is worth moving to the opposite edge, and also continue sawing parallel to the bark. From a good point, the width of the board you will cut should be no less than 0.15 m. On smaller logs, less than 0.3 meters in diameter, and the first board should be 0.1 meter wide. Larger logs will have far fewer defects inside, which means there will be no need to transfer them to larger structures for construction.
It is also worth always turning the log over to another side if the lumber from the new side turns out to be of better quality than from the one that was sawn before. This is how they make logs from waste - they cut the “ears” in one movement of the saw, and then turn the log over onto its “belly” and there is a chance that it will be possible to make at least a few small boards.
Creating a designer wall
For decoration, it is advisable to choose one side of the room. The design of all planes is a sign of bad taste, and the room will look overloaded. Any room needs to be given air, and it’s not about the windows. It should breathe space, and light empty planes give this effect. Only one “woody” edge of the room will become a kind of accent, which will become its mood. You can lay out the “wood puzzle” yourself, and now we’ll talk about how it’s done.
Floor vases in the interior +51 photos of different styles and shapes
Everyone has a dead tree in their yard that needs to be removed. Now it's time to chop it down. We take a branch and cut it into bars of medium thickness. You can remove the bark from the resulting “pancakes” and then sand it. Thanks to this, you will not drive a thorn when touching the wall. The resulting wood layers should be treated with a special insect repellent, and then placed on glue. It is advisable to varnish the resulting relief - varnished wood can last a long time.
Types of wood used for cuts in decoration
Important! The interior combines wooden elements, decorative stones or plaster well. When using wood material for decoration, it should be taken into account that when cutting a log, cracks and cracks open. Consequently, layers of wood must undergo carpentry processing.
And provided that the wood material is planned to be used in a functional role, then I advise you to restore the cracked sections of the cut. To do this, fill the damaged area with a special resin solution. After the resin has dried, we mill and sand the layer.
The following types of wood are used for decoration:
- spruce;
- pine;
- fir;
- ash;
- birch;
- oak.
When completing the finishing work, the cut of any type of wood must be coated with a paint and varnish composition. We discussed above how to process tree cuts for the interior (stain, paint, varnish).
Video Decorating a wall with a panel made from timber with your own hands
Home / Tips and ideas / DIY / Wood cuts in the interior: 20 inspiring examples and a master class
Anastasia Kuzmenko Mon, 29 Sep 2014 17:45:00 +0300
Tired of urban beauty, metropolitan residents are increasingly striving to return to natural sources, choosing an ecological lifestyle: ecological products, ecological cosmetics, ecological interiors. The latter can be called the main trend in the world of modern design.
You can find inspiration and tips for creating an ecological interior not only in the forest landscape, but also in fairy tales familiar from childhood. Remember Pinocchio? No, we are not suggesting that you cut out a talking doll from a log. There are many other ways to use logs, stumps and wood cuts in the interior. Today we will discuss how to use wood cuts in the interior and make decor with your own hands.
Thanks to their flat shape and the ability to choose almost any size (diameter and thickness), the scope of use of saw cuts in decoration is incredibly wide. Products made from wood cuts can be used as independent decorative accessories or in compositions, used as furniture parts or finishing materials. The number of original interior solutions involving this natural element depends only on your imagination.
For example, now such a design technique as the “inverted wall” is very popular. We are talking about the fact that inside the room one or more walls look the same as the outer cladding of the house, that is, the finishing material used is not standard wallpaper or tiles, but concrete, brick or wood. Cutting wood in the interior is a great way to achieve a similar decorative effect, as evidenced by the photo below.
If such an abundance of wood does not quite fit with the rest of the interior, you can create an original fragmentary finish. You can also use tree cuts, converted into art objects, in wall decor. A few natural or painted wooden circles in a picture frame will look very impressive.
The flat round shape of a wooden cut beckons experimental designers to find a master class on the Internet on how to create a homemade chair or coffee table in eco style. And those who are unfamiliar with needlework can simply use ready-made saw cuts as charming coasters for all occasions.
Instructions
The main stages of sawing wood
Since wood cutting services sometimes cost a lot of money, it’s worth trying to do everything yourself, especially if you have the right tool. So, first, make a corner cut on one side of the tree, and for this you will need to determine in which direction the tree leans the most.
A corner cut will be two inclined cuts that intersect approximately in the middle of the tree trunk, and if done correctly, you can even get a “slice” of wood. You need to make a horizontal cut on the other side of the trunk, which will reach the corner of the cut that was made earlier. The trunk, under its own weight, will “slide” towards the first cut and will immediately begin to fall.
Please note that if you made the calculations accurately and correctly, the cut tree will fall in the desired direction from which the first cut was made.
Then you can proceed directly to processing the trunk - cutting down twigs and branches, sawing the trunk crosswise into several parts. Thin branches must be cut in one step, and thicker ones in two steps. You should not allow the chain of gasoline dust to touch the ground, because this will quickly make it unsuitable for cutting. The branches on which the trunk falls should be trimmed carefully so that the wood does not settle and, even more so, the trunk does not start to roll.
Sawing a tree post always starts from the very top. First, you need to make cuts, mark the length of the separated trunk fragments, and then the wood can be sawed into several parts. It will be better to immediately cut small branches from the base of the tree to its top - the lower part of the trunk will lie more stable, and this will make it possible to cut off branches and twigs without fear that the tree pole may move.
How to properly cut a tree trunk
In order to correctly cut wood into several pieces without damaging the tool, you will first need to make a cut to the middle of the trunk and turn off the stove, leaving it inside the wood. Next, you need to drive a wedge into the resulting hole to widen the gap, and this is done so that the saw chain does not begin to deform due to the pressure of the two halves of the barrel. Once the hole has been widened, the tree can be sawed to the end.
Please note that if the bar from a gasoline saw is stuck inside the wood, and especially if we are talking about hard wood, then you should immediately turn off the device, and then you should try to get the saw and simultaneously work on both halves of the wood trunk for help.
For this, you will also need the help of a partner, and this is one of the many reasons why you cannot work alone when cutting wood - there are many moments in such a matter in which it is impossible to do without the help of a second person.
How to cut wood
After cutting down the tree, it should be properly divided so that you get as many finished wood materials as possible - beams, boards, etc. The best option would be to cut a still fresh tree that was cut down quite recently.
There are three factors that affect the quality of the finished wood product:
- The quality of the raw materials (the absence or even the presence of irregularities on the trunk, as well as various knots).
- Thickness and shape of the trunk.
- The right way to cut wood.
At home, to cut a trunk, you can use a basic set of tools, or rather a hand or electric saw and a jigsaw with a powerful motor. Sawing wood using an electric jigsaw requires preliminary marking, and in order to obtain neat and even products,
Certain rules must be followed:
- Sharpen the saw, and its teeth should be bent in different directions so that the saw chain does not get stuck in the wood.
- Before work, markings should be made using a pencil, pen or marker, and it is worth making sure that the marking lines do not intersect areas with defects.
Next, we propose to consider what methods of sawing the material are available.
What methods of sawing wood exist?
If you use a method such as laser cutting, then sawing trees will be done accurately, saving raw materials and time - this technology will make it possible to accurately cut wood with a minimum amount of waste and residues. With a laser, it is possible to cut wood of different thicknesses, and in order to avoid fires, you should definitely cool the cut area, because when laser sawing, the cut will be subject to temperature treatment. Machines for creating wood materials are used in industry.
Such devices are very large, but they are capable of working for a long time without interruption. Among all types of machines, multi-saw and circular saw models can be distinguished. The latter perform transverse and longitudinal sawing using circular saws, while the former, on the contrary, can saw and cut wood using several saws, both in turn and simultaneously.
A wood sawing line is a complex of one or more machines. Such a device is very expensive and is purchased only if
when large volumes of wood need to be processed regularly.
- Splitting and sawing - splits and saws logs of any species using a circular saw or even a chain saw.
- The line that processes round timber is equipped with two modules for sawing and a pneumatic system that removes sawdust.
- A line that sorts logs is required to optimize sawmill operations.
- Optimizing line - it automates the supply of trunks for processing and makes it possible to replace manual labor.
Advantages of decorating the interior with wood cuts
Wood cuts surprise at the same time with their visual appeal and the complexity of their creation from a technical point of view.
Now let’s see what advantages wood finishing has:
- Durability. If the wood can be properly processed and is protected from moisture and various mechanical damage, then it will last quite a long time. If it is a whole wooden wall or floor, then you can save on annual repairs.
- Thermal insulation. Firewood is a source of heat not only in a fire. The raw material has the ability to maintain temperature, so for a cold concrete apartment this is the best type of insulation, albeit partial. In winter, such an insulated floor will warm any feet.
Decorative tree from branches
Uniqueness. You can, of course, hang wallpaper with images of wood cuts, or lay laminate flooring, but in such pictures a pattern is used - a simple repetition of one module. Natural finishing with saw cuts is a composition where each element is unique. The pattern on the saw cut and its shape are unique.
How to uproot a tree and use the stump on your property
Old trees in a garden plot cause a lot of trouble for owners. Not every private household has the equipment to carry out such labor-intensive work. But even in the absence of equipment, there is always a way to put your garden in order. How to uproot a tree on your property? There are many ways to remove diseased and old trees.
You will need a shovel, an axe, gloves, comfortable shoes and a saw. If the saw is electric or chainsaw, then the easiest way is to first cut off the crown of the tree so as not to damage neighboring plantings and buildings. Then cut the branches and trunk into pieces and lastly start uprooting the roots of the tree. Look - perhaps the stump will not spoil the appearance of the site. Then it can be turned into an element of garden design. When sawing a trunk, you must immediately decide what height of the stump you need for landscape design. If the stump is completely unnecessary on the site, we remove it using one of the following methods.
Kitchen ideas based on semicircular cuts
This figure is an unusual piece of decor and a reliable assistant in the kitchen. The material can withstand high temperatures and does not heat up as much. From saw cuts you can create simple one-piece stands and modular ones, the material of which is easier to find. Everyone has seen such stands in a store and thought “No, you can’t do this yourself” - a wrong opinion. Why pay more if you do it yourself?
The kitchen will be complemented by fancy semi-circular shelves, which can be put together from solid cuts of wood, dividing them into two parts. The illusion is created that the “round block” is in the process of sinking into the wall. An interesting technique is if the shelf is round, this creates visual movement. The effect is achieved due to the dynamic relief on the bark. Cookbooks or personal collections of the housewife's recipes will harmoniously be placed on the shelves. And the product will withstand quite a lot of weight, even if its dimensions may not inspire confidence.
Transforming stumps into site design elements
When all the stumps are uprooted, examine their size, configuration, volume and mentally figure out where they could stand and be a decoration of the garden plot. Now the stumps can be washed, cleaned, trimmed off the excess root system and transported to a permanent place. You will feel for yourself where this or that stump looks best on the site. I have moved my stumps more than once to find a permanent place for them.
When I visit different places in my region, country and abroad, I always admire good aesthetic and design ideas for landscaping different landscape areas. Stumps and stones-boulders always add originality to gardens, parks, alleys, playgrounds, green areas, uniquely decorating any corner of nature. It’s a pity that such beauty is short-lived and requires annual care and renewal.
But these are pleasant worries in which you are able to show extraordinary imagination and create your own unique world of nature. Waste-free production of uprooted stumps can become a work of art in your hands. Go for it!
Creating home comfort with homemade furniture
Furniture looks completely different depending on the type of raw materials available. Tables and chairs are made, since the silhouette of the cut itself already resembles a small table or chair.
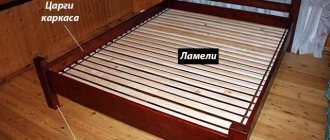
There are two basic principles for creating furniture:
Modular - assembly of an element from small parts (modules). Actually, we are already familiar with this method. It allows you to create a product of absolutely any shape. Here it is also necessary to achieve a perfectly flat surface. Dishes will be placed on the table, and to prevent them from overturning, the surface of the table must be perfectly polished.
Solid - a solid element is taken as a basis. This option is much simpler than the previous one in technical terms, but it is more difficult to find a large diameter bar. Things are better with chairs, but if you want a table where the whole family can dine, you will have to tinker with finding a large-diameter cut. The price of a dimensional cut is quite high.
It doesn’t matter what principle you apply to creating a product, the main thing is to immediately assess your capabilities so as not to spoil the material. Any method is good, because wooden furniture is famous for its strength and durability
How to remove an old tree: planning, working with the crown
The main difficulty in how to cut down a large tall tree is the following - the mass of the deciduous crown is distributed unevenly, and it is difficult to calculate the path of fall. Even if the base is cut correctly, deviations are possible. Therefore, if you want to complete the work without unnecessary risks, do it not in the summer, when the vegetation is very rough. Choose weather without rain or gusts of wind; the tree trunk should not be slippery.
How to cut down a tree on your property safely? Competent preliminary preparation is needed. Attach a stepladder to the trunk, remove the lower branches that you can reach. When working on stairs, hold the chainsaw with both hands at once, as if hugging the barrel. If you need to cut down a tree in parts, the crown must be thinned out. Go from the bottom up - this way the cut branches will fall freely, without getting tangled in the already cut down ones. Tie the rope to control the height of the fall 1 m from the tree trunk. When pruning branches, leave knots up to 30 cm.
In situations where the crop is large and tall, and the height of the stepladder is not enough, the foot sling is thrown onto a convenient strong branch or wrapped around the trunk at a given height. This will allow you to trim with your feet resting on the loop parts; the sawing area should be in the area of the working person’s chest or slightly lower. How to correctly cut down a tree in the right direction with preliminary pruning - hug the trunk with one hand, wrap the second lanyard for a belt harness, connect the loops with a carabiner, tighten the coupling. You can turn your back to the trunk and rest your feet on the branch that is being cut (but cut it in front of you). Adjust the heights and lengths of the slings before cutting. Make sure in advance that there is enough free space for maneuver. Then begin to lift the saw from the ground by the rope. The binding location should be located at a distance from the vehicle controls.
Video Decorating a wall with a panel made from timber with your own hands
The faster industry develops, the more people try to get closer to nature. He surrounds himself with nature not literally, but by creating the illusion of being in the air, even if he is relaxing in the living room. This is the desire not only to live in a house that is built from natural raw materials, but also to come up with an appropriate interior design. Therefore, everyone strives to use hand-made wooden decor in their home in order to feel like a real owner.
The fashion for wood appeared a long time ago, but now not everyone can furnish their own home in the style of the TV series “Twin Peaks”. The room should not be oversaturated with wooden furniture, furs and animal heads. This already speaks of the bad taste of the owners. These blanks are available for forest areas, but for steppe areas, finishing a house in this style will cost a pretty penny. There is an option to dilute the usual surroundings with rare inclusions of wooden cuts, which result in absolutely any image. You can create such a design yourself, spending only on fastening materials.
Mechanized method
If the length and depth of the roots are large, then you cannot do without special equipment. Just a couple of pulls with the tractor and the tree will be removed. The problem usually arises in how to get equipment to a tree on an already developed site, when plantings, plantings, beds, flower beds, buildings and fences interfere. To uproot one trunk with a diameter of 20 cm on your own, you need to make every effort for half a day or more. The development of a completely abandoned and overgrown plot of 10 acres took us the entire summer season. Today, well-groomed territory and flower beds delight not only the family, but also the neighbors.