Advantages and disadvantages of epoxy when working with wood
Working with wood and epoxy resin is fun. Knowing how to work with epoxy correctly, you can create amazingly beautiful things. If earlier such material was used when filling various surfaces, now designers actively use it in their work. The resinous substance gained popularity due to its many advantages:
- low level of abrasion;
- high strength of products and their durability;
- versatility - epoxy can be given any shape;
- after polymerization, the finished product can easily be subjected to any additional processing;
- possibility of using various dyes.
The resin is very popular among lovers of making home decor items.
But epoxy resin for wood also has some disadvantages. For example, epoxy begins to exhibit its declared qualities only after combining it with a special hardener. The resinous substance becomes completely safe only after hardening. During work, it is necessary to use personal protective equipment and constantly ventilate the work area.
For design work, it is better to use jewelry epoxy; it is of much higher quality, but also has a higher cost.
Details
Preparatory stage before applying paintwork
Before you begin the varnishing process, you must prepare the base. The following procedures will be included in the preparation:
- Remove any types of contaminants, this includes debris, dirt, grease stains, dust, old paint and varnish, and flaking particles of old coating.
- If the varnish is applied to a metal surface, rust should be removed from it by hand sanding or power tooling.
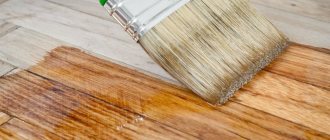
- If you plan to use wood varnish, the wood surface should be sanded and primed.
- Before you begin processing the concrete structure, all cracks should be repaired and the base should be leveled.
- Plastic products should be matted with standard sandpaper and then degreased with solvent or alcohol.
If the mixture is of a two-component type, then it should be properly prepared before application. A hardener should be added to the base, and then the mixture should be thoroughly mixed for 5-10 minutes. Next, you should wait a couple more minutes for the chemical reaction to complete, and at this time some types of varnishes become a little whitish. Once all the air bubbles have come out, you can begin applying the solution. You should immediately remember that epoxy-polyurethane varnishes have a certain pot life, and it usually ranges from 1 to 2 hours. During this time, you should have time to apply the entire prepared and diluted mixture. If you need to varnish large surfaces, then prepare the solution in batches. After every 20 minutes, the prepared composition should be mixed.
Varnishing rules
The procedure for applying two-component epoxy varnish to parquet or concrete can be carried out using a spray gun or manually - with a roller or brush. The varnish composition should be applied at temperatures from +5 to +30 degrees, and air humidity should be less than 80%. Under no circumstances should there be dew or condensation on the treatment surface, and the surface temperature should not be allowed to be lower than +5 degrees. The varnish usually dries after 8-13 hours, and complete polymerization occurs after about 48 hours if the air temperature is approximately +20 to +25 degrees.
The best method of application is, of course, spraying from a spray bottle, but if you still don’t have a spray gun, then you can use wide rollers. Please note that the wider the roller, the better, since the varnishing process will be easier and faster. When applying the composition to a concrete or parquet floor surface, you should not go over the same place twice, and thanks to this the coating will be the same in thickness and homogeneous. If varnishing is done with a roller, then ideally you should make cross-shaped movements. Due to transverse movements, the varnish will be applied to the floor, and longitudinal movements will level the applied solution. Near walls and columns, as well as other obstacles, the application speed should be reduced. Before you start varnishing, the roller should be rolled out.
Technological features
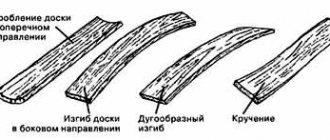
When considering the question of how to fill a tree with epoxy resin, you need to take into account some of the features of such a material. The structure of the wood is heterogeneous, and air bubbles can accumulate inside it. And when the temperature changes, the wood begins to change (expand or contract). The accumulated air begins to come to the surface, spoiling the finished work.
To prevent this, when pouring resin into wood, it is necessary to take into account the temperature of the working room: namely, 2–3 hours after completion of work, ensure a temperature regime of +20–25⁰С. If you plan to pour a thick epoxy layer, then the entire process should be done in two stages - this minimizes the risk of air appearing and escaping.
How to properly impregnate wood
Before using epoxy resins to fill wood, the working material (wood) must be heated. This process leads to the expansion of wood pores and better penetration of resin. After the surface has hardened, the fill is subjected to the necessary finishing treatment.
The quality of the final work directly depends on the correct ratio of the proportions of resin and hardener. In the classic version, 1 part catalyst is added to 10 parts of epoxy.
How to eliminate air bubbles
If all measures have been taken, but air bubbles appear on the surface of the resinous substance, they can be removed. You should not heat the surface - this will lead to the appearance of new air pockets. You should use one of the following options:
- Using a thin needle, carefully pierce the bubble.
- Spray the surface with an alcohol solution using a spray bottle.
- Air pockets that are too large are drilled out. The resulting cavities are cleaned, the surface is degreased and a second layer of fill is applied.
Working with wood and resin requires compliance with all stages of production
Epoxy resin for wood
Epoxy resin offers many possibilities that are unlike any other material. When combined with wood, you can get a wide range of design possibilities: epoxy resin coated with wood as a protective layer, wood in molded forms, epoxy resin river tables and more. We'll show you what's possible with a combination of epoxy resin and wood, and give you specific instructions, ideas and tips.
Various properties of polymer products
Epoxy resin is a two-part material that hardens within a few hours of mixing the components and can then be cut, sanded and polished. Unlike polyester and polyurethane resins, epoxy resin shrinks significantly less during cure. All other products may peel off the wood within a few hours or days and are therefore not suitable for use. There are products for different applications and it is important to choose the right product .
Two main types of resins
- high viscosity resin for coating layers
- low viscosity resin for pouring molds or
UV protection/yellowing resistance
Resin reacts differently to UV rays . The resin usually comes in a clear form and tends to yellow due to sunlight and is no longer completely transparent. However, there is an epoxy resin with the highest UV resistance for outdoor and furniture use that is resistant to yellowing . In some cases, UV protective additives may be added to best reduce yellowing.
Surface hardness
Once the resin has cured, there can be a huge difference in surface hardness. Some products are quite soft , other products are scratch and temperature resistant . For everyday items such as cutting boards, countertops and other items that are subject to high mechanical stress, it is worth purchasing a higher quality resin .
Tip: Follow the specified mixing ratio to ensure the resin hardens well.
Best recommendations for epoxy resin for wood
You can't go wrong with the following professional products and are guaranteed to get good results. They are characterized by less shrinkage, good fluidity and good compatibility . In our opinion, these are the best epoxy resins for wood:
Epoxy resin for surfaces – LEYMON-EPOXY ART
If you are looking for a durable resin that will keep your piece clean, shiny and glowing, then Leymon-epoxy Art epoxy resin is the perfect option. This artistic resin is specially formulated to create an attractive and protective finish for a variety of surfaces. It is completely non-toxic, does not emit hazardous fumes and can be used safely in all environments.
The resin kit has a self-leveling formula. This helps provide a high quality UV resistant protective coating. Once cured you will have an incredibly glossy, shiny finish. This gloss is also long lasting and with added UV protection it should not yellow.
The kit is easy to use and can be mixed in a ratio of 2:1. There is 1 kg of resin and 0.5 kg of hardener, this makes 1.5 kg. high performance epoxy resin.
pros
- Heat resistance and UV protection
- Very glossy and transparent appearance
- Occupies a large surface area
- Can be used for various arts and crafts purposes.
- Easy to add color
- Scratch resistant
- Food safety and non-toxic
- Goes well with phosphors
Leymon-epoxy Art epoxy resin is incredibly durable and was specially developed for pouring various surfaces (pictures, coasters, cutting boards, jewelry, etc.).
- It has increased viscosity, due to which it is evenly distributed over the surface of the product without flowing down the edges.
- Resin/hardener ratio - 2/1.
- Life time - 40-60 minutes .
- Complete polymerization time is 24 hours .
- The thickness of the fill is 2-3 mm.
The resin is food safe and contains no volatile organic compounds. It is also scratch resistant and designed to withstand heavy use. The formulation also includes excellent UV resistance to maintain the shine of surfaces.
BEST RESIN FOR FILLING - LEYMON-EPOXY RIVER
For large shapes such as the RIVER TABLE without excessive heat during curing and a crystal clear look, LEYMON-EPOXY RIVER EPOXY RESIN :
- The thickness of pouring one layer at a time is up to 4.5 cm . (For large volumes, the maximum thickness is determined experimentally)
- Life time - 40-60 minutes.
- Polymerization time is 24-48 hours .
- Complete curing - 7 days (at a temperature of 22 C)
- The resin is fully compatible with pigments and dyes
Where most other resins need to be applied in thin layers, this epoxy resin can be poured in layers up to 4.5cm thick. You can expect a slow cure period due to the low exothermic reaction rate, which means the resin does not generate as much heat when curing. This resin is less prone to shrinkage, has a very low odor, and emits no volatile organic compounds (VOCs) at all.
Most epoxy resins will develop a yellow tint over time, although this is less obvious on colored parts. This product contains special UV inhibitors that will help prevent yellowing of the resin. The phosphor mixes well with this resin and gives a long-lasting glow to the product. Epoxy resin should never be mixed with or poured into an oil-based product.
pros
- Long service life
- Minimum shrinkage
- Faint odor
- No VOCs
- Glossy crystal clear surface
- Self-leveling
- Food safe
Minuses
- Do not apply to oil paints or stains.
- Slow cure time
- In some cases heat is required to remove bubbles
Once completely dry, the coating will be resistant to impacts, stains, water and other damage. This product has a faster cure time than most others, as your resin will fully cure in 48-72 hours. To add color, you can use mica powder for best results.
This resin is one of the safest options in terms of toxic fumes. This is due to the fact that the resin is practically odorless and does not emit any volatile organic compounds. However, we still recommend using appropriate protective clothing when working with this resin.
Wood and epoxy resin: everything you need
To apply epoxy resin to wood, you will need the following things:
- 100% silicone sealant
- Mounting gun
- Silicone oil
- Orbital sander
- Sandpaper
- Grinding and polishing paste for glossy surfaces
- Orbital Buffer/Polisher
- High quality wood oil
- Resin mixing cups and stirring sticks
- Heat gun/gas burner
- Level
- Professional masking tape
- High Density Drop Fabric
- Nitrile gloves
- Respiratory mask
- Eye protection
- Tree of your choice
Step 1: Preparing the Wood
Before applying epoxy resin or pouring epoxy resin, the wood must be prepared:
- Polish
- Degrease
- Wood should not be oiled
- No hairs/fibres or loose bark pieces
Small parts can be sanded by hand. For large surfaces such as a wooden table, we recommend using a sander.
Tip: Before pouring, use a bubble level to check that the wood surface is completely level. Otherwise, due to the flow characteristics, the epoxy will only flow to the very bottom and will not flow properly.
Step 2: Mixing Resin
The two components (resin and hardener) must be mixed in a container. The entire mixture must be mixed well for several minutes. This is the only way to ensure that the curing process will proceed as planned. Ultimately, it should have an even flow without streaking. Only then can color be added .
Wear nitrile gloves to prevent your skin from coming into contact with the liquid.
Mixing proportions are indicated on the packaging. There are different systems on the market today: 1:1 ratio, 2:1 ratio, 4:1 ratio and 100:35. Epoxy resin is usually sold with pre-packaged resin and hardener in the exact quantities needed.
Plastic or wooden spatulas are best for mixing . Be sure to stir thoroughly to minimize air bubbles.
Now you are ready to pour, or apply, the resin mixture.
Application 1: Wood sealing
Epoxy resin is suitable for both sealing wood and waterproofing it. Some examples of this application include sealing countertops, wood planks in the kitchen, or furniture. It can also be used to seal kitchen countertops, wood floors, or any other application. As you can see, the application possibilities are endless.
How to apply epoxy resin to wood
Once the wood has been prepared according to Step 1 and the resin mixture has been mixed, you can begin. The biggest problem is the flow of the material: until the resin hardens, it flows pretty quickly anywhere.
- If you want to make a table out of epoxy resin, you will need to tape the edges to prevent the resin from spreading or dripping onto the floor.
- Apply epoxy resin to the wood surface and spread it over the entire surface with a putty knife or squeegee . If you have correctly calculated the required amount, a completely covered surface will be created, which will automatically level due to the flow property.
- Remove air bubbles using a heat gun or torch.
- As soon as you notice that the viscosity is getting higher, you should stop working, otherwise you will no longer be able to achieve a uniform surface.
- Before you start working with large objects and surfaces, it is recommended to practice with a test sample first. This will give you a feel for the process and how to handle the product. You should also not neglect time, because you have a maximum of half an hour to fill the entire surface.
Application 2: Epoxy Putty - Wood filling and repair
Old weathered pieces of wood, boards eaten by woodworms, or gnarled pieces of wood with knots are usually of no interest to carpenters. However, for artistic use, this wood is ideal for filling with resin.
How to repair cracks in wood with epoxy resin
If you have a board with holes or cracks that you want to fill, first make sure that they are not solid and that the resin cannot run down through the bottom. You can seal these holes with tape or use silicone caulk, which can be easily removed later.
Now you can fill the cavities with the resin mixture. Here it makes sense to paint the resin so that in the poured areas there is a contrast between the color of the resin and the color of the wood. Dyes or paints that glow in the dark are also exciting possibilities.
After the resin has hardened, it is necessary to sand the epoxy surface.
Application 3: Filling wood with resin (resin casting)
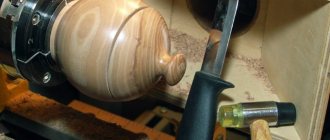
Beautiful pieces of wood can be completely cast in resin. Bars with a bright texture or small hairs are ideal. For example, you can make jewelry from epoxy resin , use a piece of wood for turning , or create a decorative piece .
Tutorial for pouring resin into wood:
There are two possible options for this application:
- You can use a silicone mold. There are special molds for epoxy resin of all shapes and sizes. You place a piece of wood into your desired silicone mold and then pour in epoxy resin. Depending on the size of the mold, you may need to cast multiple layers to prevent the resin from getting too hot. Once it has set, carefully separate the mold from the casting and you can use it again and again.
Make your own casting mold. For this process, use laminated panels that you seal with silicone sealant and then spray with silicone oil. If you don't use a special coating, the resin will stick to the panels and you won't be able to release the mold.
Dyes to create contrast with wood
The resin can be used when it is clear , but can also be easily colored. There are many possibilities such as transparent colors, metallic effects or opaque liquid colors. Regular acrylic paint will not work as it contains water. In this section you can familiarize yourself with the paints that can be mixed with all epoxy resin.
Sanding after curing
To be on the safe side, we recommend waiting a week before sanding and polishing your resin surface. Cured resin may appear soft underneath the surface, causing damage to the product.
Depending on the size of the object , fine grit sandpaper and can be used for either dry or wet sanding. You should always sand from coarse to fine grit so that there are no visible sanding marks.
For large surfaces such as RIVER tables , floors, countertops, etc., you should use an orbital sander for best results. An orbital sander not only rotates, but also produces a finer sanding . Additionally, sanding takes less time and is much less likely to result in uneven sanding in some areas.
The final step is to polish, oil and finish your artwork.
Epoxy resin does not necessarily require surface treatment. However, depending on the application, the wood next to it appears untreated. Additionally, fine marks on the epoxy may still be present and the depth effect is not optimal. In this case, you can use the following procedures:
- Apply fine polishing compound to a rag and rub the epoxy in a circular motion. You will polish the surface and remove all sanding marks on the resin surface. Make sure that the paste does not spread on the wood, otherwise the pores of the wood will become clogged. For larger surfaces, an orbital buffer/polisher .
- Wipe off the polishing compound thoroughly, making sure there is no residue. The surface should now have a beautiful shine.
- If you are still not satisfied, repeat the first steps.
- Now the wood requires final processing . Epoxy resin can also withstand finishing. Use a good quality wood oil , apply generously with a cloth, let it soak in for a few minutes, then wipe dry. You can also use varnish. Additional steps are then required for further polishing at the end.
Application 4: Wood repair with epoxy resin
Before you start working on anything, you need to first determine what the root problem is, the cause of it. If you can't figure it out on your own, ask for help.
For example, wood rots due to moisture released through another part of the object. In this case, you will have to replace the rotten part with something more resistant to moisture, such as redwood. Also, it would be nice if a sheet of metal could be held between them to avoid any contact.
Now this is a great way to control the problems that led to the first result. Another problem that can arise is that the paint on the wood ages and becomes ineffective, then the wood absorbs water and rots. This can be easily fixed by applying another coat of paint.
Repairs can now be easily made in these situations by introducing new materials into the environment and eliminating the cause of specific problems. But in cases where the reasons are much more complex, this can become a challenging task. In this case, epoxy resin can come to the rescue.
The only caveat you should take with epoxy is that you will have to let the wood dry completely, which may take longer than you expect. If this is not done, the wood may rot further due to trapped moisture. This way the epoxy and wood will not bond properly.
Now that you have an idea of where to start, let's take a step-by-step look at the process of repairing wood with epoxy resin.
Step 1: Remove damaged parts
Using a screwdriver, try to determine the extent of the damage by poking at rotten or rotting parts. Now these parts should either be removed or secured with epoxy hardener.
To remove all the necessary parts, you will need a paint scraper, a screwdriver and a chisel. Once you are sure how badly damaged the wood is, begin the process by removing the top layer of paint along with the rotten parts of the wood.
If the part has some hope of salvage and is sufficiently dry, drill 0.5cm holes, each 2-3cm apart, and let the epoxy do its magic. It should be absorbed into the rotten wood. If the surface is vertical then it would be better to have deeper holes so that the consolidating agent gets maximum space inside and the moisture also gets space to escape allowing the epoxy to soak in.
Step 2: Use liquid epoxy resin.
Choose a ventilated area to work in or prepare with a respirator to combat fumes. How to use the resin largely depends on the manufacturer's instructions. Read it at least twice as the proportions of epoxy resin and hardener must be accurate.
Once the mixture is prepared, squeeze it into the holes that were drilled into the wood for the necessary repairs. A small brush makes application easy. Continue doing this until the entire piece is soaked and everything has been absorbed.
After this, it is important to let the wood dry for at least a week.
Step 3: Prepare Putty for the Exterior Surface
Even if the consolidant has not completely frozen, you can move on to this part. This may be a little difficult to understand, so please read carefully.
To begin, take two pieces (A and B) of epoxy filler equal to the size of a golf ball using a wooden stick. Using a spatula, stir them for some time until they are completely combined.
Also make sure that the items you use for mixing are clean. If new epoxy resin is mixed with leftover cured resin, it will react and reduce your working time.
After this point, temperature will be of great importance as it will determine when the resin filler begins to cure. At around 21°C you will have 30 minutes to work. The warmer it is, the faster the epoxy resin will harden. If the temperature is lower, the epoxy will take longer to cure. This is why it is recommended to work in the shade so that all materials are cool when mixed before application. But once this is done, the part can be held in the sun to heat up the wood epoxy for faster curing.
Step 4: Fill the cavities with epoxy filler.
Using a putty knife, squeeze the putty onto the areas that need to be repaired. Make sure you apply a little force to get the epoxy and wood to bond.
To ensure optimal use of filler when filling deeper areas, you can cut pieces from another piece of wood and secure these blocks after application is complete. You can apply additional paste on top of them for better results. Make sure the pieces you use are made from the same material and the grains are aligned when you fix them.
Step 5: Shape the placeholder into the desired shape
Wearing gloves, use your fingers to create the desired shape. Filling the voids can make shaping easier. It should also be taken into account that the shape does not have to be perfect and must be consistent with the surrounding materials.
Step 6: Reshape
Check the hardness of the epoxy and if there are no dents in it, then it can be sawed off with sandpaper and other tools. First work out the rough outline using a plane or rasp. It is best to follow the natural shape of the surrounding wood.
Once you nail down the bases, use sandpaper to add details. This will help you work the surface where needed. For best results, wrap the sandpaper around a stick or cylindrical body so you can sand more accurately and avoid accidentally sanding unwanted areas. This step must be taken with great patience and precision. Take your time and make sure that only the areas you want to work on are covered.
If more epoxy is removed, you can always apply a second coat. Before doing this, make sure that the first layer is free of dust and the filler is thoroughly mixed. If you want a thinner layer, you can mix a little hardener and then add filler to get the consistency you want. Heat up the new coat with a dryer and then you can continue sanding again. If you then coat the epoxy resin properly, it can last a long, long time.
After you first sand with 80-grit sandpaper, use 120-grit sandpaper to improve your work. Your eyes should be protected while sanding, so be sure to wear goggles and a mask over your nose and mouth. Remove dust using a vacuum cleaner and acetone.
Step 7: Paint for Protection
Start with a primer and then add two coats of acrylic paint to seal the epoxy and wood. Use polyurethane sealant to complete the final layers.
Repairing wood with epoxy resin can be easily done using the process described above. Make sure to take all precautions as stated and review the materials you are using in advance for clarity.
Processing - Tips and Tricks
Working with epoxy resin casting has its pitfalls. We have listed the biggest problems for you and will tell you how to avoid or solve them.
Does epoxy bond to wood?
Yes, epoxy resin generally adheres almost all surfaces. Resin with low viscosity penetrates better into the pores of wood and binds to it. Instead, a high viscosity resin forms a layer on top.
Epoxy resin shrinks too much
Resin, especially cheap resin, shrinks during the curing process and can lead to cracks or peeling on the surface. Here's a tip: test how the resin will react to scrap wood , and if necessary, buy a higher quality product .
Epoxy resin penetrates wood
For any porous surfaces such as wood, it is especially important to seal the surface . You don't need a separate product for this, you can simply apply a thin layer of resin to the wood and let it cure. Then you have ideally prepared the wood for final surface treatment.
Several bubbles in cast resin
Air bubbles occur when two resin components are thoroughly mixed. This can't really be prevented, but they can usually be removed from the material without any problems: after the casting process, you can use a torch or hot air gun on the surface in quick movements and the bubbles will rise and disappear. To remove stubborn bubbles, you can also use a toothpick to break the bubbles. Hair and dust can be removed in the same way. However, the surface should still be liquid and able to level out again.
Optimal operating temperature
Ideally, you should work with the material at a temperature of around 20 degrees Celsius and with as little humidity as possible . This will give you the best results and reduce quality loss. The ambient temperature must remain constant until curing is complete to prevent cracks or unevenness from forming. It is recommended that you consult the specifications of the respective manufacturers as they vary from system to system.
The resin is very hot during casting.
Depending on the resin used, a suitable thickness of each layer is approx. 1–2 cm. The resin may boil if applied in too thick layers. For this reason, you should try pouring thin layers and wait until they harden before pouring the next layer and so on. This will give you the surface thickness you want.
Epoxy resin cures too quickly
Different resins have different cure times. Additionally, a general rule of thumb is that the larger the amount of mixture , the faster it will harden. It may then be helpful to separate the mixture to prevent it from curing prematurely.
Resin appears cloudy after curing
This could be due to three reasons:
- The epoxy resin is too old and expired.
- You did not maintain the exact mixing ratio.
- You are using low quality resin.
Prevent yellowing
To ensure that clear or crystal clear epoxy resin retains its shine and clarity, you must purchase a special anti-yellowing resin. For colored resin this is not necessary.
Epoxy resin storage
Epoxy resin that has not yet been mixed has a relatively short shelf life of about 12 months from production . Therefore, when purchasing, it is important to pay attention to these dates and use the material within these periods . To avoid loss of quality when storing the product, keep it at a temperature of 10–30 degrees Celsius.
Is cured epoxy resin safe?
In the hardened state, epoxy resin is chemically neutral and is fundamentally suitable for contact with food. It is no coincidence that this material is also used for prosthetics, decorating aquariums, food containers, covering kitchen countertops and much more.
Health recommendations when working with resin
Even if not specifically stated by the resin manufacturer, you should use the product in a well-ventilated area . It is also recommended to wear a respirator with an appropriate filter and use nitrile gloves to avoid coming into contact with potential allergens.
Master class on working with epoxy resin
Curing of epoxy resins
Leymon-epoxy Team September 3, 2021
How Long Does Epoxy Resin Take to Cure - A Complete Guide to Epoxy Resin Drying Times Are you looking to create...
Read more
Phosphor in epoxy resin
Leymon-epoxy Team September 3, 2021
Glow in the Dark Epoxy Resin - Glow Powder in Resin (Luminophor) Exclusive glow in the dark items add...
Read more
How to Remove Epoxy Resin
Leymon-epoxy Team September 2, 2021
Best Epoxy Remover Epoxy resin is an extremely versatile material and working with it offers a number of...
Read more
How to cure sticky resin
Leymon-epoxy Team September 2, 2021
What to do if your epoxy resin is sticky and won't cure When using epoxy resin, you may sometimes find that...
Read more
Epoxy resin for wood
Leymon-epoxy Team September 2, 2021
Epoxy Resin for Wood - Examples of Uses of Epoxy Resin for Wood Epoxy resin offers many options that...
Read more
DIY epoxy table
Leymon-epoxy Team August 27, 2021
Tutorial: How to Make a DIY River Table from Epoxy Resin and Wood In this tutorial I will show you step by step how...
Read more
How to make cup holders from epoxy resin
Leymon-epoxy Team August 26, 2021
Resin Coasters Tutorial - How to Make Epoxy Resin Coasters Resin crafts have recently found themselves in the spotlight...
Read more
How to make an epoxy resin ring
Leymon-epoxy Team August 26, 2021
Tutorial for Making Epoxy Resin Rings Want to try a new hobby and don't know what to do? Working with resin...
Read more
Preserving flowers in resin
Leymon-epoxy Team August 26, 2021
Pouring Flowers in Epoxy Resin Resin is a very versatile substance and has many uses, but for...
Read more
DIY epoxy resin tabletop
Leymon-epoxy Team August 17, 2021
How to Make an Epoxy Countertop Many homeowners want to transform the surface of their countertops in their...
Read more
3D epoxy floor
Leymon-epoxy Team August 17, 2021
How to Make a 3D Epoxy Floor Are you looking to give your new home or office a makeover or create something special?…
Read more
Is epoxy resin waterproof?
Leymon-epoxy Team August 17, 2021
Your guide to waterproof epoxy resin. Epoxy resin has many useful properties, including being...
Read more
Epoxy clear coat
Leymon-epoxy Team August 16, 2021
Best Top Coat for Floors, Pictures, and Countertops Once you've coated your floor with epoxy, there comes a time when you can...
Read more
Types of Resins - All about the different types of epoxy resins
Leymon-epoxy Team August 16, 2021
Resin has so many uses that it can be shaped and molded into any structure or shape, it can be used as...
Read more
Thinning epoxy resin
Leymon-epoxy Team August 16, 2021
How to properly dilute epoxy resin? Epoxy resin is a durable material that is used in many applications such as...
Read more
Epoxy resin for garage floor
Leymon-epoxy Team August 14, 2021
Epoxy Garage Floor Coating Tutorial Using epoxy garage floor coating has many...
Read more
Polishing Epoxy Resin - Instructions for Mirror Smooth Resin Surfaces
Leymon-epoxy Team June 2, 2021
Epoxy Resin Polishing - Instructions for Mirror Smooth Resin Surfaces Anyone who has ever made a piece of...
Read more
Sanding epoxy resin - step by step to a perfect surface
Leymon-epoxy Team June 2, 2021
Epoxy resin sanding - step by step to a perfect surface To achieve a perfect surface on an epoxy resin part after...
Read more
Epoxy Resin Lamp - Resin Wood Lamp Instructions
Leymon-epoxy Team June 2, 2021
In this blog post you will find an exclusive tutorial on how to make epoxy resin lamps from wood. I'll show you step by step...
Read more
Stabilize Wood With and Without a Vacuum Chamber [Instructions]
Leymon-epoxy Team May 28, 2021
Wood is a material that can be used to make furniture and tableware, as well as works of art.
However, the tree also has... Read more View all publications on this blog
Options for using epoxy in design
For design work with wood, it is better to use transparent epoxy resins. This composition highlights all the elements and emphasizes the beauty of the tree. Products that use resin with the addition of pigment look very original.
Advice. When working with paints, it is better to choose tinting compounds of the same brand as the epoxy used.
There are many different design techniques for working with wood and resin. For example, adding sawdust, sparkles, dried flowers to the composition. And when using luminescent paints, the product will become simply fantastic (the steps glow in the dark will prevent you from slipping, and various illuminated decorations will highlight any image). To obtain the effect of soft milky stains, water droplets are added to the resin when pouring. What can be done?
- Original furniture. Furniture elements filled with epoxy become unusual. Tables, chairs, even doors can be highlighted and made exclusive. When working, you can use any creative ideas.
- Unusual shelves. You can also create original and unusual shelves. You can make them yourself, based on the given dimensions and emphasizing the overall style of the room.
- Bar counters or tabletops. Such models not only emphasize the style of the premises, but can also create separate “islands” with their own exclusive design, becoming the central point of the interior.
- Lamps. You can create real masterpieces from epoxy and wood, even various models of table/floor lamps, lamps and night lights.
Epoxy is used not only to create unusual and unique interior details. This material adds strength to the processed product, significantly extending its service life. For example, a staircase made of epoxy, even despite the high cost of the working material, will ultimately cost much less than work according to the classical scheme for installing flights of stairs.
To obtain an impeccable final result when working with epoxy resin, you should choose this material wisely.
Decorative items can be made from resin
Tips for the master
When choosing epoxy adhesive for work, it is worth considering some additional factors:
- Turn on the “gift of soothsayer” and look a little into the future. In which room, dry or damp, cold or hot, will the furniture glued with epoxy be placed?
- In this regard, how environmentally friendly is the glue used to join parts, and will ventilation allow you to cope, especially at first, with at least a little of the odor emitted by the adhesive compositions.
- Regarding the strength of the seam, predict impact loads on furniture elements. It’s one thing when a 2-year-old child moves a chair, and another when 7-year-olds who have an awl in a certain place start fighting with chairs.
In general, epoxy adhesives will satisfy the most demanding buyer, and even the most inexperienced, novice craftsman can handle the ease of joining components.
How to choose the right epoxy for wood
All epoxy resins used for work are divided into two large groups. This:
- Construction materials. They are used in various industries. And also for repair, tuning, shipbuilding, etc. For this group of epoxies, the substance requires increased impact resistance and hardness.
- Decorative (or jewelry). These materials are most suitable for design ideas. They are transparent and allow you to see the entire structure of the tree. They are also actively used to create paintings, jewelry, sculptures and various souvenirs.
Jewelry epoxy resins are used for design work. Their important quality is resistance to ultraviolet radiation (the coatings do not turn yellow over a long period of time). The advantages also include increased fluidity. But decorative epoxies have a higher price.
The modern market of finishing materials offers a fairly extensive line of epoxy resins. To avoid confusion when choosing, consider the following recommendations:
- To fill large surfaces, such as countertops or bar counters, a thick layer of epoxy is required. Moreover, the mass should not overheat and turn yellow. For this task, Epoxy River brand resin is the best choice.
- For smaller jobs, universal epoxy is better suited. It hardens quite quickly and can be poured with either a thin coating or a thick layer. For such purposes, choose Aquaglass Citrus.
- And to create unique jewelry and costume jewelry, an important requirement for the resin is the absence of toxicity, resistance to deformation and yellowing, and economical use. Considering that such work is carried out at home, the safest is resin from Diamant.
How to pour resin into molds?
All epoxy resin items are prepared using pour molds. There are two proven methods, as a result of which the production of crafts is without flaws.
The first method is to let the mixed resin sit for half an hour. During this time, the ingredients go through all stages of the chemical process, the substance acquires properties suitable for work without the likelihood of unpleasant surprises.
Decorative decorations are placed in the mold, then the mixture is slowly poured in a thin stream. After hardening, the craft is easily removed from the mold, and the surface is polished.
With this method, the product turns out smooth, without bubbles or flaws, but the decorative elements slide down the mold. If in theory they should be evenly distributed inside the craft, then this method of filling is not suitable.
The second method is similar to the first, but is carried out in reverse order. The master class includes the following steps:
- The mixture settles for half an hour;
- First, resin is slowly poured into the mold in a thin stream;
- Then decorative objects are immersed in it using a toothpick.
Using one mold, you can create various products with your own hands, playing with decorative filling.