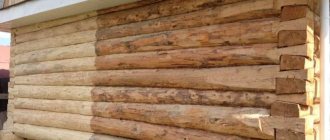
How to sand wood correctly?
Sanding wooden surfaces is a complex technological process that requires the use of special consumables and tools. Among the features we note the following points:
- Sanding wood involves careful preparation of the surface for the operation in question. The workpiece must have exact dimensions taking into account the allowance.
- Grinding involves the use of abrasives with different grain sizes. A common question is how to polish a complex product consisting of several planes.
- When working, the workpiece must be securely fastened. Otherwise, the quality of processing is significantly reduced.
Wood is considered an easily processed material. That is why problems with grinding, as a rule, do not arise.
Factors to consider
If you need to process a wooden surface, then you need to choose the optimal device to do it correctly; you should take into account several important criteria:
| Type of product being processed | It can be anything: load-bearing elements made of timber or logs, finishing made of lining, block house or boards, window and door blocks, furniture elements, decorative items and much more. Naturally, each type of product has its own optimal tool option, with which you can achieve the best quality of work with the least amount of time and effort. |
| Sanding quality | Another important factor, because in some situations it is necessary to smooth out large irregularities, and in others it is necessary to bring the surface to an ideal state. Therefore, before sanding wood, you need to stock up on the necessary consumables - discs or brushes with different grain sizes. |
| Scope of work | Smaller projects can be handled by hand, while larger projects will require the use of power tools, otherwise they can take weeks or even months to complete. If you decide to sand the wood yourself, the easiest way is to rent the necessary equipment; the price of this service is low. |
For large volumes of work, you will need a sanding cup for wood - its service life exceeds all other options tens of times
What is the best way to sand wood?
A wide variety of tools can be used to process wood. In many workshops and garages you can find almost everything you need to carry out such work. There are several tools that answer the question of how to sand wood:
- Drill.
- Bulgarian.
- Belt sander.
- Surface grinder.
Sanding wood with a grinder
The grinder has become quite widespread. It is a universal tool; grinding requires a special flap-type attachment. Other features of the process include the following:
- To make the nozzle you will need pieces of sandpaper. They must be secured to a rigid base.
- There are wheels on sale with different hardness levels, each suitable for a specific case. An example is the use of a No. 40 wheel to remove paintwork. To give smoothness, use a wheel with grain No. 120.
Grinding wheels
Another common question is how to sand wood when using a drill. Such a tool can be equipped with a special attachment, which has a pin for the cartridge in the central part. Among the features of using such a tool, we note the following points:
- All circles have a small diameter, the largest is 125 mm.
- Different grain sizes also allow for various types of work: from roughing to finishing.
There are several types of drill wheels. Most have a hard base, some have a rubber base. An adhesive substance, as well as various Velcro, can be used to adhere the sandpaper to the base. By increasing the flexibility of the disk, the processing quality can be improved.
You can also find a surface grinder on sale. This mechanism is characterized by the fact that the fixed sandpaper quickly performs a reciprocating movement. Many abrasive attachments are designed so that the sandpaper can be quickly replaced if necessary. Compared to a drill, the tool is characterized by high productivity, but it is difficult for them to process a large surface area.
Processing wood with a belt sander
The belt sander is characterized by the highest productivity. It can be used to process a wide variety of wood. The main disadvantage is the high cost, since professional equipment in this category costs 7,000 rubles or more. A special attachment can be used as a working belt, which can have a different grain size.
Wood processing
For those who build wooden houses, repair or manufacture wooden furniture, it is important to be able to properly process wooden products. First of all, decide on the necessary tool
The most common and affordable is an angle grinder (angle grinder) or, as it is also called, an angle grinder. This tool is available in every home. With its help, you can perform almost all wood processing work: sanding logs, leveling, sanding and polishing.
Grinder attachments for wood
First of all, you need to know which attachments are used for a particular operation.
- To perform rough preparation of logs during the construction of a log house, a disk plane is used. When working with such an attachment, the tool should be held with both hands. Sometimes workers remove the cover, but then it is necessary to protect the face from flying chips.
- The stripping disc is designed for removing bark from logs. If necessary, they can be used to saw lumber. In this case, the disadvantage is a wide cut and a large amount of sawdust.
- Finishing is used when grinding of a log house is needed. In this case, discs with abrasive are used.
- Brushes are used when it is necessary to level the surface.
- End discs are used when processing ends, corners or oblique cuts.
- If grinding wood with a grinder is necessary, sanding floors, processing ends and edges, preparing the surface before painting, use flap attachments and grinding wheels.
- To sand boards with a grinder, use wheels made of fine-grained sandpaper, felt or other material.
These are the main, but not all, attachments used for angle grinders. In order to sand wood with a grinder, you need to know the basic techniques. Cleaning of the log house is done using end attachments. The device should be held at a slight angle. This attachment is easy to clean not only corners and joints, but can also effectively clean logs. The timber is sanded in the same way.
Using angle grinders to artificially age wood
Nowadays, wood processing is very popular, allowing it to be artificially aged. This technique is called brushing.
The work is done with an angle grinder using a special set of attachments.
First, a steel-bristle nozzle is used. It selectively removes fibers, roughing the timber. Before painting, the workpieces are finished polished using devices with copper or sisal bristles. Sometimes a universal abrasive polymer brush is used.
Sanding a wooden floor
When carrying out major home renovations, it is often necessary to sand the wooden floor. First of all, it is necessary to remove all protrusions using appropriate tools. And only after this the wood is finished, using grinding wheels with the required grain.
In order to properly sand wooden products, you should know that there are many methods by which you can bring the workpiece to the desired state. Each of these methods has its own advantages and disadvantages. For the job to be successful, you need to have some experience, and also not forget about personal protective equipment.
Grinding with a surface grinder and an angle grinder
Most often, a special surface grinder or angle grinder is used for sanding wood. Such tools are characterized by high performance and ease of use. When choosing the most suitable attachment for such devices, the following points are taken into account:
- If you need to remove paint from wood at home, then pay attention to a coarse abrasive. It is characterized by high productivity and can quickly remove a fairly thick layer of material from wood.
- In the case when it is necessary to remove a thin surface layer due to its high roughness, an abrasive with a medium grain size is required. This type of implementation is the most widely used.
- Particular smoothness can be achieved by using fine-grained abrasive. The wood is cleaned to a similar quality by setting the nozzle to a high rotation speed.
Surface grinder on lerevo
When using this tool, it should be taken into account that the removal of wood is not carried out along the grain, since the nozzle used rotates in a circle around the axis of the fastening. Only some models have the function of adjusting the rotation speed; the feed can only be adjusted by eye. It is recommended to use an angle grinder only if high performance is not needed.
Special equipment is represented by a surface grinder. Among its features, the following points can be noted:
- The nozzle makes a reciprocating movement, and the surface layer is removed along the fibers. Due to this, high quality is achieved.
- The sandpaper moves at high speed. This indicator allows you to achieve smoothness.
The design of a surface grinder is quite simple; as a rule, there are no problems with its use. But when processing wood over a large area, difficulties arise. Some models have a large working surface, which improves the quality of the product.
The nuances of choosing a disc for an angle grinder for sanding wood
Any circle for an angle grinder is marked, which contains all the necessary information:
- diameter;
- thickness;
- seat size;
- permissible speed;
- recommended material for processing;
- best before date.
Marking of grinding wheels
The minimum standard disc diameter is 11.5 cm, but for sanding wooden boards with a grinder it is recommended to install attachments at 12.5 cm. Large diameters - over 15 cm - are not very suitable for processing wood, and create an increased risk of injury.
It is a bad idea to polish a wooden piece with a wheel of a larger diameter than intended by the angle grinder manufacturer. This option will not provide a single advantage, but there are plenty of potential problems:
- Causing injury;
- disk failure;
- lack of standard power of the grinder for working with a circle of the wrong size;
- the need to remove the protective cover under the nozzle.
The abrasiveness of the wheel depends on the type of work planned. For rough, rough processing, discs with coarse grains are used, but the finer the grinding should be achieved, the smaller the grain size of the abrasive selected.
Advice! An interesting option is a circle with replaceable adhesive attachments of different abrasiveness. True, the quality of the products is not the highest, which is why they wear out quickly.
Belt type sander
As previously noted, a belt-type grinding machine is characterized by high productivity. In this case, wood sanding occurs at high speed, but the equipment used is expensive. Among the features of using a grinding machine, we note the following points:
- The impact on the surface being processed is a round sanding belt. In this case, the grain size can be very different.
- The design removes wood along the grain.
When using a draw frame, it should be taken into account that the design cannot handle corners, since the belt has low flexibility. The tool is often used for sanding floors, walls and furniture.
Manual way to sand a wooden surface
In the absence of a special tool, grinding can be done by manually processing the surface. This requires only a special block, as well as sandpaper with a grain size suitable for the specific type of work. Among the features of this process, we note the following points:
- The design has a special fastening element, which ensures the fastening of sandpaper.
- Coarse sandpaper can be used to sand a product with a high roughness. This is due to the fact that small ones wear out quickly. Grinding should be carried out in several stages, due to which a high level of smoothness is achieved.
- Manual grinding is often carried out when the product has a small area.
- When using bars of various sizes and shapes, complex products can be processed.
Read also: How to determine the error of a pressure gauge
Manual grater for sanding wood
The manual method has been used for quite a long period. It is worth considering that achieving the required result is possible only if you have extensive work experience.
Mechanical removal
To remove sagging from the surface of the boards, you must first wait until they harden. The frozen mass is removed using a sharp object . A knife, spatula, or scalpel are suitable for this. When all drops have been removed, the board is polished with sandpaper or a sanding tool.
In some cases, it makes sense to drill out large resinous areas in the area of knots with a milling tool or cut out with a knife. The resulting recesses are filled with putty or a wooden chopstick is inserted onto the glue. Then the board is sanded.
If localized lesions are left, they will be a constant source of sticky droplets in the future. The release of resin on softwood boards increases when heated.
What are the advantages of hand sanding?
If you don’t have special tools to sand the wood, you can do this by hand. To work, it is enough to have only a piece of sandpaper and a special block, which you can make with your own hands. The advantages include the following points:
- Low cash costs.
- You can sand any surface and hard-to-reach places.
- Grinding can also be carried out in the absence of an energy source.
However, there are several significant disadvantages, including low performance.
What not to do and why?
Removing resin from a board is not difficult if you use the correct cleaners. Before you get started, there are some taboos to keep in mind .
Firstly, you cannot use products containing acetone or alkali for painted boards. Such chemicals can ruin the appearance of the coating.
Secondly, it is not recommended to paint or varnish wood until all traces of resin have been completely removed from it. This will lead to uneven painting and will require additional restoration work.
About grinding pads and making them yourself
The simplest tool can be called sanding pads. They can be used to work with a wide variety of workpieces. Among the features of common pads, the following points can be highlighted:
- Most versions consist of three main parts: the shoe and the locking mechanism and the handle. The body is used as a base; the fixing element does not allow the sandpaper to move during operation.
- Branded pads are made in a variety of shapes and types. In most cases, plastic is used in the manufacture of the case, which is characterized by low weight, but also low strength.
Homemade sanding block
If desired, you can make such a tool yourself. For this, an ordinary wooden block is used, to which the skin is attached using nails or screws. The handle can be attached to a block to simplify the grinding and polishing process.
When making a homemade structure, it is worth considering what size the workpiece will be processed. If the size is too large, the working area should be larger, but problems may arise with selecting the most suitable skin.
Why clean up?
Natural resin protects tree wood from many adverse factors. However, during the construction and operation of wooden structures, the adhesive substance brings a lot of trouble. Similar problems are caused by synthetic resin that gets onto the boards during work.
Any tar stains must be removed for several reasons:
- resin is a sticky substance, various objects (tools, rags, clothes, materials) can stick to it;
- resinous areas darken over time - this spoils the overall appearance of the wood coating;
- If there are stains and discharge, it is impossible to achieve beautiful, uniform varnishing or painting of the boards.
How to choose sandpaper for working with wood?
When choosing a consumable, quite a few different points can be taken into account. Let's take an example:
- Grain size.
- Type of abrasive used.
- For what purposes is the consumable material intended?
As a rule, the marking indicates the abrasive grain size according to ISO. When selecting, special tables can be used. Wood is processed with fine-grained sandpaper for a small number of defects and before polishing. Dry or wet sanding
Dry grinding is most often carried out. This technology is easy to implement and consumables are cheap. There is also wet sanding, which involves the use of special paper.
Wet grinding and polishing involves supplying water to the processing area. Due to this, the wood softens. Today, such technology is used extremely rarely.
Grinding technology
Working with wood to achieve the required roughness involves performing several main steps. They are as follows:
- Preparing the coating.
- Primary roughing.
- Fine grinding.
- Putty of the smallest elements.
- Final polishing and grinding with application of a finishing coating.
The final stage involves polishing. Through such actions, high surface quality can be achieved.
Coating preparation
The preparation stage involves primary surface treatment. Among the features of this process, we note the following points:
- It is recommended to work with P120 and P150 abrasives before polishing. The choice is made depending on how severe the defects are.
- The next stage is sanding with sandpaper P180 and P240. Due to this, the required roughness for coating the product with paint is achieved.
Primary preparation
At this stage, the main thing is to remove all defects that will not allow the paintwork to be evenly distributed over the surface. If the wood is properly prepared, it will look attractive after the finishing is applied.
Primary grinding
Primary removal of defects involves the use of sandpaper with a small grain size. This is due to the fact that fine sandpaper can wear out quickly.
The surface treated with coarse sandpaper is similarly prepared for fine grinding.
Fine grinding
The degree of wood roughness can be reduced by using a fine abrasive. When carrying out such work, it is worth considering the following points:
- The skin will wear out quickly.
- It is necessary to ensure rapid movement of the abrasive.
After fine sanding, in most cases the wood is coated with varnish or paint. Further processing is carried out only when higher quality is required.
Filling gaps and small defects
The most problems arise with filling gaps and smaller defects. As a rule, such work is carried out manually. Let's call its features the following points:
- The skin with the finest grain is selected.
- Hard-to-reach places are treated by hand.
- During operation, dust generated should be removed periodically.
Wood putty
Such work is carried out extremely often in the case of making furniture and other utensils from wood.
Final sanding
This stage is often the final one. Among its features we note:
- All defects are removed.
- Consumables are carefully selected depending on the roughness that needs to be achieved.
- It is carried out using manual and automated equipment.
Final sanding allows you to obtain a very high-quality coating that can be covered with paint and varnish material.
Priming and finishing coat
The topcoat can be applied in various ways. Most often the process is carried out as follows:
- With a spray gun.
- With brushes.
- Soft material.
Priming wood
Priming is carried out to smooth out unevenness; the topcoat prolongs the life of the wood.
Wood polishing
High quality can only be achieved by using special skins. Polishing of stain coatings is carried out in order to avoid applying a topcoat. Among the features of this procedure we note:
- The finest grain sandpaper suitable for polishing is selected.
- A special substance intended for polishing may be added.
- The speed of movement of the abrasive during polishing should be maximum.
Due to this, the lowest roughness is achieved.
Application of polishing for finishing
Polishing is often done as a finishing touch. This technology is characterized by the following features:
- There is no need to apply a finishing material as polishing makes the product smooth.
- It is used when it is necessary to preserve the texture, since polishing does not deform the texture.
Polished wood
Today, polished products are found on sale extremely often. They look quite attractive and are comfortable to use.
Polishing technology
The technology in question is very common. It can be used at home; it is presented in several main stages:
- By grinding.
- Applying primer.
- Polishing.
- Polished.
Each one should be given a lot of attention, since, for example, improper grinding will not allow for high-quality polishing.
Surface grinding
Wood surface treatment involves sanding to prepare the surface. It is carried out in several stages:
- Sandpaper No. 46-60.
- Sandpaper No. 80-100.
- Abrasive paper No. 140-170.
Read also: Jrm a55 what is it
As a result, you can get a glossy tree. It is recommended to use special equipment for this work.
Application of primer
Only after applying the polish can polishing be carried out. The technology is as follows:
- The substance is applied with a swab, which must be well soaked.
- Allow some time for the substance to dry on the surface. The wood is wiped with a clean rag.
- Apply two more layers of varnish.
Primer for wood
It takes about two days to dry the wood. After this, you can carry out final polishing.
Polishing
After applying the special substance, the following work is carried out:
- The tampon is soaked in vegetable oil. Due to this, the degree of sliding increases.
- The product is covered with an even layer.
- After each stage of applying the polish, you need to wait a little.
After the last layer has dried, the wood is treated with sandpaper, the wood is wiped with a rag to remove dust and polished.
Polishing
The final stage is polishing. It is carried out in several stages:
- It is sanded with fine-grained sandpaper, which is lubricated in vegetable oil.
- Vegetable oil is applied to the tampon, the wood is slightly wetted.
As a result of polishing, the product becomes smooth and of high quality. This type of finishing can be done at home.
When carrying out various types of repairs, at the time of production of furniture or wooden things, it is often necessary to sand the wood. There are quite a few methods that can be used to sand wood. They have their advantages and disadvantages, some involve the use of hand tools.
You can sand wood:
- When using an angle grinder, you can bring the condition of the tree to the required condition. The grinder has an abrasive material represented by a circle;
- a regular drill can also be used to bring the surface of the wood to the desired condition;
- a surface grinder can become the main design for sanding wood;
- belt sanders are used for sanding wood using an abrasive material;
- Sanding can also be done using hand tools.
Despite the fact that the natural material in question has a fairly high structural hardness, quite a few grinding methods can be used; we’ll talk about some in more detail.
How to prepare wood for sanding?
Wood is the material from which most furniture and interior elements are made. Its versatility makes it a raw material often processed by enthusiasts. To restore furniture, you need to properly prepare it. First of all, do not forget about safety. Buy a dust mask, as sanding produces dust that is harmful to the respiratory tract. Make sure the area you are going to work in is well ventilated. If you are going to use an electric sander, you will also need gloves and goggles.
Before you start sanding, clean the surface first. Make sure that the wood is not saturated with moisture. If you are not using a sander with a dust collection system, then prepare a vacuum cleaner or brush to remove dust. If using hand sanding, you will need a sandpaper block or holder. Prepare sheets of sandpaper of different grits and a wallpaper knife, with which you can cut the paper to the desired size. If you are using a grinder, prepare a set of discs.
If you want your wood to look its best after sanding and to last as long as possible in perfect condition, the first step is to get rid of any dust that may have occurred during sanding. You can use a soft cloth lightly dampened with water. This will help collect as much sticky and dry waste as possible. If you do not use a sander with a vacuum cleaner, it is worth repeating this action from time to time while sanding. The finished wood needs to be thoroughly impregnated so that it is not damaged in the future.
Which sander is best for sanding wood?
The choice depends on your skills. Experienced woodworking enthusiasts and professionals will likely use an eccentric or belt sander. An angle grinder is less recommended since it is most often used for cutting or fabricating metal. You can work with it on furniture, but then you need to be very careful because it can easily burn the sanded surface (especially when it does not have a speed control). The undoubted advantage of this power tool is its low price.
Grinding with a surface grinder and angle grinder (grinder)
An angle grinder (grinder) is a multifunctional device that is also used in this situation. Special circles are used for this. Petal wheels are made from sandpaper, which is attached to a flat surface. In this case, the circle can be of different diameters, with different grain sizes. When choosing, you can highlight the following recommendations:
- to remove paint, use a coarse-grained wheel;
- if it is necessary to remove a thin layer of wood, you can use an abrasive that has a medium grain size;
- In order to give the wood a special smoothness, you can use a fine-grained abrasive.
However, it should be noted that the surface removal will not be carried out along the fibers. At the same time, it is almost impossible to regulate the rotation speed and feed. You can use an angle grinder in cases where there is no need for a high performance indicator.
In order to sand wood, you can use special equipment called a surface grinder. The features of this include:
- The wood is combed using a reciprocating motion of the abrasive material.
- The sandpaper moves at high speed, which allows you to achieve good results when working.
- Unlike other methods, in this case the grinding machine carries out processing along the fibers, which determines the high quality of the product.
The design is quite simple, allowing you to achieve good quality. But when changing large surfaces, the grinder has low efficiency. Certain models have a fairly large surface to which the skin is attached, but in this case it is quite difficult to provide the necessary force.
Belt type sander
The belt sander is the most productive tool that can be used for processing wood with high productivity. The inkjet technique also has high productivity.
DeWalt Belt Sander
The work of the structure is carried out using a round sanding belt, which can have varying degrees of grain size. The design removes material along the fibers. However, do not forget that it is impossible to polish the corners using this design. The tape can be used for a large volume of work: floors, walls, furniture, and so on.
Despite the greater automation of work, it is possible to provide mechanical action manually. This is due to the fact that fiber removal can be done in the desired direction. It is also possible to process corners. However, in order to achieve the desired result, you need to have certain skills. The work is very difficult and time consuming. Therefore, hand tools are very popular only in certain cases.
If you find an error, please select a piece of text and press Ctrl+Enter.
When the part is ready, its surface should be carefully sanded.
For solid wood parts, it is customary to smooth out saw cuts or remove traces of glue, sand down areas where chips have broken off, or smooth out protruding wood fibers with the finest sandpaper before the wood is covered with stain or varnish. Even cladding made of plywood or veneer, which has an almost smooth, flawless surface, can be varnished without preliminary sanding only as a last resort.
Panels and parts made of solid wood may have almost imperceptible irregularities, which will become clearly visible after applying varnish, stain or other protective agent.
It is clear that sanding should not lead to the appearance of new scratches and grooves. You will avoid this danger if you use the correct sandpaper and block for your product.
Cycling
When planing blanks made of solid wood, more or less noticeable grooves remain after the plane. The best way to eliminate them is cycles.
Many home craftsmen prefer to process surfaces with just a scraper and completely abandon sandpaper. A well-sharpened scraper can clean planed surfaces and give them an almost flawless appearance.
The cycle is a metal rectangle with a cutting edge sharpened at a right angle, which is passed along the surface. The cutting edge becomes dull, so it needs to be sharpened from time to time. First, a chamfer (the beveled side of the cutting part) is ground on a whetstone or wheel, then the grinder is turned over, placed flat on the whetstone, and in this position it is driven along the stone in straight or circular movements, grabbing the cutting edge of the edge.
When working, take the cycle with both hands so that the thumbs are in the middle of the edge facing you. Always place the cycle at an angle and guide it in the direction of the wood fibers. Use the scraper only on solid wood, plywood or veneer. Particle boards quickly dull the cycles and leave nicks on them. It is better to use sandpaper to process putty surfaces.
Cycles smooth out unevenness left by a plane or protruding wood fibers.
Moistening the wood and applying primer
Whether you use scrapers or some other method, in any case, before sanding the surface of parts made of solid wood or lined with plywood or veneer, it must be moistened.
Read also: Frost-resistant adhesive for rubber
To do this, it is better to use warm water (you can even use hot water if the part is made of solid wood). Then you need to wait until the parts are completely dry. Small dents will disappear when exposed to water.
But the cut wood fibers, pressed to the surface of the part before they are moistened, swell and, having dried a little, stand upright. Therefore, the surface, which seemed impeccably smooth before moistening, often becomes rough and fleecy.
After sanding, the surface becomes smooth again.
Primer for quick sanding
The surface of a wooden part, regardless of whether it retains its natural appearance or is covered with stain or varnish, is primed.
The primer closes all the pores, as if sealing them.
As a result, the hygroscopicity of wood is reduced, and the paint applies better and more evenly than on an unprimed surface.
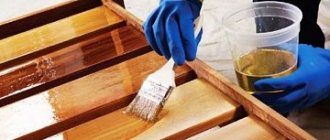
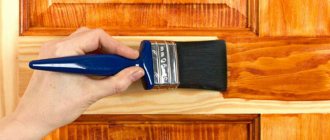
Make sure that the room you work in is dry, dust-free and not too cool. This way you will create ideal working conditions. It is more convenient to apply the primer with a soft flat brush.
The primer dries in about half an hour. But wait at least an hour before you start sanding the primed surface with the finest grit sandpaper (no. 240). Work only in the direction of the wood grain, change the sandpaper often and knock out the fine dust that forms during sanding.
The surface, which seemed impeccably smooth, became rough and fleecy after moistening.
Using a flat brush, carefully apply the diluted primer onto the prepared surface.
Sanding smooth surfaces
When sanding smooth surfaces, it is important to use sandpaper correctly: sandpaper that is too rough will scratch the wood, sandpaper without a boss will sand the surface unevenly. The boss ensures an even fit of the skin to the wood over a relatively large area. Usually a cork boss is used. But a small wooden block with even, smooth edges will do just fine. You can also use special holder pads made of hard rubber or plastic: they consist of two parts - upper and lower, between which sandpaper is placed.
First rough, then fine
To clean rough cuts with a saw, use sandpaper with a coarse abrasive coating (100 grit). Planed surfaces are sanded with 120-grit sandpaper. For a fine, final sanding, use 180- or 240-grit sandpaper. Sand the wood all the time in the direction of grain growth and without excessive force. Experienced craftsmen avoid working surfaces with sandpaper for a long time, and their movements are very light, almost without pressure. As a result, the tiny ends of the fibers are only pressed against the surface, but are not cut off.
A special grinding device is the so-called “sand plates” of different sizes and grain sizes. Each is a steel plate with tiny “pins” protruding from the surface with sharp edges. When grinding with such a plate, due to the large distance between the pins, a lot of sawdust is formed, and their cutting edges remain sharp for a long time. In practice, “sand plates” are noticeably more “aggressive” than ordinary sandpaper.
If the surfaces of large parts are sanded by running a boss wrapped in sandpaper over them, then when processing small parts they proceed differently: a piece of sandpaper of a suitable size is secured on a workbench with strips of tape and the part is passed over the sandpaper. This avoids rounding of the edges. Before proceeding with further processing of the part, after grinding it should be thoroughly cleaned of dust.
When sanding smooth surfaces, use a special pad so that the sandpaper is evenly pressed against the wood.
Small parts are best sanded by running sandpaper on a workbench.
Auxiliary devices made of cork and plastic for fixing sandpaper. “Sand plates” are glued to the handle plate.
Curved lines and profiles
Sanding difficult edges and profiles requires special flair and the right sanding tool. A boss with a sandpaper pad will not work here. It is often more convenient to work by simply taking the paper in your hand and holding its edges between your fingers so that they do not scratch the part.
When processing parts of complex shapes, it is advisable to use homemade “files”. They are made as follows. Narrow strips of sandpaper are glued onto strips or round sticks. With such “files” you can cleanly process the smallest curves or the narrowest recesses on turned parts.
Sanding sponges, which are sold in hardware stores along with sandpaper, are well suited for sanding rounded surfaces. The sponges have an abrasive coating of coarse, medium or fine grain on both sides, and a thin soft spacer between the coatings gives the sponge special flexibility and elasticity. There are also sanding sponges that are thicker and quite rigid: they are designed for sanding smooth, defect-free surfaces.
Wood dust is removed from the sponge by squeezing it. You can also wash the sponge, but wait until it is completely dry before using it again.
Coarse, medium and fine grit sanding sponges are particularly suitable for sanding curves and profiles.
The sanding jaws are so flexible that they fit tightly around any curve and even multi-stage profiles.
If you hold the sandpaper with your hand, be careful not to let the edges of the paper scratch the wood.
Sanding "files" can be made from strips of suitable sandpaper glued to strips or round sticks.
Roundings
The processing of a wooden part is usually completed by slightly rounding its edges, that is, the sharp edges of the transitions from one plane to another or from the front to the end surface are slightly ground down.
Be very careful and careful when performing this work, as the sharp edges of the part can cause injury. Do not make sudden movements when turning the part over, which could cause it to hit some hard object and, consequently, cause damage. After completing the roundings, the treated surface can be varnished. Note that on the rounded edge the varnish lays down in a uniform film and adheres better, whereas on the sharp edge of the transition from one plane to another this film is very thin and often breaks.
Perform roundings using sandpaper only with a boss, which is directed at a 45-degree angle to both surfaces. The boss ensures uniform grinding and rounding.
Make sure that the work is carried out, if possible, in the direction of the wood grain, and on the end sides - from the middle to the edges. When sanding along the edge, you need to slightly press the boss with sandpaper to the surface so as not to break off the wood fibers.
When rounding edges, guide the sandpaper-wrapped boss at an angle to the side edges or with light pressure along the edge.