Many craftsmen have encountered the gluing of wooden furniture panels at least once in their lives. This procedure is simple, but requires a competent approach.
If professionals are well acquainted with all the nuances of working with wood and the gluing result turns out to be quite predictable, then beginners may have certain problems.
In today's article we will tell you 6 important rules for gluing wooden panels that will help you achieve the highest quality results. We strongly recommend that you put these rules into practice.
The author of the YouTube channel GORDEEN`s workshop shared with us his personal experience of gluing wooden panels in a home workshop.
Rule 1: alternating tree rings
Boards obtained by tangential sawing are characterized by extreme instability, which usually manifests itself in the form of warping. If you glue a furniture panel from such boards, you will not get an ideal plane.
To level out the defect, it is necessary to cut the board into pieces and glue them together so that the growth rings alternate in a checkerboard pattern.
With this approach, the deformation will be extremely insignificant and existing surface irregularities can be removed without problems using a thickness planer.
Glued laminated timber technology
4.1. Application area of laminated timber
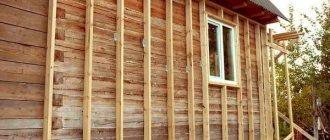
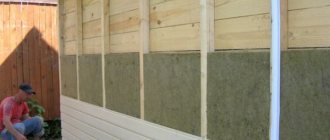
The production of construction parts from laminated veneer lumber significantly improves the strength and performance characteristics of products. Beams made of laminated veneer lumber are used in the construction of floors, roofs and ceilings (Fig. 28). Walls are also made from laminated veneer lumber (Fig. 29).
Rice. 28 The use of laminated wood beams in wooden house construction
Rice. 29 House walls made of laminated veneer lumber
Glued laminated timber is used in the manufacture of wooden windows (Fig. 30).
Rice. 30 The use of laminated veneer lumber in the manufacture of windows
Rule 2: dimensions of glued workpieces
The optimal size of the workpieces is determined not by eye, but by a special formula, from which it follows that the width of the workpiece should not exceed its height by more than 2 times. This rule is important to follow.
Ideally, the cross-sectional shape of wooden slats prepared for gluing furniture panels should tend to be square.
Please note: the width of one workpiece should not exceed 8 cm. It is best to use wooden slats 5-6 cm wide.
The nuances of placing fasteners when marking chipboard parts
At the design stage of the wardrobe body, they try to plan the internal content in such a way that the visible sides have a minimum of through holes. After all, even if you seal the hats of the confirmations with self-adhesive plugs, they will be visible and this will somewhat “cheapen” the appearance of the furniture. This can be done in several ways:
- Design open niches on the sides of the wardrobe for installing rods and pantographs for hangers with clothes.
- Most shelves are secured not rigidly, but using shelf holders.
- To rigidly fasten shelves, use eccentrics and dowels rather than confirmats.
When preliminary marking the drilling sites for fasteners, use the “32 system”, and the same distance is retreated from the edge (for example, 50mm). This allows you to automate the process of preliminary addition of parts for further assembly and eliminate errors as much as possible.
Expert opinion
Strebizh Viktor Fedorovich, leading construction foreman
This type of connection allows you to rigidly connect parts, but through holes worsen the appearance and the likelihood of parts splitting is higher than when fastening with corners. If you want to clarify something, please contact me!
Rule 3: workpiece geometry
It is very important that the wooden slats are well-finished and that their entire surface adheres to the plane.
It is equally important to maintain an angle of 90 degrees on each workpiece, so that when tightened with clamps, the shield does not move with a bump.
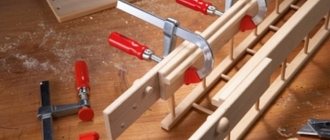
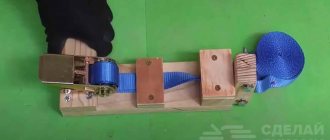
Wood gluing tool
To obtain the most durable connection, when gluing, the wood is pressed - subjected to compression using special presses. At home, improvised tools and means are used for these purposes - vices, clamps, cam devices, frames made of metal corners with clamping mechanisms. The pressure when pressing wood is maintained in the range from 0.2 to 1.2 MPa. In production, large values are possible; at home, such indicators are enough for the structural parts to stick together.
Do-it-yourself laminated wood.
If the gluing technology is followed, the adhesive seam is strong and reliable, and, unlike the method of joining parts with metal fasteners, it does not spoil the appearance.
For those who like to create household items on their own, FORUMHOUSE has opened a topic about furniture for home and garden. You can find out how to organize a convenient corner for working with wood in the article about arranging a carpentry workshop. The video about wooden elements in a country house shows interesting products made by users of the portal.
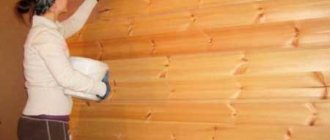
Rule 5: Apply wood glue
Wood glue must be applied to the entire plane of the workpiece in an even layer. In other words, the glue needs to be distributed over the entire area.
But you also don’t need to overdo it, otherwise the wooden slats will slide relative to each other and the shield may move apart.
Glued timber structures
3.1. Advantages of laminated timber structures
Glued laminated wood structures are used in the manufacture of structures and products for construction purposes.
Due to its lightness, excellent aesthetic and thermal properties, high strength and fire resistance, laminated wood is increasingly used in construction and reconstruction projects. With its use, it is possible to create coverings for buildings for various purposes with spans of up to 100 m. Rich experience in using this material allows it to be used in the construction of residential, industrial or public buildings of any complexity.
Despite the fact that laminated wood structures are a fairly new material, they can be easily used not only in low-rise housing construction, but also in such socially significant facilities as sports complexes, water parks, shopping centers, and bridges. Naturally, projects must comply with all existing building codes and requirements. If there are any deviations, then the project may provide for compensatory measures (coating structures with protective impregnations) or the development of special technical conditions.
For the manufacture of laminated timber structures, coniferous and deciduous wood is used. The type of wood is determined by the purpose and operating conditions of the structures. For the manufacture of load-bearing structures, mainly softwood lumber (pine, spruce, larch) of at least grade II according to GOST 1713% 2007 is used. For the manufacture of non-load-bearing structures, mainly softwood lumber (pine, spruce, larch) of at least grade III according to GOST 1713-2007 is used.
The safety and durability of laminated wood structures to a certain extent depend on the type and brand of glue used, its operational and technological properties. The main performance properties of adhesives used in the production of laminated wood include the strength of the adhesive joint, i.e. its ability to maintain strength over a given service life of the product; elasticity of the adhesive connection; water resistance as the ability of an adhesive joint to maintain strength after prolonged or intense exposure to water on products; frost resistance, biostability, temperature and fire resistance, i.e. the ability of the adhesive to maintain strength when exposed to high temperatures and open fire. Adhesive systems are characterized by a variety of resin compositions with different properties, hardeners and fillers used, and methods of applying the adhesive.
When choosing means and methods for protecting wooden laminated structures, the main attention should be paid to protecting them from alternating wetting and drying. If the requirements for structural prevention are observed, the probability of failure of massive cross-section wooden laminated structures in buildings as a result of biodestruction is so insignificant that, as a rule, it is not necessary to subject them to bioprotective treatment.
According to the functional purpose of products for processing laminated wood structures, they can be divided into four main groups:
- decorative;
- moisture-proof;
- bioprotective;
- fire retardant.
In practice, we often encounter the need to carry out complex and combined processing of laminated wood. For example, if during operation it is possible that the wood may become moistened, which can lead to the appearance of fungi, then it is necessary to provide protection for laminated wood structures not only from biodegradation, but also from moisture.
In some cases, in addition to biomoisture protection treatment, fire protection of laminated wood structures is required for fire safety requirements. To protect the ends of massive glued elements from moisture and delamination during operation in conditions of high or variable humidity, waterproofing mastic compositions are used.
The use of laminated wood as a structural material is facilitated by a number of its properties:
- low dead weight with high strength;
- high factory readiness of structures;
- manufacturability of products of various sizes and shapes; ease of assembly and processing of structures on the construction site;
- replenishment of the raw material base.
In civil engineering, laminated timber structures are attractive due to their ability to create a variety of structural schemes, including spatial ones.
An important difference between laminated wood structures and reinforced concrete and metal ones is the ease of manufacturing individual products. In civil buildings such as gyms, indoor markets, arenas, pavilions, the use of laminated wood structures reduces the weight of the coating by 4–5 times, the labor intensity of installation by up to 20%, and steel consumption by up to 50%.
The advantage of laminated wood structures is the ability to create structures of almost any size and shape. However, the design and manufacture of original structures is advisable only for individual buildings and structures, including those unique in size or technical solution. In other cases, standardized structures and their elements that are more accessible for mass production should be used.
3.2. Technological process for manufacturing laminated timber structures
The technological process diagram for manufacturing laminated timber structures is shown in Table 1.
We will consider the technological process of manufacturing laminated veneer lumber for load-bearing structures using the example of the Nizhny Novgorod Woodworking Plant DOK-78 enterprise.
Table 1. Scheme of the technological process for manufacturing laminated timber structures
| № p/p | Operation | Image | |||
| 1. | Drying lumber to a moisture content of 8-12% | ||||
| 2. | Preparing base surfaces for splicing | ||||
| 3. | Cutting out defective areas | ||||
| 4. | Length splicing | ||||
| 5. | Milling the lamellas before gluing along the width | ||||
| 6. | Width gluing | ||||
| 7. | Milling a mini-tenon at the ends and gluing panel blanks along the length | ||||
| 8. | Milling workpieces to obtain precise geometric shapes | ||||
| 9. | Applying glue to the surface | ||||
| 10. | Gluing straight timber | ||||
| 11. | Gluing curved beams | ||||
| 12. | Final machining to obtain precise geometric shape | ||||
| 13. | Final machining of curved timber on a specialized four-sided planer in order to obtain an accurate geometric shape |
The technological process for the production of laminated veneer lumber begins in a warehouse, where softwood timber is sorted, after which edged lumber is produced on a sawmill (Fig. 23).
Next, the lumber is dried in drying chambers with automatic control programming, heating, ventilation and humidification functions (Fig. 24).
Rice. 23 Production of edged lumber
A four-sided longitudinal milling machine processes the sides of the lamellas to give the correct geometric dimensions and expose defects (see Fig. 25). Smooth workpieces of the required dimensions of rectangular cross-section with a straight edge come out of the machine.
Rice. 24 Dryer with bags of lumber
Rice. 25 Four-sided planer
The automatic cross-cutting machine of the optimization line cuts out defects marked by the operator in automatic mode. Defects are marked with fluorescent chalk, which is recognized by a camera located on the saw. If there are cracks at the ends of the boards, they are automatically cut out without prior marking. The waste is discarded, and the quality blanks are sent to the lengthwise splicing line onto a toothed tenon.
On the splicing line, a toothed tenon is first milled at the ends of the workpiece, and then glue is applied to them and the workpieces are pressed into a board or beam of infinite length, which is then cut to the required dimensions. After this, a technological holding period is carried out to harden the glue for up to 8 hours, depending on the type of glue.
A four-sided longitudinal milling machine plans lamellas from the upper and lower surfaces of the part.
The glue-applying machine (Fig. 26) applies glue to the surface of the part, after which the workpieces are fed into the press for gluing (Fig. 27).
Rice. 26 Applying glue to the surface of the part
Rice. 27 Press for gluing laminated timber structures
Pressing mode:
- room temperature, °C 16;
- glue temperature, °C 18 ± 1;
- glue viability, hours 2–4;
- glue consumption, g/m2 250–350;
- open time (from applying glue to assembly), min 10;
- closed holding time (from assembly to pressing), min 30;
- pressure, MPa 3–5;
- pressing time, hours 8–10;
- holding time after pressing, h 8. Transportation of glued workpieces is carried out by a workshop crane.
The beam milling machine performs two- or four-sided processing of straight or bent beams with or without chamfer. Currently, machines with working widths from 400 to 2600 mm are used for these purposes. When producing only straight beams, a roller conveyor must be located before and after the machine; for straight and bent beams, a movable trolley is required, since the planer itself is installed on a turntable and rotates depending on the radius of the beam. Laying the part in front of the machine and removing it after processing is carried out using a crane, and for small products - using a stacker.
Finishing equipment includes a beam trimming machine and a machining center. Numerous hand tools are also required, used to form various mortises, drilling and milling necessary for building structures.
With the help of a pusher, the beam is sent by a roller conveyor to a cross-cutting machine, where first an incision is made, and then the beam is cut to lengths in accordance with a given program.
The packaging operation is necessary to protect the beams from contamination and moisture during transportation. Typically, the products are wrapped in film (sections from 6 × 12 to 16 × 36 cm and a length of 12–18 m are considered standard) and then placed in a temporary storage warehouse.
To protect against moisture and destruction of the adhesive layer, epoxy putty is applied to the end surfaces of the structure at the workplace.
Putty application mode:
- air temperature, °C 18–20;
- relative humidity, % 65–75;
- putty consumption, kg/m2 1.9.
The next operation in the production of glued structures is finishing, which is carried out in the finishing areas. The structures are placed in bags and, using a crane, transferred to transport carts and removed from the workshop for further processing. Trimmings, shavings, and sawdust are removed using pneumatic transport.
Rule 6: Compression Force
If you tighten the clamps loosely, the shield will not stick together well - the seams between the workpieces will be “weak.”
If, on the contrary, you tighten it, the shield may become deformed. Therefore, you need to find a middle ground.
This is very easy to do: pay attention to the joints being glued.
If the glue appears as a uniform strip or droplets equidistant from each other, then the compression force is sufficient.
DIY furniture made from chipboard (chipboard)
Making furniture from chipboard or laminated chipboard with your own hands is one of the most affordable options for making furniture without special carpentry tools. The easiest way is to order parts of the shape and size you need from specialized companies (Chipboard Kit provides the service of cutting and sawing chipboard to your size, professional processing of chipboard and laminated chipboard edges).
Finished furniture parts will already undergo the necessary processing - decorating the ends with edges and additives (drilling holes for fittings). All fittings necessary for furniture are sold on any construction market, or you can order furniture fittings from the Chipboard Kit (only for large orders). You can also order inexpensive sliding doors from us for your closet or dressing room.
For assembly you only need: a drill, a screwdriver or a screwdriver. The production of furniture parts for your furniture in the Chipboard Set company is carried out according to the order forms:
Expert opinion
Strebizh Viktor Fedorovich, leading construction foreman
For example, with cellular partitions in drawers or multi-level open shelves with coaxial joints, it is better and easier to use furniture dowels as hidden fasteners. If you want to clarify something, please contact me!
Useful tips
To ensure that your work progresses easily and the finished product turns out the way you wanted to see it, we bring to your attention some useful tips that will greatly facilitate the process.
- When choosing a material for making a shield, try to choose bars with a small number or complete absence of knots.
- For a neater appearance of the future product and to reduce warping of the board, try to maintain the thickness of the board as much as possible.
- Alternate the orientation of the growth rings.
- Choose boards or bars with straight lines of pattern texture. This is due to the fact that such material warps less.
- Before gluing the workpiece, form ridges and tongues on the edges of the plots. This way you will align the front side of the parts.
- To avoid sagging, use pressure blocks during gluing.